Page 77 of 289
�µ
The 4-cylinder EX model has a
power seat bottom height
adjustment. All other driver’s seat
adjustmentsinthismodelare
manual.
The 4-cylinder LX model has manual
driver’s seat adjustments (see next
column).
The f ront passenger’s seat in all
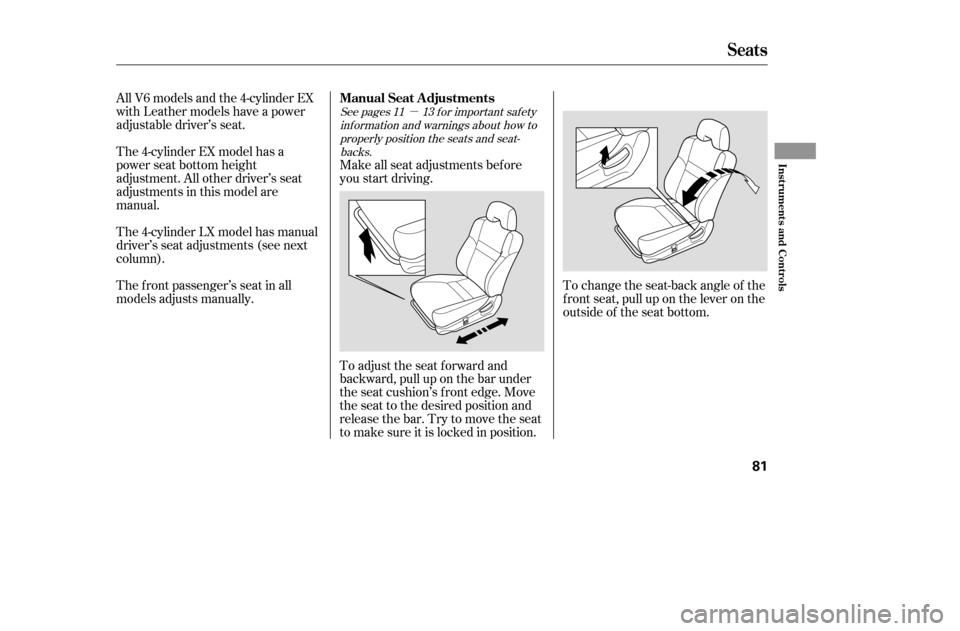
models adjusts manually.To adjust the seat forward and
backward, pull up on the bar under
the seat cushion’s f ront edge. Move
the seat to the desired position and
releasethebar.Trytomovetheseat
to make sure it is locked in position.
Make all seat adjustments bef ore
you start driving.
All V6 models and the 4-cylinder EX
with Leather models have a power
adjustable driver’s seat.
To change the seat-back angle of the
f ront seat, pull up on the lever on the
outside of the seat bottom.
See pages f or important saf etyinf ormation and warnings about how toproperly position the seats and seat-
backs. 11 13
Seats
Manual Seat Adjustments
Inst rument s and Cont rols
81
�����—�����—�����y�
�������������y���
�(���%�������y���������y
Page 79 of 289
�µ
See pages f or important saf ety
inf ormation and warnings about how toproperly position the seats and seat-
backs. 11 13
On all V6 models, and the 4-cylinder EX
with Leather model
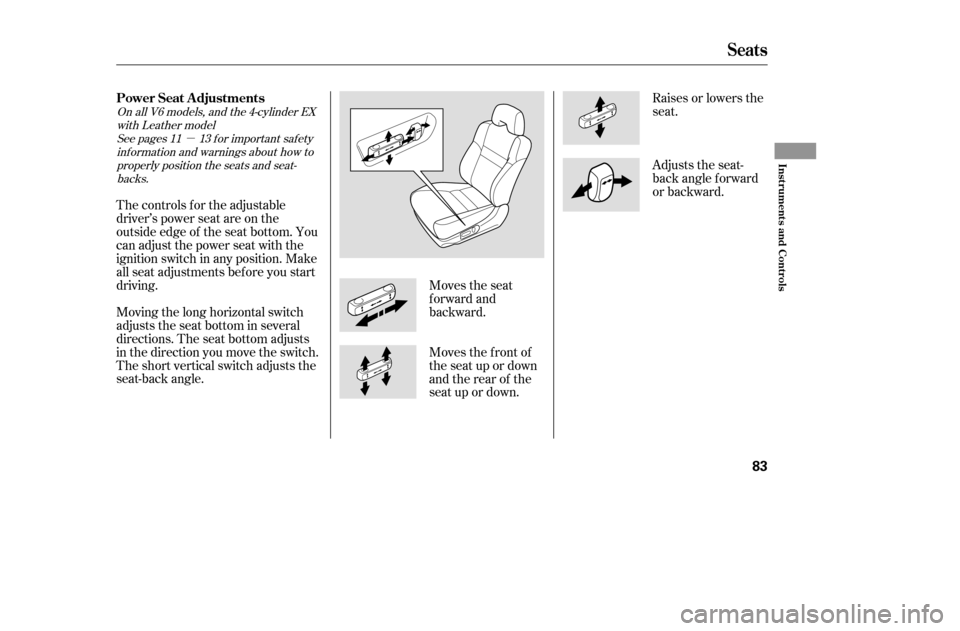
The controls f or the adjustable
driver’s power seat are on the
outside edge of the seat bottom. You
can adjust the power seat with the
ignition switch in any position. Make
all seat adjustments bef ore you start
driving.
Moving the long horizontal switch
adjusts the seat bottom in several
directions. The seat bottom adjusts
in the direction you move the switch.
The short vertical switch adjusts the
seat-back angle. Raises or lowers the
seat.
Adjusts the seat-
back angle f orward
or backward.
Moves the f ront of
the seat up or down
and the rear of the
seat up or down.
Moves the seat
forward and
backward.
Seats
Power Seat A djustments
Inst rument s and Cont rols
83
�����—�����—�����y�
�������������y���
�(���%�������y���������y
Page 82 of 289
See page f or important saf etyinf ormation and a warning about how toproperly position the head restraints. 13
The head restraints help protect you
and your passengers f rom whiplash
and other injuries.
Your vehicle has adjustable head
restraints on the f ront seats. They
are also on the outside positions of
the rear seat.
Theyaremosteffectivewhenyou
adjust them so the back of the
occupant’s head rests against the
center of the restraint.
The head restraints adjust f or height.
You need both hands to adjust the
restraint. Do not attempt to adjust it
while driving. To raise it, pull upward.
To lower the restraint, push the
release button sideways and push
the restraint down.
Seats
Head Restraints
86
RELEASE BUTTON
FRONT
REAR
�����—�����—�����y�
�������������y���
�(���%�������y���������y
Page 236 of 289
Check the condition of the battery
monthlybylookingatthetest
indicator window. The label on the
battery explains the test indicator’s
colors.Check the terminals f or corrosion (a
white or yellowish powder). To
remove it, cover the terminals with a
solution of baking soda and water. It
will bubble up and turn brown. When
this stops, wash it of f with plain
water. Dry off the battery with a
cloth or paper towel. Coat the
terminals with grease to help prevent
f uture corrosion.If additional battery maintenance is
needed, see your dealer or a
qualif ied technician.
Battery posts,
terminals, and related accessories
contain lead and lead compounds.
WARNING:
Wash your hands af ter handling.
Checking the Battery
244
TEST INDICATOR WINDOW
4-cylinder models
6-cylinder modelsTEST INDICATOR WINDOW
�����—�����—�����y�
�
��
��������y���
�(���%�������y���������y
Page 240 of 289

CONT INUED
If you have a f lat tire while driving,
stop in a saf e place to change it.
Drive slowly along the shoulder until
you get to an exit or an area that is
far away from the traffic lanes.If you are towing a trailer, unhitch
the trailer.
Turn on the hazard warning
indicators, and turn the ignition
switch to LOCK (0). Have all the
passengers get out of the vehicle
while you change the tire.The tools are in the trunk. Open
the trunk and raise the trunk f loor
by lif ting up on the back edge.
Take the tool kit out of the trunk.
Unscrew the wing bolt and take
the spare tire out of its well.
Park the vehicle on f irm, level and
non-slippery ground. Put the
transmission in Park (A/T) or
Reverse (M/T). Apply the parking
brake. 5.
4.
3.
2. 1.
Changing a Flat T ire
T aking Care of t he Unexpect ed
249
TRUNK FLOOR
SPARE TIRE JACK
TOOL KIT
The vehicle can easily roll off
the jack, seriously injuring
anyone underneath.
Follow the directions for
changing a tire exactly, and
never get under the vehicle
when it is supported only by thejack.
�����—�����—�����y�
�
��
��������y���
�(���%�������y���������y
Page 249 of 289

Once your vehicle is running,
disconnect the negative cable f rom
your vehicle, then f rom the
booster battery. Disconnect the
positive cable f rom your vehicle,
then from the booster battery.
Keep the ends of the jumper
cables away from each other and
any metal on the vehicle until
everything is disconnected.
Otherwise, you may cause an
electrical short.If your vehicle overheats, you should
take immediate action. The only
indication may be the temperature
gauge climbing to or above the red
mark. Or you may see steam or
spray coming f rom under the hood.
The pointer of the vehicle’s
temperature gauge should stay in
the midrange. If it climbs to the red
mark, you should determine the
reason (hot day, driving up a steep
hill, etc.).
Saf ely pull to the side of the road.
Put the transmission in Neutral
(M/T) or Park (A/T), and set the
parking brake. Turn of f all
accessories, and turn on the
hazard warning indicators.
If you see steam and/or spray
coming f rom under the hood, turn
of f the engine. Wait until you see
no more signs of steam or spray,
then open the hood.
2.
1.
7.
Jump Starting, If the Engine Overheats
If the Engine Overheats
258
Steam and spray from an
overheated engine can
seriously scald you.
Do not open the hood if steam
is coming out.
Driving with the temperature gauge
pointer at the red mark can cause
serious damage to your engine.
�����—�����—�����y�
�
��
������
�y���
�(���%�������y�������
�y
Page 251 of 289

This indicator should never come on
when the engine is running. If it
starts flashing or stays on, the oil
pressure has dropped very low or
lost pressure. Serious engine
damage is possible and you should
take immediate action.Saf ely pull of f the road, and shut
of f the engine. Turn on the hazard
warning indicators.
Let the vehicle sit f or a minute.
Open the hood, and check the oil
level (see page ). An engine
very low on oil can lose pressure
during cornering and other driving
maneuvers.
If necessary, add oil to bring the
level back to the full mark on the
dipstick (see page ).
Start the engine, and watch the oil
pressure indicator. If it does not go
out within 10 seconds, turn of f the
engine. There is a mechanical
problem that needs to be repaired
bef ore you can continue driving
(see on page
). If the charging system indicator
comes on brightly when the engine
is running, the battery is not being
charged.
Immediately turn of f all electrical
accessories. Try not to use other
electrically operated controls such as
the power windows. Keep the engine
running; starting the engine will
discharge the battery rapidly.
Go to a service station or garage
where you can get technical
assistance.
1. 2. 3. 4.
213
164
269
L ow Oil Pressure
Indicator
Emergency T owing Charging System
Indicator
L ow Oil Pressure Indicator, Charging System Indicator
260
Running the engine with low oil
pressure can cause serious mechanical
damage almost immediately. Turn of f
the engine as soon as you can saf ely get
the vehicle stopped.
�����—�����—�����y�
�
��
����
���y���
�(���%�������y���������y
Page 268 of 289

�µ
Quality grades can be f ound where
applicable on the tire sidewall
between the tread shoulder and the
maximum section width. For
example:
All passenger car tires must conf orm
to Federal Saf ety Requirements in
addition to these grades. The treadwear grade is a compara-
tive rating based on the wear rate of
the tire when tested under controlled
conditions on a specif ied government
test course. For example, a tire
graded 150 would wear one and one-
half (1 1/2) times as well on the
government course as a tire graded
100. The relative perf ormance of
tires depends upon the actual condi-
tions of their use, however, and may
depart signif icantly f rom the norm
due to variations in driving habits,
service practices, and dif f erences in
road characteristics and climate.
The traction grades, f rom highest to
lowest, are AA, A, B, and C. Those
grades represent the tire’s ability to
stop on wet pavement as measured
under controlled conditions on
specif ied government test surf aces
of asphalt and concrete. A tire
marked C may have poor traction
perf ormance.
Warning: The traction grade
assignedtothistireisbasedon
straight-ahead braking traction tests,
and does not include acceleration,
cornering, hydroplaning, or peak
traction characteristics.
The tires on your vehicle meet all
U.S. Federal Saf ety Requirements.
All tires are also graded f or
treadwear, traction, and temperature
perf ormance according to
Department of Transportation
(DOT) standards. The f ollowing
explains these gradings.
DOT T ire Quality Grading (U.S. Vehicles)
Unif orm T ire Quality Grading
T readwear 200
Traction AA
Temperature A Treadwear Traction AA, A, B, C
278
�����—�����—�����y�
�
�����������y���
�(���%�������y�������
�y