Page 73 of 289
�µ�µ�µ
�µ
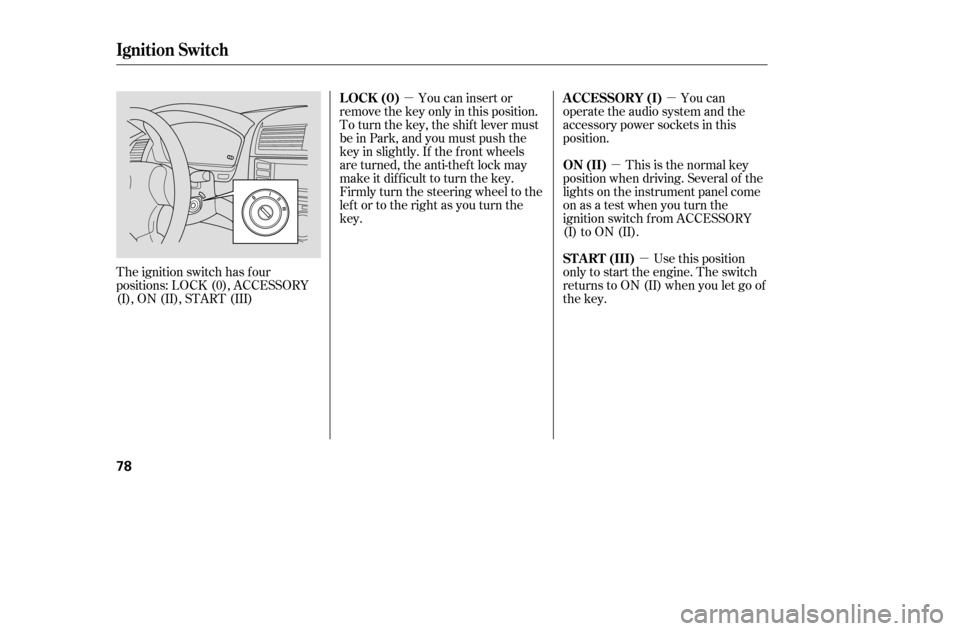
You can insert or
remove the key only in this position.
To turn the key, the shift lever must
be in Park, and you must push the
key in slightly. If the f ront wheels
are turned, the anti-thef t lock may
make it difficult to turn the key.
Firmly turn the steering wheel to the
left or to the right as you turn thekey.
The ignition switch has f our
positions: LOCK (0), ACCESSORY
(I), ON (II), START (III) You can
operate the audio system and the
accessory power sockets in this
position.
This is the normal key
position when driving. Several of the
lights on the instrument panel come
on as a test when you turn the
ignition switch f rom ACCESSORY
(I) to ON (II).
Use this position
only to start the engine. The switch
returns to ON (II) when you let go of
the key.
L OCK (0) A CCESSORY (I)
ON (II)
ST A RT (III)
Ignition Switch
78
�����—�����—�����y�
�������������y���
�(�����������y�������
�y
Page 106 of 289

Air conditioning, as it cools, removes
moisture from the air. When used in
combination with the heater, it
makes the interior warm and dry.Turn the fan on.
Turn on the air conditioning.
Select and Fresh Air mode.
Adjust the temperature control
dial or buttons to your pref erence.
This setting is suitable f or all driving
conditions whenever the outside
temperature is above 32°F (0°C). To remove f og f rom the inside of the
windows:
Set the f an to the desired speed or
high f or f aster def rosting.
Select . When you select , the system automatically
switches to Fresh Air mode and
turns on the A/C. The A/C
indicator will not come on in U.S.
vehicles.
Set the temperature control dial or
buttons so the airflow feels warm.
Select to help clear the
rear window.
To increase airf low to the
windshield, close the side vents.
When you switch to another mode
f rom , the A/C stays on.
Press the A/C button to turn it of f . Select . The system
automatically switches to Fresh
Air mode and turns on the A/C.
The A/C indicator will not come
on in U.S. vehicles.
Select .
Set the f an and temperature
controls to maximum level.
To clear the windows f aster, you can
close the dashboard corner vents by
rotating the wheel below it. This will
send more warm air to the
windshield def roster vents. Once the
windshield is clear, select the Fresh
Air mode to avoid f ogging the
windows.
For your saf ety, make sure you have
a clear view through all the windows
bef ore driving.
1.2.3.4.
1. 2. 3. 4.5.1. 2. 3.
Dehumidif y the Interior T o Def og and Def rost T o Remove Exterior Frost or Ice
From the Windows
Vents, Heating, and A/C
112
�����—�����—�����y�
������
������y���
�(�����������y���
�
���y
Page 141 of 289
 or down ( ). Press the top
or bottom of the button and hold it
until the desired volume is reached,
then release it.
Three contro")
�Û�Ý�´�µ
�´ �µ
�´
�µ
The VOL button adjusts the volume
up ( ) or down ( ). Press the top
or bottom of the button and hold it
until the desired volume is reached,
then release it.
Three controls f or the audio system
are mounted in the steering wheel
hub. These let you control basic
f unctions without removing your
hand f rom the wheel. If youareplayingaCD,thesystem
skips to the beginning of the next
track each time you press the top
( ) of the CH button. Press the
bottom ( ) to return to the
beginning of the current track. Press
it twice to return to the previous
track. You will see the disc and track
numbers in the display.
If youareplayingatapeinthe
optional cassette player, press the
top ( ) of the CH button to advance
to the next selection. Press the
bottom( )togobacktothe
previous selection. The system
senses a silent period, then resumes
playing.
The MODE button changes the
mode. Pressing the button
repeatedly selects FM1, FM2, AM,
XM1, XM2, CD, or a tape.
If you are listening to the radio, use
the CH button to change stations.
Each time you press the top ( ) of
the button, the system goes to the
next preset station on the band you
are listening to. Press the bottom
( ) to go back to the previous
station.
OnEX,EX-L,LX-V6andEX-V6models
Steering Wheel Controls
Features
147
CH BUTTON
VOL BUTTON MODE BUTTON
�����—�����—�����y�
�������������y���
�(�����������y���
�����y
Page 145 of 289
Cruise control allows you to maintain
asetspeedabove25mph(40km/h)
without keeping your f oot on the
accelerator pedal. It should be used
f or cruising on straight, open
highways. It is not recommended f or
city driving, winding roads, slippery
roads, heavy rain, or bad weather.Push in the Cruise Control Master
Buttononthesteeringwheel.The
CRUISE MAIN light on the
instrument panel comes on.
Accelerate to the desired cruising
speedabove25mph(40km/h).Press and release the DECEL/
SET button on the steering wheel.
The CRUISE CONTROL light on
the instrument panel comes on to
show the system is now activated.
1. 2. 3.
On all models except U.S. DXUsing the Cruise Control
Cruise Control
Features
151
CRUISE CONTROL MASTER BUTTON
CANCEL
BUTTON RES/ACCEL
BUTTON
DECEL/SET
BUTTON
Improper use of the cruise
control can lead to a crash.
Use the cruise control only
when traveling on open
highways in good weather.
�����—�����—�����y�
�������������y���
�(�����������y���
�����y
Page 147 of 289
When you push the CANCEL button,
or tap the brake or clutch pedal, the
system will remember the
previously-set cruising speed. To
return to that speed, accelerate to
above25mph(40km/h)thenpress
and release the RES/ACCEL button.
The CRUISE CONTROL indicator
comes on. The vehicle will accelerate
to the same cruising speed as before.PressingtheCruiseControlMaster
Button turns the system off and
erases the previous cruising speed.
Youcancancelthecruisecontrolin
any of these ways:
Tap the brake or clutch pedal.
Push the CANCEL button on the
steering wheel.
Push the Cruise Control Master
Button.
Cancelling the Cruise Control Resuming the Set Speed
Cruise Control
Features
153
�����—�����—�����y�
�������������y���
�(�����������y���
�����y
Page 162 of 289

Removing parts f rom your vehicle,
or replacing components with
af termarket components could
seriously af f ect your vehicle’s
handling, stability, and reliability.
Some examples are:Lowering the vehicle with an
aftermarket suspension kit that
signif icantly reduces ground
clearance can allow the
undercarriage to hit speed bumps
or other raised objects, which
could cause the airbags to deploy.
Raising your vehicle with an
af termarket suspension kit can
af f ect the handling and stability.
Af termarket wheels, because they
are a universal design, can cause
excessive stress on suspension
components. Larger or smaller wheels and tires
can interf ere with the operation of
your vehicle’s anti-lock brakes and
other systems.
If you plan to modif y your vehicle,
consult your dealer. Any object
attached to or placed on the covers
marked ‘‘SRS AIRBAG’’ in the
center of the steering wheel and
on top of the dashboard, could
interf ere with the proper operation
of the airbags. Or, if the airbags
inf late, the objects could be
propelled inside the vehicle and
hurt someone. If a side airbag
or a side curtain airbag inf lates, a
cupholderorotherhardobject
attached on or near the door could
be propelled inside the vehicle and
hurt someone.
This could prevent the
airbag from inflating properly.
Modif ying your steering wheel or
any other part of your vehicle’s
safety features can make the
systems inef f ective.
Modif ying Your Vehicle
Additional Saf ety Precautions
Do not at t ach or place object s onthe f ront airbag covers. Do not at t ach hard object s on or
near a f ront door.
Do not place any object s over orreplacetheoutsideedgeof afrontseat -back.
A ccessories and Modif ications
Bef ore Driving
169
�����—�����—�����y�
����
��������y���
�(�����������y���
�����y
Page 166 of 289

Youshoulddothefollowingchecks
and adjustments bef ore you drive
your vehicle.Make sure all windows, mirrors,
and outside lights are clean and
unobstructed. Remove f rost, snow,
or ice.
Make sure the doors are securely
closed and locked.
Fasten your seat belt. Check that
your passengers have f astened
their seat belts (see page ).
Check the steering wheel
adjustment (see page ).
Check that the hood is f ully closed.
Check that the trunk is f ully
closed.
Visually check the tires. If a tire
looks low, use a gauge to check its
pressure.
Check that any items you may be
carrying are stored properly or
f astened down securely. Check the seat adjustment (see
pages to ).
Check the adjustment of the
inside and outside mirrors (see
pages and ).
When you start the engine, check
the gauges and indicators in the
instrument panel (see pages to
).
3.
2. 1.
4. 5. 6. 7. 8. 9.
11.
10. 88
94 58
67
90
95
16
74
Preparing to Drive
174
�����—�����—�����y�
����
�
������y���
�(�����������y���
�����y
Page 172 of 289

�µ�µThis position locks
the transmission in second gear. It
does not downshif t to f irst gear
when you come to a stop.
Use Second gear:
For starting out on a slippery
surf ace or in deep snow.
To help reduce wheel spin.
When driving downhill with a
trailer. To shif t f rom Second to
First, press the release button on the
side of the shif t lever. This position
locks the transmission in f irst gear.
By upshif ting and downshif ting
through 1, 2, D , and D, you can
operate this transmission much like
a manual transmission without a
clutch pedal. If you exceed the maximum speed
f or the gear you are in, the engine
speed will enter into the tachometer’s
red zone. If this occurs, you may f eel
the engine cut in and out. This is
caused by a limiter in the engine’s
computer controls. The engine will
run normally when you reduce the
RPM below the red zone.
For more power when climbing.
To increase engine braking when
going down steep hills.
3
Automatic Transmission
Second (2) First (1) Engine Speed L imiter
180
�����—�����—�����y�
����
��������y���
�(�����������y���
�����y

without keeping your f oot on the
accelerator pedal. It should be used
f or cruising on straight, open
highways. It is not recommende")
thenpress
and r")