Page 42 of 62

Language
Your vehicle has been set for the English language,
but you may also select French for all instructional text
and voice prompts. However, names on the map
when using the navigation functions will not change.
If you wish to change the language, the map DVD must
be inserted. Then, do the following:
1. Touch the Language screen button. A caution
will display.
2. Touch the desired language to select it.
3. Touch the NEXT screen button to change the
display back to the map screen.
If the language is changed from English, the menu
screens will not match word-for-word as they appear in
this manual.
If you accidentally select a language you do not
understand, press the CONFIG hard key, then select
the desired language.
Clock
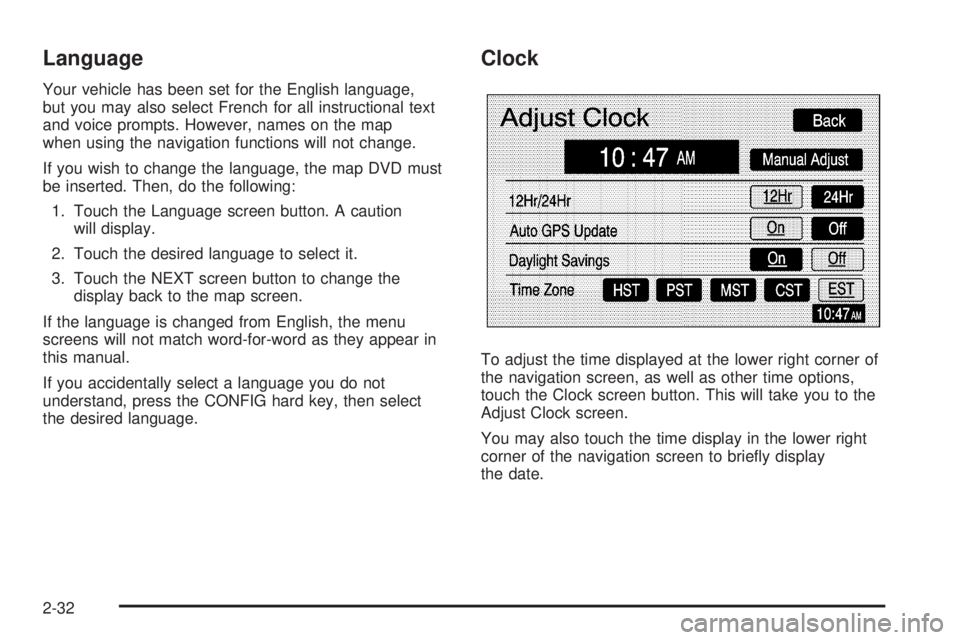
To adjust the time displayed at the lower right corner of
the navigation screen, as well as other time options,
touch the Clock screen button. This will take you to the
Adjust Clock screen.
You may also touch the time display in the lower right
corner of the navigation screen to brie�y display
the date.
2-32
Page 43 of 62

To change the hours and minutes on the clock,
do the following:
1. Touch the Manual Adjust screen button.
2. Touch the up or down arrow screen buttons to
increase or decrease the hours and minutes.
3. Touch the Back screen button to return to the
previous screen.
12Hr/24Hr:This feature allows you to choose whether
the time is displayed in standard or military time.
Touch the 12Hr screen button for standard time or the
24Hr screen button for military time.
Auto GPS Update:With this feature on, the navigation
system time will be set to match the current GPS
time. The time will be updated with the GPS time when
the ignition is turned on. You may also touch the Off
screen button to turn this feature off.Daylight Savings:With this feature on, the navigation
system will automatically adjust the time for Daylight
Savings. You may also touch the Off screen button to
turn this feature off.
Time Zone:This feature allows you to choose from
�ve different time zones: HST (Hawaii), PST (Paci�c),
MST (Mountain), CST (Central), and EST (Eastern).
Touch the desired time zone screen button to select it.
Display Off
To turn the navigation screen off, touch the Disp Off
screen button on the Con�gure menu. To turn the
screen back on, press any hard key to the left of the
navigation screen.
2-33
Page 45 of 62

Vehicle Positioning
At times, the position of the vehicle on the map
may be inaccurate due to one or more of the
following reasons:
The road system has changed.
The vehicle is traveling on slippery road surfaces
such as sand, gravel, and/or snow.
The vehicle is being driven on winding roads.
The vehicle is being driven on a long straight road.
The vehicle is approaching a tall building or a
large vehicle.
The surface streets run parallel to a freeway.
The vehicle has just been transferred by a vehicle
carrier or a ferry.
The current position calibration is set incorrectly.
The vehicle is being driven at high speeds.
The vehicle is repeating a change of direction by
going forward and backward, or turning on a turn
table in a parking lot.
The vehicle is entering and/or exiting a parking lot
or garage with a roof.
The vehicle has a roof carrier, ski, or bike rack
installed on it.
The vehicle has tire chains on it.
The tires have been replaced.
The tire pressure is incorrect.
The tires are worn.
The battery is disconnected.
The vehicle is driven in heavy traffic where driving
is at low speeds and the vehicle is stopped and
started repeatedly.
2-35
Page 46 of 62

Problems with Route Guidance
Inappropriate route guidance may occur under any of
the following conditions:
You have not turned onto the road indicated by
the system.
Route guidance is not available for the next turn.
The route is not changed during automatic rerouting.
Plural names of places are displayed.
You are driving at high speeds, which may cause
the automatic rerouting to operate more slowly.
The route prohibits the entry of a vehicle due to a
regulation by time or season or any other regulation
which may be given.
A route cannot be found.
A road is new, was recently changed or is not listed
on the DVD. The route to the destination may not
be shown. SeeOrdering Map DVDs on page 2-36.
If the System Needs Service
If you are still experiencing difficulty with your navigation
system after reading this information, see your dealer
for assistance.
Ordering Map DVDs
The map DVD in your vehicle is the most up-to-date
information available when your vehicle was purchased.
The map DVD is updated periodically, provided that
the map information has changed. To order a new map
DVD, contact your dealer.
Database Coverage Explanations
Coverage areas vary with respect to the level of map
detail available for any given area. Some areas will
feature greater levels of detail than others. If this
happens, it does not mean there is a problem with the
system. As the map DVD is updated, more detail
may become available for areas which previously had
limited detail. SeeOrdering Map DVDs on page 2-36.
2-36
Page 59 of 62

Playing a CD with the CD Changer
Your vehicle may be equipped with a CD changer.
See “Radio with Six-Disc CD” in Section 3 of your
vehicle’s owner manual for more information on how to
operate the CD changer.
Random:Touch the Random screen button for less than
two seconds to play the tracks on the current disc in
random, rather than sequential, order. Touch it again to
turn off random play. When Random is touched for more
than two seconds, the player selects D. Random mode.
The system will then select a track from all of the discs
in the magazine and will play them in random order.
To cancel it, touch the Random screen button again.
Repeat:Touch the Repeat screen button to repeat the
track that is currently being played. Touch it again to
turn this feature off.
[(Forward):Touch and hold the forward arrow
screen button to advance quickly within a track. As the
CD advances, elapsed time will be displayed to help
you �nd the correct passage.
r(Reverse):Touch and hold the reverse arrow
screen button to reverse quickly within a track. As the
CD reverses, elapsed time will be displayed to help you
�nd the correct passage.
Disc
r:Touch this screen button to advance to the
next disc in the changer.
qDisc:Touch this screen button to return to the
previous disc in the changer.
To switch between tracks on a disc, use the SEEK
arrows. Press the up arrow to advance to the next track
on the disc. Press the down arrow to return to the
previous track on the disc.
Track Scan:To use this function, press and hold the
SEEK key for at least two seconds, but less than
four seconds, at which time a single chime will sound to
alert you that the CD changer has entered TRACK
SCAN mode for the current CD. While TRACK SCAN
is active, the �rst 10 seconds of each track on the
current disc will be played before advancing to the next.
Press the SEEK key again to stop the scan at the
track currently being played.
Disc Scan:To use this function, press and hold the
SEEK key for at least four seconds, at which time
a double chime will sound to alert you that the CD
changer has entered DISC SCAN mode for the entire
CD magazine. While DISC SCAN is active, the �rst
10 seconds of the �rst track on each disc will be played
before advancing to the �rst track on the next disc.
Press the SEEK key again to stop the scan at the track
and disc currently being played.
BAND:Press this hard key to switch to the radio when
a CD is playing.
3-13