2005 GMC SAVANA parking brake
[x] Cancel search: parking brakePage 237 of 384

When You Are Ready to Leave After
Parking on a Hill
1. Apply your regular brakes and hold the pedal down
while you:
start your engine,
shift into a gear, and
release the parking brake.
2. Let up on the brake pedal.
3. Drive slowly until the trailer is clear of the chocks.
4. Stop and have someone pick up and store
the chocks.
Maintenance When Trailer Towing
Your vehicle will need service more often when you’re
pulling a trailer. See the Maintenance Schedule for more
on this. Things that are especially important in trailer
operation are automatic transmission �uid (don’t over�ll),
engine oil, axle lubricant, belt, cooling system and
brake system. Each of these is covered in this manual,
and the Index will help you �nd them quickly. If you’re
trailering, it’s a good idea to review these sections
before you start your trip.
Check periodically to see that all hitch nuts and bolts
are tight.
Trailer Wiring Harness
The optional heavy-duty trailer wiring package includes
a seven-wire harness assembly at the rear of the
vehicle and a four-wire harness assembly under the
left hand side of the instrument panel. The seven-wire
harness assembly is taped together and located in
a frame pocket at the driver side rear left corner of the
frame. The seven-wire harness includes a 30-amp
feed wire. Both harnesses come without connectors and
should be wired by a quali�ed electrical technician.
The technician can use the following color code chart
when connecting the wiring harness to your trailer
and trailer brake controller.
Seven-Wire Harness
Light Green: Back-up lamps
Brown: Parking lamps
Yellow: Left stoplamp and turn signal
Dark Green: Right stoplamp and turn signal
Dark Blue: Use for electric trailer brakes
Orange: Trailer accessory
White (heavy gage): Ground wire
Four-Wire Harness (Trailer Brake Controller)
Black: Ground
Red/White Stripe: Fused Battery
Dark Blue: Trailer Brake Feed
Light Blue: Fused Stoplamp/CHMSL
4-49
Page 239 of 384

Service............................................................5-3
Doing Your Own Service Work.........................5-4
Adding Equipment to the Outside of Your
Vehicle......................................................5-5
Fuel................................................................5-5
Gasoline Octane............................................5-5
Gasoline Speci�cations....................................5-5
California Fuel...............................................5-6
Additives.......................................................5-6
Fuels in Foreign Countries...............................5-7
Filling Your Tank............................................5-8
Filling a Portable Fuel Container.....................5-10
Checking Things Under the Hood....................5-10
Hood Release..............................................5-11
Engine Compartment Overview.......................5-12
Engine Oil...................................................5-13
Engine Oil Life System..................................5-16
Engine Air Cleaner/Filter................................5-18
Automatic Transmission Fluid.........................5-19
Engine Coolant.............................................5-22
Radiator Pressure Cap..................................5-25
Engine Overheating.......................................5-25Cooling System............................................5-27
Engine Fan Noise.........................................5-32
Power Steering Fluid.....................................5-33
Windshield Washer Fluid................................5-34
Brakes........................................................5-35
Battery........................................................5-38
Jump Starting...............................................5-39
All-Wheel Drive..............................................5-43
Rear Axle.......................................................5-44
Front Axle......................................................5-44
Noise Control System.....................................5-45
Tampering with Noise Control System
Prohibited.................................................5-45
Bulb Replacement..........................................5-47
Halogen Bulbs..............................................5-47
Headlamps..................................................5-47
Front Turn Signal, Sidemarker and Parking
Lamps.....................................................5-49
Center High-Mounted Stoplamp (CHMSL).........5-49
Taillamps.....................................................5-50
Replacement Bulbs.......................................5-51
Section 5 Service and Appearance Care
5-1
Page 259 of 384

Checking the Fluid Level
Prepare your vehicle as follows:
Park your vehicle on a level place. Keep the engine
running.
With the parking brake applied, place the shift lever
in PARK (P).
With your foot on the brake pedal, move the shift
lever through each gear range, pausing for about
three seconds in each range. Then, position the shift
lever in PARK (P).
Let the engine run at idle for three minutes or more.
Then, without shutting off the engine, follow these steps:
The transmission dipstick
is located near the center
of the engine compartment
and will be labeled with
the graphic shown.SeeEngine Compartment Overview on page 5-12for
more information on location.
Flip the handle up and then pull out the dipstick and
wipe it with a clean rag or paper towel.
Push it back in all the way, wait three seconds and
then pull it back out again.
Check both sides of the dipstick, and read the lower
level. The �uid level must be in the COLD area for
a cold check or in the HOT or cross-hatched
area for a hot check. Be sure to keep the dipstick
pointed down to get an accurate reading.
If the �uid level is in the acceptable range, push the
dipstick back in all the way; then �ip the handle
down to lock the dipstick in place.
5-21
Page 277 of 384

Jump Starting
If your battery has run down, you may want to use
another vehicle and some jumper cables to start your
vehicle. Be sure to use the following steps to do it safely.
{CAUTION:
Batteries can hurt you. They can be dangerous
because:
They contain acid that can burn you.
They contain gas that can explode or
ignite.
They contain enough electricity to
burn you.
If you do not follow these steps exactly, some
or all of these things can hurt you.
Notice:Ignoring these steps could result in costly
damage to your vehicle that would not be covered
by your warranty.
Trying to start your vehicle by pushing or pulling it
will not work, and it could damage your vehicle.
1. Check the other vehicle. It must have a 12-volt
battery with a negative ground system.Notice:If the other vehicle’s system is not a 12-volt
system with a negative ground, both vehicles can
be damaged. Only use vehicles with 12-volt systems
with negative grounds to jump start your vehicle.
2. Get the vehicles close enough so the jumper cables
can reach, but be sure the vehicles are not touching
each other. If they are, it could cause a ground
connection you do not want. You would not be able
to start your vehicle, and the bad grounding
could damage the electrical systems.
To avoid the possibility of the vehicles rolling, set
the parking brake �rmly on both vehicles involved in
the jump start procedure. Put an automatic
transmission in PARK (P) or a manual transmission
in NEUTRAL before setting the parking brake.
Notice:If you leave your radio or other accessories
on during the jump starting procedure, they could
be damaged. The repairs would not be covered
by your warranty. Always turn off your radio and
other accessories when jump starting your vehicle.
3. Turn off the ignition on both vehicles. Unplug
unnecessary accessories plugged into the cigarette
lighter or the accessory power outlet. Turn off
the radio and all lamps that are not needed. This
will avoid sparks and help save both batteries. And
it could save the radio!
5-39
Page 307 of 384

{CAUTION:
Changing a tire can be dangerous. The vehicle
can slip off the jack and roll over or fall on you
or other people. You and they could be badly
injured or even killed. Find a level place to
change your tire. To help prevent the vehicle
from moving:
1. Set the parking brake �rmly.
2. Put the shift lever in PARK (P).
3. Turn off the engine and do not restart
while the vehicle is raised.
4. Do not allow passengers to remain in the
vehicle.
To be even more certain the vehicle will not
move, you should put blocks at the front and
rear of the tire farthest away from the one
being changed. That would be the tire, on the
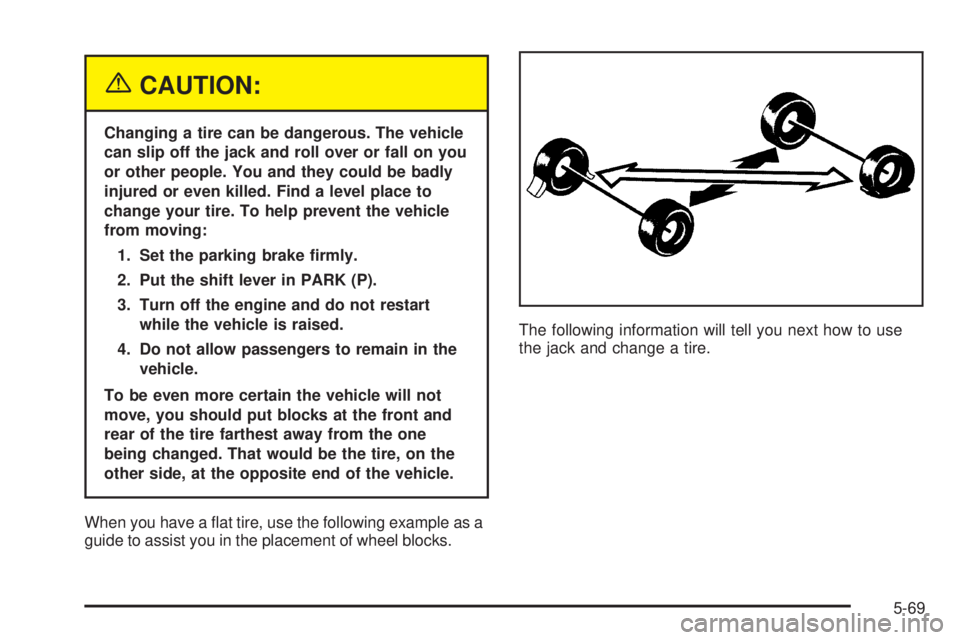
other side, at the opposite end of the vehicle.
When you have a �at tire, use the following example as a
guide to assist you in the placement of wheel blocks.The following information will tell you next how to use
the jack and change a tire.
5-69
Page 346 of 384

Additional Required Services (cont’d)
Service and Miles (Kilometers)25,000
(41 500)50,000
(83 000)75,000
(125 000)100,000
(166 000)125,000
(207 500)150,000
(240 000)
Engine cooling system service
(or every 5 years, whichever occurs
�rst).An Emission Control Service.
See footnote (i).•
Inspect engine accessory drive belt.
An Emission Control Service.•
Inspect evaporative control system.
An Emission Control Service. See
footnotes † and (k).•••
Maintenance Footnotes
†The U.S. Environmental Protection Agency or the
California Air Resources Board has determined that the
failure to perform this maintenance item will not nullify
the emission warranty or limit recall liability prior to
the completion of the vehicle’s useful life. We, however,
urge that all recommended maintenance services be
performed at the indicated intervals and the
maintenance be recorded.
#Lubricate the front suspension, kingpin bushings,
steering linkage and rear driveline center splines.(a)Visually inspect brake lines and hoses for proper
hook-up, binding, leaks, cracks, cha�ng, etc. Inspect
disc brake pads for wear and rotors for surface
condition. Inspect other brake parts, including calipers,
parking brake, etc.
(b)Visually inspect front and rear suspension and
steering system for damaged, loose or missing parts,
signs of wear or lack of lubrication. Inspect power
steering lines and hoses for proper hook-up, binding,
leaks, cracks, cha�ng, etc.
6-8
Page 349 of 384

Engine Coolant Level Check
Check the engine coolant level and add
DEX-COOL®coolant mixture if necessary. SeeEngine
Coolant on page 5-22for further details.
Windshield Washer Fluid Level Check
Check the windshield washer �uid level in the windshield
washer tank and add the proper �uid if necessary.
At Least Once a Month
Tire In�ation Check
Visually inspect your tires and make sure tires are in�ated
to the correct pressures. Do not forget to check your
spare tire. SeeTires on page 5-52for further details.
Check to make sure the spare tire is stored securely.
Push, pull and then try to turn the spare tire. If it moves,
tighten it. SeeChanging a Flat Tire on page 5-68.
At Least Once a Year
Starter Switch Check
{CAUTION:
When you are doing this inspection, the
vehicle could move suddenly. If the vehicle
moves, you or others could be injured.
1. Before you start, be sure you have enough room
around the vehicle.
2. Firmly apply both the parking brake and the regular
brake. SeeParking Brake on page 2-25if necessary.
Do not use the accelerator pedal, and be ready to
turn off the engine immediately if it starts.
3. Try to start the engine in each gear. The starter
should work only in PARK (P) or NEUTRAL (N).
If the starter works in any other position, contact
your GM Goodwrench dealer for service.
6-11
Page 350 of 384

Automatic Transmission Shift Lock
Control System Check
{CAUTION:
When you are doing this inspection, the
vehicle could move suddenly. If the vehicle
moves, you or others could be injured.
1. Before you start, be sure you have enough room
around the vehicle. It should be parked on a level
surface.
2. Firmly apply the parking brake. SeeParking Brake
on page 2-25if necessary.
Be ready to apply the regular brake immediately if
the vehicle begins to move.
3. With the engine off, turn the ignition to RUN, but do
not start the engine. Without applying the regular
brake, try to move the shift lever out of PARK (P)
with normal effort. If the shift lever moves out
of PARK (P), contact your GM Goodwrench dealer
for service.
Ignition Transmission Lock Check
While parked, and with the parking brake set, try to turn
the ignition to LOCK in each shift lever position.
The ignition should turn to LOCK only when the
shift lever is in PARK (P).
The key should come out only in LOCK.
Contact your GM Goodwrench dealer if service
is required.
Parking Brake and Automatic
Transmission Park (P) Mechanism Check
{CAUTION:
When you are doing this check, your vehicle
could begin to move. You or others could be
injured and property could be damaged. Make
sure there is room in front of your vehicle in
case it begins to roll. Be ready to apply the
regular brake at once should the vehicle begin
to move.
6-12