2005 GMC ENVOY oil reset
[x] Cancel search: oil resetPage 180 of 502

Change Engine Oil Light
When this light comes on,
it means that an oil change
and other maintenance
procedures are required for
your vehicle.
SeeScheduled Maintenance on page 6-4andEngine
Oil on page 5-16for more information.
Once the engine oil has been changed, the change
engine oil light must be reset. Until it is reset, the light
will be displayed when the engine is on.
Security Light
This light will come on
brie�y when you turn the
key toward START.
The light will stay on until the engine starts. If the light
�ashes, the Passlock
®system has entered a tamper
mode. If the vehicle fails to start, seePasslock®
on page 2-18.
If the light comes on continuously while driving and
stays on, there may be a problem with the Passlock
®
system. Your vehicle will not be protected by Passlock®,
and you should see your dealer.
Also, seeContent Theft-Deterrent on page 2-16for
additional information regarding the security light.
3-46
Page 186 of 502

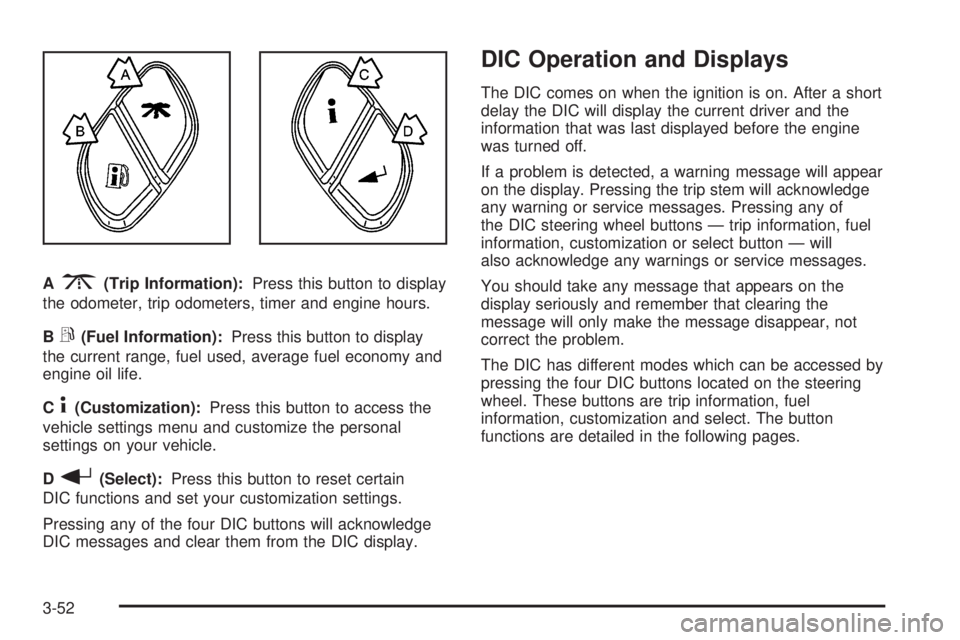
A3(Trip Information):Press this button to display
the odometer, trip odometers, timer and engine hours.
B
r(Fuel Information):Press this button to display
the current range, fuel used, average fuel economy and
engine oil life.
C
4(Customization):Press this button to access the
vehicle settings menu and customize the personal
settings on your vehicle.
D
r(Select):Press this button to reset certain
DIC functions and set your customization settings.
Pressing any of the four DIC buttons will acknowledge
DIC messages and clear them from the DIC display.
DIC Operation and Displays
The DIC comes on when the ignition is on. After a short
delay the DIC will display the current driver and the
information that was last displayed before the engine
was turned off.
If a problem is detected, a warning message will appear
on the display. Pressing the trip stem will acknowledge
any warning or service messages. Pressing any of
the DIC steering wheel buttons — trip information, fuel
information, customization or select button — will
also acknowledge any warnings or service messages.
You should take any message that appears on the
display seriously and remember that clearing the
message will only make the message disappear, not
correct the problem.
The DIC has different modes which can be accessed by
pressing the four DIC buttons located on the steering
wheel. These buttons are trip information, fuel
information, customization and select. The button
functions are detailed in the following pages.
3-52
Page 188 of 502

Fuel Information Button
t
(Fuel Information):Press the fuel information
button to scroll through the range, average fuel
economy, instant fuel economy and the engine
oil life system.
Fuel Range:Press the fuel information button until
RANGE appears on the display. This mode shows the
remaining distance you can drive without refueling.
It is based on fuel economy and the fuel remaining in
the tank. The display will show LOW if the fuel level
is low.
The fuel economy data used to determine fuel range is
an average of recent driving conditions. As your
driving conditions change, this data is gradually updated.
Fuel range cannot be reset.
Fuel Used:Press the fuel information button until
FUEL USED appears on the display. This mode shows
the number of gallons or liters of fuel used since the
last reset of this menu item. To reset the fuel used
information, press and hold the select button for
one second while FUEL USED is displayed.Average Fuel Economy:Press the fuel information
button until AVG ECON appears on the display.
This mode shows how many miles per gallon (MPG) or
liters per 100 kilometers (L/100 km) your vehicle is
getting based on current and past driving conditions.
Press and hold the select button for one second
while AVG ECON is displayed to reset the average fuel
economy. Average fuel economy will then be calculated
starting from that point. If the average fuel economy
is not reset, it will be continually updated each time you
drive.
Engine Oil Life System:Press the fuel information
button until ENGINE OIL LIFE appears on the display.
The engine oil life system shows an estimate of the
oil’s remaining useful life. It will show 100% when the
system is reset after an oil change. It will alert you
to change your oil on a schedule consistent with your
driving conditions.
Always reset the engine oil life system after an oil
change. To reset the engine oil life system, use the fuel
button to reach the ENGINE OIL LIFE screen and
then press and hold the select button for �ve seconds
while ENGINE OIL LIFE is displayed. OIL LIFE
RESET will appear on the display for 10 seconds to let
you know the system is reset. SeeEngine Oil Life
System on page 5-19for more information.
3-54
Page 189 of 502

In addition to the engine oil life system monitoring the
oil life, additional maintenance is recommended in
the Maintenance Schedule in this manual. SeeEngine
Oil on page 5-16andScheduled Maintenance on
page 6-4.
Customization Button
4
(Customization):Press the customization button to
access the VEHICLE SETTINGS menu and customize
the settings to your vehicle. SeeDIC Vehicle
Customization on page 3-59for more information.
Select Button
r
(Select):Press the select button to reset certain
DIC functions, turn off or acknowledge messages
on the DIC display and set your customization settings.
For example, this button will reset the trip odometers,
turn off the FUEL LEVEL LOW message and scroll
through the languages in which you can select the DIC
to display information.
DIC Warnings and Messages
Messages are displayed on the DIC to notify the driver
that the status of the vehicle has changed and that
some action may be needed by the driver to correct the
condition. More than one message may appear at
one time. They will appear one behind the other. Some
messages may not require immediate action but you
should press the trip stem to acknowledge that you
received the message and clear it from the display.
Pressing any of the DIC steering wheel buttons — trip
information, fuel information, customization or select
button — will also acknowledge any warnings or service
messages. Some messages cannot be cleared from
the display because they are more urgent. These
messages require action before they can be removed
from the DIC display. The following are the possible
messages that can be displayed and some information
about them.
3-55
Page 272 of 502

The broken tape detection feature of the cassette tape
player may identify the cleaning cassette as a
damaged tape, in error. To prevent the cleaning cassette
from being ejected, use the following steps:
1. Turn the ignition on.
2. Turn the radio off.
3. Press and hold the TAPE CD button for �ve seconds.
READY will appear on the display and a cassette
symbol will �ash for �ve seconds.
4. Insert the scrubbing action cleaning cassette.
5. Eject the cleaning cassette after the manufacturer’s
recommended cleaning time.
After the cleaning cassette is ejected, the broken
tape detection feature will be active again.
A non-scrubbing action, wet-type cleaner which uses a
cassette with a fabric belt to clean the tape head
can be used. This type of cleaning cassette will not
eject on its own. A non-scrubbing action cleaner may not
clean as thoroughly as the scrubbing type cleaner.
The use of a non-scrubbing action, dry-type cleaning
cassette is not recommended.After the player is cleaned, press and hold the EJT
button for �ve seconds to reset the CLEAN indicator.
The radio will display CLEANED to show the indicator
was reset.
Cassettes are subject to wear and the sound quality may
degrade over time. Always make sure the cassette tape
is in good condition before the tape player is serviced.
Care of Your CDs and DVDs
Handle discs carefully. Store them in their original cases
or other protective cases and away from direct sunlight
and dust. If the surface of a disc is soiled, dampen
a clean, soft cloth in a mild, neutral detergent solution
and clean it, wiping from the center to the edge.
Be sure never to touch the side without writing when
handling discs. Pick up discs by grasping the outer
edges or the edge of the hole and the outer edge.
3-138
Page 361 of 502

Notice:Use only engine oil identi�ed as meeting
GM Standard GM6094M and showing the American
Petroleum Institute Certi�ed For Gasoline Engines
starburst symbol. Failure to use the recommended
oil can result in engine damage not covered by
your warranty.
GM Goodwrench
®oil meets all the requirements for
your vehicle.
If you are in an area of extreme cold, where the
temperature falls below−20°F (−29°C), it is
recommended that you use either an SAE 5W-30
synthetic oil or an SAE 0W-30 oil. Both will provide
easier cold starting and better protection for your engine
at extremely low temperatures.
Engine Oil Additives
Do not add anything to your oil. The recommended oils
with the starburst symbol that meet GM Standard
GM6094M are all you will need for good performance
and engine protection.
Engine Oil Life System
When to Change Engine Oil
Your vehicle has a computer system that lets you know
when to change the engine oil and �lter. This is based on
engine revolutions and engine temperature, and not on
mileage. Based on driving conditions, the mileage at
which an oil change will be indicated can vary
considerably. For the oil life system to work properly, you
must reset the system every time the oil is changed.
When the system has calculated that oil life has been
diminished, it will indicate that an oil change is necessary.
A change engine oil light will come on. SeeChange
Engine Oil Light on page 3-46. Change your oil as soon
as possible within the next 600 miles (1 000 km). It is
possible that, if you are driving under the best conditions,
the oil life system may not indicate that an oil change is
necessary for over a year. However, your engine oil and
�lter must be changed at least once a year and at this
time the system must be reset. Your dealer has
GM-trained people who will perform this work using
genuine GM parts and reset the system. It is also
important to check your oil regularly and keep it at the
proper level.
If the system is ever reset accidentally, you must
change your oil at 3,000 miles (5 000 km) since your
last oil change. Remember to reset the oil life system
whenever the oil is changed.
5-19
Page 362 of 502

How to Reset the Engine Oil Life
System
The Engine Oil Life System calculates when to change
your engine oil and �lter based on vehicle use. Anytime
your oil is changed, reset the system so it can calculate
when the next oil change is required. If a situation occurs
where you change your oil prior to a change engine oil
light being turned on, reset the system.
To reset the change engine oil light, do the following:
1. Turn the ignition key to RUN with the engine off.
2. Fully press and release the accelerator pedal slowly
three times within �ve seconds.
3. Turn the key to LOCK.
If the change engine oil light comes back on when you
start your vehicle, the engine oil life system has not
reset. Repeat the procedure.
For vehicles with the Driver Information Center, see
Driver Information Center (DIC) on page 3-51to reset
the system.
What to Do with Used Oil
Used engine oil contains certain elements that may be
unhealthy for your skin and could even cause cancer.
Do not let used oil stay on your skin for very long. Clean
your skin and nails with soap and water, or a goodhand cleaner. Wash or properly dispose of clothing or
rags containing used engine oil. See the manufacturer’s
warnings about the use and disposal of oil products.
Used oil can be a threat to the environment. If you
change your own oil, be sure to drain all the oil from the
�lter before disposal. Never dispose of oil by putting it in
the trash, pouring it on the ground, into sewers, or into
streams or bodies of water. Instead, recycle it by taking it
to a place that collects used oil. If you have a problem
properly disposing of your used oil, ask your dealer, a
service station or a local recycling center for help.
Engine Air Cleaner/Filter
SeeEngine Compartment
Overview on page 5-12for
the location of the
engine air cleaner/�lter.
5-20
Page 460 of 502

The proper replacement parts, �uids and lubricants to
use are listed inRecommended Fluids and Lubricants
on page 6-12andNormal Maintenance Replacement
Parts on page 6-14. When your vehicle is serviced,
make sure these are used. All parts should be replaced
and all necessary repairs done before you or anyone
else drives the vehicle. We recommend the use of
genuine GM parts.
Scheduled Maintenance
When the change engine oil light comes on, it means that
service is required for your vehicle. Have your vehicle
serviced as soon as possible within the next
600 miles (1 000 km). It is possible that, if you are driving
under the best conditions, the engine oil life system may
not indicate that vehicle service is necessary for over a
year. However, your engine oil and �lter must be changed
at least once a year and at this time the system must be
reset. Your GM Goodwrench
®dealer has GM-trained
service technicians who will perform this work using
genuine GM parts and reset the system.If the engine oil life system is ever reset accidentally,
you must service your vehicle within 3,000 miles
(5 000 km) since your last service. Remember to reset
the oil life system whenever the oil is changed. See
Engine Oil Life System on page 5-19for information on
the Engine Oil Life System and resetting the system.
When the change engine oil light appears, certain
services, checks and inspections are required. Required
services are described in the following for
“MaintenanceI” and “MaintenanceII.” Generally, it is
recommended that your �rst service be MaintenanceI,
your second service be MaintenanceIIand that you
alternate MaintenanceIand MaintenanceIIthereafter.
However, in some cases, MaintenanceIImay be
required more often.
MaintenanceI— Use MaintenanceIif the change
engine oil light comes on within 10 months since
the vehicle was purchased or MaintenanceIIwas
performed.
MaintenanceII— Use MaintenanceIIif the previous
service performed was MaintenanceI. Always use
MaintenanceIIwhenever the light comes on 10 months
or more since the last service or if the light has not
come on at all for one year.
6-4