2005 FORD TAURUS interior lights
[x] Cancel search: interior lightsPage 10 of 248

WARNING LIGHTS AND CHIMES
Warning lights and gauges can alert you to a vehicle condition that may
become serious enough to cause expensive repairs. A warning light may
illuminate when a problem exists with one of your vehicle's functions.
Many lights will illuminate when you start your vehicle to make sure the
bulb works. If any light remains on after starting the vehicle, have the
respective system inspected immediately.
Service engine soon:TheService
engine soonindicator light
illuminates when the ignition is first
turned to the ON position to check
the bulb. Solid illumination after the engine is started indicates the On
Board Diagnostics System (OBD-II) has detected a malfunction. Refer to
On board diagnostics (OBD-II)in theMaintenance and Specifications
chapter. If the light is blinking, engine misfire is occurring which could
damage your catalytic converter. Drive in a moderate fashion (avoid
heavy acceleration and deceleration) and have your vehicle serviced
immediately.
Under engine misfire conditions, excessive exhaust temperatures
could damage the catalytic converter, the fuel system, interior
floor coverings or other vehicle components, possibly causing a fire.
Check fuel cap:Illuminates when
the fuel cap may not be properly
installed. Continued driving with
this light on may cause the Service
engine soon warning light to come
on. Refer toFuel filler capin the
Maintenance and Specificationschapter.
Instrument Cluster
Instrument Cluster
10
Page 31 of 248

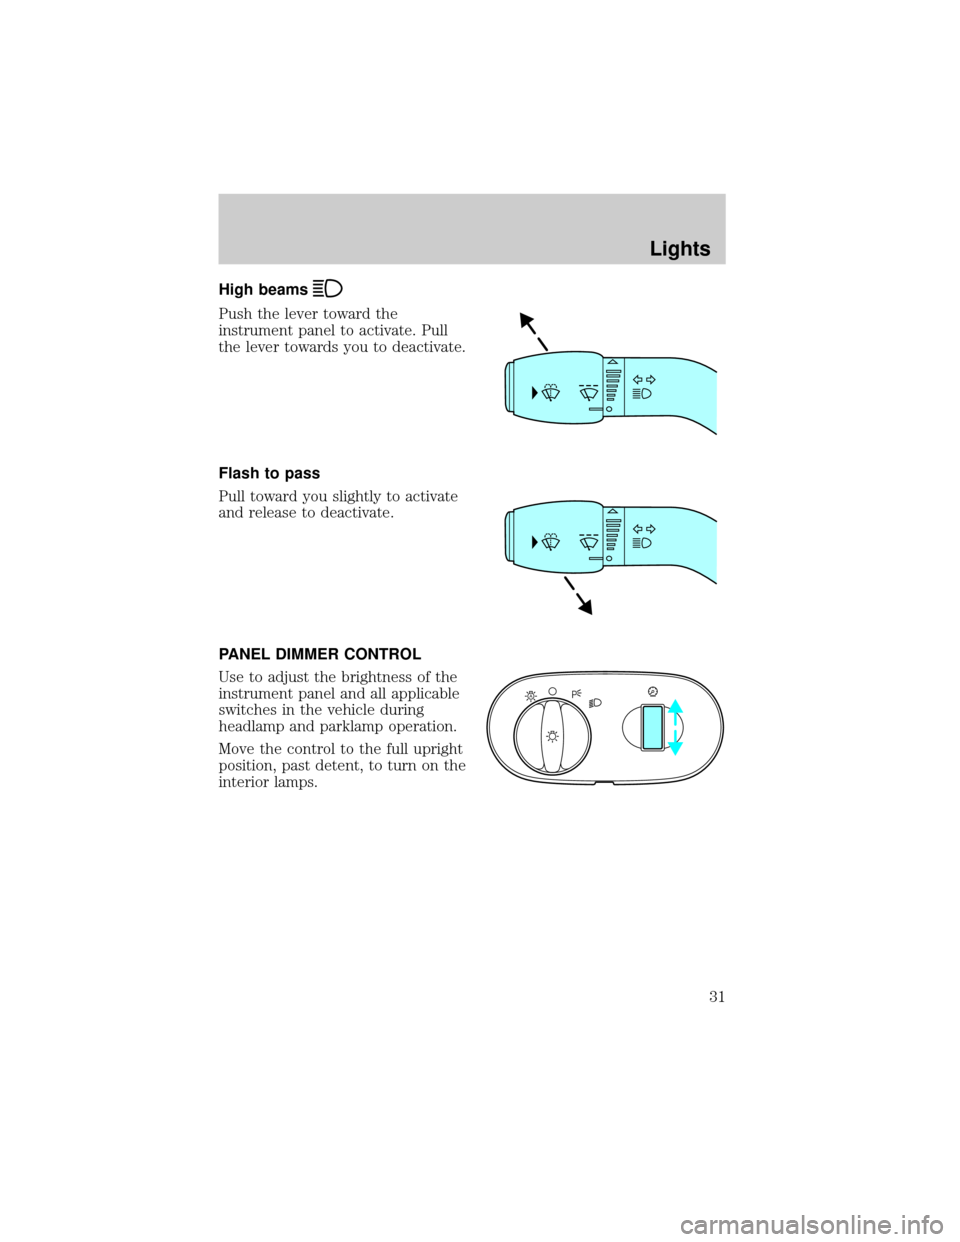
High beams
Push the lever toward the
instrument panel to activate. Pull
the lever towards you to deactivate.
Flash to pass
Pull toward you slightly to activate
and release to deactivate.
PANEL DIMMER CONTROL
Use to adjust the brightness of the
instrument panel and all applicable
switches in the vehicle during
headlamp and parklamp operation.
Move the control to the full upright
position, past detent, to turn on the
interior lamps.
A
Lights
31
Page 33 of 248

To see a clearer light pattern for
adjusting, you may want to block
the light from one headlamp while
adjusting the other.
5. Locate the vertical adjuster on
each headlamp. Usinga4mm
wrench, turn the adjuster either
clockwise (to adjust down) or
counterclockwise (to adjust up).
The horizontal edge of the brighter
light should touch the horizontal
reference line.
6. HORIZONTAL AIM IS NOT
REQUIRED FOR THIS VEHICLE
AND IS NON-ADJUSTABLE.
7. Close the hood and turn off the
lamps.
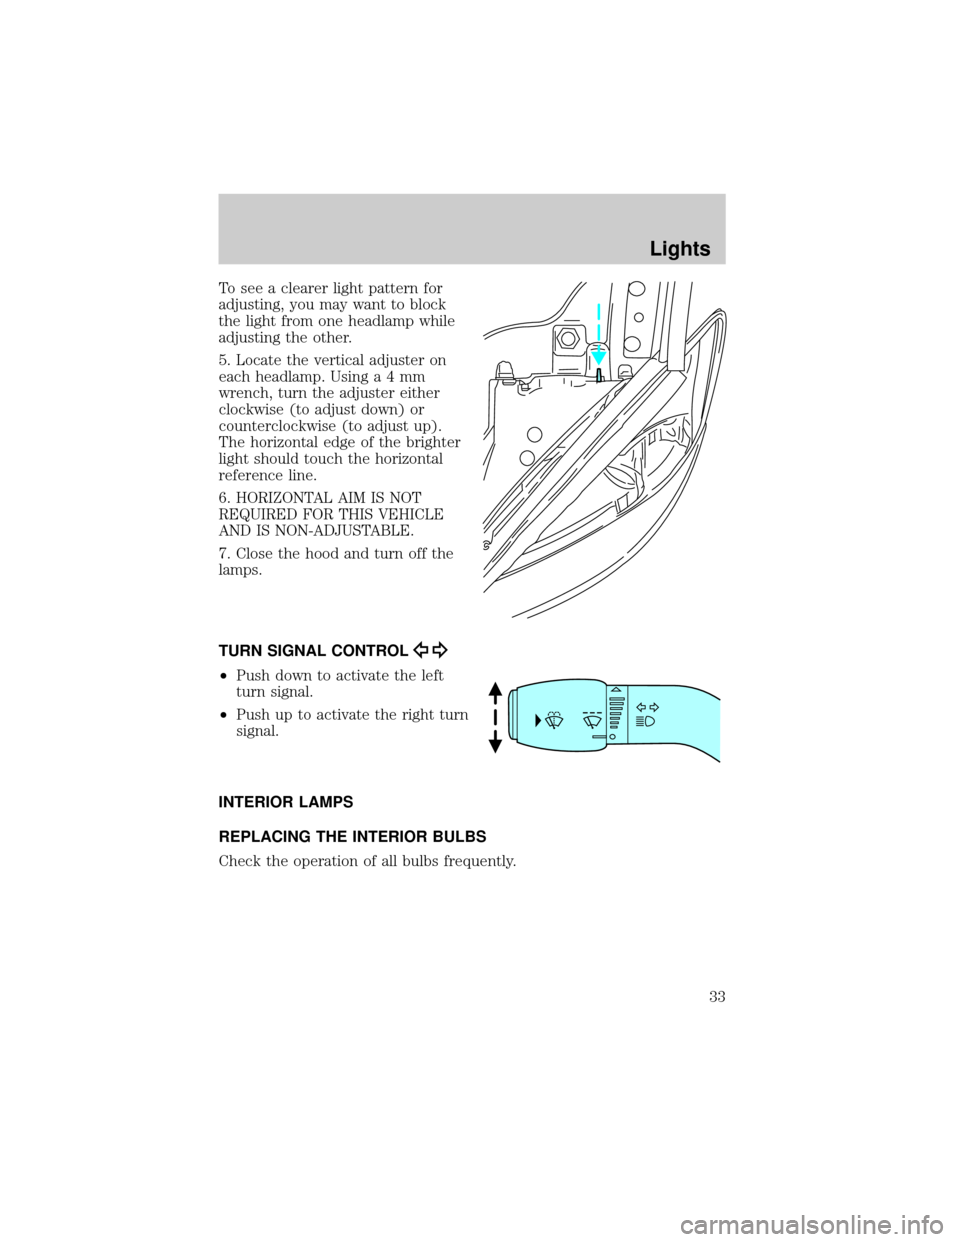
TURN SIGNAL CONTROL
²Push down to activate the left
turn signal.
²Push up to activate the right turn
signal.
INTERIOR LAMPS
REPLACING THE INTERIOR BULBS
Check the operation of all bulbs frequently.
Lights
33
Page 36 of 248

Function Number of bulbsTrade
number
Rear turn lamp (wagon) 2 3456K
Backup lamp 2 921
Backup lamp (wagon) 2 3156
License plate lamp 2 168
High-mount brake lamp
(wagon)2 912
High-mount brake lamp
(sedan)Must replace the hi-mount brake lamp
assembly
Rear side marker lamp
(wagon)2 194
Cargo lamp (wagon) 1 578
Dome lamp 1 12V6W
Dome/map lamp 3 578
Visor vanity lamp
(passenger/driver)2 DE 3021
Luggage compartment
lamp1 212±2
All replacement bulbs are clear in color except where noted.
To replace all instrument panel lights - see your dealer.
Replacing the interior bulbs
Check the operation of all bulbs frequently.
Lights
36
Page 76 of 248

Changes or modifications not expressly approved by the party
responsible for compliance could void the user's authority to
operate the equipment.
The typical operating range for your remote entry transmitter is
approximately 33 feet (10 meters). A decrease in operating range could
be caused by:
²weather conditions,
²nearby radio towers,
²structures around the vehicle, or
²other vehicles parked next to your vehicle.
The remote entry system allows you
to:
²lock or unlock all vehicle doors,
²open the trunk or the liftgate,
and
²sound the panic alarm.
If there is a problem with the
remote entry system make sure to
takeALL remote entry
transmitterswith you to the
dealership, this will aid in troubleshooting the problem.
Unlocking the doors
1. Pressand release to unlock the driver's door.Note:The interior
lamps will illuminate.
2. Press
and release again within three seconds to unlock all the
doors and the liftgate (wagon).
The remote entry system comes with an illuminated entry feature. This
feature turns on the interior lamps for 25 seconds or until the ignition is
turned to the the 4 (ON) position. If the dome lamp control is in theoff
position the illuminated entry feature will not work.
The inside lights will not turn off if:
²they have been turned on using the dimmer control or
²any door is open.
The battery saver feature will turn off the interior lamps 10 minutes after
the ignition is turned to the 3 (OFF) position.
Locks and Security
76
Page 79 of 248

4. Cycle eight times rapidly (within 10 seconds) between the 3 (OFF)
position and 4 (ON).Note:The eighth turn must end in the 4 (ON)
position.
5. The doors will lock, then unlock, to confirm that the programming
mode has been activated.
6. Within 20 seconds press any button on the remote entry transmitter.
Note:If more than 20 seconds have passed you will need to start the
procedure over again.
7. The doors will lock, then unlock, to confirm that this remote entry
transmitter has been programmed.
8. Repeat Step 6 to program each additional remote entry transmitter.
9. Turn the ignition to the 3 (OFF) position after you have finished
programming all of the remote entry transmitters.Note:After 20
seconds, you will automatically exit the programming mode.
10. The doors will lock, then unlock, to confirm that the programming
mode has been exited.
Illuminated entry
The interior lamps illuminate when the remote entry system is used to
unlock the door(s) or sound the personal alarm.
The illuminated entry system will turn off the interior lights if:
²the ignition is turned to the 4 (ON) position, or
²the remote transmitter lock control is pressed, or
²the vehicle is locked using the keyless entry keypad (if equipped), or
²after 25 seconds of illumination.
The dome lamp control (if equipped) mustnotbe set to the off position
for the illuminated entry system to operate.
The inside lights will not turn off if:
²they have been turned on with the dimmer control, or
²any door is open.
The battery saver will shut off the interior lamps 10 minutes after the
ignition has been turned to the 3 (OFF) position.
Perimeter lamps illuminated entry
The exterior lamps illuminate when the vehicle is unlocked using the
remote entry system.
Locks and Security
79
Page 81 of 248

KEYLESS ENTRY SYSTEM (IF EQUIPPED)
You can use the keyless entry
keypad to:
²lock or unlock the doors without
using a key.
²open the trunk or liftgate (wagon).
²activate or deactivate the autolock feature.
The keypad can be operated with the factory set 5±digit entry code; this
code is located on the owner's wallet card in the glove box, is marked on
the computer module, and is available from your authorized dealer. You
can also create your own 5±digit personal entry code.
When pressing the controls on the keypad, press the middle of the
controls to ensure a good activation.
Programming a personal entry code
To create your own personal entry code:
1. Enter the factory set code.Note:The keyless entry keypad and
interior lights will illuminate and the driver's door will unlock.
2. Within five seconds press the 1²2 on the keypad.
3. Enter your personal 5-digit code. Each number must be entered
within five seconds of each other.
4. The doors will again lock then unlock, to confirm that your personal
keycode has been programmed to the module.
Tips:
²Do not set a code that uses five of the same number.
²Do not use five numbers in sequential order.
²The factory set code will work even if you have set your own personal
code.
²If you set a second personal code it will erase your first personal code.
Note:To exit programming mode, either wait 5 seconds after pressing 1
²2 on the keypad, or press the 7²8 and 9²0 pads simultaneously to
lock all vehicle doors and end programming mode.
Erasing personal codes
1. Enter the factory set 5±digit code. The keyless entry keypad and
interior lights will illuminate and the driver's door will unlock.
123
45678
90
Locks and Security
81
Page 241 of 248

GENUINE FORD ACCESSORIES FOR YOUR VEHICLE
A wide selection of Genuine Ford Accessories are available for your
vehicle through your local authorized Ford or Ford of Canada dealer.
These quality accessories have been specifically engineered to fulfill your
automotive needs; they are custom designed to complement the style
and aerodynamic appearance of your vehicle. In addition, each accessory
is made from high quality materials and meets or exceeds Ford's rigorous
engineering and safety specifications. Ford Motor Company will repair or
replace any properly dealer-installed Genuine Ford Accessory found to
be defective in factory-supplied materials or workmanship during the
warranty period, as well as any component damaged by the defective
accessory. The accessory will be warranted for whichever provides you
the greatest benefit:
²12 months or 12,000 miles (20,000 km) (whichever occurs first), or
²the remainder of your new vehicle limited warranty.
This means that Genuine Ford Accessories purchased along with your new
vehicle and installed by the dealer are covered for the full length of your
New Vehicle's Limited Warranty Ð 3 years or 36,000 miles (60,000 km)
(whichever occurs first). Contact your dealer for details and a copy of
the warranty.
Not all accessories are available for all models.
The following is a list of several Genuine Ford Accessory products for
your vehicle. Not all accessories are available for all models. For a
complete listing of the accessories that are available for your vehicle,
please contact your dealer or visit our online store at:
www.fordaccessoriesstore.com.
Exterior style
Bug shields
Deflectors
Exterior trim kits
Front end covers
Grille inserts
Headlamps, fog lights and Daytime Running Lamps (DRLs)
Splash guards
Wheels
Interior style
Cell phone holders
Electrochromatic compass/temperature interior mirrors
Accessories
Accessories
241