Page 44 of 248

Replacing tail/brake/turn signal/backup lamp bulbs
Sedan
The tail lamp, brake lamp, turn
signal lamp and backup lamp bulbs
are located in the same portion of
the tail lamp assembly. Follow the
same steps to replace either bulb.
1. Make sure headlamp switch is in
OFF position and open trunk and
remove two plastic mushroom nuts,
five push pins and the plastic cover
from inside the trunk to access the
lamp assembly.
2. Carefully pull the carpet away to
expose the lamp assembly hardware.
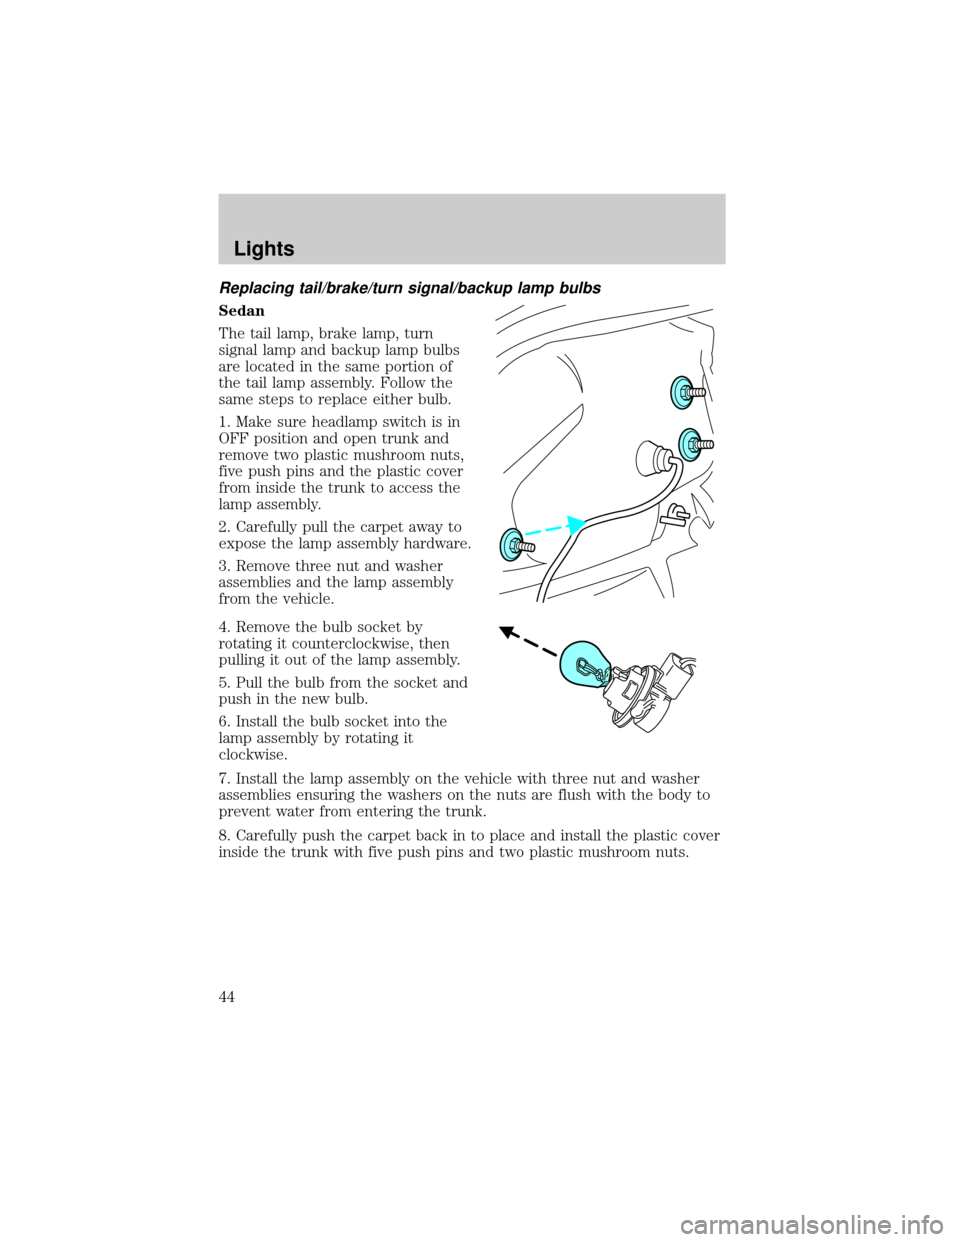
3. Remove three nut and washer
assemblies and the lamp assembly
from the vehicle.
4. Remove the bulb socket by
rotating it counterclockwise, then
pulling it out of the lamp assembly.
5. Pull the bulb from the socket and
push in the new bulb.
6. Install the bulb socket into the
lamp assembly by rotating it
clockwise.
7. Install the lamp assembly on the vehicle with three nut and washer
assemblies ensuring the washers on the nuts are flush with the body to
prevent water from entering the trunk.
8. Carefully push the carpet back in to place and install the plastic cover
inside the trunk with five push pins and two plastic mushroom nuts.
Lights
44
Page 45 of 248
Wagon
The tail lamp/turn lamp
bulbs/brake/backup are located in
the same portion of the tail lamp
assembly, one just below the other.
Follow the same steps to replace
either bulb:
1. Make sure headlamp switch is in
OFF position and open the liftgate
to expose the lamp assemblies.
2. Remove the two bolts from the
tail lamp assembly.
3. Carefully pull the lamp assembly
from the tailgate.
4. Twist the bulb socket
counterclockwise and remove from
lamp assembly.
5. Pull the bulb straight out of the
socket and push in the new bulb.
6. Install bulb socket in lamp assembly by turning clockwise.
7. Carefully install the tail lamp assembly on tailgate and secure with two
bolts.
Lights
45
Page 52 of 248
Setting speed control
The controls for using your speed
control are located on the steering
wheel for your convenience.
1. Press the ON control and release
it.
2. Accelerate to the desired speed.
3. Press the SET ACC control and
release it.
4. Take your foot off the accelerator
pedal.
5. TheCRUISEindicator light on
the instrument cluster will turn on.
Note:
²Vehicle speed may vary momentarily when driving up and down a
steep hill.
²If the vehicle speed increases above the set speed on a downhill, you
may want to apply the brakes to reduce the speed.
²If the vehicle speed decreases more than 10 mph (16 km/h) below
your set speed on an uphill, your speed control will disengage.
²If the vehicle speed decreases to 30 mph (48 km/h) or less, your
speed control will disengage
Disengaging speed control
To disengage the speed control:
²Depress the brake pedal
Disengaging the speed control will not erase previous set speed.
Driver Controls
52
Page 102 of 248

shoulder and chest. Be sure the belt is not twisted. If the belt is twisted,
remove the twist. Insert the tongue into the proper buckle for your
seating position until you hear a snap and feel it latch. Make sure the
tongue is securely fastened to the buckle by pulling on the tongue.
The lap belt should fit snugly and as low as possible around the
hips, not across the waist.
Front and rear seat occupants, including pregnant women,
should wear safety belts for optimum protection in an accident.
Each seating position in your vehicle has a specific safety belt
assembly which is made up of one buckle and one tongue that
are designed to be used as a pair. 1) Use the shoulder belt on the
outside shoulder only. Never wear the shoulder belt under the arm. 2)
Never swing the safety belt around your neck over the inside shoulder.
3) Never use a single belt for more than one person.
Due to folding rear seats, sometimes the buckles and tongues toward the
center of the vehicle may be hidden by the rear edge of the seat cushion.
Pull them out so they will be accessible.
While you are fastened in the seat belt, the shoulder belt adjusts to your
movement. However, if you brake hard, turn hard or your vehicle
receives an impact of 5 mph (8 km/h) or more, the safety belt will
become locked and help reduce your forward movement.
To unfasten the belt, push the red release button on the end of the
buckle. This allows the tongue to unlatch from the buckle. While the belt
retracts, guide the tongue to its original position to prevent it from
striking you or the vehicle.
Safety belt warning light and indicator chime
The safety belt warning light illuminates in the instrument cluster and a
chime sounds to remind the occupants to fasten their safety belts.
Seating and Safety Restraints
102
Page 130 of 248

STARTING
Positions of the ignition
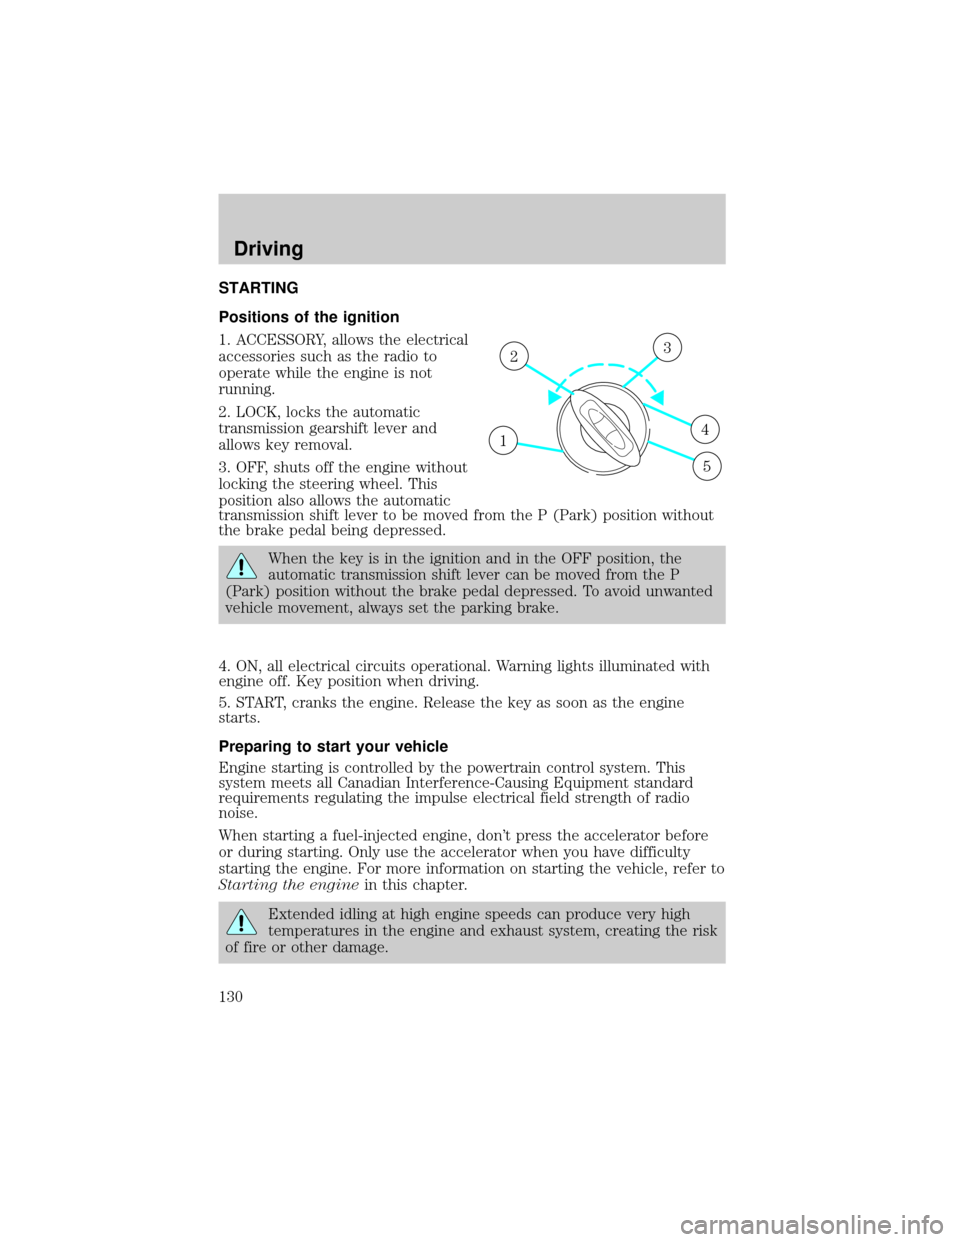
1. ACCESSORY, allows the electrical
accessories such as the radio to
operate while the engine is not
running.
2. LOCK, locks the automatic
transmission gearshift lever and
allows key removal.
3. OFF, shuts off the engine without
locking the steering wheel. This
position also allows the automatic
transmission shift lever to be moved from the P (Park) position without
the brake pedal being depressed.
When the key is in the ignition and in the OFF position, the
automatic transmission shift lever can be moved from the P
(Park) position without the brake pedal depressed. To avoid unwanted
vehicle movement, always set the parking brake.
4. ON, all electrical circuits operational. Warning lights illuminated with
engine off. Key position when driving.
5. START, cranks the engine. Release the key as soon as the engine
starts.
Preparing to start your vehicle
Engine starting is controlled by the powertrain control system. This
system meets all Canadian Interference-Causing Equipment standard
requirements regulating the impulse electrical field strength of radio
noise.
When starting a fuel-injected engine, don't press the accelerator before
or during starting. Only use the accelerator when you have difficulty
starting the engine. For more information on starting the vehicle, refer to
Starting the enginein this chapter.
Extended idling at high engine speeds can produce very high
temperatures in the engine and exhaust system, creating the risk
of fire or other damage.
1
23
4
5
Driving
Driving
130
Page 132 of 248
²Make sure the parking brake is
set.
²Make sure the gearshift is in P
(Park).
²Turn the key to 4 (ON) without
turning the key to 5 (START).
Make sure the corresponding lights illuminate or illuminate briefly. If a
light fails to illuminate, have the vehicle serviced.
²If the driver's safety belt is fastened, the
light may not illuminate.
PRNDD1
1
23
4
5
Driving
132
Page 135 of 248

Refer toBrake system warning
lightin theInstrument Cluster
chapter for information on the brake
system warning light.
Four-wheel anti-lock brake system (ABS) (if equipped)
On vehicles equipped with an anti-lock braking system (ABS), a noise
from the hydraulic pump motor and pulsation in the pedal may be
observed during ABS braking events. Pedal pulsation coupled with noise
while braking under panic conditions or on loose gravel, bumps, wet or
snowy roads is normal and indicates proper functioning of the vehicle's
anti-lock brake system. The ABS performs a self-check after you start
the engine and begin to drive away. A brief mechanical noise may be
heard during this test. This is normal. If a malfunction is found, the ABS
warning light will come on.
The ABS operates by detecting the onset of wheel lockup during brake
applications and compensates for this tendency. The wheels are
prevented from locking even when the brakes are firmly applied.
Using ABS
²In an emergency or when maximum efficiency from the four-wheel
ABS is required, apply continuous force on the brake. The four wheel
ABS will be activated immediately, thus allowing you to retain steering
control of your vehicle and, providing there is sufficient space, will
enable you to avoid obstacles and bring the vehicle to a controlled
stop.
²The anti-lock system does not reduce stopping distance. Always leave
enough room between your vehicle and the vehicle in front of you to
stop.
²We recommend that you familiarize yourself with this braking
technique. However, avoid taking any unnecessary risks.
ABS warning lamp
The ABS lamp in the instrument
cluster momentarily illuminates
when the ignition is turned on. If
the light does not illuminate during
start up, remains on or flashes, the
ABS may be disabled and may need to be serviced.
P!
BRAKE
ABS
Driving
135
Page 140 of 248

Understanding the gearshift positions of the 4±speed automatic
transaxle
This vehicle is equipped with an adaptive Transmission Shift Strategy.
Adaptive Shift Strategy offers the optimal transmission operation and
shift quality. When the vehicle's battery has been disconnected for any
type of service or repair, the transmission will need to relearn the normal
shift strategy parameters, much like having to reset your radio stations
when your vehicle battery has been disconnected. The Adaptive
Transmission Strategy allows the transmission to relearn these operating
parameters. This learning process could take several transmission
upshifts and downshifts; during this learning process, slightly firmer
shifts may occur. After this learning process, normal shift feel and shift
scheduling will resume.
P (Park)
This position locks the transaxle and prevents the front wheels from
turning.
To put your vehicle in gear:
²Start the engine
²Depress the brake pedal
²Move the gearshift lever into the desired gear
To put your vehicle in P (Park):
²Come to a complete stop
Driving
140