Page 43 of 304

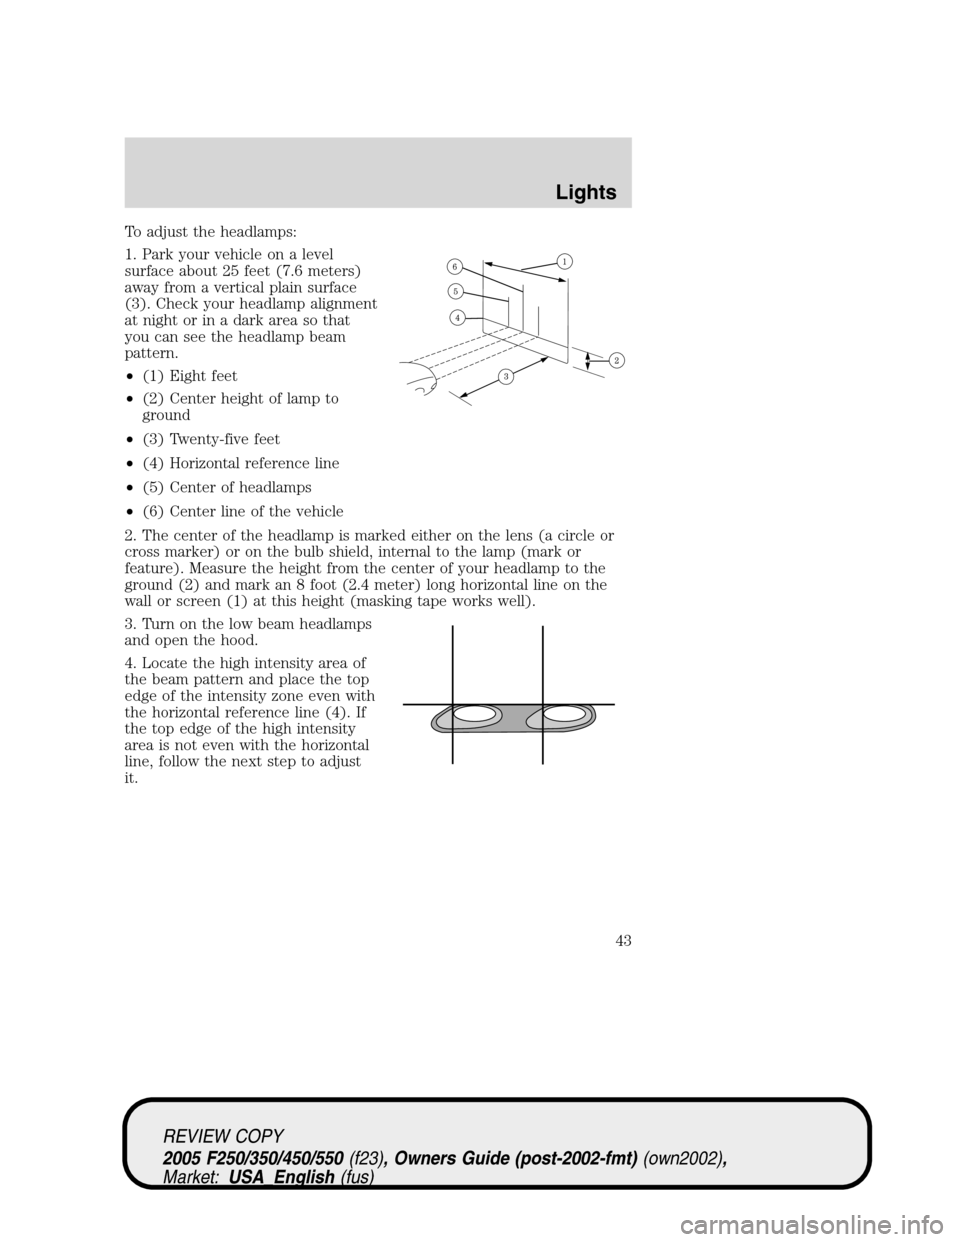
To adjust the headlamps:
1. Park your vehicle on a level
surface about 25 feet (7.6 meters)
away from a vertical plain surface
(3). Check your headlamp alignment
at night or in a dark area so that
you can see the headlamp beam
pattern.
•(1) Eight feet
•(2) Center height of lamp to
ground
•(3) Twenty-five feet
•(4) Horizontal reference line
•(5) Center of headlamps
•(6) Center line of the vehicle
2. The center of the headlamp is marked either on the lens (a circle or
cross marker) or on the bulb shield, internal to the lamp (mark or
feature). Measure the height from the center of your headlamp to the
ground (2) and mark an 8 foot (2.4 meter) long horizontal line on the
wall or screen (1) at this height (masking tape works well).
3. Turn on the low beam headlamps
and open the hood.
4. Locate the high intensity area of
the beam pattern and place the top
edge of the intensity zone even with
the horizontal reference line (4). If
the top edge of the high intensity
area is not even with the horizontal
line, follow the next step to adjust
it.
REVIEW COPY
2005 F250/350/450/550(f23), Owners Guide (post-2002-fmt)(own2002),
Market:USA_English(fus)
Lights
43
Page 45 of 304

2. Measure the height from the
center of your headlamp (indicated
by a 3.0 mm circle on the lens) to
the ground and mark an 8 foot
(2.4 meter) horizontal reference line
on the vertical wall or screen at this
height (a piece of masking tape
works well).
3. Turn on the low beam headlamps
to illuminate the wall or screen and
open the hood. Cover one of the
headlamps so no light hits the wall.
4. On the wall or screen you will
observe a light pattern with a
distinct horizontal edge towards the
right. If this edge is not at the
horizontal reference line, the beam will need to be adjusted so the edge
is at the same height as the horizontal reference line.
5. Locate the vertical adjuster on
each headlamp, then use a E5 Torx
socket to turn the adjuster either
counterclockwise (to adjust down)
or clockwise (to adjust up) aligning
the upper edge of the light pattern
up to the horizontal line.
6. Repeat step 3–5 for the other
headlamp.
7. Close the hood and turn off the
lamps.
REVIEW COPY
2005 F250/350/450/550(f23), Owners Guide (post-2002-fmt)(own2002),
Market:USA_English(fus)
Lights
45
Page 48 of 304

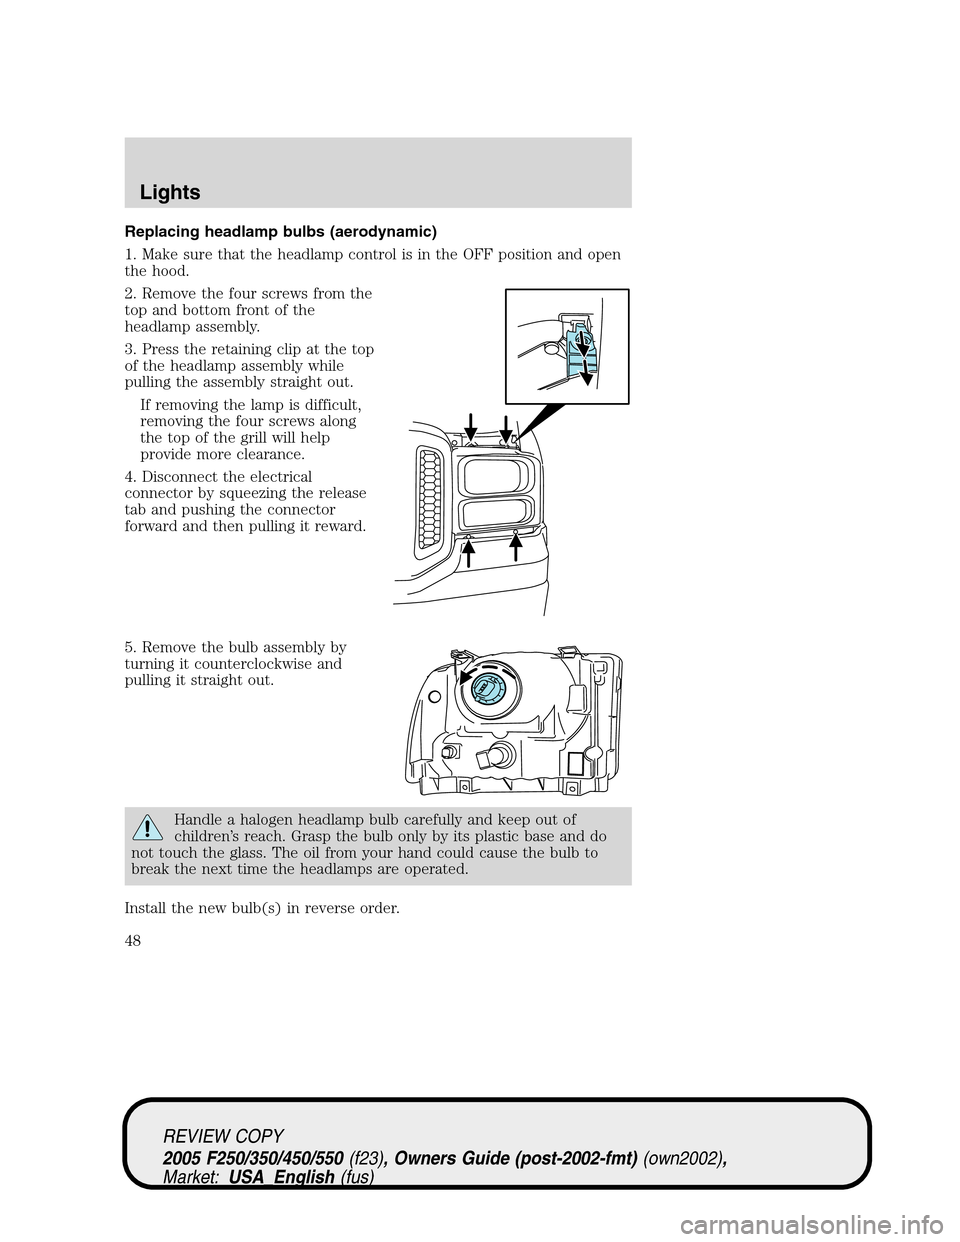
Replacing headlamp bulbs (aerodynamic)
1. Make sure that the headlamp control is in the OFF position and open
the hood.
2. Remove the four screws from the
top and bottom front of the
headlamp assembly.
3. Press the retaining clip at the top
of the headlamp assembly while
pulling the assembly straight out.
If removing the lamp is difficult,
removing the four screws along
the top of the grill will help
provide more clearance.
4. Disconnect the electrical
connector by squeezing the release
tab and pushing the connector
forward and then pulling it reward.
5. Remove the bulb assembly by
turning it counterclockwise and
pulling it straight out.
Handle a halogen headlamp bulb carefully and keep out of
children’s reach. Grasp the bulb only by its plastic base and do
not touch the glass. The oil from your hand could cause the bulb to
break the next time the headlamps are operated.
Install the new bulb(s) in reverse order.
REVIEW COPY
2005 F250/350/450/550(f23), Owners Guide (post-2002-fmt)(own2002),
Market:USA_English(fus)
Lights
48
Page 49 of 304
Replacing park/turn and sidemarker lamp bulbs (aerodynamic)
1. Make sure that the headlamp control is in the OFF position and open
the hood.
2. Remove the four screws from the
top and bottom front of the
headlamp assembly.
3. Press the retaining clip at the top
of the headlamp assembly while
pulling the assembly straight out.
If removing the lamp is difficult,
removing the four screws along
the top of the grill will help
provide more clearance.
4. Remove the bulb assembly, (1)
sidemarker or (2) park/turn by
turning it counterclockwise and
pulling it straight out.
5. Pull the old bulb out from the
socket.
Install the new bulb(s) in reverse order.
REVIEW COPY
2005 F250/350/450/550(f23), Owners Guide (post-2002-fmt)(own2002),
Market:USA_English(fus)
Lights
49
Page 50 of 304
Replacing headlamp bulbs (sealed beam)
1. Make sure that the headlamp control is in the OFF position and open
the hood.
2. Remove the four screws from the
top and bottom front of the
headlamp assembly.
3. Press the retaining clip at the top
of the headlamp assembly while
pulling the assembly straight out.
If removing the lamp is difficult,
removing the four screws along
the top of the grill will help
provide more clearance.
4. Disconnect the electrical
connector from the park lamp/bezel.
5. Remove the four screws and the
headlamp retaining ring from
headlamp.
Install the new bulb(s) in reverse order.
REVIEW COPY
2005 F250/350/450/550(f23), Owners Guide (post-2002-fmt)(own2002),
Market:USA_English(fus)
Lights
50
Page 51 of 304
Replacing park/turn/sidemarker bulbs (sealed beam)
1. Make sure that the headlamp control is in the OFF position and open
the hood.
2. Remove the four screws from the
top and bottom front of the
headlamp assembly.
3. Press the retaining clip at the top
of the headlamp assembly while
pulling the assembly straight out.
If removing the lamp is difficult,
removing the four screws along
the top of the grill will help
provide more clearance.
4. Remove the bulb assembly, (1)
sidemarker or (2), park/turn by
turning it counterclockwise.
5. Pull the old bulb out from the
socket.
Install the new bulb(s) in reverse order.
REVIEW COPY
2005 F250/350/450/550(f23), Owners Guide (post-2002-fmt)(own2002),
Market:USA_English(fus)
Lights
51
Page 246 of 304
•Manual transmission:
1. Set the parking brake, depress the clutch and place the gearshift in N
(Neutral).
2. Block the wheels.
Note:Do not start your engine with the air cleaner removed and do not
remove it while the engine is running.
OPENING THE HOOD
1. Inside the vehicle, pull the hood
release handle located under the
bottom left corner of the instrument
panel.
2. Go to the front of the vehicle and
release the auxiliary latch located
under the right center of the hood.
Slide the handle to release the
auxiliary latch.
3. Lift the hood until the lift
cylinders hold it open.
HOOD
REVIEW COPY
2005 F250/350/450/550(f23), Owners Guide (post-2002-fmt)(own2002),
Market:USA_English(fus)
Maintenance and Specifications
246
Page 249 of 304

WINDSHIELD WASHER FLUID
Add fluid to fill the reservoir if the
level is low. In very cold weather, do
not fill the reservoir completely.
Only use a washer fluid that meets
Ford specification WSB-M8B16–A2.
Refer toLubricant specifications
in this chapter.
State or local regulations on volatile organic compounds may restrict the
use of methanol, a common windshield washer antifreeze additive.
Washer fluids containing non-methanol antifreeze agents should be used
only if they provide cold weather protection without damaging the
vehicle’s paint finish, wiper blades or washer system.
If you operate your vehicle in temperatures below 40° F (4.5°C),
use washer fluid with antifreeze protection. Failure to use
washer fluid with antifreeze protection in cold weather could result in
impaired windshield vision and increase the risk of injury or accident.
Note:Do not put washer fluid in the engine coolant reservoir. Washer
fluid placed in the cooling system may harm engine and cooling system
components.
ENGINE OIL
Checking the engine oil
Refer to the scheduled maintenance guide for the appropriate intervals
for checking the engine oil.
1. Make sure the vehicle is on level ground.
2. Turn the engine off and wait a few minutes for the oil to drain into the
oil pan.
3. Set the parking brake and ensure the gearshift is securely latched in P
(Park) (automatic transmission) or 1 (First) (manual transmission).
4. Open the hood. Protect yourself from engine heat.
5. Locate and carefully remove the engine oil level indicator (dipstick).
REVIEW COPY
2005 F250/350/450/550(f23), Owners Guide (post-2002-fmt)(own2002),
Market:USA_English(fus)
Maintenance and Specifications
249