2005 FORD F250 SUPER DUTY seats
[x] Cancel search: seatsPage 7 of 312

To access this information, special equipment must be directly connected to the
recording modules. Ford Motor Company and Ford of Canada do not access event
data recorder information without obtaining consent, unless pursuant to court order
or where required by law enforcement, other government authorities or other third
parties acting with lawful authority. Other parties may seek to access the information
independently of Ford Motor Company and Ford of Canada.
Vehicle Modification Data Recording
Some aftermarket products may cause severe engine and/or transmission damage;
refer to the What is not covered section in The new vehicle limited warranty for
your vehicle chapter of your vehicle’s Warranty Guide for more information. Some
vehicles are equipped with Powertrain Control Systems that can detect and store
information about vehicle modifications that increase horsepower and torque output;
this information cannot be erased and will stay in the system’s memory even if the
modification is removed. When a dealer or repair facility works on your vehicle, it may
be necessary for them to access the information in the Powertrain Control System.
This information will likely identify if any unauthorized modifications have been made
to the system and may be used to determine if repairs will be covered by warranty.
Special instructions
For your added safety, your vehicle is fitted with sophisticated electronic controls.
Please read the section Supplemental restraint system (SRS) in the
Seating and Safety Restraints chapter. Failure to follow the specific
warnings and instructions could result in personal injury.
Front seat mounted rear-facing child or infant seats should NEVER be
placed in front of an active passenger air bag.
Notice to owners of diesel-powered vehicles
Read the 6.0 Liter Power Stroke Direct Injection Turbo Diesel Owner’s Guide
Supplement for information regarding correct operation and maintenance of your
Diesel-powered light truck.
Notice to owners of pickup trucks and utility type vehicles
Utility vehicles have a significantly higher rollover rate than other types
of vehicles.
Before you drive your vehicle, please read this Owner’s Guide carefully. Your vehicle
is not a passenger car. As with other vehicles of this type, failure to operate this
vehicle correctly may result in loss of vehicle control, vehicle rollover, personal injury
or death.
Be sure to read Driving off road in the Driving chapter.
2005 F250/350/450/550 (f23)
Owners Guide (post-2002-fmt)
USA_English (fus) Introduction
7
Page 33 of 312
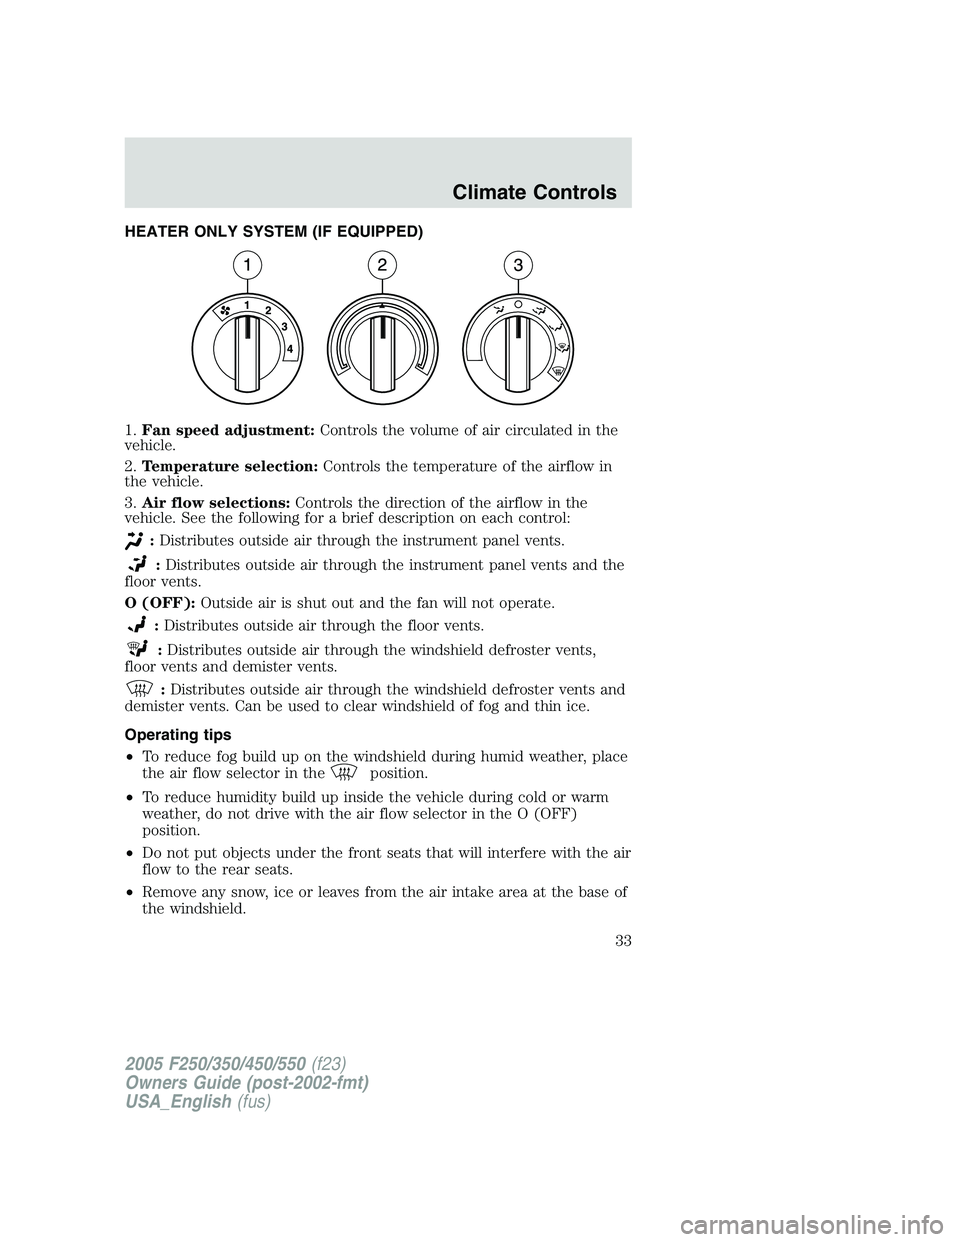
HEATER ONLY SYSTEM (IF EQUIPPED)
1. Fan speed adjustment: Controls the volume of air circulated in the
vehicle.
2. Temperature selection: Controls the temperature of the airflow in
the vehicle.
3. Air flow selections: Controls the direction of the airflow in the
vehicle. See the following for a brief description on each control:
: Distributes outside air through the instrument panel vents.
: Distributes outside air through the instrument panel vents and the
floor vents.
O (OFF): Outside air is shut out and the fan will not operate.
: Distributes outside air through the floor vents.
: Distributes outside air through the windshield defroster vents,
floor vents and demister vents.
: Distributes outside air through the windshield defroster vents and
demister vents. Can be used to clear windshield of fog and thin ice.
Operating tips
• To reduce fog build up on the windshield during humid weather, place
the air flow selector in the position.
• To reduce humidity build up inside the vehicle during cold or warm
weather, do not drive with the air flow selector in the O (OFF)
position.
• Do not put objects under the front seats that will interfere with the air
flow to the rear seats.
• Remove any snow, ice or leaves from the air intake area at the base of
the windshield.
2005 F250/350/450/550 (f23)
Owners Guide (post-2002-fmt)
USA_English (fus)Climate Controls
Climate Controls
33
Page 35 of 312
: Distributes outside air through the instrument panel vents, floor
vents and center console vents (if equipped).
O (OFF): Outside air is shut out and the climate system is turned off.
: Distributes outside air through the floor vents.
: Distributes outside air through the windshield defroster vents,
floor vents and demister vents.
: Distributes outside air through the windshield defroster vents and
demister vents.
Operating tips
• To reduce fog build up on the windshield during humid weather, place
the air flow selector in the position.
• To reduce humidity build up inside the vehicle, do not drive with the
air flow selector in the O (OFF) position.
• Do not put objects under the front seats that will interfere with the
airflow to the rear seats.
• Remove any snow, ice or leaves from the air intake area at the base of
the windshield.
• To improve the A/C cool down, drive with the windows slightly open
for 2–3 minutes after start up or until the vehicle has been “aired out.”
For maximum cooling performance (MAX A/C) in MAX A/C mode:
• Move the temperature control to the coolest setting.
• Set the fan to the highest speed initially, then adjust in order to
maintain comfort.
To aid in side window defogging and demisting in cold weather:
1. Select .
2. Select A/C.
3. Set the temperature control to maintain comfort.
4. Set the fan speed to highest setting.
5. Direct the outer instrument panel vents towards the side windows.
Do not place objects on top of the instrument panel as these
objects may become projectiles in a collision or sudden stop.
2005 F250/350/450/550 (f23)
Owners Guide (post-2002-fmt)
USA_English (fus) Climate Controls
35
Page 37 of 312
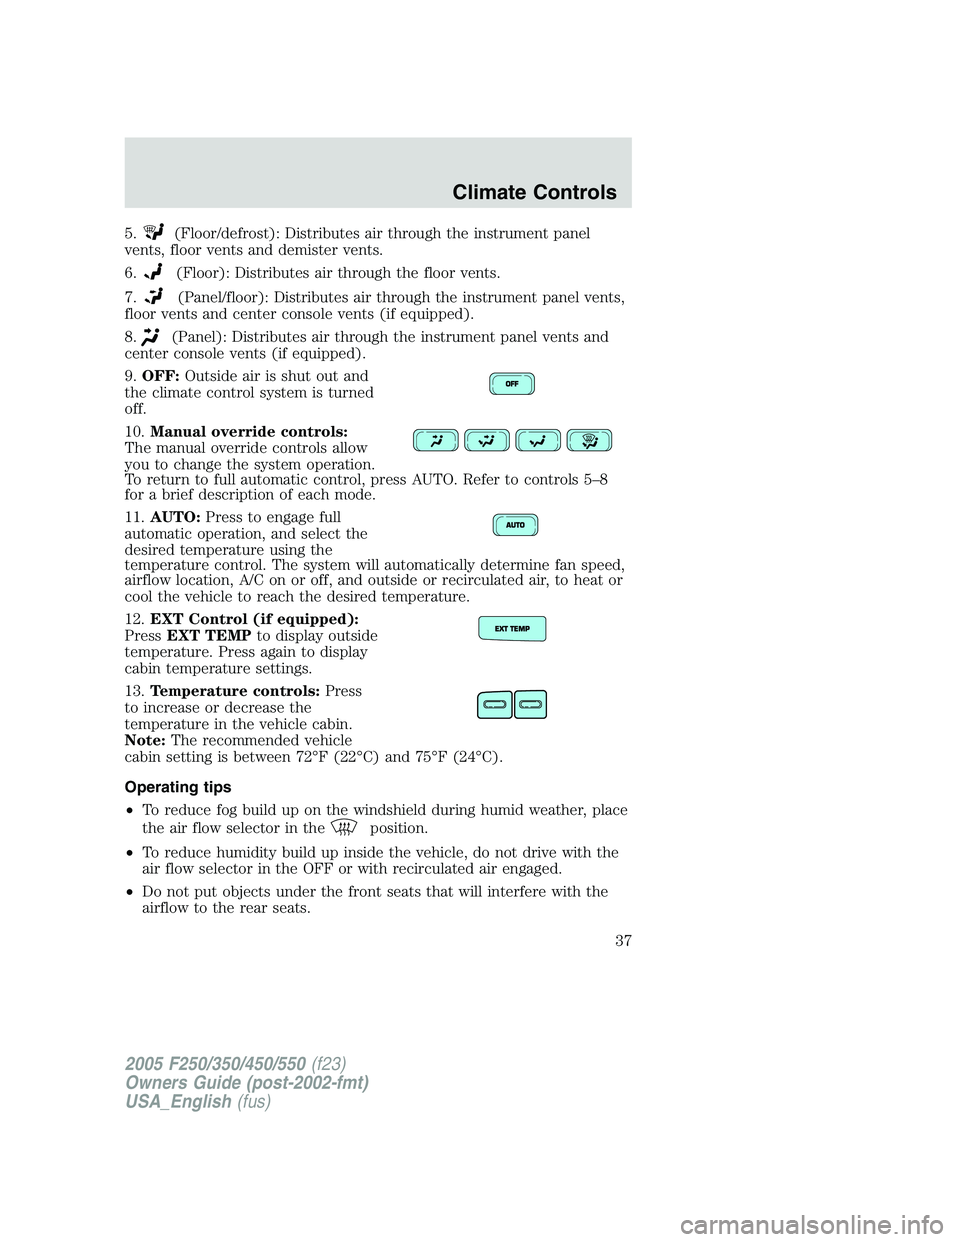
5. (Floor/defrost): Distributes air through the instrument panel
vents, floor vents and demister vents.
6. (Floor): Distributes air through the floor vents.
7. (Panel/floor): Distributes air through the instrument panel vents,
floor vents and center console vents (if equipped).
8. (Panel): Distributes air through the instrument panel vents and
center console vents (if equipped).
9. OFF: Outside air is shut out and
the climate control system is turned
off.
10. Manual override controls:
The manual override controls allow
you to change the system operation.
To return to full automatic control, press AUTO. Refer to controls 5–8
for a brief description of each mode.
11. AUTO: Press to engage full
automatic operation, and select the
desired temperature using the
temperature control. The system will automatically determine fan speed,
airflow location, A/C on or off, and outside or recirculated air, to heat or
cool the vehicle to reach the desired temperature.
12. EXT Control (if equipped):
Press EXT TEMP to display outside
temperature. Press again to display
cabin temperature settings.
13. Temperature controls: Press
to increase or decrease the
temperature in the vehicle cabin.
Note: The recommended vehicle
cabin setting is between 72°F (22°C) and 75°F (24°C).
Operating tips
• To reduce fog build up on the windshield during humid weather, place
the air flow selector in the position.
• To reduce humidity build up inside the vehicle, do not drive with the
air flow selector in the OFF or with recirculated air engaged.
• Do not put objects under the front seats that will interfere with the
airflow to the rear seats.
2005 F250/350/450/550 (f23)
Owners Guide (post-2002-fmt)
USA_English (fus) Climate Controls
37
Page 94 of 312

Using the manual lumbar support
For more lumbar support, turn the
lumbar support control toward the
front of vehicle.
For less lumbar support, turn the
lumbar support control toward the
rear of vehicle.
Heated seats (if equipped)
To operate the heated seats, do the following:
• Push control to activate.
• Push again to deactivate.
The indicator light on the control will illuminate when activated.
The system will not automatically shutoff unless control is pushed to
deactivate. If system is not manually terminated at last use, then system
will remain active at next ignition key cycle.
2005 F250/350/450/550 (f23)
Owners Guide (post-2002-fmt)
USA_English (fus)Seating and Safety Restraints
94
Page 97 of 312
It is extremely dangerous to ride in a cargo area, inside or
outside of a vehicle. In a collision, people riding in these areas
are more likely to be seriously injured or killed. Do not allow people to
ride in any area of your vehicle that is not equipped with seats and
safety belts. Be sure everyone in your vehicle is in a seat and using a
safety belt properly.
In a rollover crash, an unbelted person is significantly more likely
to die than a person wearing a safety belt.
Each seating position in your vehicle has a specific safety belt
assembly which is made up of one buckle and one tongue that
are designed to be used as a pair. 1) Use the shoulder belt on the
outside shoulder only. Never wear the shoulder belt under the arm. 2)
Never swing the safety belt around your neck over the inside shoulder.
3) Never use a single belt for more than one person.
Always transport children 12 years old and under in the back
seat and always properly use appropriate child restraints.
Safety belts and seats can become hot in a vehicle that has been
closed up in sunny weather; they could burn a small child. Check
seat covers and buckles before you place a child anywhere near them.
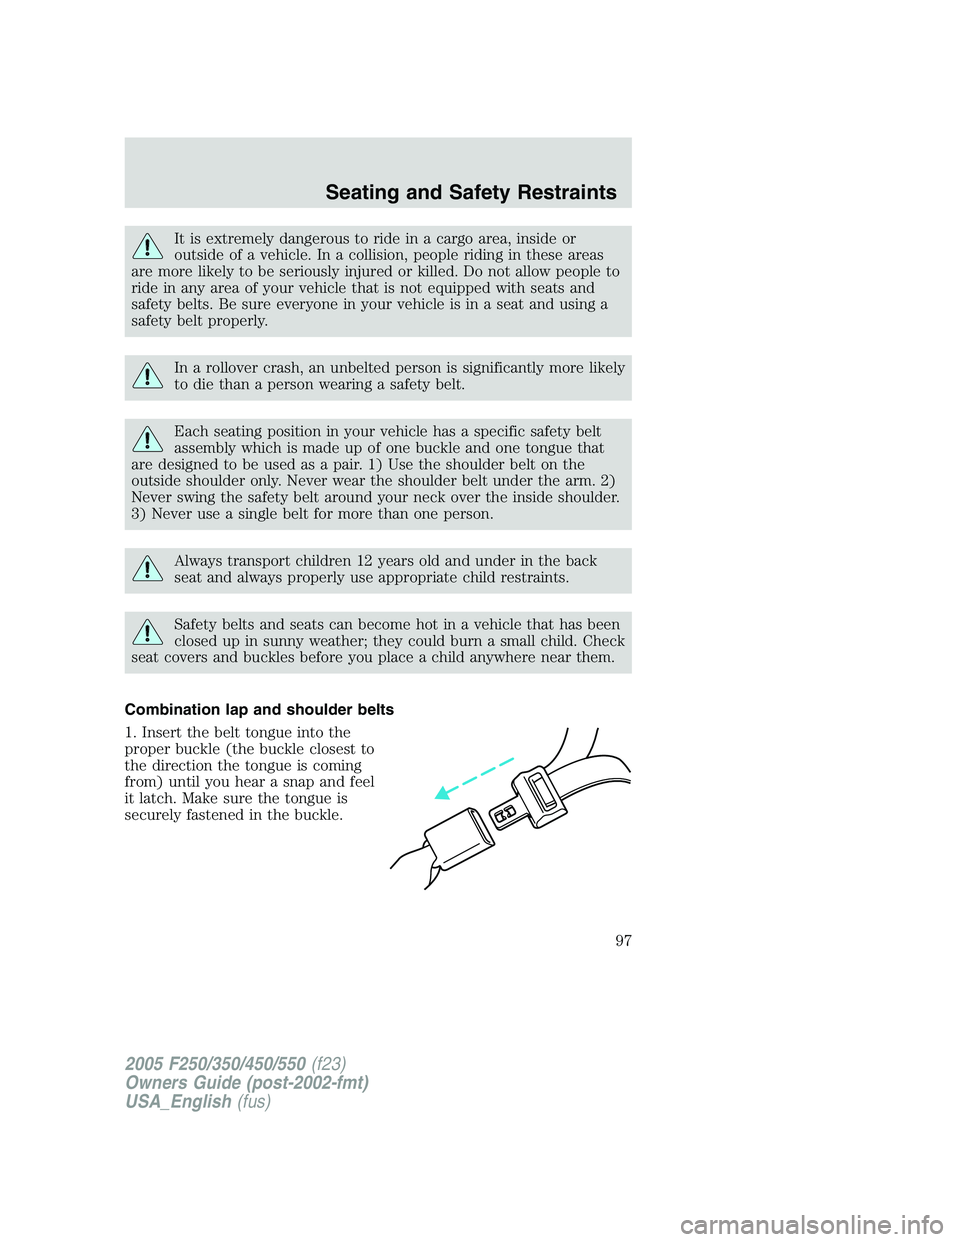
Combination lap and shoulder belts
1. Insert the belt tongue into the
proper buckle (the buckle closest to
the direction the tongue is coming
from) until you hear a snap and feel
it latch. Make sure the tongue is
securely fastened in the buckle.
2005 F250/350/450/550 (f23)
Owners Guide (post-2002-fmt)
USA_English (fus) Seating and Safety Restraints
97
Page 98 of 312
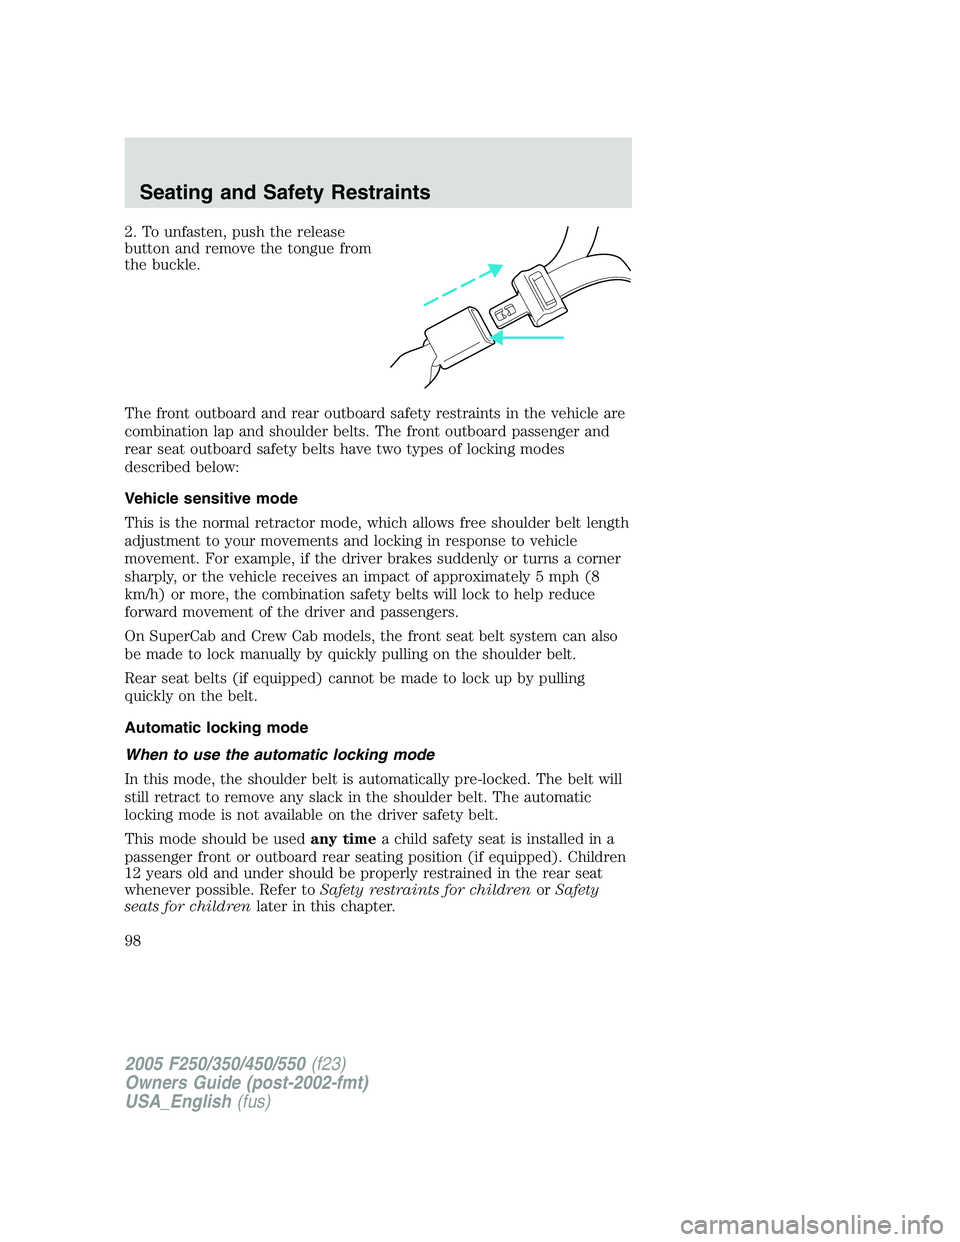
2. To unfasten, push the release
button and remove the tongue from
the buckle.
The front outboard and rear outboard safety restraints in the vehicle are
combination lap and shoulder belts. The front outboard passenger and
rear seat outboard safety belts have two types of locking modes
described below:
Vehicle sensitive mode
This is the normal retractor mode, which allows free shoulder belt length
adjustment to your movements and locking in response to vehicle
movement. For example, if the driver brakes suddenly or turns a corner
sharply, or the vehicle receives an impact of approximately 5 mph (8
km/h) or more, the combination safety belts will lock to help reduce
forward movement of the driver and passengers.
On SuperCab and Crew Cab models, the front seat belt system can also
be made to lock manually by quickly pulling on the shoulder belt.
Rear seat belts (if equipped) cannot be made to lock up by pulling
quickly on the belt.
Automatic locking mode
When to use the automatic locking mode
In this mode, the shoulder belt is automatically pre-locked. The belt will
still retract to remove any slack in the shoulder belt. The automatic
locking mode is not available on the driver safety belt.
This mode should be used any time a child safety seat is installed in a
passenger front or outboard rear seating position (if equipped). Children
12 years old and under should be properly restrained in the rear seat
whenever possible. Refer to Safety restraints for children or Safety
seats for children later in this chapter.
2005 F250/350/450/550 (f23)
Owners Guide (post-2002-fmt)
USA_English (fus)Seating and Safety Restraints
98
Page 99 of 312
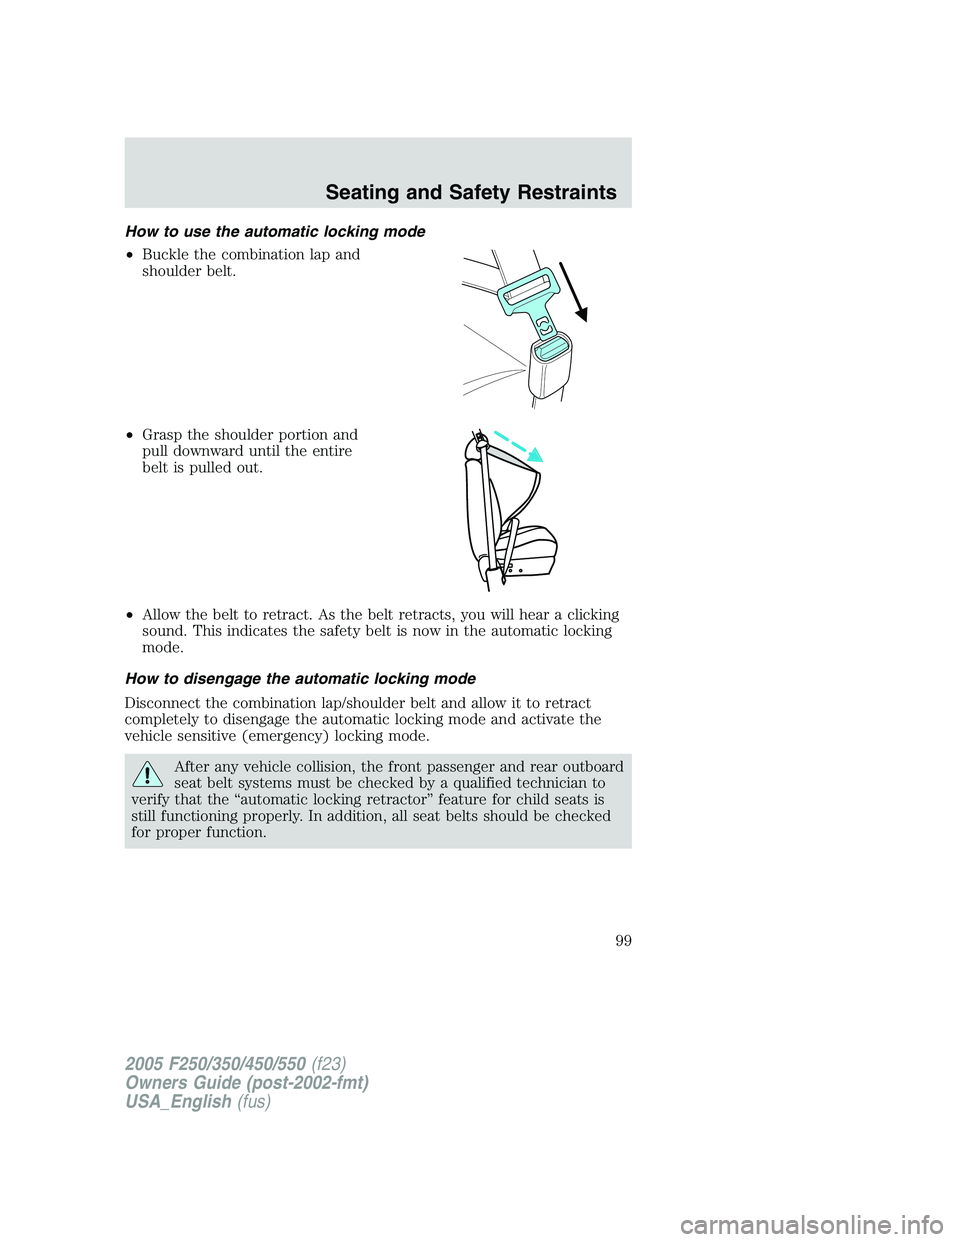
How to use the automatic locking mode
• Buckle the combination lap and
shoulder belt.
• Grasp the shoulder portion and
pull downward until the entire
belt is pulled out.
• Allow the belt to retract. As the belt retracts, you will hear a clicking
sound. This indicates the safety belt is now in the automatic locking
mode.
How to disengage the automatic locking mode
Disconnect the combination lap/shoulder belt and allow it to retract
completely to disengage the automatic locking mode and activate the
vehicle sensitive (emergency) locking mode.
After any vehicle collision, the front passenger and rear outboard
seat belt systems must be checked by a qualified technician to
verify that the “automatic locking retractor” feature for child seats is
still functioning properly. In addition, all seat belts should be checked
for proper function.
2005 F250/350/450/550 (f23)
Owners Guide (post-2002-fmt)
USA_English (fus) Seating and Safety Restraints
99