Page 12 of 312
WARNING LIGHTS AND CHIMES
Standard instrument cluster (manual transmission)
Standard instrument cluster (automatic transmission)
Harley—Davidson instrument cluster
Warning lights and gauges can alert you to a vehicle condition that may
become serious enough to cause expensive repairs. A warning light may
illuminate when a problem exists with one of your vehicle’s functions.
2005 F250/350/450/550 (f23)
Owners Guide (post-2002-fmt)
USA_English (fus)Instrument Cluster
Instrument Cluster
12
Page 14 of 312

Driving a vehicle with the brake system warning light on is
dangerous. A significant decrease in braking performance may
occur. It will take you longer to stop the vehicle. Have the vehicle
checked by your dealer immediately.
Anti-lock brake system: If the
ABS light stays illuminated or
continues to flash, a malfunction has
been detected, have the system
serviced immediately. Normal
braking is still functional unless the brake warning light also is
illuminated.
Air bag readiness: If this light fails
to illuminate when ignition is turned
to ON, continues to flash or remains
on, have the system serviced
immediately. A chime will also sound when a malfunction in the
supplemental restraint system has been detected.
Safety belt: Reminds you to fasten
your safety belt. A chime will also
sound to remind you to fasten your
safety belt.
Charging system: Illuminates when
the battery is not charging properly.
Transmission Tow/Haul Feature
(automatic transmission):
Illuminates when the Tow/Haul
feature has been activated. Refer to
the Driving chapter for transmission function and operation. If the light
flashes steadily, have the system serviced immediately, damage to the
transmission could occur. ABS
2005 F250/350/450/550 (f23)
Owners Guide (post-2002-fmt)
USA_English (fus)Instrument Cluster
14
Page 19 of 312
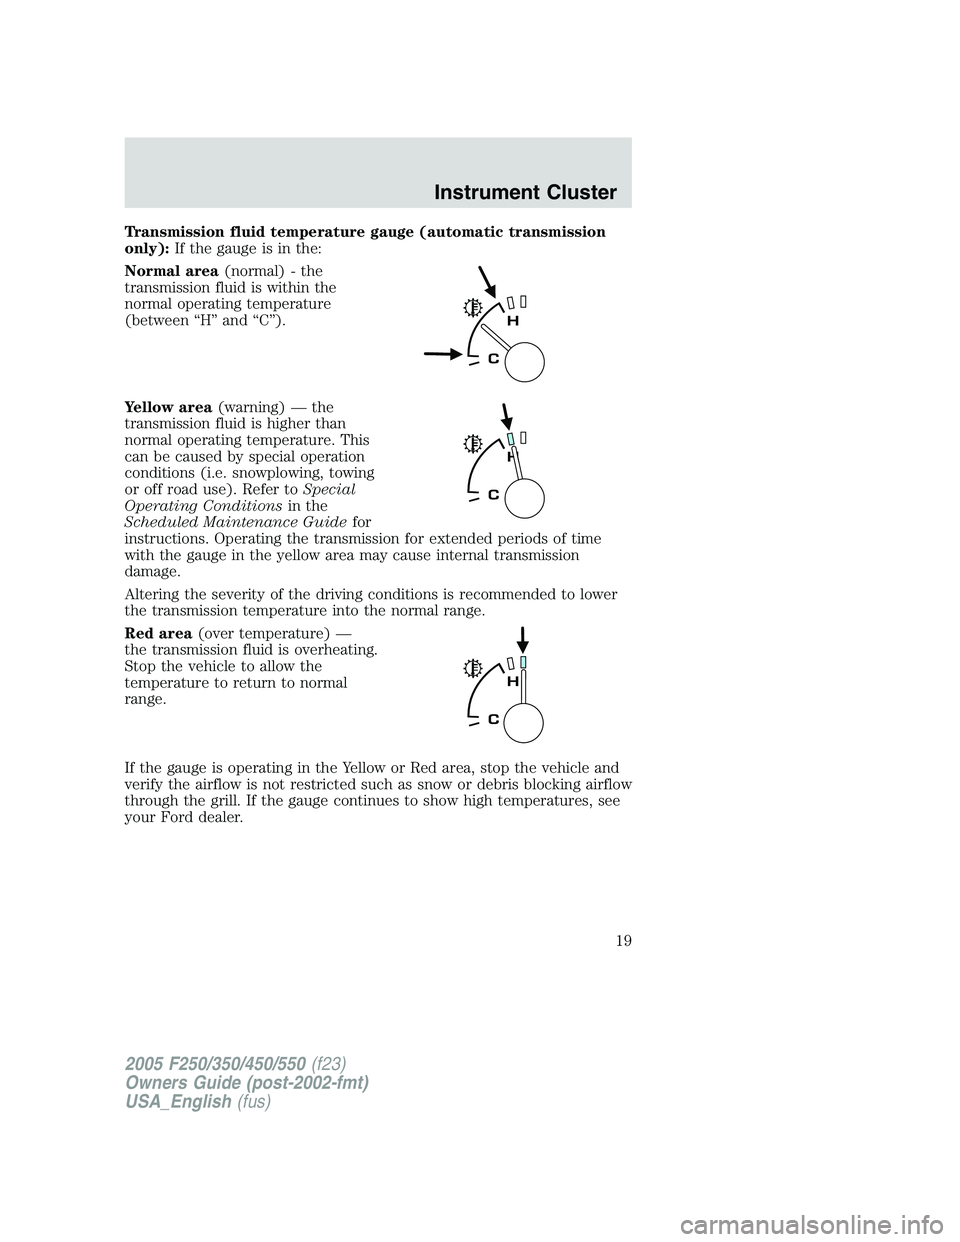
Transmission fluid temperature gauge (automatic transmission
only): If the gauge is in the:
Normal area (normal) - the
transmission fluid is within the
normal operating temperature
(between “H” and “C”).
Yellow area (warning) — the
transmission fluid is higher than
normal operating temperature. This
can be caused by special operation
conditions (i.e. snowplowing, towing
or off road use). Refer to Special
Operating Conditions in the
Scheduled Maintenance Guide for
instructions. Operating the transmission for extended periods of time
with the gauge in the yellow area may cause internal transmission
damage.
Altering the severity of the driving conditions is recommended to lower
the transmission temperature into the normal range.
Red area (over temperature) —
the transmission fluid is overheating.
Stop the vehicle to allow the
temperature to return to normal
range.
If the gauge is operating in the Yellow or Red area, stop the vehicle and
verify the airflow is not restricted such as snow or debris blocking airflow
through the grill. If the gauge continues to show high temperatures, see
your Ford dealer.
2005 F250/350/450/550 (f23)
Owners Guide (post-2002-fmt)
USA_English (fus) Instrument Cluster
19
Page 55 of 312
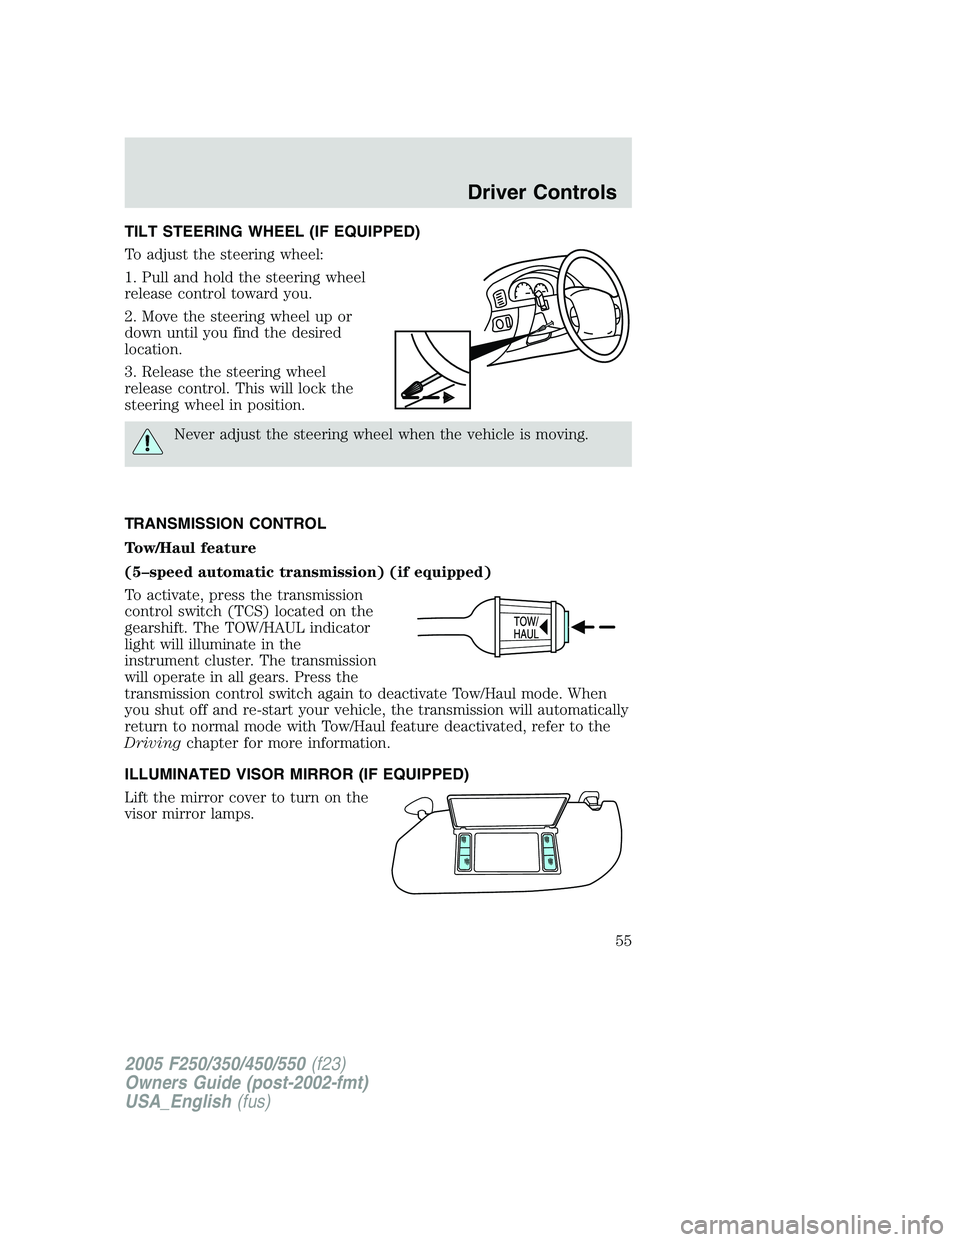
TILT STEERING WHEEL (IF EQUIPPED)
To adjust the steering wheel:
1. Pull and hold the steering wheel
release control toward you.
2. Move the steering wheel up or
down until you find the desired
location.
3. Release the steering wheel
release control. This will lock the
steering wheel in position.
Never adjust the steering wheel when the vehicle is moving.
TRANSMISSION CONTROL
Tow/Haul feature
(5–speed automatic transmission) (if equipped)
To activate, press the transmission
control switch (TCS) located on the
gearshift. The TOW/HAUL indicator
light will illuminate in the
instrument cluster. The transmission
will operate in all gears. Press the
transmission control switch again to deactivate Tow/Haul mode. When
you shut off and re-start your vehicle, the transmission will automatically
return to normal mode with Tow/Haul feature deactivated, refer to the
Driving chapter for more information.
ILLUMINATED VISOR MIRROR (IF EQUIPPED)
Lift the mirror cover to turn on the
visor mirror lamps.
2005 F250/350/450/550 (f23)
Owners Guide (post-2002-fmt)
USA_English (fus) Driver Controls
55
Page 105 of 312
Reasons given... Consider...
“I have an air bag” Air bags offer greater protection when
used with safety belts. Frontal airbags
are not designed to inflate in rear and
side crashes or rollovers.
“I’d rather be thrown clear” Not a good idea. People who are
ejected are 40 times more likely
to DIE. Safety belts help prevent
ejection, WE CAN’T “PICK OUR
CRASH”.
Do not sit on top of a buckled safety belt to avoid the
BeltMinder � chime. Sitting on the safety belt will increase the
risk of injury in an accident. To disable (one-time) or deactivate the
BeltMinder � feature please follow the directions stated below.
One time disable
Any time the safety belt is buckled and then unbuckled during an
ignition ON cycle, the BeltMinder � will be disabled for that ignition
cycle only.
Deactivating/activating the BeltMinder � feature
Read Step s1-5t horoughly before proceeding with the
deactivation/activation programming procedure.
The BeltMinder � feature can be deactivated/activated by performing the
following procedure:
Before following the procedure, make sure that:
• the parking brake is set
• the gearshift is in P (Park) (automatic transmission)
• the ignition switch is in the OFF position
• all vehicle doors are closed
• the driver’s safety belt is unbuckled
• the parklamps/headlamps are in OFF position
To reduce the risk of injury, do not deactivate/activate the Belt
Minder feature while driving the vehicle.
2005 F250/350/450/550 (f23)
Owners Guide (post-2002-fmt)
USA_English (fus) Seating and Safety Restraints
105
Page 141 of 312
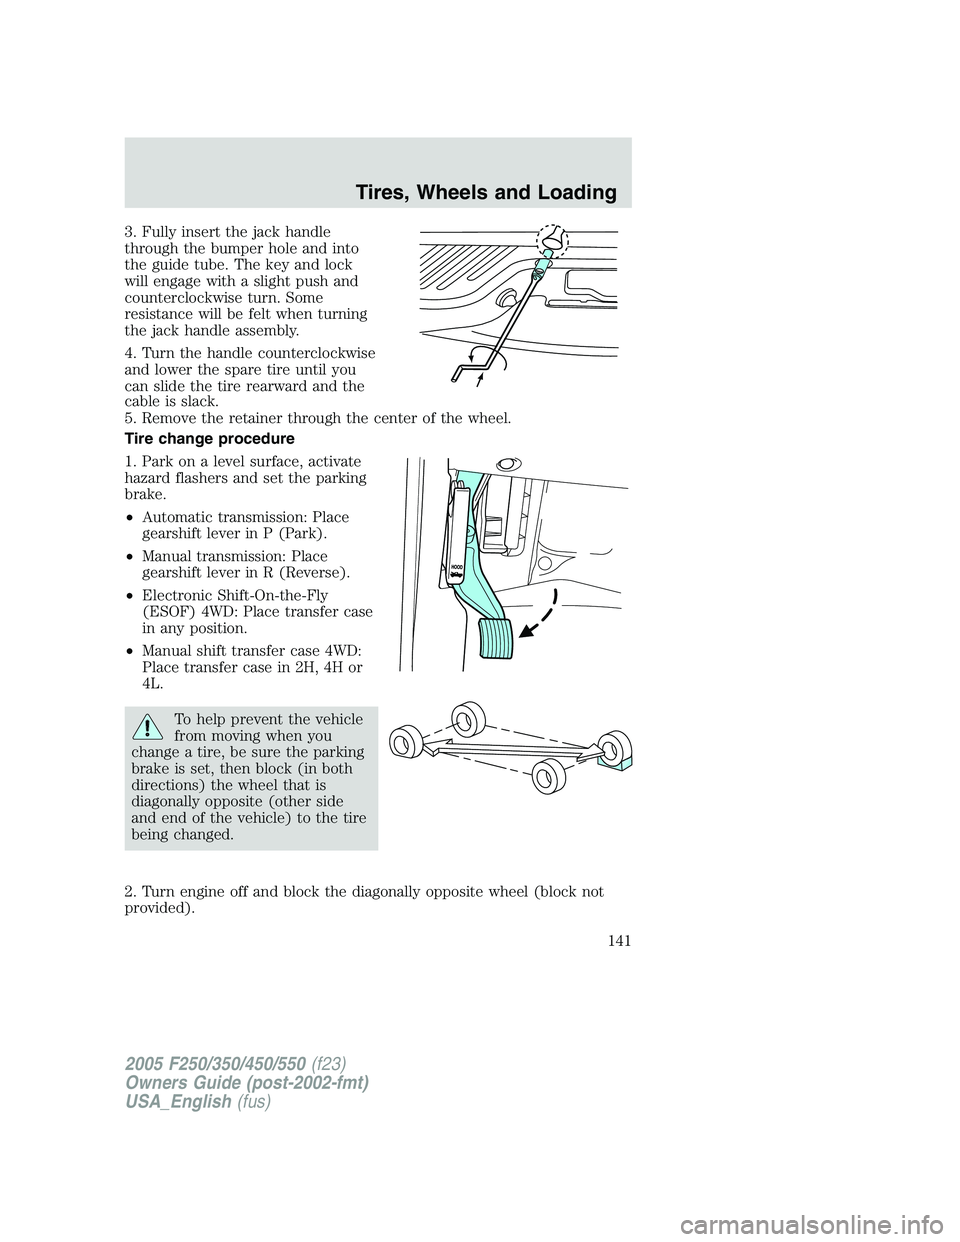
3. Fully insert the jack handle
through the bumper hole and into
the guide tube. The key and lock
will engage with a slight push and
counterclockwise turn. Some
resistance will be felt when turning
the jack handle assembly.
4. Turn the handle counterclockwise
and lower the spare tire until you
can slide the tire rearward and the
cable is slack.
5. Remove the retainer through the center of the wheel.
Tire change procedure
1. Park on a level surface, activate
hazard flashers and set the parking
brake.
• Automatic transmission: Place
gearshift lever in P (Park).
• Manual transmission: Place
gearshift lever in R (Reverse).
• Electronic Shift-On-the-Fly
(ESOF) 4WD: Place transfer case
in any position.
• Manual shift transfer case 4WD:
Place transfer case in 2H, 4H or
4L.
To help prevent the vehicle
from moving when you
change a tire, be sure the parking
brake is set, then block (in both
directions) the wheel that is
diagonally opposite (other side
and end of the vehicle) to the tire
being changed.
2. Turn engine off and block the diagonally opposite wheel (block not
provided).
2005 F250/350/450/550 (f23)
Owners Guide (post-2002-fmt)
USA_English (fus) Tires, Wheels and Loading
141
Page 142 of 312
3. Remove the jack, jack handle, lug wrench and spare tire from the
stowage locations.
4. Use the tip of the lug wrench to remove any wheel trim.
5. Loosen each wheel lug nut one-half turn counterclockwise but do not
remove them until the wheel is raised off the ground.
When one of the rear wheels is off the ground, the transmission
alone will not prevent the vehicle from moving or slipping off the
jack, even if the transmission is in P (Park) (automatic transmission)
or R (Reverse) (manual transmission). To prevent the vehicle from
moving when you change the tire, be sure that the parking brake is set
and the diagonally opposite wheel is blocked.
If the vehicle slips off the jack, you or someone else could be
seriously injured.
The following steps apply to F–250/F–350 Single Rear Wheel
(SRW) vehicles only (unless otherwise noted):
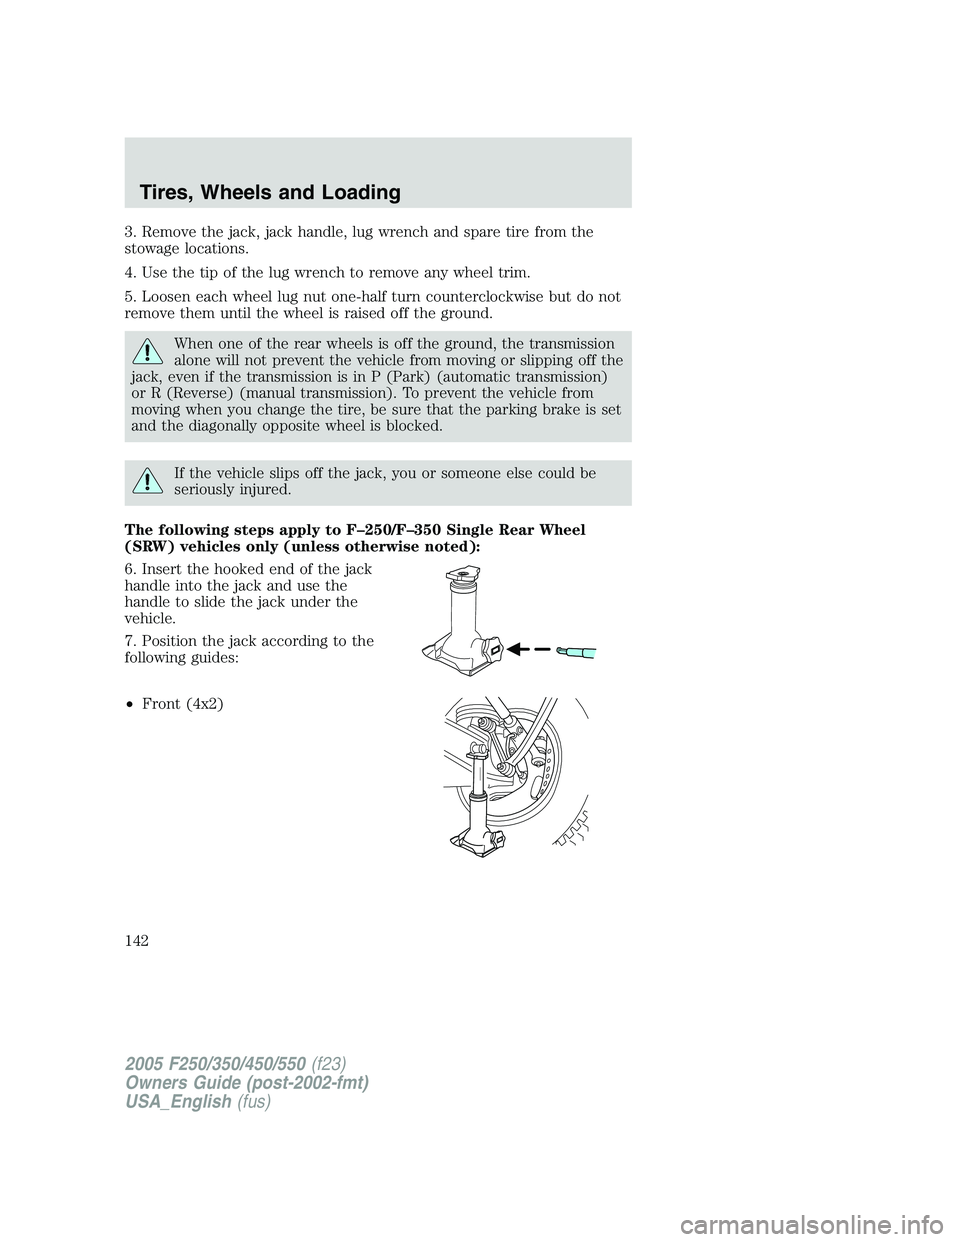
6. Insert the hooked end of the jack
handle into the jack and use the
handle to slide the jack under the
vehicle.
7. Position the jack according to the
following guides:
• Front (4x2)
2005 F250/350/450/550 (f23)
Owners Guide (post-2002-fmt)
USA_English (fus)Tires, Wheels and Loading
142
Page 168 of 312
components carefully prior to and after any towing operation. Refer to
Transmission temperature gauge in the Instrument Cluster chapter
for the transmission fluid temperature information.
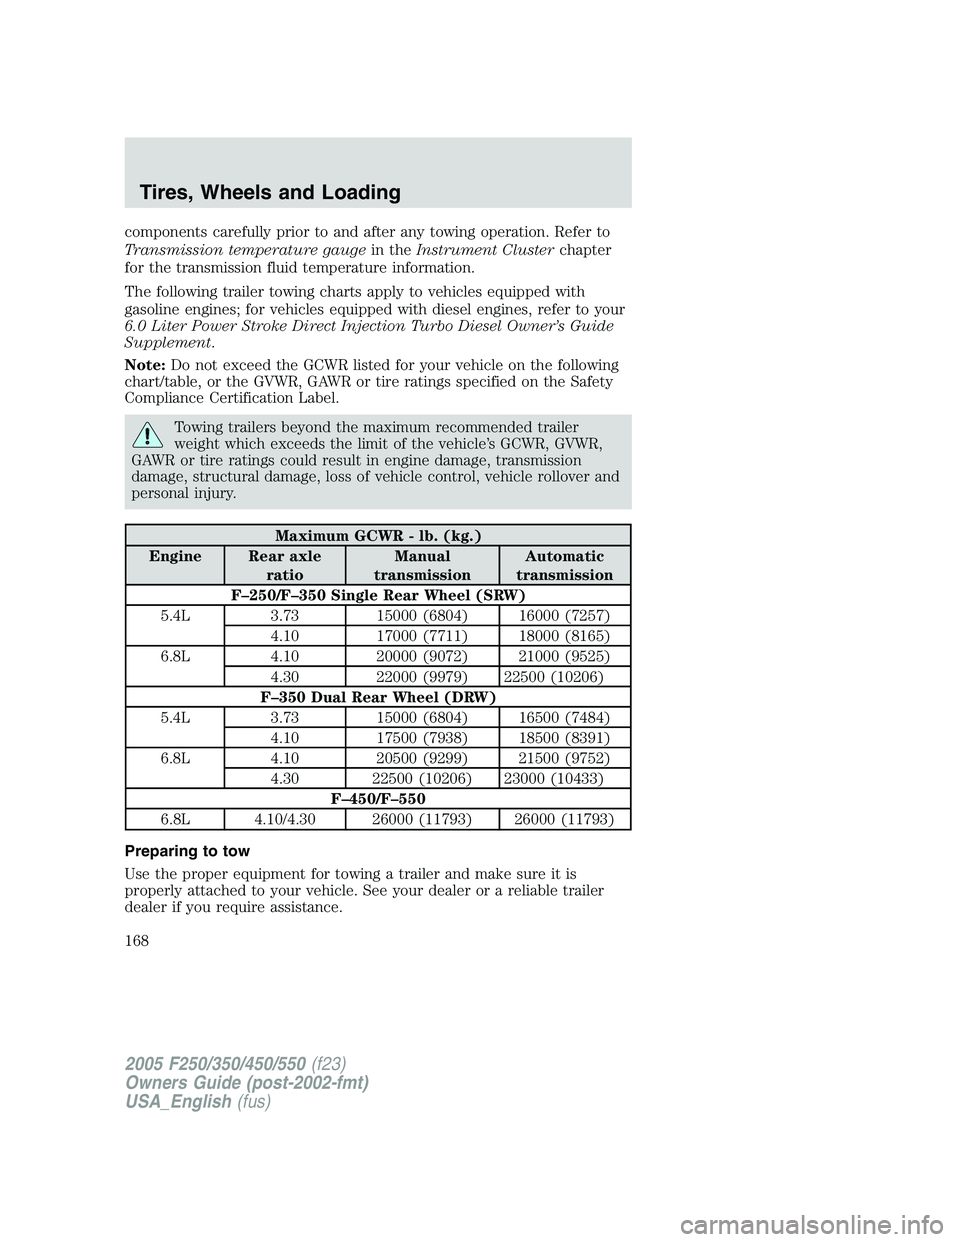
The following trailer towing charts apply to vehicles equipped with
gasoline engines; for vehicles equipped with diesel engines, refer to your
6.0 Liter Power Stroke Direct Injection Turbo Diesel Owner’s Guide
Supplement .
Note: Do not exceed the GCWR listed for your vehicle on the following
chart/table, or the GVWR, GAWR or tire ratings specified on the Safety
Compliance Certification Label.
Towing trailers beyond the maximum recommended trailer
weight which exceeds the limit of the vehicle’s GCWR, GVWR,
GAWR or tire ratings could result in engine damage, transmission
damage, structural damage, loss of vehicle control, vehicle rollover and
personal injury.
Maximum GCWR - lb. (kg.)
Engine Rear axle
ratio Manual
transmission Automatic
transmission
F–250/F–350 Single Rear Wheel (SRW)
5.4L 3.73 15000 (6804) 16000 (7257)
4.10 17000 (7711) 18000 (8165)
6.8L 4.10 20000 (9072) 21000 (9525)
4.30 22000 (9979) 22500 (10206)
F–350 Dual Rear Wheel (DRW)
5.4L 3.73 15000 (6804) 16500 (7484)
4.10 17500 (7938) 18500 (8391)
6.8L 4.10 20500 (9299) 21500 (9752)
4.30 22500 (10206) 23000 (10433)
F–450/F–550
6.8L 4.10/4.30 26000 (11793) 26000 (11793)
Preparing to tow
Use the proper equipment for towing a trailer and make sure it is
properly attached to your vehicle. See your dealer or a reliable trailer
dealer if you require assistance.
2005 F250/350/450/550 (f23)
Owners Guide (post-2002-fmt)
USA_English (fus)Tires, Wheels and Loading
168