2005 FORD EXPLORER instrument panel
[x] Cancel search: instrument panelPage 46 of 320
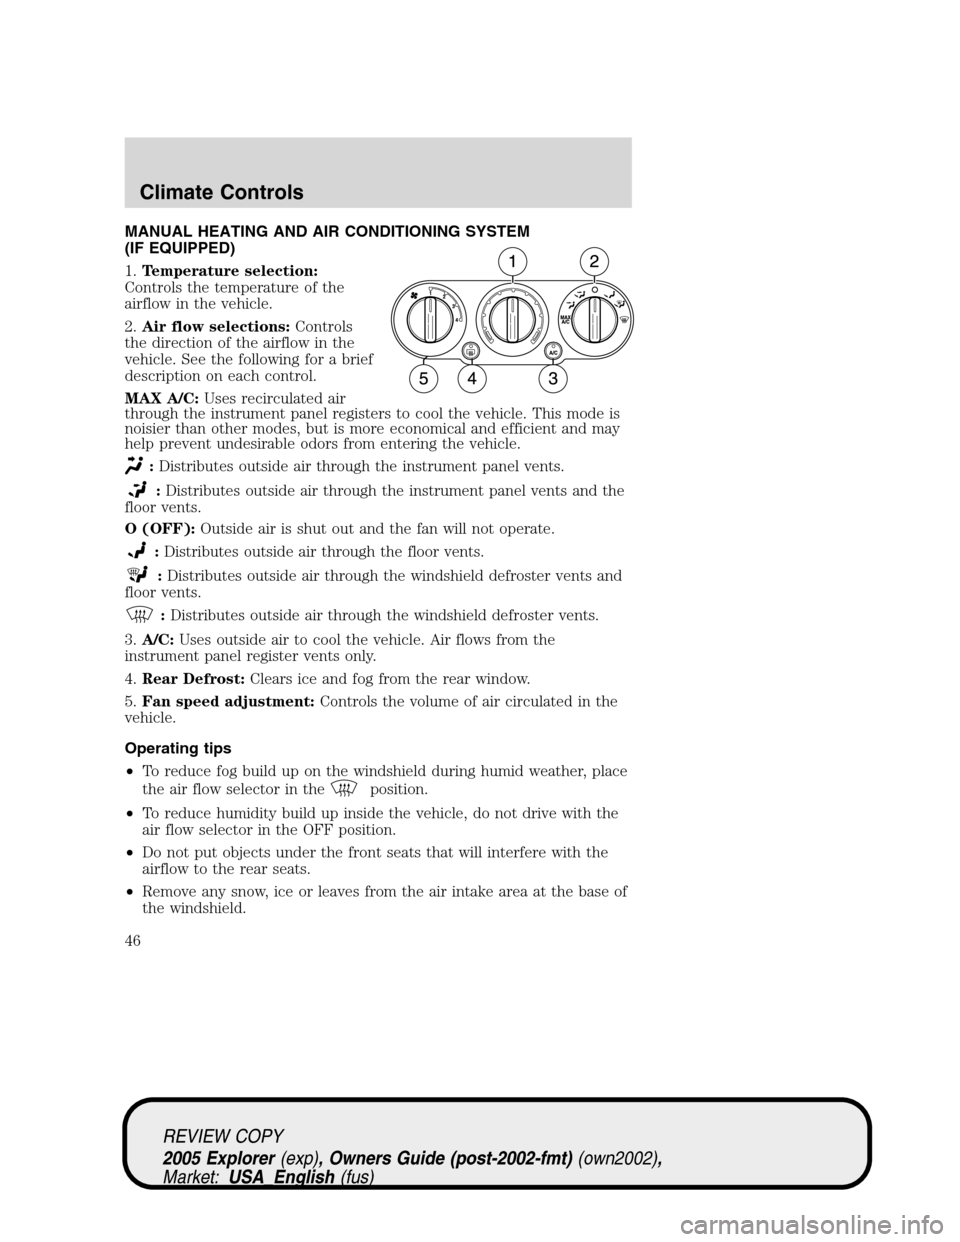
MANUAL HEATING AND AIR CONDITIONING SYSTEM
(IF EQUIPPED)
1.Temperature selection:
Controls the temperature of the
airflow in the vehicle.
2.Air flow selections:Controls
the direction of the airflow in the
vehicle. See the following for a brief
description on each control.
MAX A/C:Uses recirculated air
through the instrument panel registers to cool the vehicle. This mode is
noisier than other modes, but is more economical and efficient and may
help prevent undesirable odors from entering the vehicle.
:Distributes outside air through the instrument panel vents.
:Distributes outside air through the instrument panel vents and the
floor vents.
O (OFF):Outside air is shut out and the fan will not operate.
:Distributes outside air through the floor vents.
:Distributes outside air through the windshield defroster vents and
floor vents.
:Distributes outside air through the windshield defroster vents.
3.A/C:Uses outside air to cool the vehicle. Air flows from the
instrument panel register vents only.
4.Rear Defrost:Clears ice and fog from the rear window.
5.Fan speed adjustment:Controls the volume of air circulated in the
vehicle.
Operating tips
•To reduce fog build up on the windshield during humid weather, place
the air flow selector in the
position.
•To reduce humidity build up inside the vehicle, do not drive with the
air flow selector in the OFF position.
•Do not put objects under the front seats that will interfere with the
airflow to the rear seats.
•Remove any snow, ice or leaves from the air intake area at the base of
the windshield.
REVIEW COPY
2005 Explorer(exp), Owners Guide (post-2002-fmt)(own2002),
Market:USA_English(fus)
Climate Controls
Climate Controls
46
Page 47 of 320
•To improve the A/C cool down, drive with the windows slightly open
for 2–3 minutes after start up or until the vehicle has been “aired out.”
For maximum cooling performance in panel (
) mode:
•Select MAX A/C mode. MAX A/C uses recirculated air with A/C to
provide a cooler airflow.
•Move the temperature control to the coolest setting.
•Set the fan to the highest speed initially, then adjust in order to
maintain comfort.
To allow side window defogging and demisting while warming up the
vehicle cabin:
1. Select
.
2. Select A/C.
3. Set the temperature control to maintain comfort.
4. Set the fan speed to highest setting.
5. Direct the outer instrument panel vents towards the side windows. To
increase airflow to the outer instrument panel vents, close the vents
located in the middle of the instrument panel.
Do not place objects on top of the instrument panel as these
objects may become projectiles in a collision or sudden stop.
REVIEW COPY
2005 Explorer(exp), Owners Guide (post-2002-fmt)(own2002),
Market:USA_English(fus)
Climate Controls
47
Page 49 of 320
6.:Distributes outside air through the windshield defroster vents.
7.
:Distributes outside air through the windshield defroster vents
and floor vents.
8.
:Distributes outside air through the floor vents.
9.
:Distributes outside air through the instrument panel vents and
the floor vents.
10.
:Distributes outside air through the instrument panel vents.
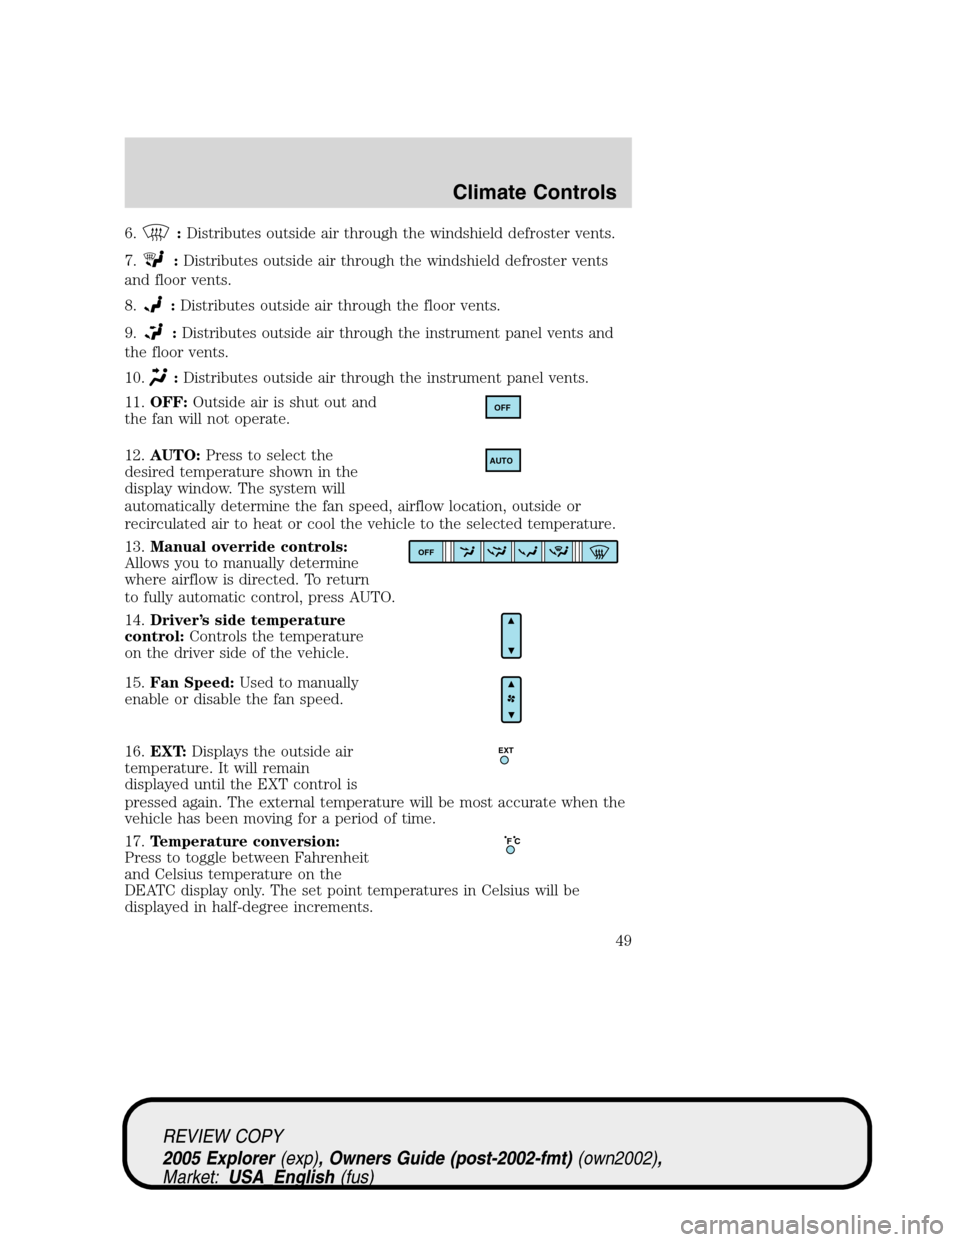
11.OFF:Outside air is shut out and
the fan will not operate.
12.AUTO:Press to select the
desired temperature shown in the
display window. The system will
automatically determine the fan speed, airflow location, outside or
recirculated air to heat or cool the vehicle to the selected temperature.
13.Manual override controls:
Allows you to manually determine
where airflow is directed. To return
to fully automatic control, press AUTO.
14.Driver’s side temperature
control:Controls the temperature
on the driver side of the vehicle.
15.Fan Speed:Used to manually
enable or disable the fan speed.
16.EXT:Displays the outside air
temperature. It will remain
displayed until the EXT control is
pressed again. The external temperature will be most accurate when the
vehicle has been moving for a period of time.
17.Temperature conversion:
Press to toggle between Fahrenheit
and Celsius temperature on the
DEATC display only. The set point temperatures in Celsius will be
displayed in half-degree increments.
OFF
AUTO
OFF
EXT
F C
REVIEW COPY
2005 Explorer(exp), Owners Guide (post-2002-fmt)(own2002),
Market:USA_English(fus)
Climate Controls
49
Page 50 of 320
Operating tips
•To reduce fog build up on the windshield during humid weather, place
the air flow selector in the
position.
•To reduce humidity build up inside the vehicle, do not drive with the
air flow selector in the OFF or with recirculated air engaged.
•Do not put objects under the front seats that will interfere with the
airflow to the rear seats.
•Remove any snow, ice or leaves from the air intake area at the base of
the windshield.
•To improve the A/C cool down, drive with the windows slightly open
for 2–3 minutes after start up or until the vehicle has been “aired out.”
For maximum cooling performance:
•Select and A/C and recirculated air. Use recirculated air with A/C to
provide a cooler airflow.
•Move the temperature control to the coolest setting.
To allow side window defogging and demisting while warming up the
vehicle cabin:
1. Select
.
2. Select A/C.
3. Set the temperature control to maintain comfort.
4. Set the fan speed to highest setting.
5. Direct the outer instrument panel vents towards the side windows. To
increase airflow to the outer instrument panel vents, close the vents
located in the middle of the instrument panel.
Do not place objects on top of the instrument panel as these
objects may become projectiles in a collision or sudden stop.
Auxiliary system (if equipped)
Your vehicle may be equipped with auxiliary climate controls. These
allow the front or rear seat passengers to control airflow direction,
temperature and fan level of the rear compartment to quickly heat or
cool the entire vehicle.
REVIEW COPY
2005 Explorer(exp), Owners Guide (post-2002-fmt)(own2002),
Market:USA_English(fus)
Climate Controls
50
Page 52 of 320
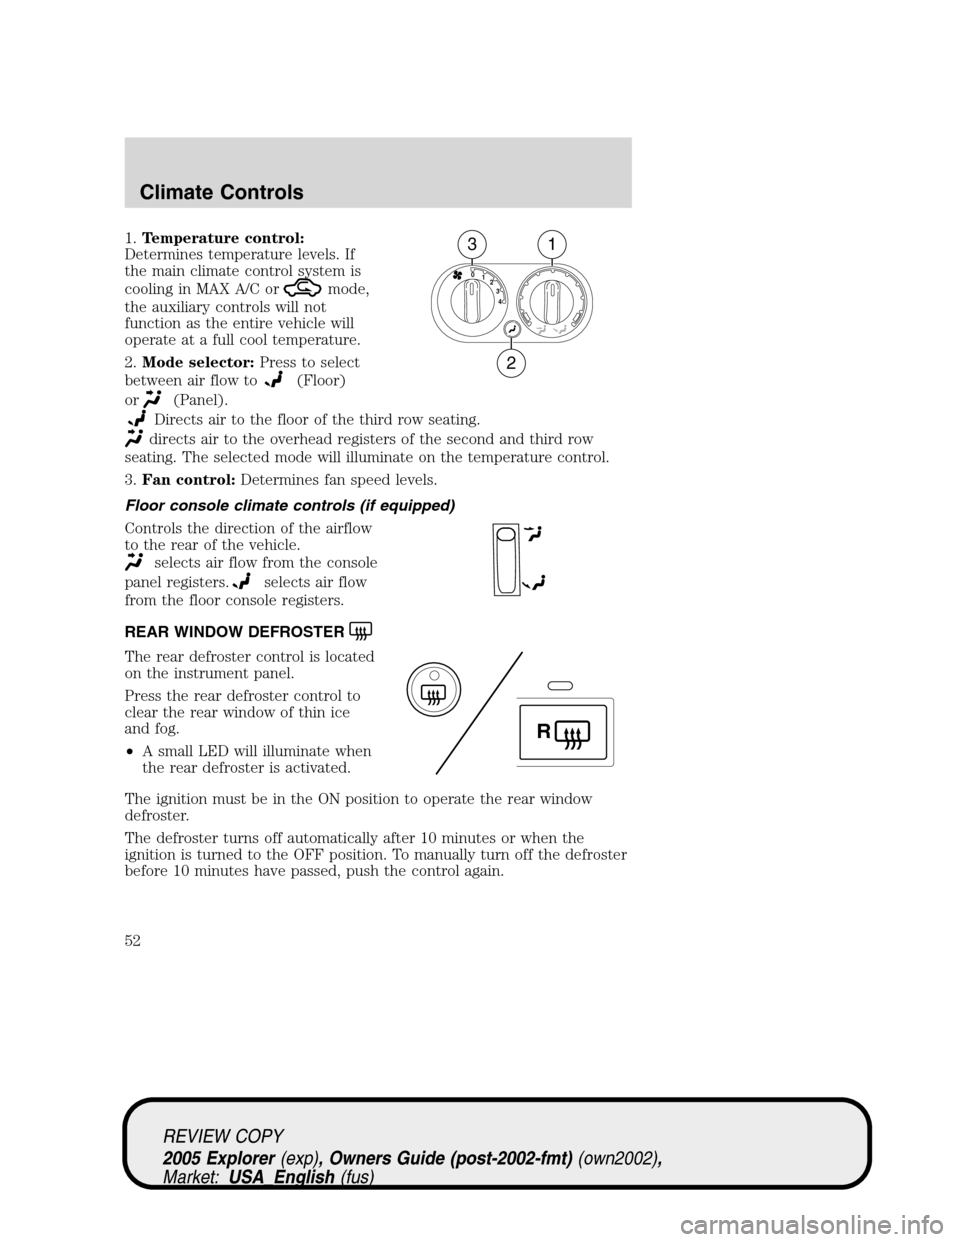
1.Temperature control:
Determines temperature levels. If
the main climate control system is
cooling in MAX A/C or
mode,
the auxiliary controls will not
function as the entire vehicle will
operate at a full cool temperature.
2.Mode selector:Press to select
between air flow to
(Floor)
or
(Panel).
Directs air to the floor of the third row seating.
directs air to the overhead registers of the second and third row
seating. The selected mode will illuminate on the temperature control.
3.Fan control:Determines fan speed levels.
Floor console climate controls (if equipped)
Controls the direction of the airflow
to the rear of the vehicle.
selects air flow from the console
panel registers.
selects air flow
from the floor console registers.
REAR WINDOW DEFROSTER
The rear defroster control is located
on the instrument panel.
Press the rear defroster control to
clear the rear window of thin ice
and fog.
•A small LED will illuminate when
the rear defroster is activated.
The ignition must be in the ON position to operate the rear window
defroster.
The defroster turns off automatically after 10 minutes or when the
ignition is turned to the OFF position. To manually turn off the defroster
before 10 minutes have passed, push the control again.
4 3 2 1 0
31
2
R
REVIEW COPY
2005 Explorer(exp), Owners Guide (post-2002-fmt)(own2002),
Market:USA_English(fus)
Climate Controls
52
Page 53 of 320

HEADLAMP CONTROL
Turns the lamps off.
Turns on the parking lamps,
instrument panel lamps, license
plate lamps and tail lamps.
Turns the headlamps on.
Autolamp system
(if equipped)
The autolamp system sets the
headlamps to turn on and off
automatically. The autolamp control,
located on the headlamp control,
may be set to:
•turn on the lamps automatically
at night
•turn off the lamps automatically during the daylight
•keep the lamps on for up to three minutes after the key is turned to
OFF.
To turn the autolamps on, rotate the control counterclockwise to
.
Foglamp control (if equipped)
The foglamps can be turned on only
when the headlamp control is in
the
,andposition and
the high beams are not turned on.
Pull headlamp control towards you
to turn foglamps on. The foglamp
indicator light
will illuminate
when foglamp is activated.
Push the headlamp control towards
the instrument panel to deactivate
the foglamps.
Daytime running lamps (DRL) (if equipped)
To activate DRL:
•the ignition must be in the ON position and
REVIEW COPY
2005 Explorer(exp), Owners Guide (post-2002-fmt)(own2002),
Market:USA_English(fus)
Lights
Lights
53
Page 54 of 320

•the headlamp control is in theorposition
•the parking brake must be disengaged.
Always remember to turn on your headlamps at dusk or during
inclement weather. The Daytime Running Light (DRL) System
does not activate your tail lamps and generally may not provide
adequate lighting during these conditions. Failure to activate your
headlamps under these conditions may result in a collision.
High beams
Push the lever toward the
instrument panel to activate. Pull
the lever towards you to deactivate.
Flash to pass
Pull the lever toward you to
activate. Release the lever to
deactivate.
Use to adjust the brightness of the
instrument panel when exterior
lights are on.
•Rotate up to brighten.
•Rotate down to dim.
•Rotate to full up position (past
detent) to turn on interior lamps.
INT2OFFOFFINT1
INT2OFFOFFINT1
REVIEW COPY
2005 Explorer(exp), Owners Guide (post-2002-fmt)(own2002),
Market:USA_English(fus)
Lights
54
Page 56 of 320

5. Locate the vertical adjuster for
each headlamp. Adjust the aim by
turning the adjuster control either
clockwise (to adjust down) or
counterclockwise (to adjust up).
Note:Usea4mmsocket or box
wrench to turn the vertical adjuster
control.
6. Horizontal aiming is not required
for this vehicle and is
non-adjustable.
TURN SIGNAL CONTROL
•Push down to activate the left
turn signal.
•Push up to activate the right turn
signal.
INTERIOR LAMPS
Dome/reading lamps
The dome lamp lights when:
•any door is opened.
•the instrument panel dimmer
switch is rotated up until the
courtesy lamps come on.
•any of the remote entry controls
are pressed and the ignition is
OFF.
The reading portion, the two outer lights, can only be toggled on and off
at the lamp.
INT2OFFOFFINT1
REVIEW COPY
2005 Explorer(exp), Owners Guide (post-2002-fmt)(own2002),
Market:USA_English(fus)
Lights
56