Page 102 of 368
HEADLAMP CONTROL
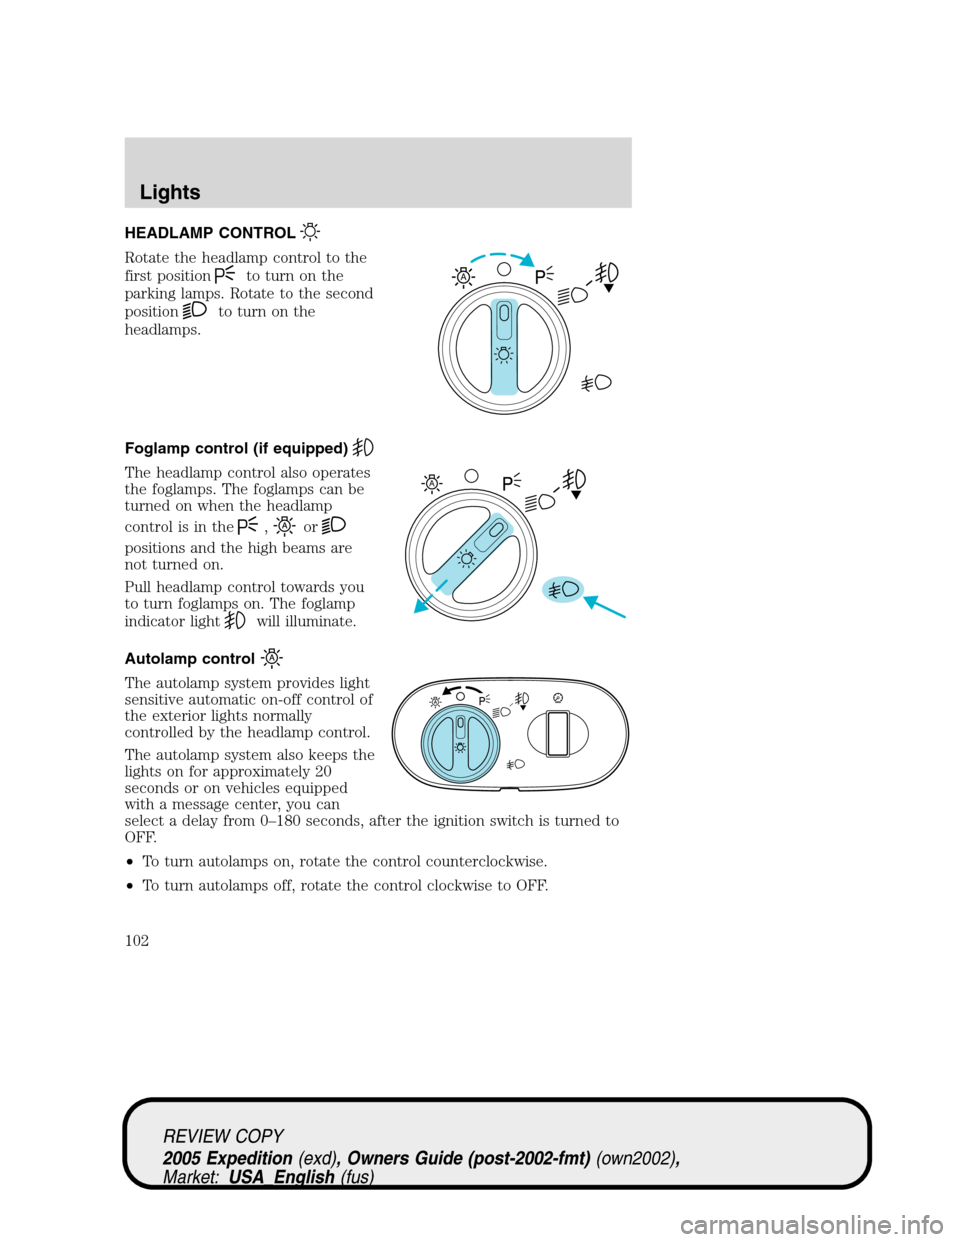
Rotate the headlamp control to the
first position
to turn on the
parking lamps. Rotate to the second
position
to turn on the
headlamps.
Foglamp control (if equipped)
The headlamp control also operates
the foglamps. The foglamps can be
turned on when the headlamp
control is in the
,or
positions and the high beams are
not turned on.
Pull headlamp control towards you
to turn foglamps on. The foglamp
indicator light
will illuminate.
Autolamp control
The autolamp system provides light
sensitive automatic on-off control of
the exterior lights normally
controlled by the headlamp control.
The autolamp system also keeps the
lights on for approximately 20
seconds or on vehicles equipped
with a message center, you can
select a delay from 0–180 seconds, after the ignition switch is turned to
OFF.
•To turn autolamps on, rotate the control counterclockwise.
•To turn autolamps off, rotate the control clockwise to OFF.
A
A
REVIEW COPY
2005 Expedition(exd), Owners Guide (post-2002-fmt)(own2002),
Market:USA_English(fus)
Lights
Lights
102
Page 105 of 368
5. Locate the vertical adjuster on
each headlamp, then use a 10 mm
socket/wrench to turn the adjuster
either counterclockwise (to adjust
down) or clockwise (to adjust up)
aligning the upper edge of the light
pattern up to the horizontal line.
6. HORIZONTAL AIM IS NOT
REQUIRED FOR THIS VEHICLE
AND IS NON-ADJUSTABLE.
7. Repeat step 3–5 for the other headlamp.
8. Close the hood and turn off the lamps.
TURN SIGNAL CONTROL
•Push down to activate the left
turn signal.
•Push up to activate the right turn
signal.
INTERIOR LAMPS
Front row map lamps (if equipped)
To turn on the map lamps, press the
rear edge of the lamp.
INT2OFFOFFINT1
REVIEW COPY
2005 Expedition(exd), Owners Guide (post-2002-fmt)(own2002),
Market:USA_English(fus)
Lights
105
Page 109 of 368
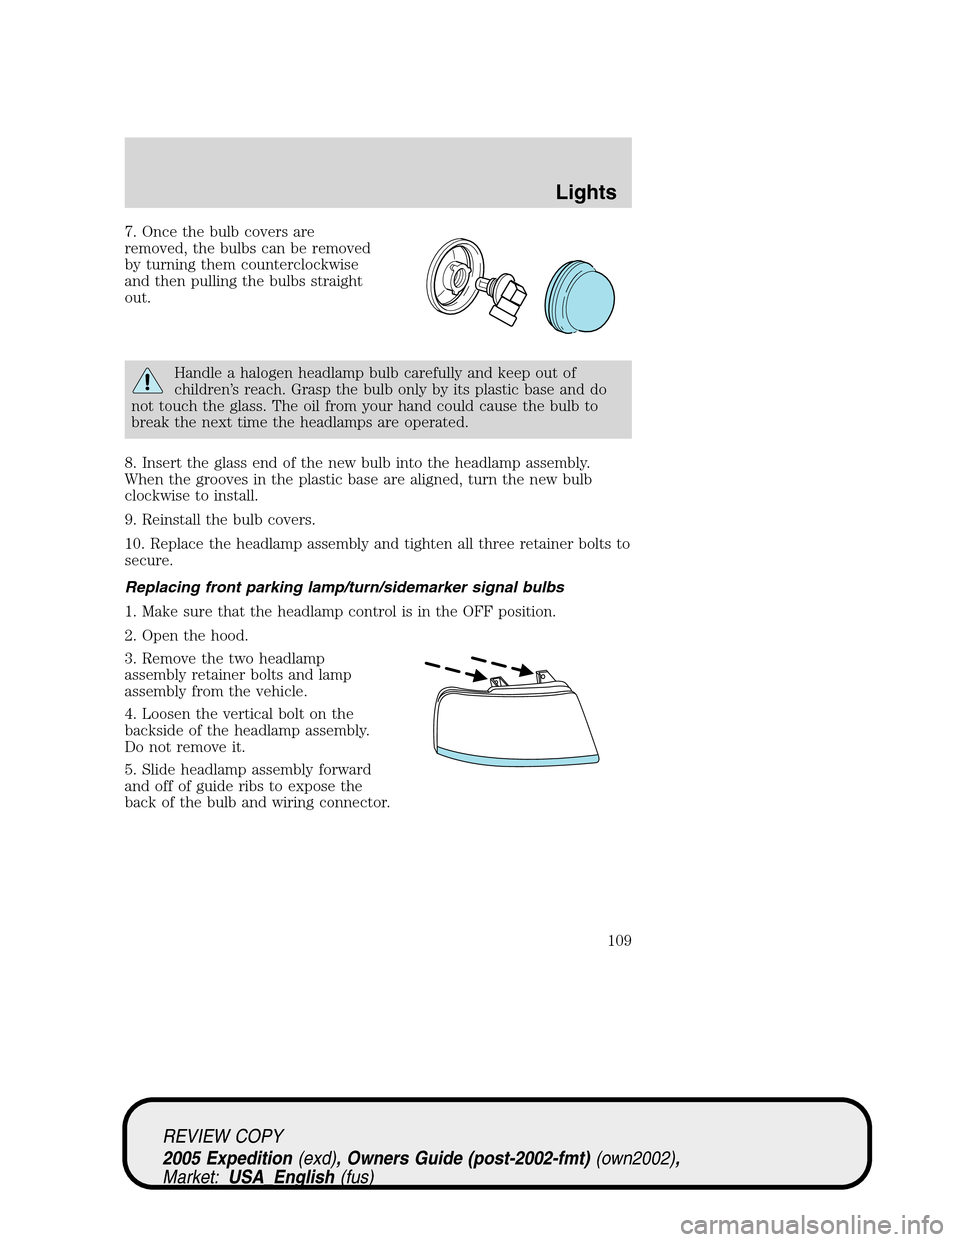
7. Once the bulb covers are
removed, the bulbs can be removed
by turning them counterclockwise
and then pulling the bulbs straight
out.
Handle a halogen headlamp bulb carefully and keep out of
children’s reach. Grasp the bulb only by its plastic base and do
not touch the glass. The oil from your hand could cause the bulb to
break the next time the headlamps are operated.
8. Insert the glass end of the new bulb into the headlamp assembly.
When the grooves in the plastic base are aligned, turn the new bulb
clockwise to install.
9. Reinstall the bulb covers.
10. Replace the headlamp assembly and tighten all three retainer bolts to
secure.
Replacing front parking lamp/turn/sidemarker signal bulbs
1. Make sure that the headlamp control is in the OFF position.
2. Open the hood.
3. Remove the two headlamp
assembly retainer bolts and lamp
assembly from the vehicle.
4. Loosen the vertical bolt on the
backside of the headlamp assembly.
Do not remove it.
5. Slide headlamp assembly forward
and off of guide ribs to expose the
back of the bulb and wiring connector.
REVIEW COPY
2005 Expedition(exd), Owners Guide (post-2002-fmt)(own2002),
Market:USA_English(fus)
Lights
109
Page 110 of 368
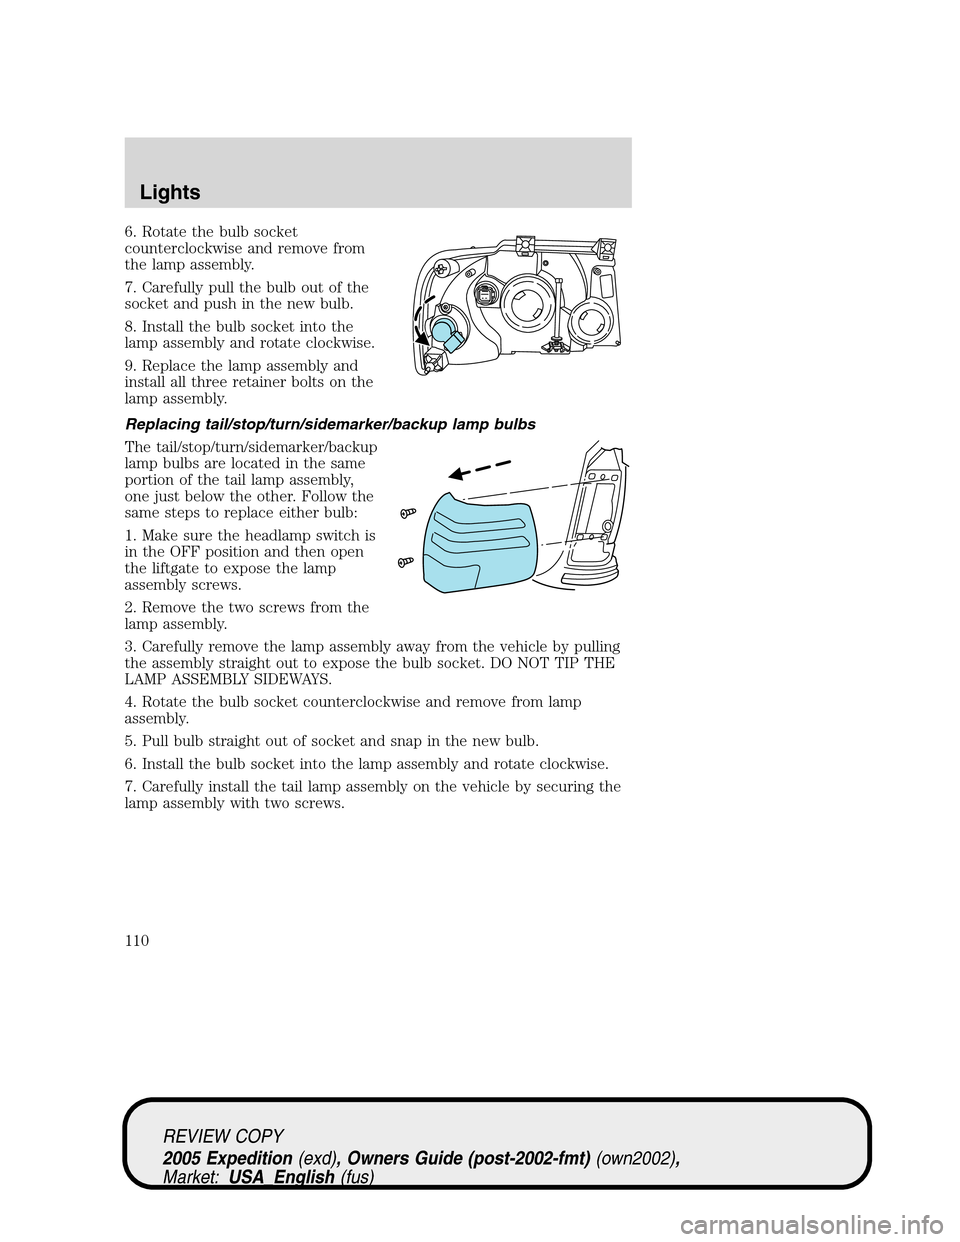
6. Rotate the bulb socket
counterclockwise and remove from
the lamp assembly.
7. Carefully pull the bulb out of the
socket and push in the new bulb.
8. Install the bulb socket into the
lamp assembly and rotate clockwise.
9. Replace the lamp assembly and
install all three retainer bolts on the
lamp assembly.
Replacing tail/stop/turn/sidemarker/backup lamp bulbs
The tail/stop/turn/sidemarker/backup
lamp bulbs are located in the same
portion of the tail lamp assembly,
one just below the other. Follow the
same steps to replace either bulb:
1. Make sure the headlamp switch is
in the OFF position and then open
the liftgate to expose the lamp
assembly screws.
2. Remove the two screws from the
lamp assembly.
3. Carefully remove the lamp assembly away from the vehicle by pulling
the assembly straight out to expose the bulb socket. DO NOT TIP THE
LAMP ASSEMBLY SIDEWAYS.
4. Rotate the bulb socket counterclockwise and remove from lamp
assembly.
5. Pull bulb straight out of socket and snap in the new bulb.
6. Install the bulb socket into the lamp assembly and rotate clockwise.
7. Carefully install the tail lamp assembly on the vehicle by securing the
lamp assembly with two screws.
REVIEW COPY
2005 Expedition(exd), Owners Guide (post-2002-fmt)(own2002),
Market:USA_English(fus)
Lights
110
Page 111 of 368
Replacing foglamp bulbs
Handle a halogen headlamp bulb carefully and keep out of
children’s reach. Grasp the bulb only by its plastic base and do
not touch the glass. The oil from your hand could cause the bulb to
break the next time the headlamps are operated.
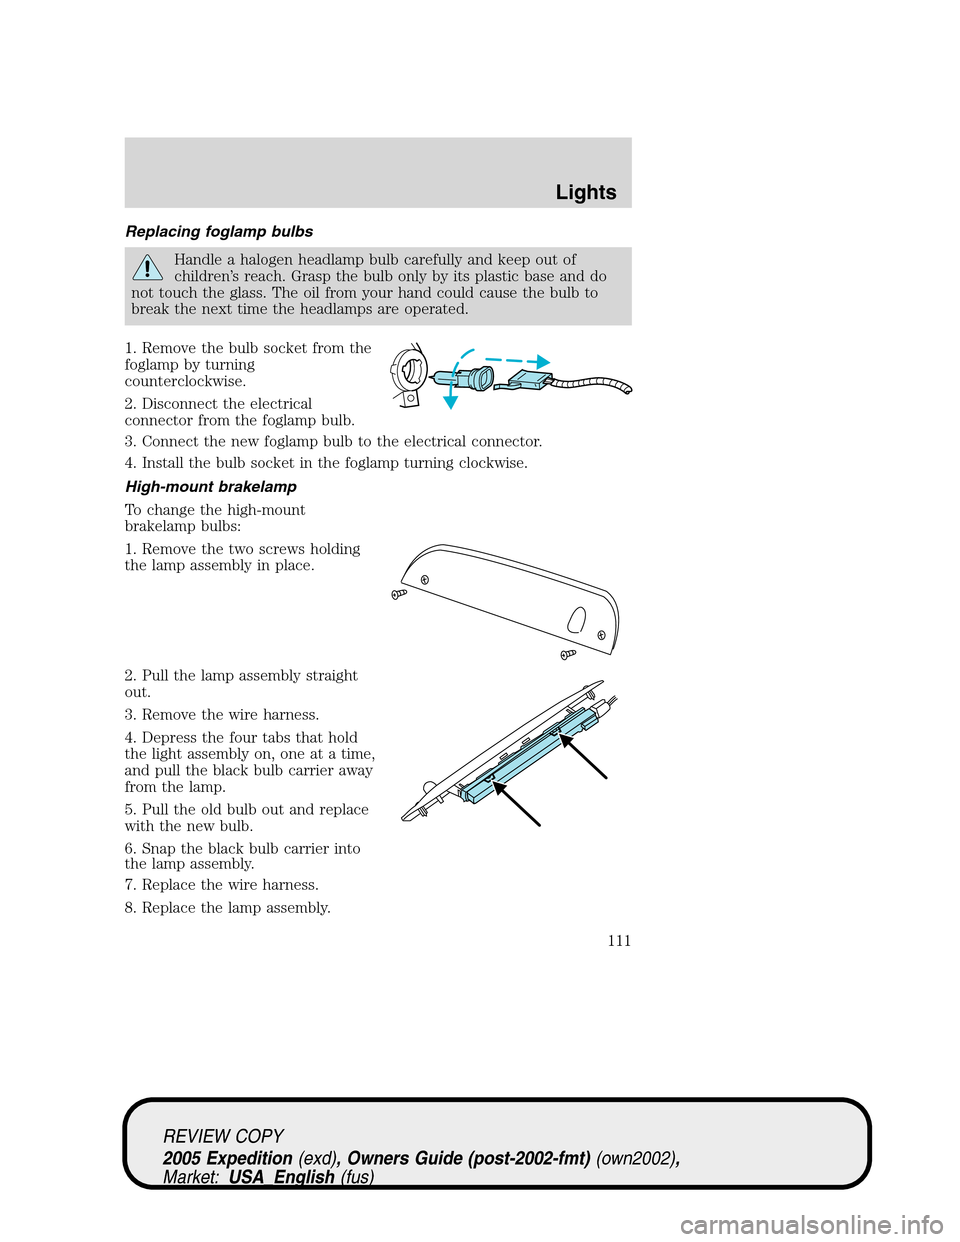
1. Remove the bulb socket from the
foglamp by turning
counterclockwise.
2. Disconnect the electrical
connector from the foglamp bulb.
3. Connect the new foglamp bulb to the electrical connector.
4. Install the bulb socket in the foglamp turning clockwise.
High-mount brakelamp
To change the high-mount
brakelamp bulbs:
1. Remove the two screws holding
the lamp assembly in place.
2. Pull the lamp assembly straight
out.
3. Remove the wire harness.
4. Depress the four tabs that hold
the light assembly on, one at a time,
and pull the black bulb carrier away
from the lamp.
5. Pull the old bulb out and replace
with the new bulb.
6. Snap the black bulb carrier into
the lamp assembly.
7. Replace the wire harness.
8. Replace the lamp assembly.
REVIEW COPY
2005 Expedition(exd), Owners Guide (post-2002-fmt)(own2002),
Market:USA_English(fus)
Lights
111
Page 112 of 368
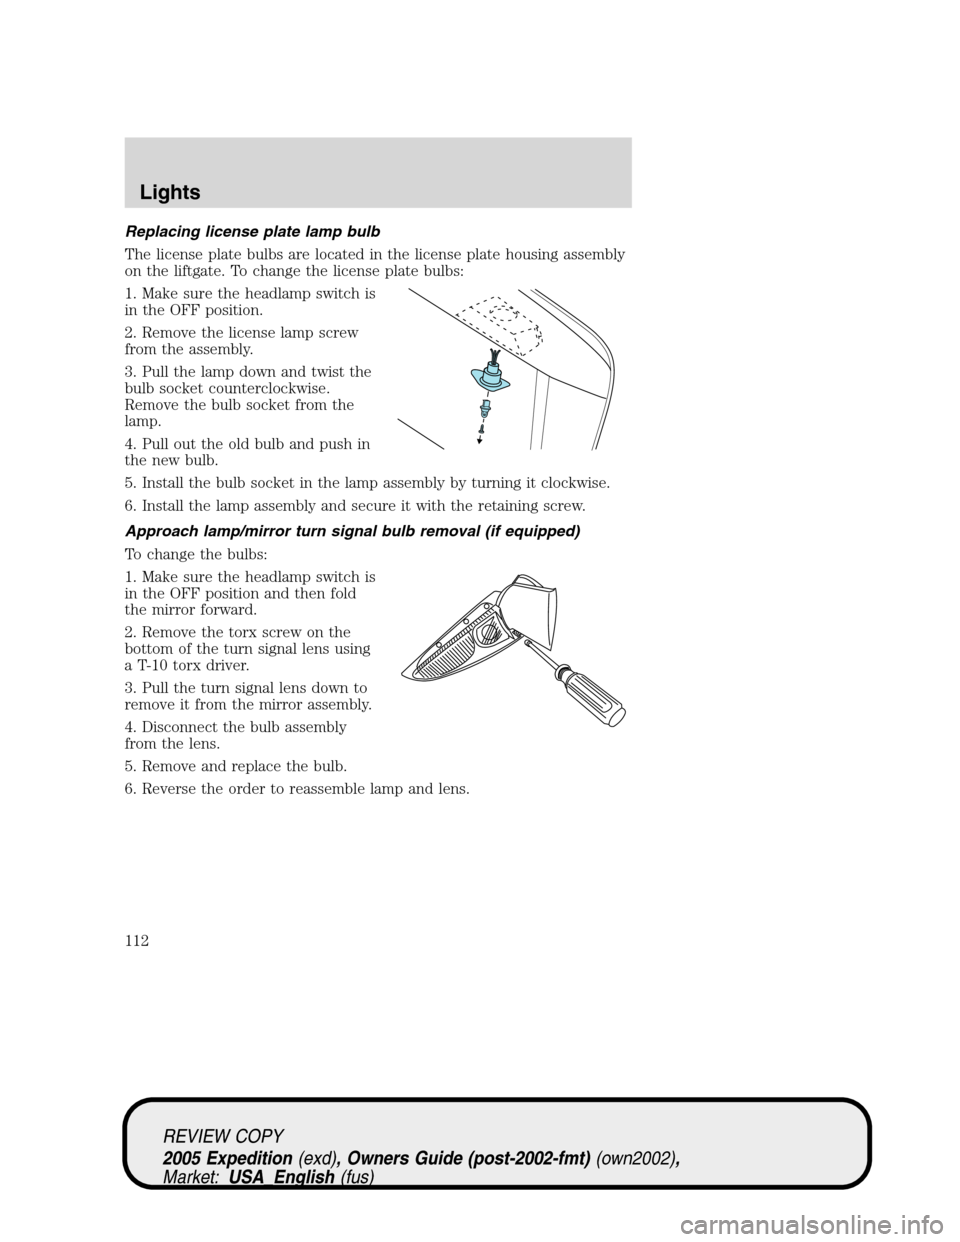
Replacing license plate lamp bulb
The license plate bulbs are located in the license plate housing assembly
on the liftgate. To change the license plate bulbs:
1. Make sure the headlamp switch is
in the OFF position.
2. Remove the license lamp screw
from the assembly.
3. Pull the lamp down and twist the
bulb socket counterclockwise.
Remove the bulb socket from the
lamp.
4. Pull out the old bulb and push in
the new bulb.
5. Install the bulb socket in the lamp assembly by turning it clockwise.
6. Install the lamp assembly and secure it with the retaining screw.
Approach lamp/mirror turn signal bulb removal (if equipped)
To change the bulbs:
1. Make sure the headlamp switch is
in the OFF position and then fold
the mirror forward.
2. Remove the torx screw on the
bottom of the turn signal lens using
a T-10 torx driver.
3. Pull the turn signal lens down to
remove it from the mirror assembly.
4. Disconnect the bulb assembly
from the lens.
5. Remove and replace the bulb.
6. Reverse the order to reassemble lamp and lens.
REVIEW COPY
2005 Expedition(exd), Owners Guide (post-2002-fmt)(own2002),
Market:USA_English(fus)
Lights
112
Page 122 of 368
1. Rotate the control clockwise to
adjust the right mirror and rotate
the control counterclockwise to
adjust the left mirror.
2. Move the control in the direction
you wish to tilt the mirror.
3. Return to the center position to
lock mirrors in place.
Heated outside mirrors
(if equipped)
Both mirrors are heated
automatically to remove ice, mist
and fog when the rear window
defrost is activated.
Do not remove ice from the
mirrors with a scraper or
attempt to readjust the mirror
glass if it is frozen in place.
These actions could cause
damage to the glass and mirrors.
Signal indicator mirrors (if equipped)
When the turn signal is activated,
the lower portion of the mirror
housing will blink.
REVIEW COPY
2005 Expedition(exd), Owners Guide (post-2002-fmt)(own2002),
Market:USA_English(fus)
Driver Controls
122
Page 222 of 368

If your vehicle is equipped with TPMS, have a flat tire serviced by a
dealer or qualified technician in order to prevent damage to the TPMS
sensor, refer toChanging tires with TPMSlater in this chapter. Replace
the spare tire with a road tire as soon as possible.
Location of the spare tire and tools
The spare tire and tools for your vehicle are stowed in the following
locations:
Item Location
Spare tire Under the vehicle, just forward of
the rear bumper
Jack tools and jacking instructions Under the access panel located in
the floor compartment behind the
rear seat
Removing the jack and tools
1. Open the liftgate, then locate the access panel on the floor behind the
3rd row seat. Unlatch and remove the panel.
2. Remove the jack and tools assembly tray from the compartment by
turning the wing-nut counterclockwise to relieve tension against the jack
assembly tray.
3. Unsnap the wheel lug nut wrench, jack extension and handle from the
plastic tray. Remove the jack and instruction sheet from the tray
assembly.
REVIEW COPY
2005 Expedition(exd), Owners Guide (post-2002-fmt)(own2002),
Market:USA_English(fus)
Tires, Wheels and Loading
222