2005 FIAT DUCATO 244 Power
[x] Cancel search: PowerPage 80 of 258

79GETTING TO KNOW YOUR VEHICLE
IMPORTANT NOTES
Do not use abrasive detergents or
solvents to clean the device. To clean
its external surface, use a wet cloth or
special products for cleaning synthet-
ic materials.
The multimeter is installed and
sealed with lead by authorised per-
sonnel: access to the device and rele-
vant power and recording cables is
forbidden.
The vehicle owner is responsible for
governing the instrument use. The in-
spection must be carried out at least
every two years and will include a test
to confirm correct operation.
After the inspection, check that the
plate is updated with specified data.DRIVER’S CAB DOORS
Opening by hand from
the outside
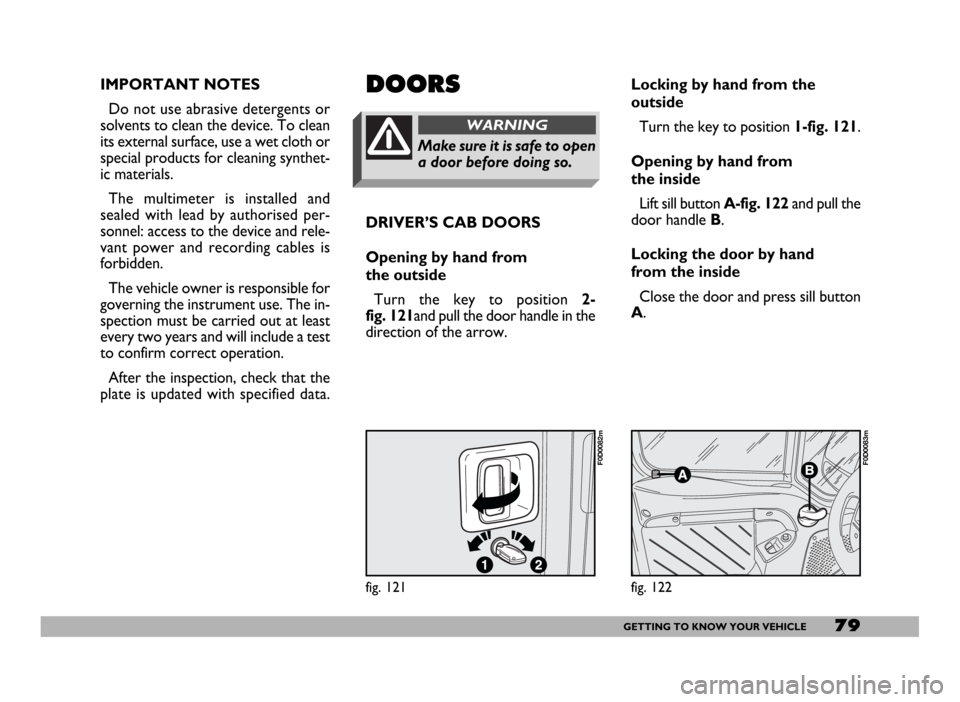
Turn the key to position 2-
fig. 121and pull the door handle in the
direction of the arrow.DOORS
Make sure it is safe to open
a door before doing so.
WARNING
Locking by hand from the
outside
Turn the key to position 1-fig. 121.
Opening by hand from
the inside
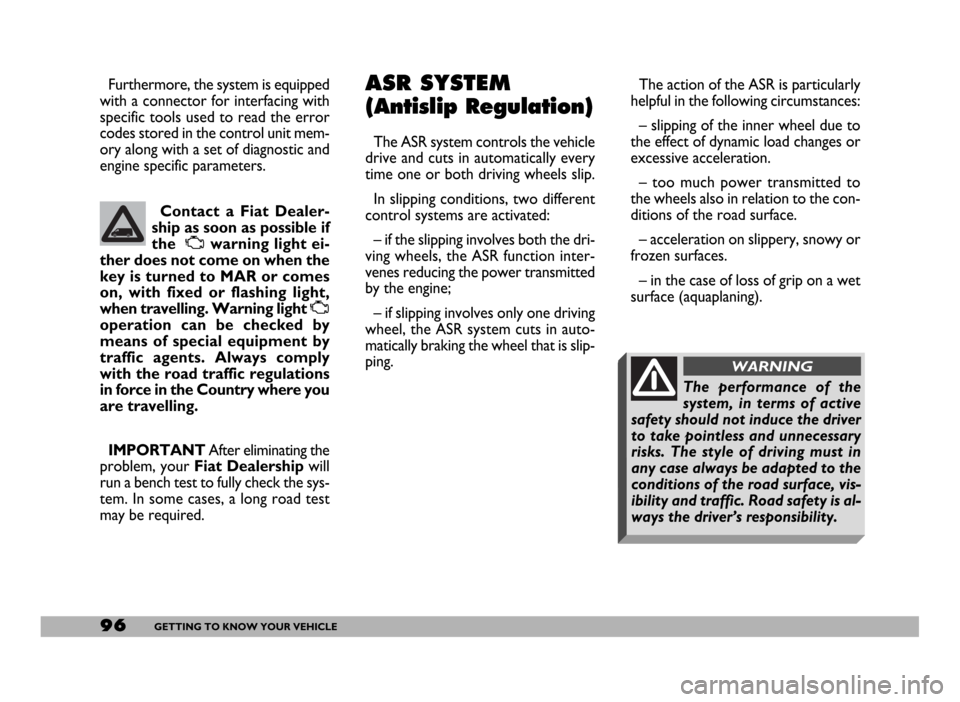
Lift sill button A-fig. 122and pull the
door handle B.
Locking the door by hand
from the inside
Close the door and press sill button
A.
fig. 121
F0D0082m
fig. 122
F0D0083m
Page 97 of 258

96GETTING TO KNOW YOUR VEHICLE
The action of the ASR is particularly
helpful in the following circumstances:
– slipping of the inner wheel due to
the effect of dynamic load changes or
excessive acceleration.
– too much power transmitted to
the wheels also in relation to the con-
ditions of the road surface.
– acceleration on slippery, snowy or
frozen surfaces.
– in the case of loss of grip on a wet
surface (aquaplaning). Furthermore, the system is equipped
with a connector for interfacing with
specific tools used to read the error
codes stored in the control unit mem-
ory along with a set of diagnostic and
engine specific parameters.ASR SYSTEM
(Antislip Regulation)
The ASR system controls the vehicle
drive and cuts in automatically every
time one or both driving wheels slip.
In slipping conditions, two different
control systems are activated:
– if the slipping involves both the dri-
ving wheels, the ASR function inter-
venes reducing the power transmitted
by the engine;
– if slipping involves only one driving
wheel, the ASR system cuts in auto-
matically braking the wheel that is slip-
ping.
IMPORTANTAfter eliminating the
problem, your Fiat Dealershipwill
run a bench test to fully check the sys-
tem. In some cases, a long road test
may be required.Contact a Fiat Dealer-
ship as soon as possible if
the Uwarning light ei-
ther does not come on when the
key is turned to MAR or comes
on, with fixed or flashing light,
when travelling. Warning light U
operation can be checked by
means of special equipment by
traffic agents. Always comply
with the road traffic regulations
in force in the Country where you
are travelling.
The performance of the
system, in terms of active
safety should not induce the driver
to take pointless and unnecessary
risks. The style of driving must in
any case always be adapted to the
conditions of the road surface, vis-
ibility and traffic. Road safety is al-
ways the driver’s responsibility.
WARNING
Page 99 of 258

98GETTING TO KNOW YOUR VEHICLE
SOUND SYSTEM
Visit a Fiat Dealership if
you want to fit a sound
system after buying the
vehicle. They can advise you on
how to safeguard battery life. Ex-
cessive idle intake can damage
the battery and may invalidate
the warranty.LIGHT SET-UP
The system consists of:
– radio power supply cables
– dashboard front speaker cables
– housing for the radio
– aerial and relevant wire
HEAVY SET-UP
The system consists of:
– radio power supply cables
– dashboard front speaker cables
– dashboard speakers
– door speaker cables
– door speakers
– housing for the radio
– aerial and relevant wire.
fig. 145
F0D0171m
For the Panorama version, four ad-
ditional speakers are provided, two on
the right and two on the left side, set
one in the body side and the other on
the top of the pillar.
For the Combi version, two addi-
tional rear speakers are provided, one
per body side.
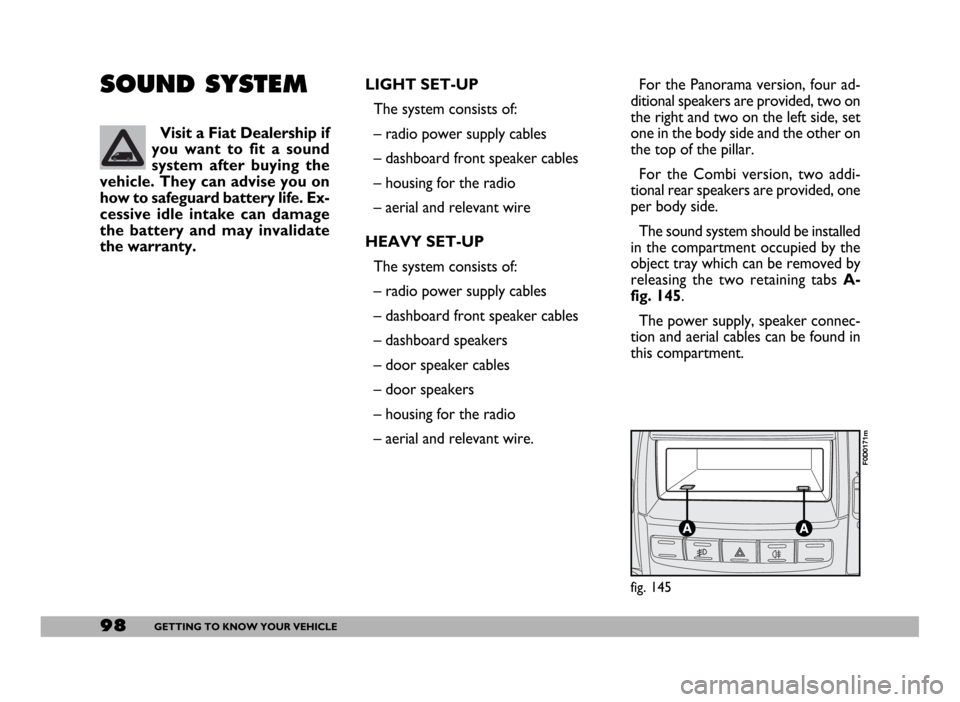
The sound system should be installed
in the compartment occupied by the
object tray which can be removed by
releasing the two retaining tabs A-
fig. 145.
The power supply, speaker connec-
tion and aerial cables can be found in
this compartment.
Page 100 of 258

99GETTING TO KNOW YOUR VEHICLE
IMPORTANT The cables are se-
cured to the heater cables bundle with
adhesive tape to cut out noise.
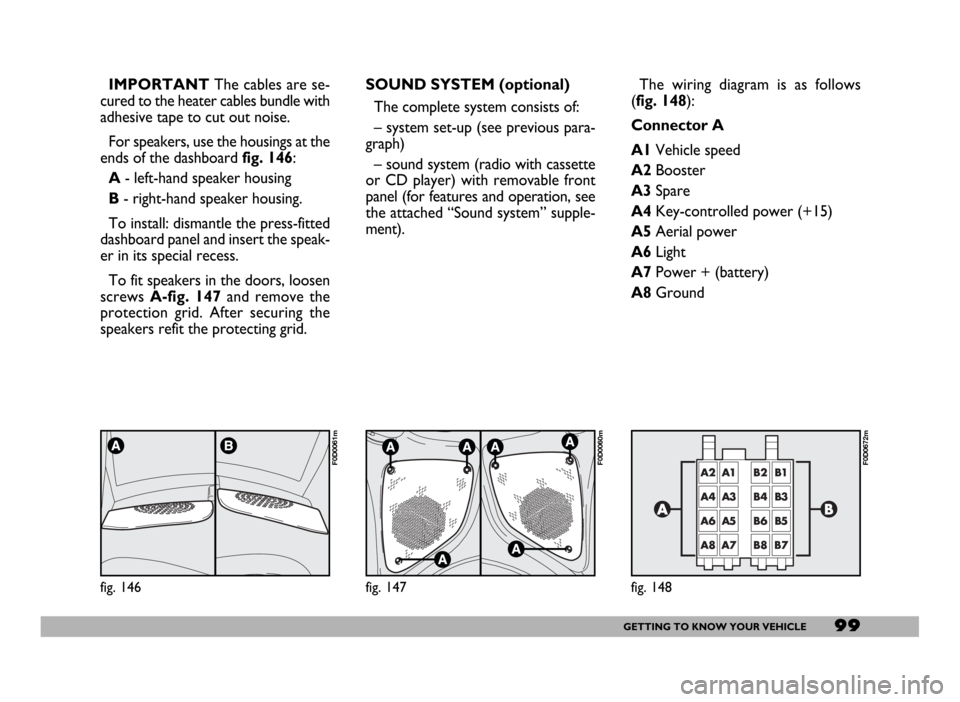
For speakers, use the housings at the
ends of the dashboard fig. 146:
A- left-hand speaker housing
B- right-hand speaker housing.
To install: dismantle the press-fitted
dashboard panel and insert the speak-
er in its special recess.
To fit speakers in the doors, loosen
screws A-fig. 147and remove the
protection grid. After securing the
speakers refit the protecting grid.
fig. 146
F0D0061m
SOUND SYSTEM (optional)
The complete system consists of:
– system set-up (see previous para-
graph)
– sound system (radio with cassette
or CD player) with removable front
panel (for features and operation, see
the attached “Sound system” supple-
ment).
fig. 147
F0D0060m
The wiring diagram is as follows
(fig. 148):
Connector A
A1Vehicle speed
A2Booster
A3Spare
A4Key-controlled power (+15)
A5Aerial power
A6Light
A7Power + (battery)
A8Ground
fig. 148
F0D0672m
Page 101 of 258

100GETTING TO KNOW YOUR VEHICLE
The wiring connection diagram is:
1Sound system MUTE function.
2Spare.
3Cellular phone INPUT ground
signal (–).
4Cellular phone INPUT ground
signal (+).
5Spare
6Spare
7Ignition switch power (+15).
8Spare
9Battery power (+).
10Ground.
Max. aerial power is 20W.
WARNINGConnector B
B1Door speaker
passenger’s side (+)
B2Door speaker
passenger’s side (-)
B3Dashboard speaker
right side (+)
B4Dashboard speaker
right side (-)
B5Dashboard speaker
left side (+)
B6Dashboard speaker
left side (-)
B7Door speaker
driver’s side (+)
B8Door speaker
driver’s side (-)
AERIAL
Aerial is built into the passenger’s
door mirror.CELLULAR PHONE
SET-UP
IMPORTANTThe optional cellu-
lar phone set-up is bound to “Heavy
set-up” or “Radio” purchase.
The system set-up consists of:
– dual-purpose aerial (sound system
+ cellular phone), built into the pas-
senger’s door mirror;
– dual-purpose aerial connection
wires and ten-pin connector wiring
fig. 149;
– front door speakers.
fig. 149
F0D0106m
See the information given
in the “Accessory installa-
tion” section when making electri-
cal connections so as not to dam-
age the system.
WARNING
Page 107 of 258

106GETTING THE BEST OUT OF YOUR VEHICLE
HOW TO START DIESEL
VERSIONS
1) Ensure that the handbrake is up.
2)Put the gear lever into neutral.
3)Press the clutch pedal down to
the floor without touching the accel-
erator.
4) Turn the ignition key to MAR. In-
strument panel warning lights mand
Ywill come on.
5)Wait for the instrument panel
warning light Yto go out.
6) Wait for the instrument panel
warning light mto go out. The hot-
ter the engine is, the quicker this will
happen.
7) Turn the key to AVVimmediate-
ly after the mwarning light goes out.
If you wait too long, you will lose the
benefit of the work done by the glow
plugs.
Release the key as soon as the engine
starts.Intake air heater (Heat Flange)
An air heating device is fitted on the
intake manifold inlet in 2.8 JTD ver-
sions to facilitate starting the engine in
cold weather.
This device will be switched on au-
tomatically when the key is turned to
MAR.
The heater is fitted in all 2.8 JTD ver-
sions with EGR system. It is optional
for other JTD versions.
The engine start-up procedure is the
same with and without the heater.GENERAL NOTES
If the engine does not start first time,
return the key to STOPbefore try-
ing to start the engine again.
If warning light Yremains lit when
the ignition key is at MAR, turn the
key to STOPand then to MAR; if the
warning light stays on, try with the
other keys provided. The warning light m
will flash (for approxi-
mately 60 seconds) at
start-up or during prolonged
cranking to signal a fault in the
glow plug heating system. You
can use the vehicle as usual if the
engine starts but you should con-
tact a Fiat Dealership as soon as
possible to have problem seen to.
SELENIA 20K (petrol en-
gines) is recommended
when the vehicle is mainly
used in relatively mild climates. If
however, the vehicle is mainly
used where the climate is partic-
ularly severe, the use of SELENIA
PERFORMER MULTIPOWER
(petrol engines) or SELENIA WR
(diesel engines) is recommended.
Page 108 of 258

107GETTING THE BEST OUT OF YOUR VEHICLE
If you still cannot start the engine,
get in touch with a Fiat Dealership.
IMPORTANT When the outside
temperature is low, it is important to
note that the use of a more fluid oil
will facilitate starting the cold engine.
Therefore, in winter, follow the advice
in chapter “Technical specifications”,
paragraph “Fluids and lubricants”.
IMPORTANTNever leave the igni-
tion key at MARwhen the engine is off.
Minibus and School Bus versions:
press the ignition enable button lo-
cated to the left of the steering col-
umn as shown in the specific supple-
ment to this handbook.HOW TO WARM UP
THE ENGINE AFTER IT
HAS JUST STARTED
(petrol and diesel versions)
– Begin to move forward slowly let-
ting the engine turn at medium revs.
Do not accelerate abruptly.
– Do not push the engine to its lim-
it for the first few kilometres. You are
recommended to wait until the
coolant temperature indicator starts
to move.
EMERGENCY START-UP
If the Fiat CODE system fails to
recognise that code transmitted by the
ignition key (warning light Yon the
instrument panel lit) the emergency
start-up can be performed by using the
CODE card code.
See the “In an emergency” section.Catalysed vehicles must
not be bump started
(pushed, towed or coast-
ed downhill) as this could cause
fuel to flow into the catalytic ex-
haust system and damage it be-
yond repair.
Remember that until the
engine has started the
brake booster and power steering
systems will not work and a greater
effort will therefore be required to
depress the brake pedal or turn the
steering wheel.
WARNING
Page 111 of 258

110GETTING THE BEST OUT OF YOUR VEHICLE
STARTING
After starting the engine, with the en-
gine idling and keeping the brake ped-
al pressed, move the gearshift lever to
position D. Release the brake pedal
and gradually press the accelerator
pedal.
IMPORTANT Movement of the
lever from position Pis allowed only
with the ignition key at MARand the
button on the lever and the brake ped-
al pressed. STOPPING THE VEHICLE
To stop the vehicle, simply press the
brake pedal regardless of the position
of the gearshift lever.
IMPORTANTRemoving the igni-
tion key is only allowed with the
gearshift lever in position Pand for a
maximum time of 30 seconds from
when the engine is turned off P, when
the door is opened a buzzer will sound
for about 15 seconds to alert the dri-
ver.
In the case of an emergency (faults,
flat battery, etc.) the ignition key can
be removed from the switch fitting a
screwdriver in hole infig. 3set under
the ignition switch and pressing up-
wards Do not attempt to ob-
tain peak performance
until the engine has
reached normal operating tem-
perature.
fig. 3
F0D0236m
With the engine idling, also
on a level surface, and the
gearshift lever in position D or R,
the vehicle tends to move if the
brake pedal is not kept pressed.
WARNING
ELECTRONIC
AUTOMATIC
GEARBOX
(2.8 JTD versions
only)
The automatic gearbox fitted on Fi-
at Ducato features four speeds plus
reverse with self-adapting control (i.e.
capable of adapting to the driver’s dri-
ving style), which transmits power
continuously and with very fast elec-
tro-hydraulic gear engagement times.
STARTING THE ENGINE
The engine can be started only with
the gearshift lever in the P or Nposi-
tion.
For safety reasons, it is advisable to
start the engine with the brake pedal
pressed.
IMPORTANTWhen moving off af-
ter starting the engine, do not press
the accelerator pedal before and dur-
ing the movement of the gearshift
lever. This is particularly important
when the engine is cold.