2005 DODGE STRATUS COUPE fuel pressure
[x] Cancel search: fuel pressurePage 8 of 396

Outside
1. Engine compartment!p. 259
Engine hood!p. 422. Windshield wiper and washer!p. 128
3. Sunroof (if so equipped)!p. 46
4. Outside rear-view mirrors!p. 190
5. Whip antenna!p. 221
6. Front turn signal lights and parking lights
!p. 122, 297
7. Fog lights (if so equipped)!p. 122
8. Headlights!p. 122, 295
9. Front side marker lights!p. 300
10. Tire inflation pressure!p. 340
Changing tires!p. 270
Tire rotation!p. 347
Tire chains!p. 348
Wheel covers (if so equipped)!p. 268
11. Locking and unlocking!p. 26
Keyless entry system (if so equipped)!p. 29
12. High-mounted stop lights!p. 302
13. Trunk lid!p. 35
14. License plate lights!p. 303
15. Back up lights!p. 294
16. Stop and tail lights!p. 294
17. Rear turn signal and tail lights!p. 294
18. Rear side-marker lights!p. 294
19. Fuel filler!p. 39
8 INTRODUCTION
Page 40 of 396

WARNING!
²Remove the fuel tank filler tube cap (gas cap)
slowly to prevent fuel spray from the filler neck
which may cause injury.
²The volatility of some gasolines may cause a build
up of pressure in the fuel tank that may increase
while you drive. This pressure can result in a
spray of gasoline and/or vapors when you remove
the cap from a hot vehicle. Removing the cap
slowly allows the pressure to vent and prevents
fuel spray.
²Never have any smoking materials lit in or near
the vehicle when the gas cap is removed or the
tank filled.
²Never add fuel when the engine is running. This
is in violation of most state and federal fire
regulations and will cause the malfunction indi-
cator light to turn on.
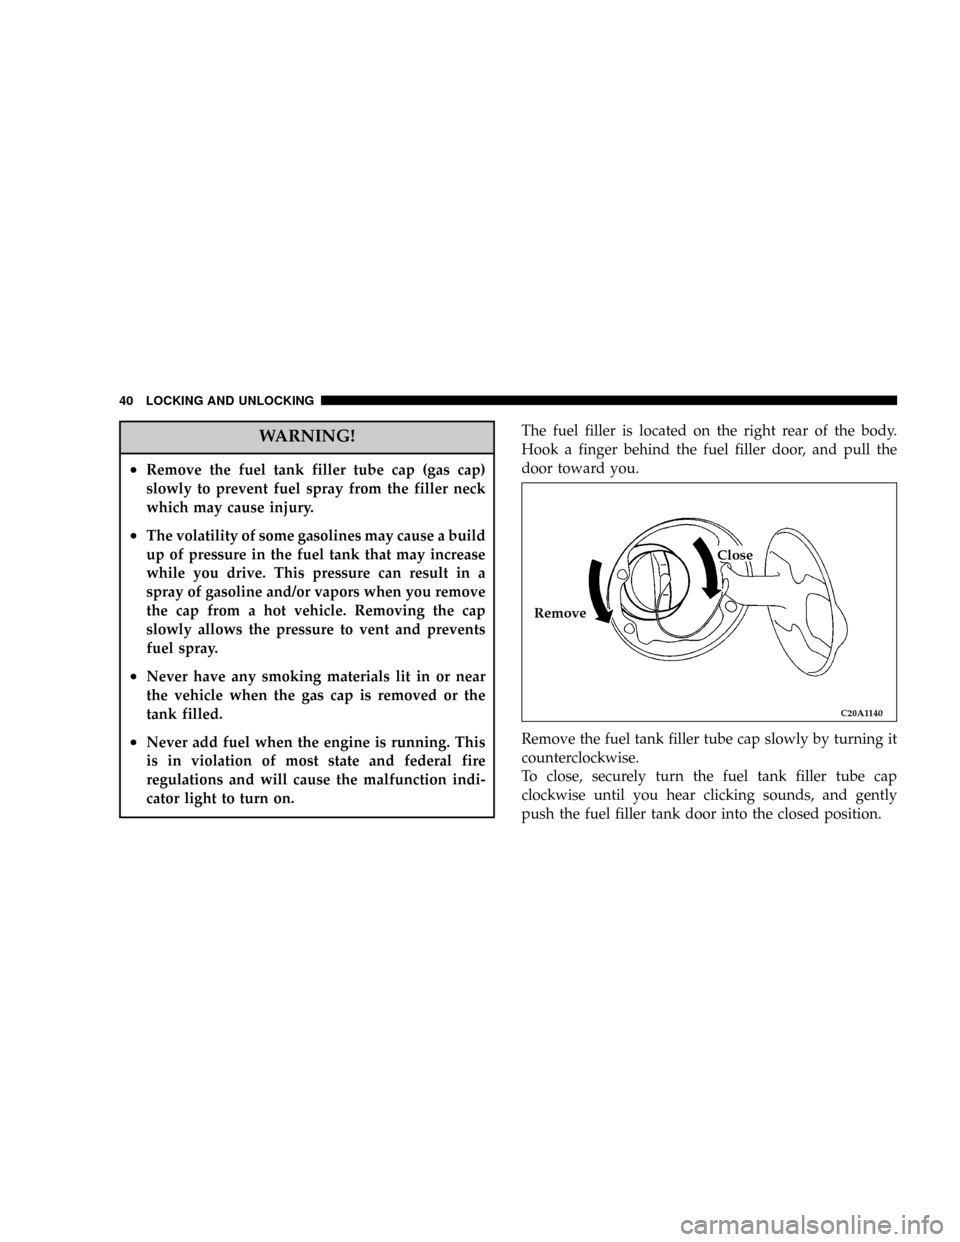
The fuel filler is located on the right rear of the body.
Hook a finger behind the fuel filler door, and pull the
door toward you.
Remove the fuel tank filler tube cap slowly by turning it
counterclockwise.
To close, securely turn the fuel tank filler tube cap
clockwise until you hear clicking sounds, and gently
push the fuel filler tank door into the closed position.
C20A1140
RemoveClose
40 LOCKING AND UNLOCKING
Page 41 of 396

Low fuel warning chime
If a chime sounds when the low fuel warning light is on,
that means the fuel is low.
NOTE: If the low fuel warning light goes off, then comes
back on again, the chime will not sound.
Fuel tank capacity 62 L (16.4 gal)
CAUTION!
²As the fuel system may be under pressure, remove the
fuel tank filler tube cap slowly. Removing the cap
slowly relieves any pressure or vacuum that might have
built up in the fuel tank. If the cap is venting vapor or
if you hear a hissing sound, wait until it stops before
completely removing the cap. Otherwise, fuel may
spray out and injure you or others.
²If you need to replace the fuel tank filler tube cap,
use only a cap specified for your model vehicle.
²To avoid fuel spillage and overfilling, do not ªtop-offº
the fuel tank again and again after filling.
NOTE: If the fuel tank filler tube cap is not tight while
driving, the ªMalfunction indicator light (SERVICE EN-
GINE SOON)º may illuminate when the onboard diag-
nostic (OBD) system performs its self check.
Always tighten the fuel tank filler tube cap until you hear
clicking sounds. The indicator light will go off after
driving several times. If the indicator light does not go
off, contact your authorized dealer as soon as possible.
LOCKING AND UNLOCKING 41
2
Page 105 of 396

INSTRUMENTS AND CONTROLS
CONTENTS
mInstrument cluster......................108
NMeter cluster.........................108
NIndicator and warning light package........109
NSpeedometer.........................110
NTachometer..........................110
NFuel gauge..........................111
NOdometer/Trip odometer................112
NEngine coolant temperature gauge..........113
NTurn signal indicators/hazard warning lights . . 114
NHigh beam indicator...................114
NTheft-alarm indicator...................114
NDoor-ajar warning light and chime.........114NAnti-lock braking system warning light
(if so equipped).......................115
NCruise/speed control indicator............115
NLow-fuel warning light and chime..........115
NFront fog light indicator (if so equipped).....116
NCharging system warning light............116
NOil pressure warning light...............116
NMalfunction indicator light
(SERVICE ENGINE SOON)...............117
NSupplemental Restraint System (SRS)-air bag
warning light.........................118
NBrake warning light....................119
NSeat belt reminder/warning light...........120
4
Page 116 of 396

CAUTION!
Do not drive with an extremely low fuel level;
running out of fuel could cause damage to the
catalytic converter.
Front fog light indicator (if so equipped)
This indicator illuminates while the fog
lights are on.
NOTE:Fog lights will not be operational when high
beam (headlights) are selected.
Charging system warning light
This light illuminates in the event of a
malfunction in the charging system.
This light illuminates when the ignition key
is turned to the ªONº position (engine off). When the
engine is started, the light should go off. Always be sure
that the light goes out before beginning to drive.
CAUTION!
If the charging light remains on after the engine has
started, the battery charging system may be malfunc-
tioning. In this case, take your vehicle to an autho-
rized dealer and have the system checked.
Oil pressure warning light
This light illuminates when the engine oil
pressure is below normal. If the light stays
on while driving, stop the engine as soon as possible and
do not drive until the cause of the low oil pressure is
corrected.
116 INSTRUMENTS AND CONTROLS
Page 202 of 396

Check wheel nuts for tightness and tires (including spare
tire) for proper pressure. Maintain specified tire inflation
pressures. Replace tires before they are excessively worn.
Lights
Have someone observe the operation of all exterior lights
while you activate the controls. Check the turn signals
and highbeam indicators on the instrument panel.
Fluid leaks
Check the area under the vehicle after overnight parking
for fuel, water, oil, or other fluid leaks. Make sure all fluid
levels are at the proper levels. Also, if fuel leaks are
detected, the cause should be located and corrected
immediately.
Driver
Do not drive if you are tired or sleepy. Do not drive if you
have been drinking or taking drugs. Unless you are alert
and able to concentrate on your driving, you could have
an accident, resulting in serious or fatal injury to yourself
and others.
SAFE DRIVING TECHNIQUES
Even this vehicle's safety equipment, and your safest
driving, cannot guarantee that you can avoid accident or
injury. However, we recommend that you give extra
attention to the following, to help maximize the safety of
you and your passengers:
1. Drive defensively. Be aware of traffic, road and
weather conditions. Leave adequate stopping distance
for your vehicle.
2. Before changing lanes, check your mirrors and flash
the proper turn-signal light.
3. While driving, watch the behavior of other drivers,
bicyclists and pedestrians.
4. During an emergency stop, switch on the hazard
warning flasher.
5. When leaving the vehicle, set the parking brake and
place the gearshift lever into low gear.
In vehicles with an automatic transaxle, place the selector
lever in the ªPº (PARK) position. Remove the key.
202 STARTING AND DRIVING
Page 204 of 396

over curbs or parking stop blocks. Always use caution
when traveling up or down sharp inclines as your
bumper may contact the road surface.
2. Maintain specified tire inflation pressures. Replace
tires before they are excessively worn.
3. If you plan to drive in another country, comply with
the vehicle registration laws and confirm the availability
of the correct fuel.
OPERATION DURING COLD WEATHER
1. Check the battery, including terminals and cables.
During extremely cold weather, the battery capacity will
decrease. Also, the battery power level may drop because
more power is needed for cold starting and operation.
Before driving the vehicle, check to see if the engine runs
at the proper speed and if the headlights are at their usual
intensity. Charge or replace the battery if necessary.
During cold weather, it is possible that a discharged
battery could freeze.
WARNING!
The battery gives off explosive hydrogen gas. Any
spark or flame can cause the battery to explode,
which could seriously injury or kill you.
Always wear protective clothes and a face shield
when doing battery maintenance, or let a skilled
technician do it.
2. Manual transaxles may be more difficult to shift
during cold weather operation. This is normal and shift
effort will become easier as the transaxle reaches a
normal operating temperature.
Maintain low-speed operation at first to allow the trans-
axle oil to be distributed to all lubrication points.
3. Check the engine antifreeze.
If there is a shortage of coolant due to leakage or engine
overheating, add high-quality ethylene glycol antifreeze
and water. The recommended ratio is about 50% water
and 50% anti-freeze. This ratio provides adequate corro-
sion, boiling, and freeze protection.
204 STARTING AND DRIVING
Page 340 of 396

Vehicle Safety Standard No. 109. Grades B and A repre-
sent higher levels of performance on the laboratory test
wheel than the minimum required by law.
Tire inflation pressures
Proper tire inflation pressure is essential to the safe and
satisfactory operation of your vehicle. Three primary
areas are affected by improper tire pressure:
1. Safety
Under-inflation increases tire flexing and can result in tire
failure. Over-inflation results in a tire losing its ability to
cushion shock. Objects on the road and potholes could
cause tire damage that may result in tire failure.
2. Economy
Improper inflation pressures can cause uneven wear
patterns to develop across the tire tread. These abnormal
wear patterns will reduce tread life, resulting in a need
for earlier tire replacement.
Under-inflation also increases tire rolling resistance and
results in higher fuel consumption.
3. Ride comfort and vehicle stability
Proper tire inflation pressures contribute to the excellentride quality built into your vehicle. Over-inflation pro-
duces an uncomfortable and jarring ride.
Under-inflation can produce a feeling of sluggish response.
Unequal inflation pressures can produce erratic and
unpredictable vehicle response to steering maneuvers.
The proper tire pressure for your vehicle is listed on a
placard attached near the door sill striker on the driver's
side ``B''-Pillar.
The recommended inflation pressures should be followed
when the specified tires are installed.
Item Tire size Front Rear
Normal tire P205/60R16 91H 32 psi (220 kpa)
P215/50R17 90H 32 psi (220 kpa)
Compact spare tire T125/70D16 60 psi (420 kpa)
The pressures should be checked and adjusted, if neces-
sary, at least once a month.
Tire pressures should be checked more often when weather
temperatures vary widely, because tire pressures vary with
outdoor temperatures. Inflation pressures specified on the
placard are always ªcold inflation pressureº.
Cold inflation pressure can be measured after the vehicle has
been stationary for at least three hours or driven less than
340 MAINTENANCE