Page 38 of 396

The handle glows in the dark after exposure to sunlight.
You and your family should familiarize yourselves with the
location and operation of the emergency trunk release
handle. Children should be taught not to play in or around
vehicles.
WARNING!
²Children should never be left unsupervised in or
around vehicles.
²Unsupervised children could lock themselves in
an open vehicle or trunk.
²People trapped inside a vehicle, or trunk, even if
only for a short period of time, can quickly die
from suffocation or heat stroke, especially on hot
days. Interior temperatures in vehicles can rise in
minutes.
²Keep your vehicle doors locked and the trunk
closed when not in use. Keep your vehicle keys
away from children.
To open the trunk from inside the trunk, tear off the
illuminated9T9handle from its holder by pulling in the
direction of the arrow (1). Then pull the handle in the
direction of the arrow (2). Push up on the trunk to exit.
F15A2180
1. Tear off
2. PullHandle
Holder
38 LOCKING AND UNLOCKING
Page 39 of 396
CAUTION!
²When loading objects in the trunk, position them
so that they will not contact the emergency trunk
release handle when closing the trunk. This will
prevent damage to the handle that could render it
inoperable.
²Always keep the handle in its holder when oper-
ating the vehicle to prevent trunk cargo from
moving the handle that might result in the open-
ing of the trunk lid.
FUEL FILLER
C20A1520
LOCKING AND UNLOCKING 39
2
Page 40 of 396

WARNING!
²Remove the fuel tank filler tube cap (gas cap)
slowly to prevent fuel spray from the filler neck
which may cause injury.
²The volatility of some gasolines may cause a build
up of pressure in the fuel tank that may increase
while you drive. This pressure can result in a
spray of gasoline and/or vapors when you remove
the cap from a hot vehicle. Removing the cap
slowly allows the pressure to vent and prevents
fuel spray.
²Never have any smoking materials lit in or near
the vehicle when the gas cap is removed or the
tank filled.
²Never add fuel when the engine is running. This
is in violation of most state and federal fire
regulations and will cause the malfunction indi-
cator light to turn on.
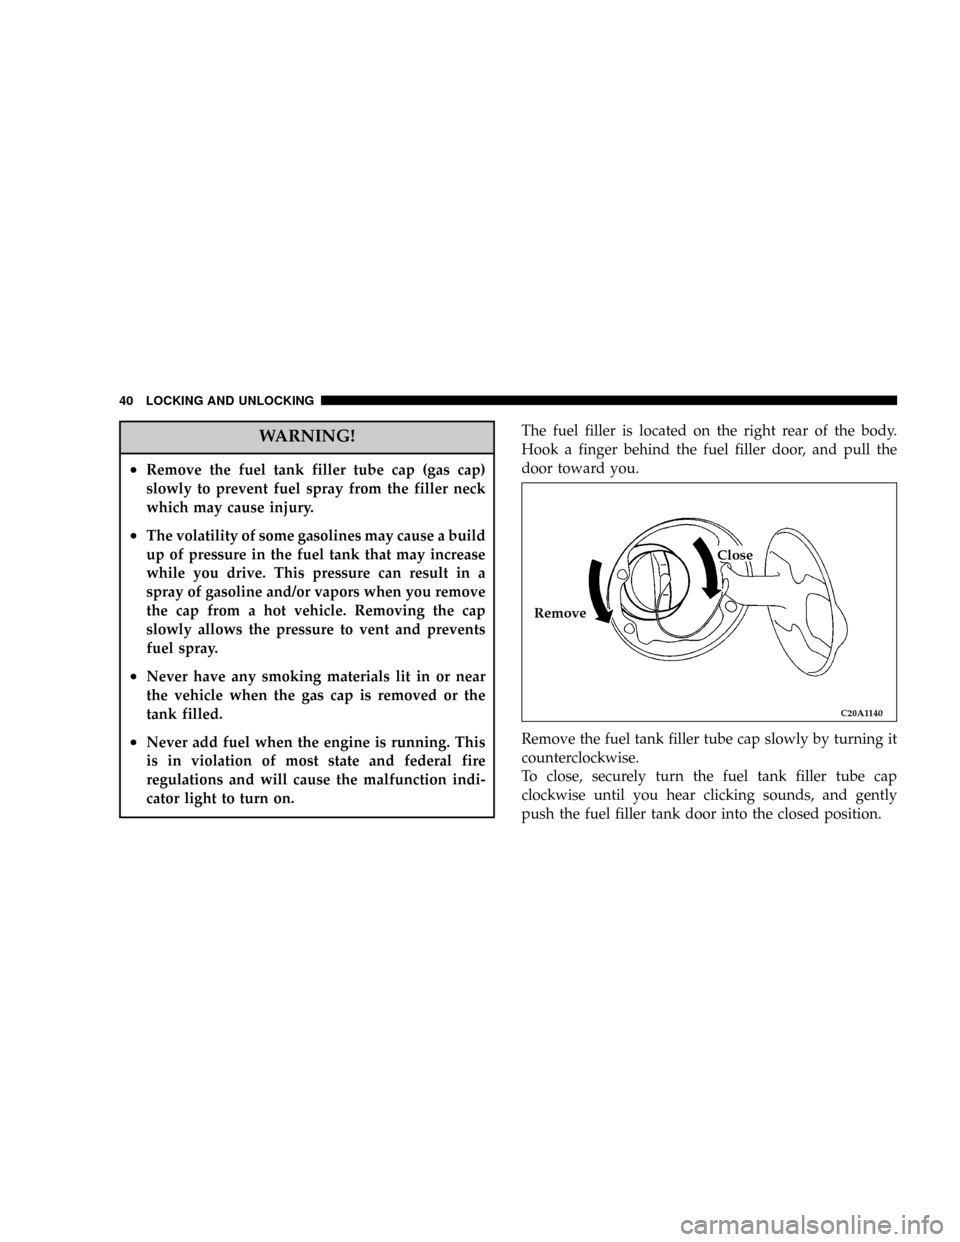
The fuel filler is located on the right rear of the body.
Hook a finger behind the fuel filler door, and pull the
door toward you.
Remove the fuel tank filler tube cap slowly by turning it
counterclockwise.
To close, securely turn the fuel tank filler tube cap
clockwise until you hear clicking sounds, and gently
push the fuel filler tank door into the closed position.
C20A1140
RemoveClose
40 LOCKING AND UNLOCKING
Page 41 of 396

Low fuel warning chime
If a chime sounds when the low fuel warning light is on,
that means the fuel is low.
NOTE: If the low fuel warning light goes off, then comes
back on again, the chime will not sound.
Fuel tank capacity 62 L (16.4 gal)
CAUTION!
²As the fuel system may be under pressure, remove the
fuel tank filler tube cap slowly. Removing the cap
slowly relieves any pressure or vacuum that might have
built up in the fuel tank. If the cap is venting vapor or
if you hear a hissing sound, wait until it stops before
completely removing the cap. Otherwise, fuel may
spray out and injure you or others.
²If you need to replace the fuel tank filler tube cap,
use only a cap specified for your model vehicle.
²To avoid fuel spillage and overfilling, do not ªtop-offº
the fuel tank again and again after filling.
NOTE: If the fuel tank filler tube cap is not tight while
driving, the ªMalfunction indicator light (SERVICE EN-
GINE SOON)º may illuminate when the onboard diag-
nostic (OBD) system performs its self check.
Always tighten the fuel tank filler tube cap until you hear
clicking sounds. The indicator light will go off after
driving several times. If the indicator light does not go
off, contact your authorized dealer as soon as possible.
LOCKING AND UNLOCKING 41
2
Page 42 of 396
ENGINE HOOD RELEASE
The engine hood release lever (located under the instru-
ment panel near the driver's door) is used to unlock the
engine hood.
Pull the lever toward you to release the engine hood
latch.
WARNING!
²Never release the engine hood using the release
lever while the vehicle is in motion.
²Do not operate the vehicle unless the engine hood
is latched.
Release the safety lever and lift the engine hood.
F13A1480
F13A2240
42 LOCKING AND UNLOCKING
Page 43 of 396
NOTE: Only open the engine hood when the wipers are
at their parked position to prevent damage to the engine
hood and wipers.
Support the engine hood with the hood prop by
inserting the hood prop securely in the opening in the
hood marked with an arrow.To close, unlatch the hood prop from the engine hood
and place the hood prop in its retainer. Slowly lower
the engine hood to about 12 inches (30 cm) from the
closed position, then release it. The hood should latch
from its own weight.
NOTE
: If this does not latch the engine hood, release it
from a slightly higher position.
F13A1710
F13A1720
LOCKING AND UNLOCKING 43
2
Page 44 of 396

CAUTION!
Be careful that hands or fingers are not trapped
when closing the engine hood.
POWER WINDOWS
NOTE
1. The windows can be operated when the ignition key is
in the ªON ºposition. The door windows can be openedor closed for a 30-second period even after the ignition
switch is turned off. However, once the driver's door or
the front passenger's door is opened, the windows can-
not be operated until the ignition switch is turned on
again.
2. Never try to operate the driver switch and passenger
switch in opposing directions at the same time. Doing so
will cause the window to freeze in position.
3. Repeated operation with the engine stopped (key
ªONº) will run down the battery. Operate the window
switches while the engine is running.
WARNING!
²Before operating the power windows, make sure
that nothing can be trapped (head, hand, finger,
etc.) in the window.
²Never leave the vehicle without removing the key.
²Never leave a child in the vehicle alone.
F17A0250
Open
Close
44 LOCKING AND UNLOCKING
Page 45 of 396
Driver switch
The main driver switch can be used to operate both door
windows.
Windows will move while the switch is being operated
and stop when the switch is released.
1. Driver's door window switch
(To fully open the driver's door window, it is not neces-
sary to hold the switch down for the entire time the
window is being lowered.)2. Passenger 's door window switch
3. Window lock switch
(When this switch is pressed into lock mode, the passen-
ger switch cannot be used to open or close the door
window, and the driver switch can open or close either
window. To unlock, press the window lock switch again.)
WARNING!
Before driving with a child in the vehicle, be sure to
press the window lock switch to make the window
switches inoperative. A child may tamper with the
switch at the risk of their hands or head becoming
trapped by the window.
F17A1600
LOCKING AND UNLOCKING 45
2