Page 268 of 396

CAUTION!
²Avoid rapid starting and braking with a compact
spare tire.
²Avoid driving through automatic vehicle washes
and over obstacles that could possibly damage the
vehicle's under-carriage. Because the tire is
smaller than the original tire, vehicle ground
clearance is slightly reduced.
²As the compact spare tire is specifically designed
for your vehicle, it should not be used on any
other vehicle.
²The compact spare tire should not be used on any
other wheels, nor should standard tires, snow tires,
wheel covers or trim rings be used with the compact
spare wheel. If such use is attempted, damage to
these items or other vehicle components may occur.
²Do not use snow chains with your compact spare
tire. Because of the smaller tire size, a snow chain
will not fit properly. This could cause damage to
the vehicle and could result in loss of the chains.
²The compact spare tire pressure should be
checked once a month while the tire is stowed.
WHEEL COVERS (IF SO EQUIPPED)
To remove
Wrap the tip of the bar with a cloth, insert it deeply into
the notch provided in the wheel cover, and pry the cover
away from the wheel.
Using the same procedure on the other side, work the
wheel cover away from the wheel to remove it com-
pletely.
N23B0630
268 EMERGENCIES
Page 274 of 396
WARNING!
²Before using the jack, chock or block the wheel
that is tire diagonally opposite the jacking point.
²Stop jacking up the vehicle when the tire is raised
off the ground. It is dangerous to raise the vehicle
any higher.
²Do not get under the vehicle while using the jack.
²Avoid jarring the raised vehicle or leaving it
supported on the jack for extended periods. Both
are very dangerous.
²Do not use a jack other than the one provided
with your vehicle.
²The jack should not be used for any purpose other
than changing a tire.
²No one should stay in the vehicle while the jack is
used.
²Do not start or run the engine while the vehicle is
on the jack.
NOTE: Place the spare wheel under the vehicle body
near the jack; this helps to minimize danger should the
jack slip out of position.
N24A1500
274 EMERGENCIES
Page 275 of 396
9. Remove the wheel nuts with the wheel nut wrench,
then take the wheel off.
CAUTION!
Handle the wheel cover carefully when replacing the
flat tire, to avoid the wheel surface becoming
scratched and causing premature corrosion.
WARNING!
Mount the spare wheel with the valve stem (G) on
the side facing outward, not on the side facing the
vehicle. Mounting the wheel back to front could
cause vehicle damage and result in an accident.
N24A0210
G
G
EMERGENCIES 275
8
Page 276 of 396
10. Clear out any mud, etc. on the hub surface, hub bolts
or in the installation holes in the wheel, and then mount
the spare tire.
11. Install the spare wheel with the nut's tapered end
facing inward, then tighten by hand until the wheel is no
longer loose.
CAUTION!
Never apply oil to either wheel bolts or nuts as it can
cause them to overtighten.
NOTE: Flange nuts can be temporarily used on the steel
wheel, but return to the original wheel and tire as soon as
possible.
If all four wheels are changed to steel wheels, use
tapered nuts.
N24A1410
Tapered nut
Flange nut
276 EMERGENCIES
Page 338 of 396

letters9LT9that are molded into the sidewall preceding
the size designation. Example: LT235/85R16.
²Temporary spare tires are high pressure compact
spares designed for temporary emergency use only.
Tires designed to this standard have the letter9T9
molded into the sidewall preceding the size designa-
tion. Example: T145/80D18 103M.
Service Description
EXAMPLE: 95H
95Load index
A numerical code associated with the maximum
load a tire can carry.
HSpeed symbol
A symbol indicating the range of speeds at which
a tire can carry a load corresponding to its load
index under certain operating conditions.
The maximum speed corresponding to the speed
symbol should only be achieved under specified
operating conditions. (i.e. tire pressure, vehicle
loading, road conditions and posted speed limits).
Maximum Load
Maximum load indicates the maximum load this tire is
designed to carry
Maximum Pressure
Maximum Pressure indicates the maximum permissible
cold tire inflation pressure for this tire.
Tire Identification Number (TIN)
The TIN may be found on one or both sides of the tire,
but the date code may only be on one side. Tires with
white sidewalls will have the full TIN including date
code located on the white sidewall side of the tire. Look
for the TIN on the outboard side of black sidewall tires as
mounted on the vehicle. If the TIN is not found on the
outboard side then you will find it on the inboard side of
the tire.
338 MAINTENANCE
Page 340 of 396

Vehicle Safety Standard No. 109. Grades B and A repre-
sent higher levels of performance on the laboratory test
wheel than the minimum required by law.
Tire inflation pressures
Proper tire inflation pressure is essential to the safe and
satisfactory operation of your vehicle. Three primary
areas are affected by improper tire pressure:
1. Safety
Under-inflation increases tire flexing and can result in tire
failure. Over-inflation results in a tire losing its ability to
cushion shock. Objects on the road and potholes could
cause tire damage that may result in tire failure.
2. Economy
Improper inflation pressures can cause uneven wear
patterns to develop across the tire tread. These abnormal
wear patterns will reduce tread life, resulting in a need
for earlier tire replacement.
Under-inflation also increases tire rolling resistance and
results in higher fuel consumption.
3. Ride comfort and vehicle stability
Proper tire inflation pressures contribute to the excellentride quality built into your vehicle. Over-inflation pro-
duces an uncomfortable and jarring ride.
Under-inflation can produce a feeling of sluggish response.
Unequal inflation pressures can produce erratic and
unpredictable vehicle response to steering maneuvers.
The proper tire pressure for your vehicle is listed on a
placard attached near the door sill striker on the driver's
side ``B''-Pillar.
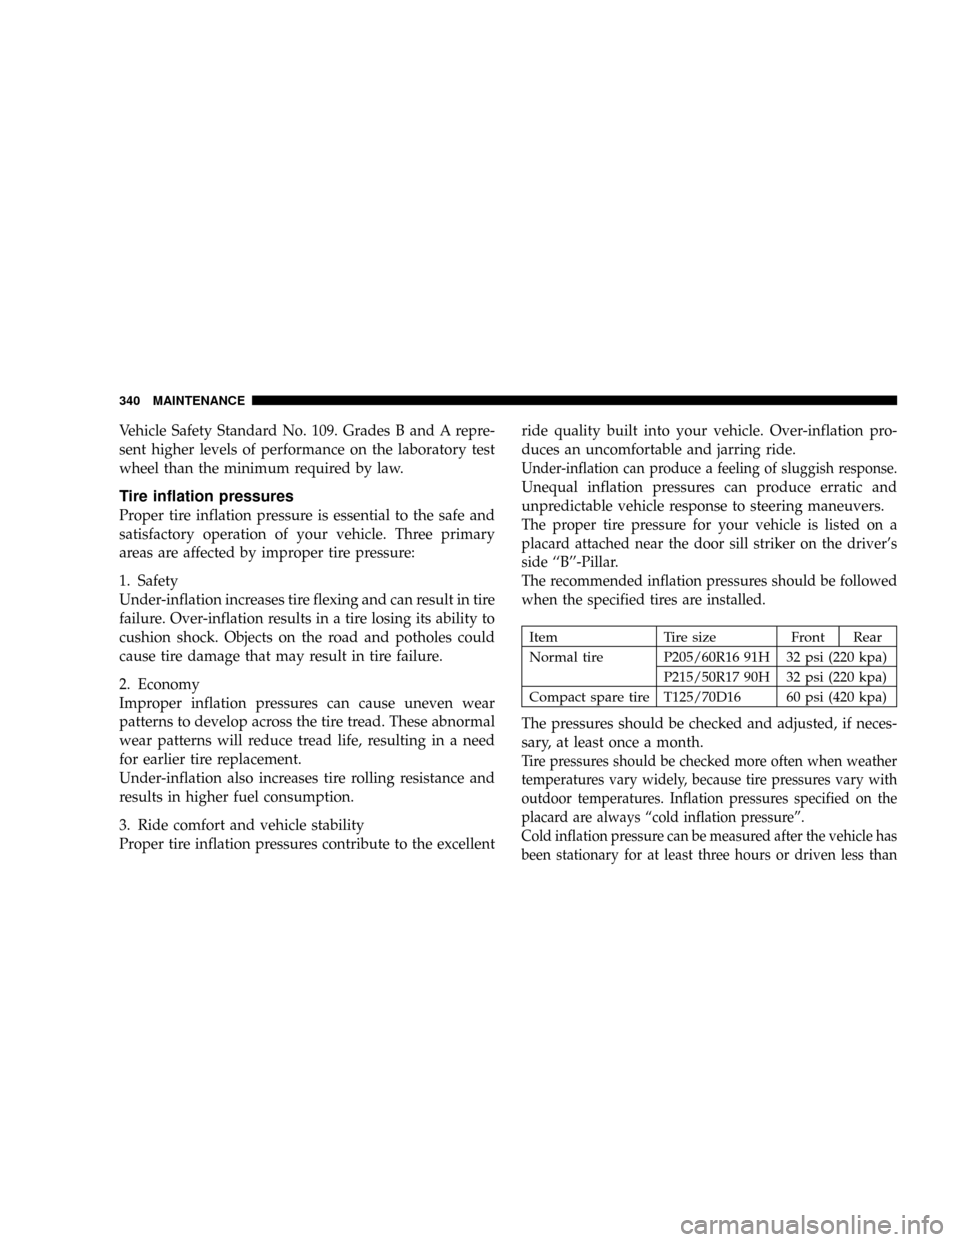
The recommended inflation pressures should be followed
when the specified tires are installed.
Item Tire size Front Rear
Normal tire P205/60R16 91H 32 psi (220 kpa)
P215/50R17 90H 32 psi (220 kpa)
Compact spare tire T125/70D16 60 psi (420 kpa)
The pressures should be checked and adjusted, if neces-
sary, at least once a month.
Tire pressures should be checked more often when weather
temperatures vary widely, because tire pressures vary with
outdoor temperatures. Inflation pressures specified on the
placard are always ªcold inflation pressureº.
Cold inflation pressure can be measured after the vehicle has
been stationary for at least three hours or driven less than
340 MAINTENANCE
Page 348 of 396

CAUTION!
Do not use the compact spare tire for tire rotation.
Tire chains
CAUTION!
Tire chains are not recommended for your vehicle.
The clearance between the chains and the body is
small, and the body might be damaged.
Snow tires
Some areas of the country require the use of snow tires
during winter. Standard tires are of the all season type
and satisfy this requirement as indicated by the M+S
designation on the tire side wall.
If you need snow tires, select tires equivalent in size and
type to the original equipment tires. Failure to do so may
adversely affect the safety and handling of your vehicle.Snow tires should be inflated 4 psi (28 kPa) higher than
the inflation pressure shown on the vehicle's tire placard.
Never inflate over the maximum pressure shown on the
tire sidewall.
Snow tires should not be operated at sustained speeds
over 75 mph (120 km/h).
NOTE: As flange nuts are used on your vehicle, change
to tapered nuts when snow tires (steel wheels) are used.
348 MAINTENANCE
Page 375 of 396

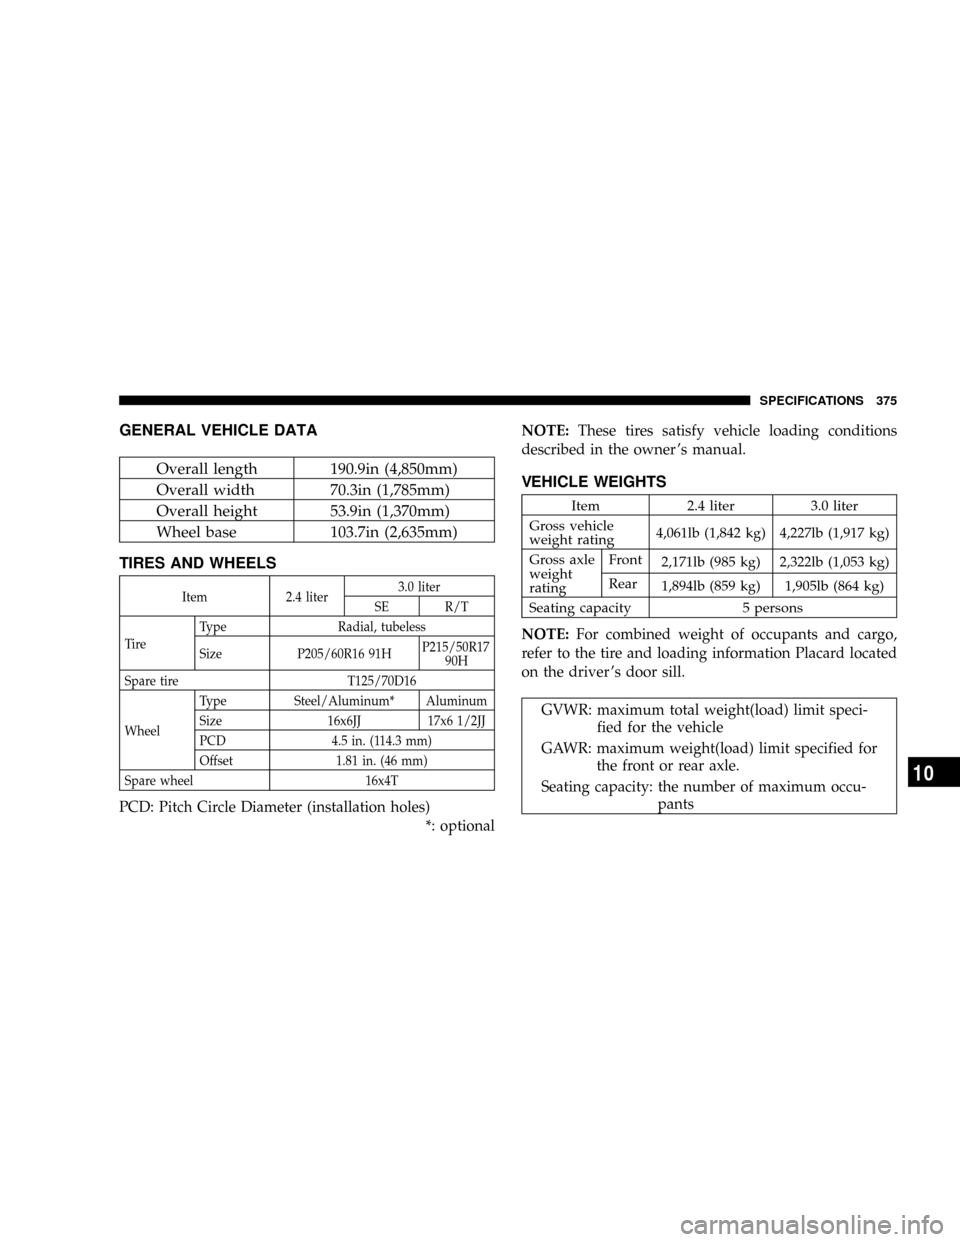
GENERAL VEHICLE DATA
Overall length 190.9in (4,850mm)
Overall width 70.3in (1,785mm)
Overall height 53.9in (1,370mm)
Wheel base 103.7in (2,635mm)
TIRES AND WHEELS
Item 2.4 liter3.0 liter
SE R/T
Ti reType Radial, tubeless
Size P205/60R16 91HP215/50R17
90H
Spare tire T125/70D16
WheelType Steel/Aluminum* Aluminum
Size 16x6JJ 17x6 1/2JJ
PCD 4.5 in. (114.3 mm)
Offset 1.81 in. (46 mm)
Spare wheel 16x4T
PCD: Pitch Circle Diameter (installation holes)
*: optionalNOTE:These tires satisfy vehicle loading conditions
described in the owner 's manual.
VEHICLE WEIGHTS
Item 2.4 liter 3.0 liter
Gross vehicle
weight rating4,061lb (1,842 kg) 4,227lb (1,917 kg)
Gross axle
weight
ratingFront
2,171lb (985 kg) 2,322lb (1,053 kg)
Rear
1,894lb (859 kg) 1,905lb (864 kg)
Seating capacity 5 persons
NOTE:For combined weight of occupants and cargo,
refer to the tire and loading information Placard located
on the driver 's door sill.
GVWR: maximum total weight(load) limit speci-
fied for the vehicle
GAWR: maximum weight(load) limit specified for
the front or rear axle.
Seating capacity: the number of maximum occu-
pants
SPECIFICATIONS 375
10