Page 253 of 396
CLEANING THE INSIDE OF YOUR VEHICLE
After cleaning the inside of your vehicle with cleaner,
wipe it dry in a shady, well ventilated area.
CAUTION!
Do not use organic substances (solvents, kerosene,
alcohol, gasoline, etc.) or alkaline or acidic solutions.
These chemicals can cause discoloring, staining or
cracking of the surface.
If you use cleaners or polishing agents, make sure
their ingredients do not include the substances men-
tioned above.
NOTE: Always read the instructions on the cleaner
label.
Plastic, vinyl leather, fabric, and flocked parts
1. Lightly wipe with a soft cloth soaked in a 3% solution
of neutral detergent and water.2. After using detergent, dip the cloth in fresh water and
wring out well. Using this cloth, wipe off the detergent
thoroughly.
NOTE: Cleaners, conditioners, and protectants contain-
ing silicons or waxes may cause annoying reflections and
obscure vision.
Upholstery
1. To maintain the value of your new vehicle, maintain
the upholstery carefully and keep the interior clean.
Use a vacuum cleaner and brush to clean the seats. If
stained, vinyl and synthetic leather should be cleaned
with an appropriate cleaner. Cloth fabrics can be cleaned
with either upholstery cleaner or a 3% solution of neutral
detergent in lukewarm water.
2. Clean the carpeting with a vacuum cleaner and re-
move any stains with carpet cleaner. Oil and grease can
be removed by lightly dabbing with a clean colorfast
cloth and spot remover.
NOTE: If fuzzing is difficult to remove from the seat
upholstery, draw a suitable defuzzing brush over the
surface in one direction.
VEHICLE CARE 253
7
Page 254 of 396
Genuine leather (if so equipped)
1. Lightly wipe with a soft cloth soaked in a 5% solution
of neutral detergent and water.
2. Dip the cloth in fresh water and wring it out well.
Using this cloth, wipe off the detergent thoroughly.
3. Apply a leather protecting agent to the genuine leather
surface.
NOTE
1. If genuine leather is wet with water, wipe off the water
as quickly as possible with a dry, soft cloth.
2. Slight stains on genuine leather may be removed with
a leather cleaner.
3. The genuine leather surface may be damaged if a
nylon brush is rubbed hard against it.
4. Organic solvents such as benzine, alcohol, gasoline,
acid or alkaline solvents may discolor the genuine leather
surface and should not be used.
5. Dirty genuine leather seats may mildew. Be very
careful about oil stains and remove them immediately.6. The genuine leather surface may harden and shrink if
it is exposed to the direct rays of the sun for long hours.
When your vehicle is parked, place it in the shade as
much as possible.
7. When the temperature of the vehicle interior rises in
the summer, vinyl products left on the genuine leather
seat may deteriorate and stick to the seat.
CLEANING THE OUTSIDE OF YOUR VEHICLE
To protect your vehicle's outside finish, it is important
that you wash it often and thoroughly. If desired, you
may wax your vehicle by using an automobile wax.
Foreign material
Industrial fallout, road tar, bird droppings, tree sap,
insect remains, sea water, and other foreign matter can
damage the finish of your vehicle.
Generally, the longer the foreign material remains in
contact with the outside finish the more extensive the
damage. Wash your vehicle as soon as possible if it
becomes contaminated with foreign material.
254 VEHICLE CARE
Page 258 of 396
Polishing your vehicle
If painted surfaces have been severely damaged and lost
their original luster and color tone, polish the surface
lightly with a fine polishing compound. Avoid limiting
your polishing to the damaged surface only; polish a
somewhat wider area, moving the polishing cloth in one
direction. After polishing, flush the compound from the
surface and apply a coat of wax to regain a beautiful
luster.
Damaged paint
Small cracks and scratches in the paint coat should be
touched up as soon as possible with touch-up paint to
prevent corrosion.
Check body areas facing the road or the tires carefully for
damage to the paint coat caused by flying stones, etc. The
paint code number for your vehicle can be found on the
vehicle information code plate in the engine compart-
ment.
Cleaning plastic parts
Use a sponge or chamois.
If vehicle wax adheres on the plastic bumper or mold-
ings, the surface may appear white in color. In this case,
wipe it off using lukewarm water and a soft cloth or
chamois.
CAUTION!
²Do not use a scrub brush or other hard tools as
they may damage the plastic part surface.
²Do not use wax containing compound (polishing
compound) which may damage the plastic part
surface.
²Do not bring plastic parts into contact with brake
fluids, engine oils, greases, thinner for painting,
and sulfuric acid (battery electrolyte) which may
stain, crack or discolor the plastic parts.
If they touch the plastic part, wipe them with a
soft cloth, or chamois and an aqueous solution of
neutral detergent. Then, immediately rinse the
affected parts with water.
258 VEHICLE CARE
Page 259 of 396
Chrome parts
To prevent spots and corrosion of chrome parts, wash
with water, dry thoroughly, and apply a nonabrasive
automotive wax. If the chrome is severely damaged or
pitted use a commercially available chrome polish.
Aluminum wheels (if so equipped)
A protective coating is provided over aluminum wheels.
Clean aluminum wheels with a cleaner designed for use
on aluminum and apply an appropriate protection agent.
CAUTION!
²Do not use abrasive cleaners.
²Brushes may damage the aluminum wheel sur-
face. Be sure to use a sponge, chamois, etc.
²Do not apply hot water directly from a steam
cleaner to the wheel surface.
²Wheels exposed to sea water or road chemicals
should be cleaned as soon as possible.
Window glass
The window glass can be cleaned using only a sponge
and water. Glass cleaner can be used to remove wax, oil,
grease, dead insects, etc. After washing the glass, wipe
dry with a clean, dry, soft cloth.
Wiper blades
Use a soft cloth and glass cleaner to remove grease, dead
insects, etc., from the wiper blades.
Replace the wiper blades when they no longer clean the
windshield properly.
Cleaning the sunroof (if so equipped)
Clean the inside of the sunroof with a soft cloth. Hard
deposits should be wiped away with a cloth dipped in
warm, neutral detergent solution. Wipe away the solu-
tion with a sponge dipped in fresh water.
NOTE: The surface treatment on the inside of the glass
may be removed if a hard cloth or organic solvent is used.
Engine compartment
Never spray or splash water on the electrical components
in the engine compartment, as this may adversely affect
the electrical circuits.
VEHICLE CARE 259
7
Page 276 of 396
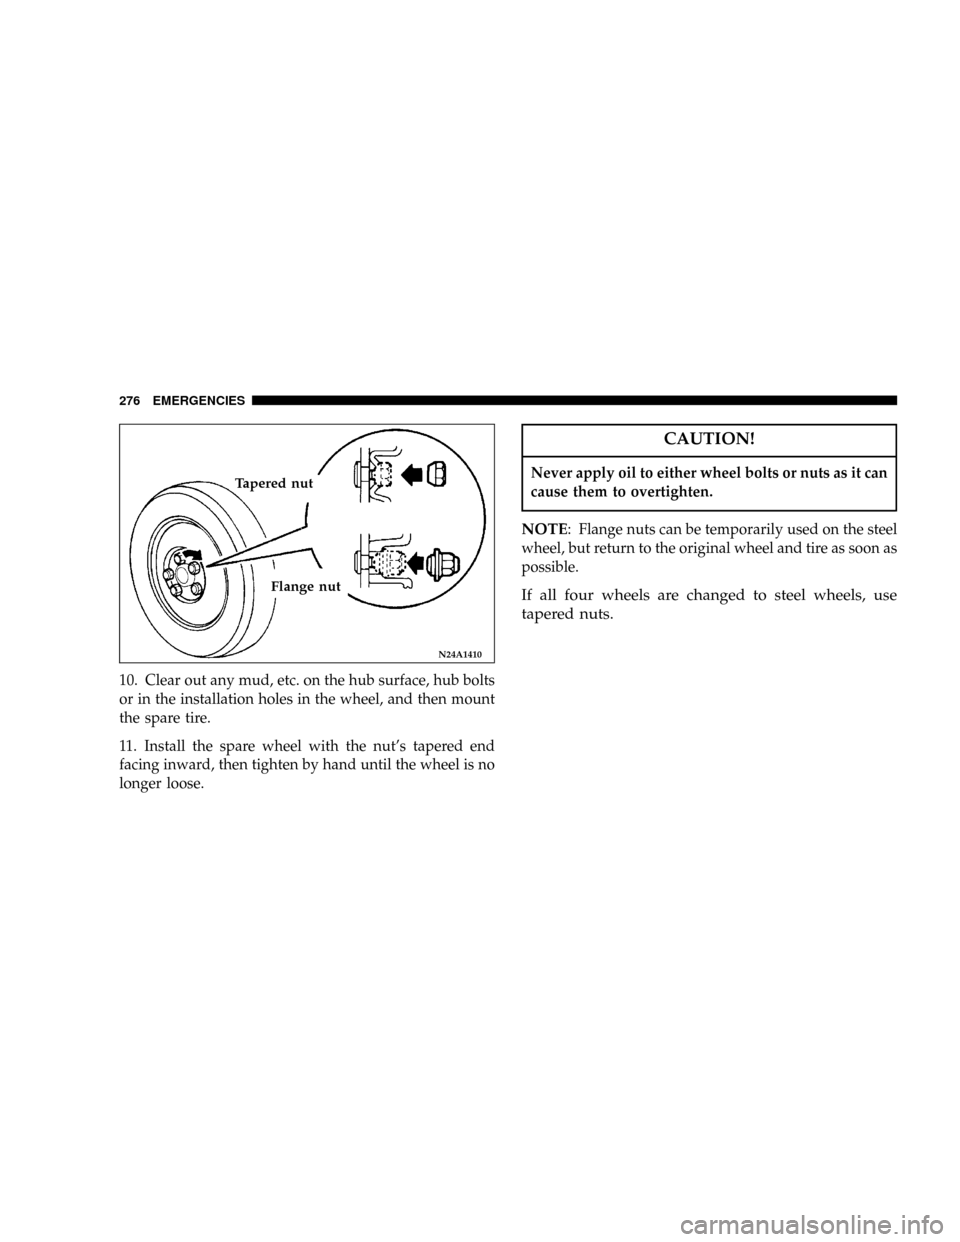
10. Clear out any mud, etc. on the hub surface, hub bolts
or in the installation holes in the wheel, and then mount
the spare tire.
11. Install the spare wheel with the nut's tapered end
facing inward, then tighten by hand until the wheel is no
longer loose.
CAUTION!
Never apply oil to either wheel bolts or nuts as it can
cause them to overtighten.
NOTE: Flange nuts can be temporarily used on the steel
wheel, but return to the original wheel and tire as soon as
possible.
If all four wheels are changed to steel wheels, use
tapered nuts.
N24A1410
Tapered nut
Flange nut
276 EMERGENCIES
Page 279 of 396
ENGINE OVERHEATING
If the engine coolant temperature gauge indicator enters
the ªHº (hot) position, the engine may be overheated.
In any of the following situations, you can reduce the
potential for overheating by taking the appropriate ac-
tion.
²On the highways Ð Slow down.
²In city traffic Ð While stopped, put transaxle in
neutral, but do not increase engine idle speed.
NOTE:There are steps that you can take to slow down
an impending overheat condition. If your air conditioner
is on, turn it off. The air conditioning system adds heat to
the engine cooling system and turning off the A/C
removes this heat. You can also turn the Temperature
control to maximum heat, the Mode control to floor, and
the fan control to High. This allows the heater core to act
as a supplement to the radiator and aids in removing heat
from the engine cooling system.
CAUTION!
Driving with a hot cooling system could damage
your vehicle. If temperature gauge reads ªHº, pull
over and stop the vehicle. Idle the vehicle with the
air conditioner turned off until the pointer drops
back into the normal range. If the pointer remains on
the ªHº, turn the engine off immediately, and call for
service.
WARNING!
A hot engine cooling system is dangerous. You or
others could be badly burned by steam or boiling
coolant. You may want to call a service center if your
vehicle overheats. If you decide to look under the
hood yourself, see Maintenance Section of this
manual. Follow the warnings under the Cooling
System Pressure Cap paragraph.
EMERGENCIES 279
8
Page 293 of 396

CAUTION!
²Never use a fuse with a capacity larger than that
specified or any substitute, such as wire, foil, etc.
Doing so will cause the circuit wiring to heat up
and could cause a fire.
²If the newly inserted fuse blows again after a
short time, have the electrical system checked by
an authorized dealer to find and correct the cause.
REPLACEMENT OF LIGHT BULBS
Before replacing a bulb, be sure the light is off. Do not
touch the glass part of the new bulb with your bare
fingers; the skin oil left on the glass will evaporate when
the bulb gets hot and the vapor will condense on the
reflector and dim the surface.
Bulb capacity
A bulb should only be replaced with a new bulb of the
same rating and type. The designation can be found on
the base of the bulb.
Outside
DescriptionWattage or
Candela
PowerANSI Trade
No. or
Bulb type
1 - Front turn signal and
parking light2.2cp 3157NAK
2 - Headlight 65/55W 9007(HB5)
3 - Front side marker light 1.5cp 194NA
4 - Front fog light (if so
equipped)37.5W 896
N10B2820
EMERGENCIES 293
8
Page 297 of 396
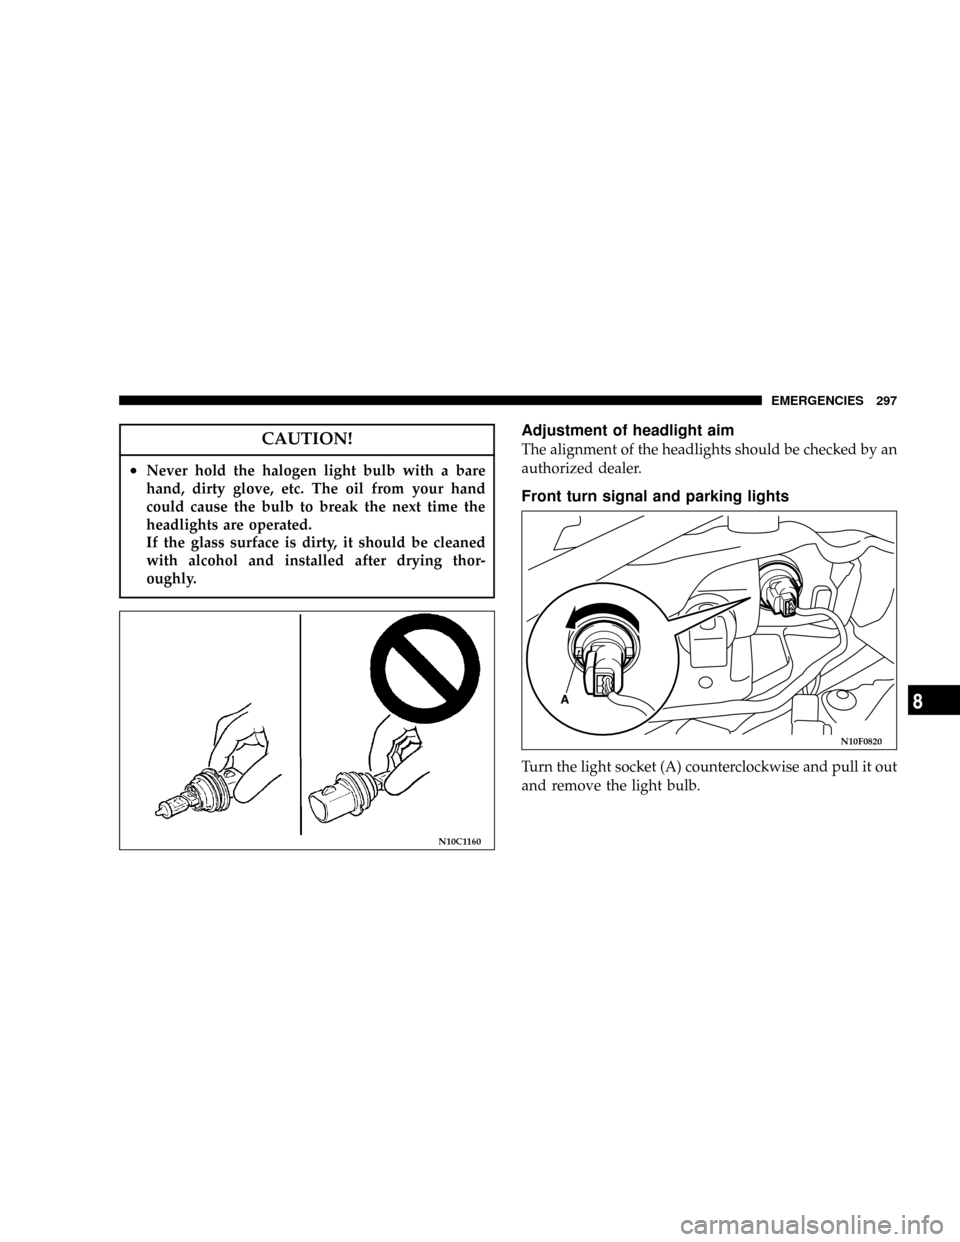
CAUTION!
²Never hold the halogen light bulb with a bare
hand, dirty glove, etc. The oil from your hand
could cause the bulb to break the next time the
headlights are operated.
If the glass surface is dirty, it should be cleaned
with alcohol and installed after drying thor-
oughly.
Adjustment of headlight aim
The alignment of the headlights should be checked by an
authorized dealer.
Front turn signal and parking lights
Turn the light socket (A) counterclockwise and pull it out
and remove the light bulb.
N10C1160
N10F0820
EMERGENCIES 297
8