2005 CHRYSLER VOYAGER headrest
[x] Cancel search: headrestPage 1909 of 2339
WARNING: TO AVOID PERSONAL INJURY OR
DEATH ON VEHICLES EQUIPPED WITH THE OCCU-
PANT CLASSIFICATION SYSTEM (OCS), ONLY THE
OCCUPANT CLASSIFICATION MODULE (OCM) AND
THE SEAT CUSHION TRIM MAY BE SERVICED SEP-
ARATELY. ALL OTHER COMPONENTS OF THE PAS-
SENGER SIDE FRONT SEAT CUSHION ASSEMBLY
MUST BE SERVICED ONLY AS A COMPLETE FAC-
TORY-CALIBRATED, ASSEMBLED AND TAMPER-EV-
IDENT SERVICE REPLACEMENT PACKAGE. THIS
PACKAGE INCLUDES THE FRAME, SPRINGS, PAD,
BLADDER, SENSOR, FOAM, WIRING AND A CALI-
BRATED OCM. WHEN INSTALLING THIS PACKAGE
ALWAYS REPLACE ALL OF THE EXISTING COMPO-
NENTS WITH THE NEW COMPONENTS AS A UNIT.
DO NOT ATTEMPT TO SEPARATE OR DISCONNECT
ANY OF THE NEW OCS COMPONENTS IN THE SER-
VICE REPLACEMENT PACKAGE FROM EACH
OTHER, AND DO NOT ATTEMPT TO REUSE ANY OF
THE REPLACED COMPONENTS IN THIS OR ANY
OTHER VEHICLE. FAILURE TO TAKE THE PROPER
PRECAUTIONS COULD RESULT IN FAILURE OF
THE PASSENGER AIRBAG TO DEPLOY WHEN
REQUIRED, OR IN PASSENGER AIRBAG DEPLOY-
MENT WHEN NOT REQUIRED.
(1) Place rear cover in position on seat.
(2) Engage fasteners attaching rear cover to slots
on power seat track.
(3) Engage arrowhead retainer into loop strip
attaching rear cover to power seat track crossbar
(Fig. 42).
ARMREST - SECOND ROW -
FOLD-IN-FLOOR
REMOVAL
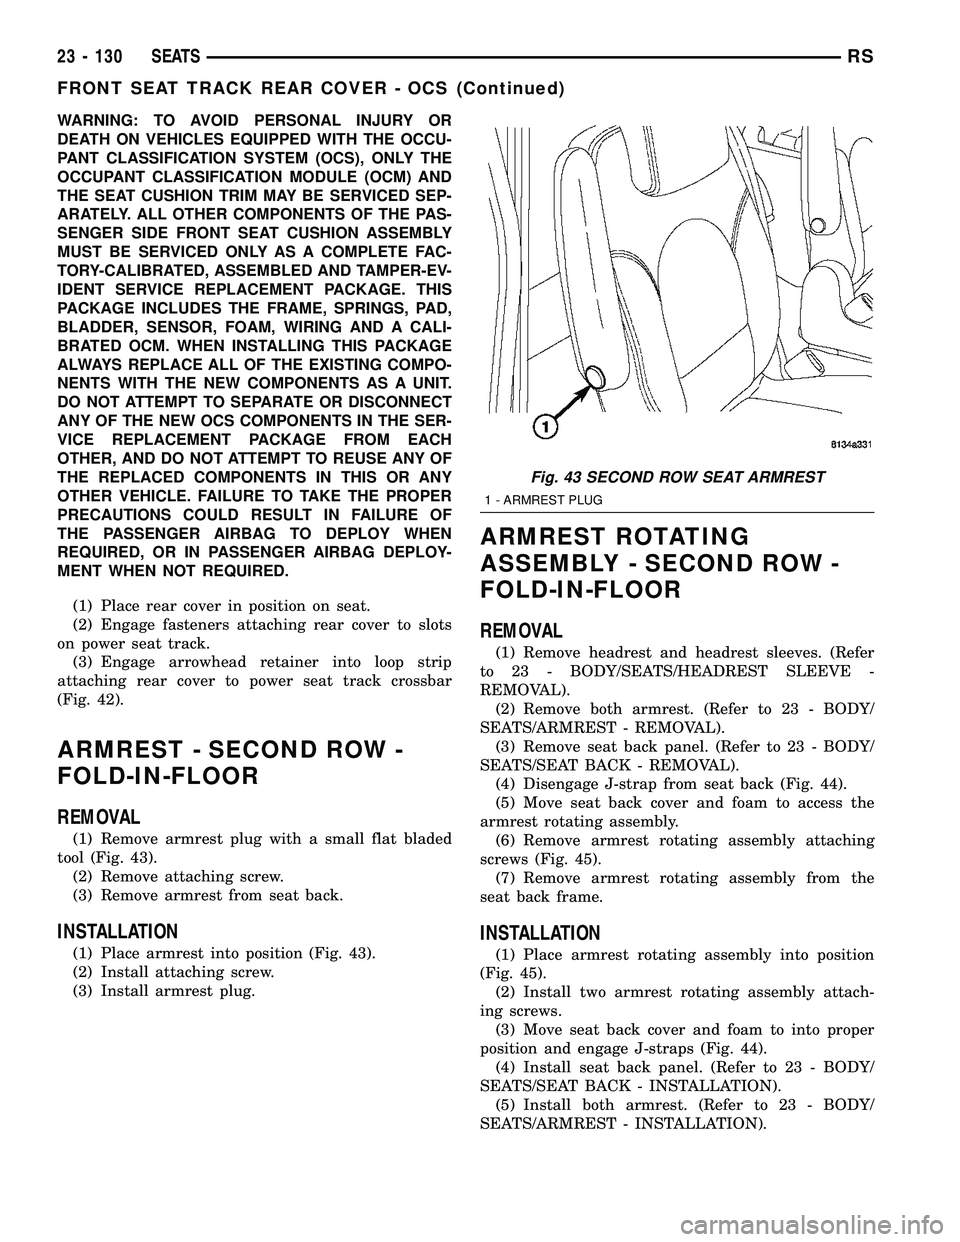
(1) Remove armrest plug with a small flat bladed
tool (Fig. 43).
(2) Remove attaching screw.
(3) Remove armrest from seat back.
INSTALLATION
(1) Place armrest into position (Fig. 43).
(2) Install attaching screw.
(3) Install armrest plug.
ARMREST ROTATING
ASSEMBLY - SECOND ROW -
FOLD-IN-FLOOR
REMOVAL
(1) Remove headrest and headrest sleeves. (Refer
to 23 - BODY/SEATS/HEADREST SLEEVE -
REMOVAL).
(2) Remove both armrest. (Refer to 23 - BODY/
SEATS/ARMREST - REMOVAL).
(3) Remove seat back panel. (Refer to 23 - BODY/
SEATS/SEAT BACK - REMOVAL).
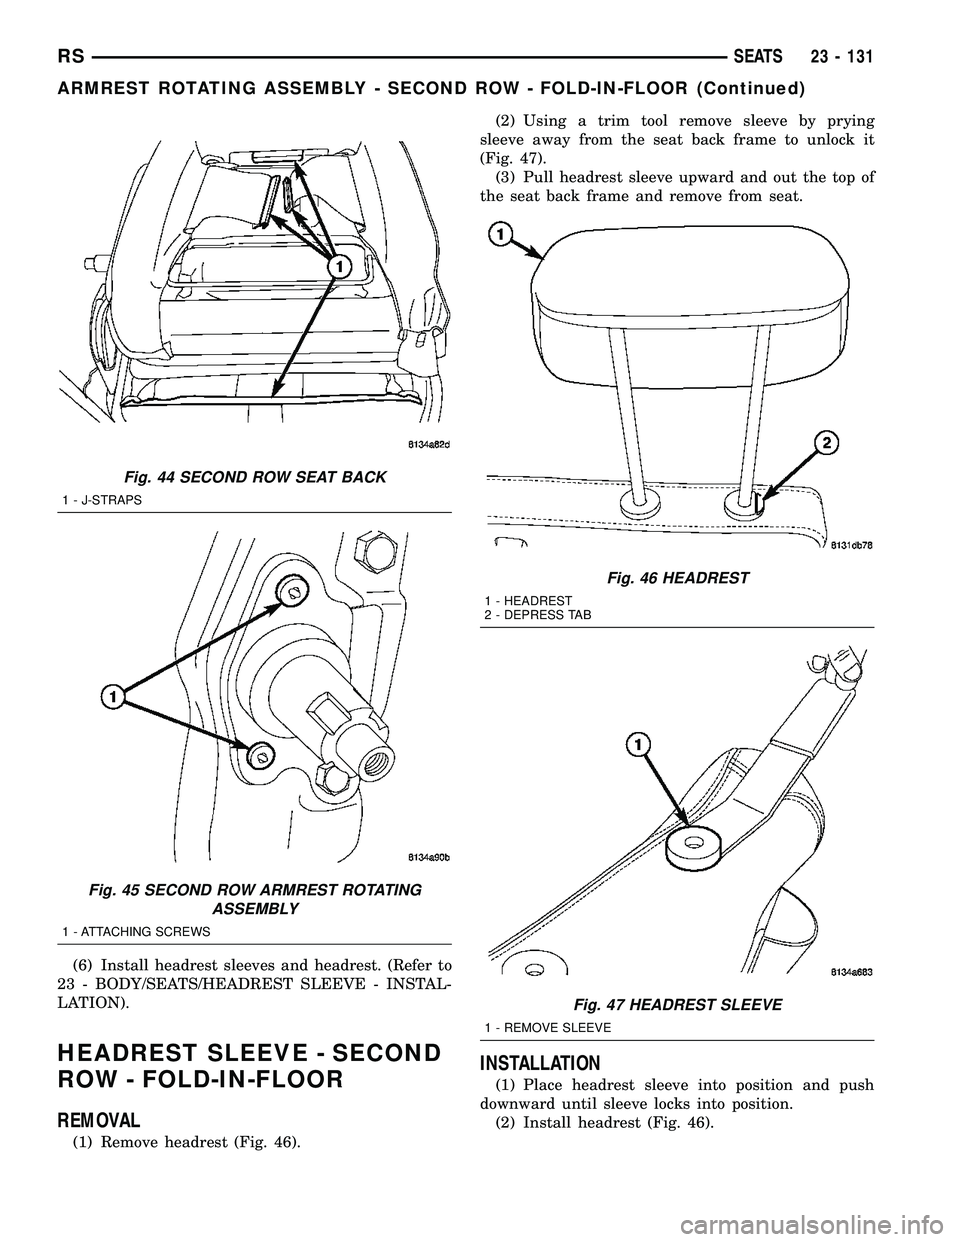
(4) Disengage J-strap from seat back (Fig. 44).
(5) Move seat back cover and foam to access the
armrest rotating assembly.
(6) Remove armrest rotating assembly attaching
screws (Fig. 45).
(7) Remove armrest rotating assembly from the
seat back frame.
INSTALLATION
(1) Place armrest rotating assembly into position
(Fig. 45).
(2) Install two armrest rotating assembly attach-
ing screws.
(3) Move seat back cover and foam to into proper
position and engage J-straps (Fig. 44).
(4) Install seat back panel. (Refer to 23 - BODY/
SEATS/SEAT BACK - INSTALLATION).
(5) Install both armrest. (Refer to 23 - BODY/
SEATS/ARMREST - INSTALLATION).
Fig. 43 SECOND ROW SEAT ARMREST
1 - ARMREST PLUG
23 - 130 SEATSRS
FRONT SEAT TRACK REAR COVER - OCS (Continued)
Page 1910 of 2339
(6) Install headrest sleeves and headrest. (Refer to
23 - BODY/SEATS/HEADREST SLEEVE - INSTAL-
LATION).
HEADREST SLEEVE - SECOND
ROW - FOLD-IN-FLOOR
REMOVAL
(1) Remove headrest (Fig. 46).(2) Using a trim tool remove sleeve by prying
sleeve away from the seat back frame to unlock it
(Fig. 47).
(3) Pull headrest sleeve upward and out the top of
the seat back frame and remove from seat.
INSTALLATION
(1) Place headrest sleeve into position and push
downward until sleeve locks into position.
(2) Install headrest (Fig. 46).
Fig. 44 SECOND ROW SEAT BACK
1 - J-STRAPS
Fig. 45 SECOND ROW ARMREST ROTATING
ASSEMBLY
1 - ATTACHING SCREWS
Fig. 46 HEADREST
1 - HEADREST
2 - DEPRESS TAB
Fig. 47 HEADREST SLEEVE
1 - REMOVE SLEEVE
RSSEATS23 - 131
ARMREST ROTATING ASSEMBLY - SECOND ROW - FOLD-IN-FLOOR (Continued)
Page 1912 of 2339
SEAT BACK COVER/FOAM -
SECOND ROW - FOLD-IN-
FLOOR
REMOVAL
(1) Remove both armrest. (Refer to 23 - BODY/
SEATS/ARMREST - REMOVAL).
(2) Remove headrest and headrest sleeves. (Refer
to 23 - BODY/SEATS/HEADREST SLEEVE -
REMOVAL).
(3) Remove seat back panel. (Refer to 23 - BODY/
SEATS/SEAT BACK PANEL - REMOVAL).
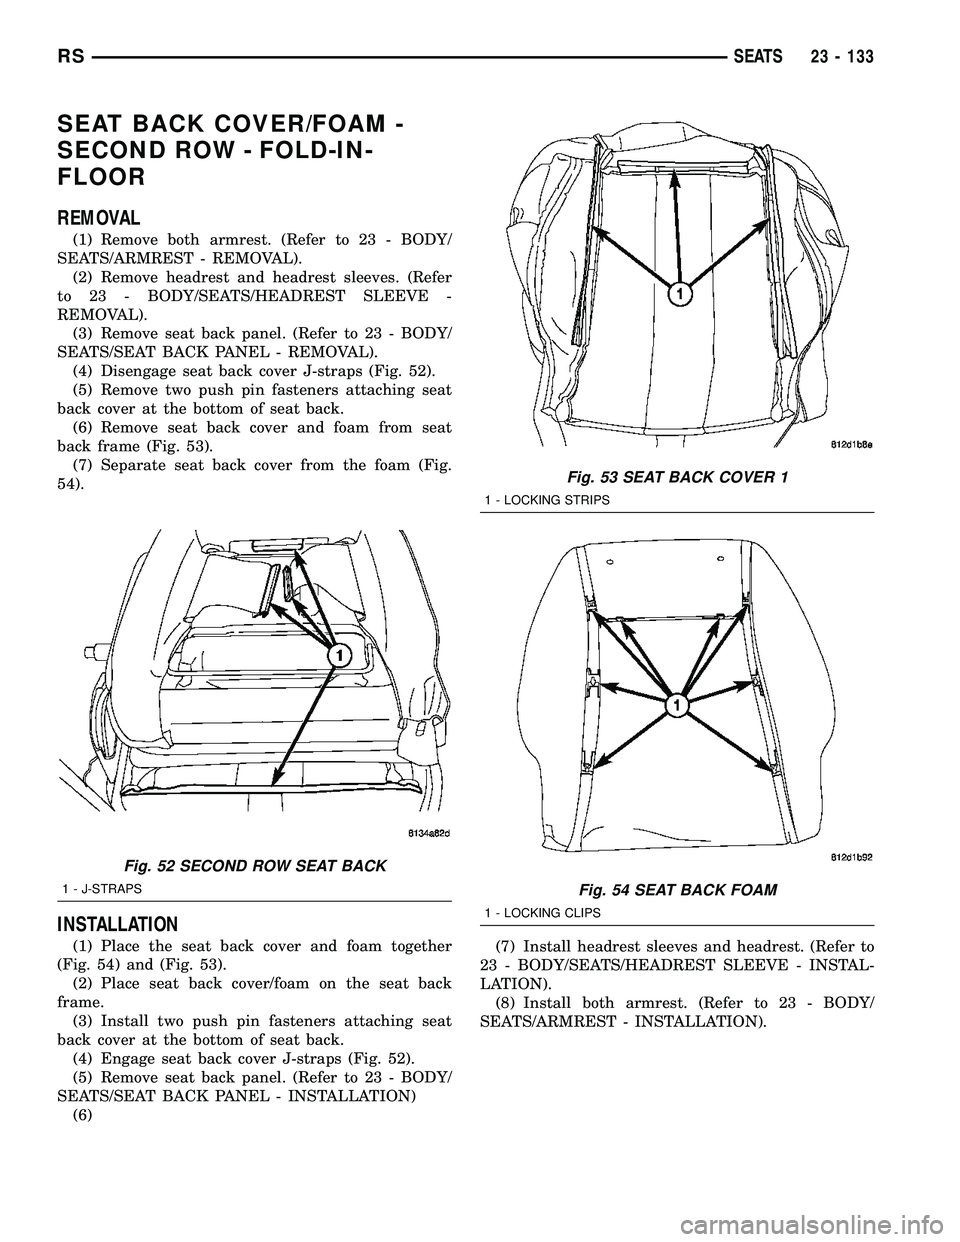
(4) Disengage seat back cover J-straps (Fig. 52).
(5) Remove two push pin fasteners attaching seat
back cover at the bottom of seat back.
(6) Remove seat back cover and foam from seat
back frame (Fig. 53).
(7) Separate seat back cover from the foam (Fig.
54).
INSTALLATION
(1) Place the seat back cover and foam together
(Fig. 54) and (Fig. 53).
(2) Place seat back cover/foam on the seat back
frame.
(3) Install two push pin fasteners attaching seat
back cover at the bottom of seat back.
(4) Engage seat back cover J-straps (Fig. 52).
(5) Remove seat back panel. (Refer to 23 - BODY/
SEATS/SEAT BACK PANEL - INSTALLATION)
(6)(7) Install headrest sleeves and headrest. (Refer to
23 - BODY/SEATS/HEADREST SLEEVE - INSTAL-
LATION).
(8) Install both armrest. (Refer to 23 - BODY/
SEATS/ARMREST - INSTALLATION).
Fig. 52 SECOND ROW SEAT BACK
1 - J-STRAPS
Fig. 53 SEAT BACK COVER 1
1 - LOCKING STRIPS
Fig. 54 SEAT BACK FOAM
1 - LOCKING CLIPS
RSSEATS23 - 133
Page 1919 of 2339
INSTALLATION
(1) Place prop rod into position.
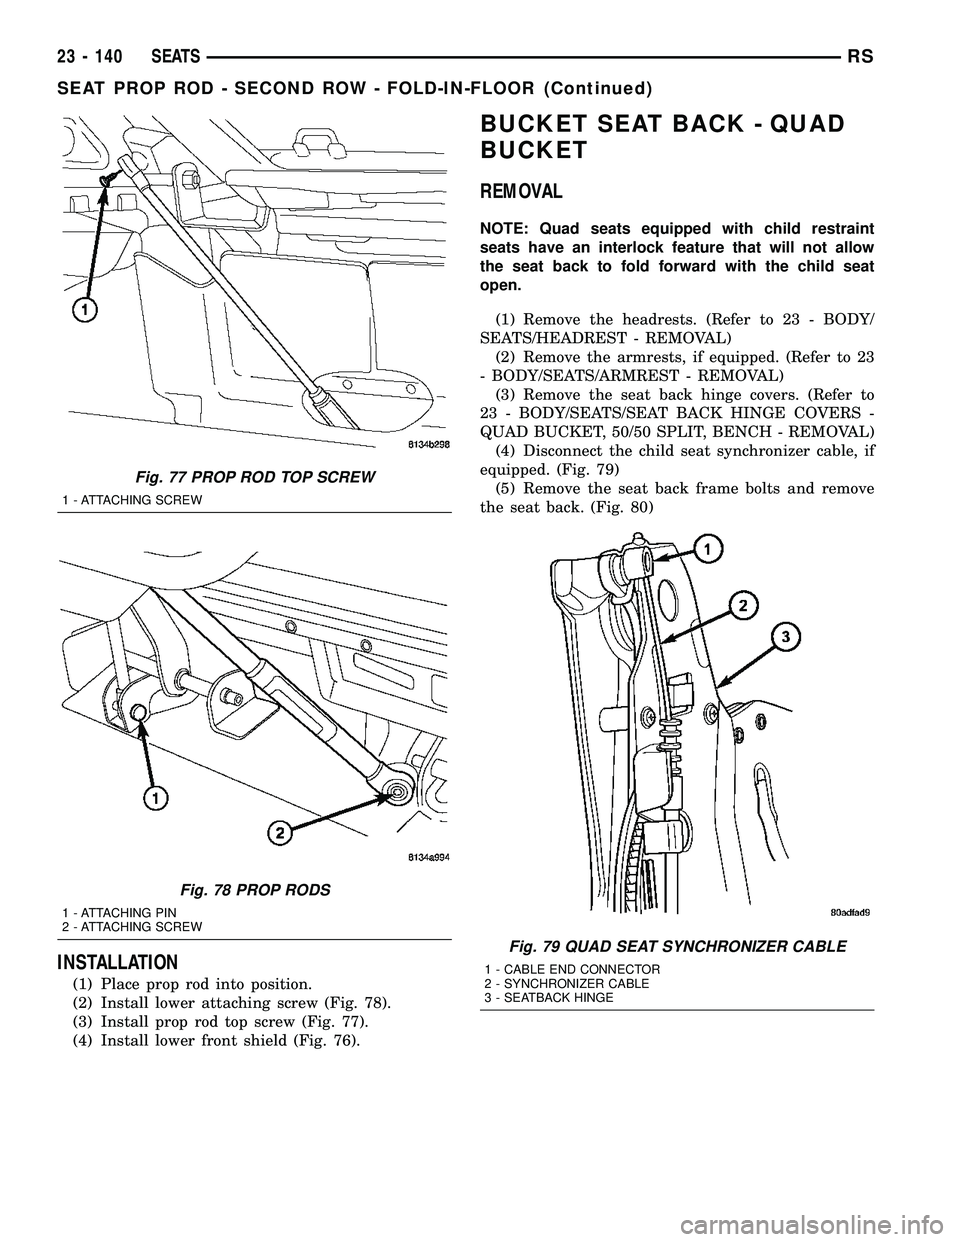
(2) Install lower attaching screw (Fig. 78).
(3) Install prop rod top screw (Fig. 77).
(4) Install lower front shield (Fig. 76).
BUCKET SEAT BACK - QUAD
BUCKET
REMOVAL
NOTE: Quad seats equipped with child restraint
seats have an interlock feature that will not allow
the seat back to fold forward with the child seat
open.
(1) Remove the headrests. (Refer to 23 - BODY/
SEATS/HEADREST - REMOVAL)
(2) Remove the armrests, if equipped. (Refer to 23
- BODY/SEATS/ARMREST - REMOVAL)
(3) Remove the seat back hinge covers. (Refer to
23 - BODY/SEATS/SEAT BACK HINGE COVERS -
QUAD BUCKET, 50/50 SPLIT, BENCH - REMOVAL)
(4) Disconnect the child seat synchronizer cable, if
equipped. (Fig. 79)
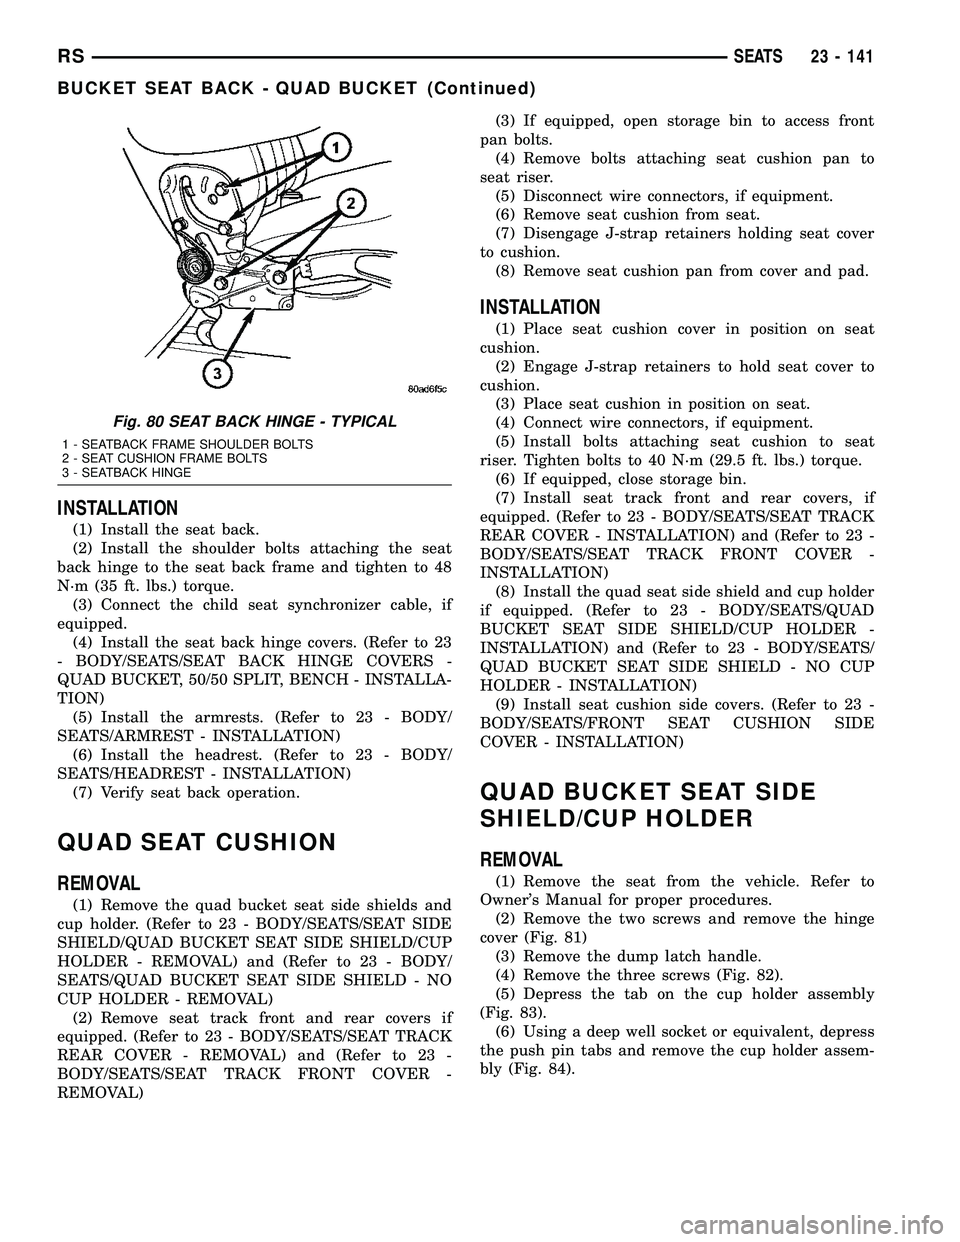
(5) Remove the seat back frame bolts and remove
the seat back. (Fig. 80)
Fig. 77 PROP ROD TOP SCREW
1 - ATTACHING SCREW
Fig. 78 PROP RODS
1 - ATTACHING PIN
2 - ATTACHING SCREW
Fig. 79 QUAD SEAT SYNCHRONIZER CABLE
1 - CABLE END CONNECTOR
2 - SYNCHRONIZER CABLE
3 - SEATBACK HINGE
23 - 140 SEATSRS
SEAT PROP ROD - SECOND ROW - FOLD-IN-FLOOR (Continued)
Page 1920 of 2339
INSTALLATION
(1) Install the seat back.
(2) Install the shoulder bolts attaching the seat
back hinge to the seat back frame and tighten to 48
N´m (35 ft. lbs.) torque.
(3) Connect the child seat synchronizer cable, if
equipped.
(4) Install the seat back hinge covers. (Refer to 23
- BODY/SEATS/SEAT BACK HINGE COVERS -
QUAD BUCKET, 50/50 SPLIT, BENCH - INSTALLA-
TION)
(5) Install the armrests. (Refer to 23 - BODY/
SEATS/ARMREST - INSTALLATION)
(6) Install the headrest. (Refer to 23 - BODY/
SEATS/HEADREST - INSTALLATION)
(7) Verify seat back operation.
QUAD SEAT CUSHION
REMOVAL
(1) Remove the quad bucket seat side shields and
cup holder. (Refer to 23 - BODY/SEATS/SEAT SIDE
SHIELD/QUAD BUCKET SEAT SIDE SHIELD/CUP
HOLDER - REMOVAL) and (Refer to 23 - BODY/
SEATS/QUAD BUCKET SEAT SIDE SHIELD - NO
CUP HOLDER - REMOVAL)
(2) Remove seat track front and rear covers if
equipped. (Refer to 23 - BODY/SEATS/SEAT TRACK
REAR COVER - REMOVAL) and (Refer to 23 -
BODY/SEATS/SEAT TRACK FRONT COVER -
REMOVAL)(3) If equipped, open storage bin to access front
pan bolts.
(4) Remove bolts attaching seat cushion pan to
seat riser.
(5) Disconnect wire connectors, if equipment.
(6) Remove seat cushion from seat.
(7) Disengage J-strap retainers holding seat cover
to cushion.
(8) Remove seat cushion pan from cover and pad.
INSTALLATION
(1) Place seat cushion cover in position on seat
cushion.
(2) Engage J-strap retainers to hold seat cover to
cushion.
(3) Place seat cushion in position on seat.
(4) Connect wire connectors, if equipment.
(5) Install bolts attaching seat cushion to seat
riser. Tighten bolts to 40 N´m (29.5 ft. lbs.) torque.
(6) If equipped, close storage bin.
(7) Install seat track front and rear covers, if
equipped. (Refer to 23 - BODY/SEATS/SEAT TRACK
REAR COVER - INSTALLATION) and (Refer to 23 -
BODY/SEATS/SEAT TRACK FRONT COVER -
INSTALLATION)
(8) Install the quad seat side shield and cup holder
if equipped. (Refer to 23 - BODY/SEATS/QUAD
BUCKET SEAT SIDE SHIELD/CUP HOLDER -
INSTALLATION) and (Refer to 23 - BODY/SEATS/
QUAD BUCKET SEAT SIDE SHIELD - NO CUP
HOLDER - INSTALLATION)
(9) Install seat cushion side covers. (Refer to 23 -
BODY/SEATS/FRONT SEAT CUSHION SIDE
COVER - INSTALLATION)
QUAD BUCKET SEAT SIDE
SHIELD/CUP HOLDER
REMOVAL
(1) Remove the seat from the vehicle. Refer to
Owner's Manual for proper procedures.
(2) Remove the two screws and remove the hinge
cover (Fig. 81)
(3) Remove the dump latch handle.
(4) Remove the three screws (Fig. 82).
(5) Depress the tab on the cup holder assembly
(Fig. 83).
(6) Using a deep well socket or equivalent, depress
the push pin tabs and remove the cup holder assem-
bly (Fig. 84).
Fig. 80 SEAT BACK HINGE - TYPICAL
1 - SEATBACK FRAME SHOULDER BOLTS
2 - SEAT CUSHION FRAME BOLTS
3 - SEATBACK HINGE
RSSEATS23 - 141
BUCKET SEAT BACK - QUAD BUCKET (Continued)
Page 1926 of 2339
(7) Install bench seat back hinge covers. (Refer to
23 - BODY/SEATS/SEAT BACK HINGE COVERS -
50/50 SPLIT, BENCH - INSTALLATION)
(8) Verify seat back hinge operation and adjust
synchronizing cable, if equipped. (Refer to 23 -
BODY/SEATS/SYNCHRONIZING CABLE ADJUST-
MENT)
SYNCHRONIZING CABLE ADJUSTMENT
NOTE:
Bench seats equipped with child restraint seats
have an interlock feature that will not allow the seat
back to fold forward with the child seat open.
If the seat back hinges do not release at the same
time the synchronizing cable must be adjusted.
(1) Remove seat from vehicle. Refer to Owner's
Manual for proper procedures.
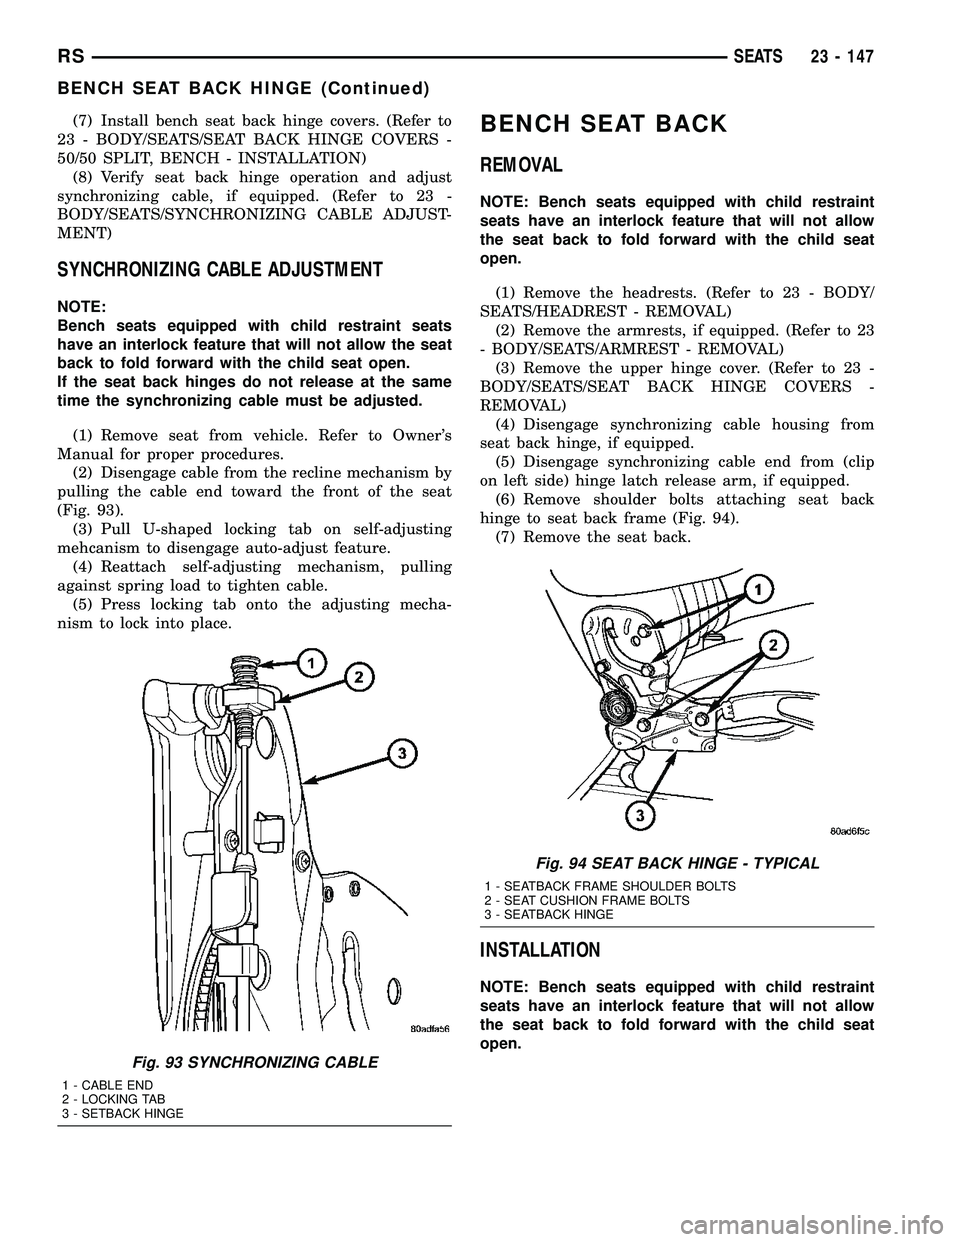
(2) Disengage cable from the recline mechanism by
pulling the cable end toward the front of the seat
(Fig. 93).
(3) Pull U-shaped locking tab on self-adjusting
mehcanism to disengage auto-adjust feature.
(4) Reattach self-adjusting mechanism, pulling
against spring load to tighten cable.
(5) Press locking tab onto the adjusting mecha-
nism to lock into place.
BENCH SEAT BACK
REMOVAL
NOTE: Bench seats equipped with child restraint
seats have an interlock feature that will not allow
the seat back to fold forward with the child seat
open.
(1) Remove the headrests. (Refer to 23 - BODY/
SEATS/HEADREST - REMOVAL)
(2) Remove the armrests, if equipped. (Refer to 23
- BODY/SEATS/ARMREST - REMOVAL)
(3) Remove the upper hinge cover. (Refer to 23 -
BODY/SEATS/SEAT BACK HINGE COVERS -
REMOVAL)
(4) Disengage synchronizing cable housing from
seat back hinge, if equipped.
(5) Disengage synchronizing cable end from (clip
on left side) hinge latch release arm, if equipped.
(6) Remove shoulder bolts attaching seat back
hinge to seat back frame (Fig. 94).
(7) Remove the seat back.
INSTALLATION
NOTE: Bench seats equipped with child restraint
seats have an interlock feature that will not allow
the seat back to fold forward with the child seat
open.
Fig. 93 SYNCHRONIZING CABLE
1 - CABLE END
2 - LOCKING TAB
3 - SETBACK HINGE
Fig. 94 SEAT BACK HINGE - TYPICAL
1 - SEATBACK FRAME SHOULDER BOLTS
2 - SEAT CUSHION FRAME BOLTS
3 - SEATBACK HINGE
RSSEATS23 - 147
BENCH SEAT BACK HINGE (Continued)
Page 1927 of 2339
(1) Install the seat back.
(2) Install the shoulder bolts attaching the seat
back hinge to the seat back frame and tighten to 34
N´m (25 ft. lbs.) torque.
(3) Connect the synchronizing cable end from (clip
on left side) hinge latch release arm, if equipped.
(4) Connect the synchronizing cable housing to the
seat back hinge, if equipped.
(5) Install the upper hinge cover. (Refer to 23 -
BODY/SEATS/SEAT BACK HINGE - INSTALLA-
TION)
(6) Install the armrests, if equipped. (Refer to 23 -
BODY/SEATS/ARMREST - INSTALLATION)
(7) Install the headrest sleeves. (Refer to 23 -
BODY/SEATS/HEADREST SLEEVE - INSTALLA-
TION)
(8) Adjust synchronizing cable, if equipped. (Refer
to 23 - BODY/SEATS/SYNCHRONIZING CABLE
ADJUSTMENT)
BENCH SEAT BACK COVER
REMOVAL
(1) Remove the bench seat back. (Refer to 23 -
BODY/SEATS/BENCH SEAT BACK - REMOVAL)
(2) Remove the bench seat back panel. (Refer to 23
- BODY/SEATS/BENCH SEAT BACK PANEL -
REMOVAL)
(3) Disconnect the cover J-straps.
(4) Remove the seat back cover from the seat back
assembly.
INSTALLATION
(1) Install seat back cover onto the seat back
frame and cushion assembly.
(2) Connect the J-straps.
(3) Install the bench seat back panel. (Refer to 23 -
BODY/SEATS/BENCH SEAT BACK PANEL -
INSTALLATION)
(4) Install the seat back. (Refer to 23 - BODY/
SEATS/BENCH SEAT BACK - INSTALLATION)
BENCH SEAT TRACK
REMOVAL
(1) Remove second row seat from vehicle. Refer to
Owner's Manual for proper procedure.
(2) Place seat on clean covered work surface.
(3) Disengage seat track adjuster link wire from
track being removed.
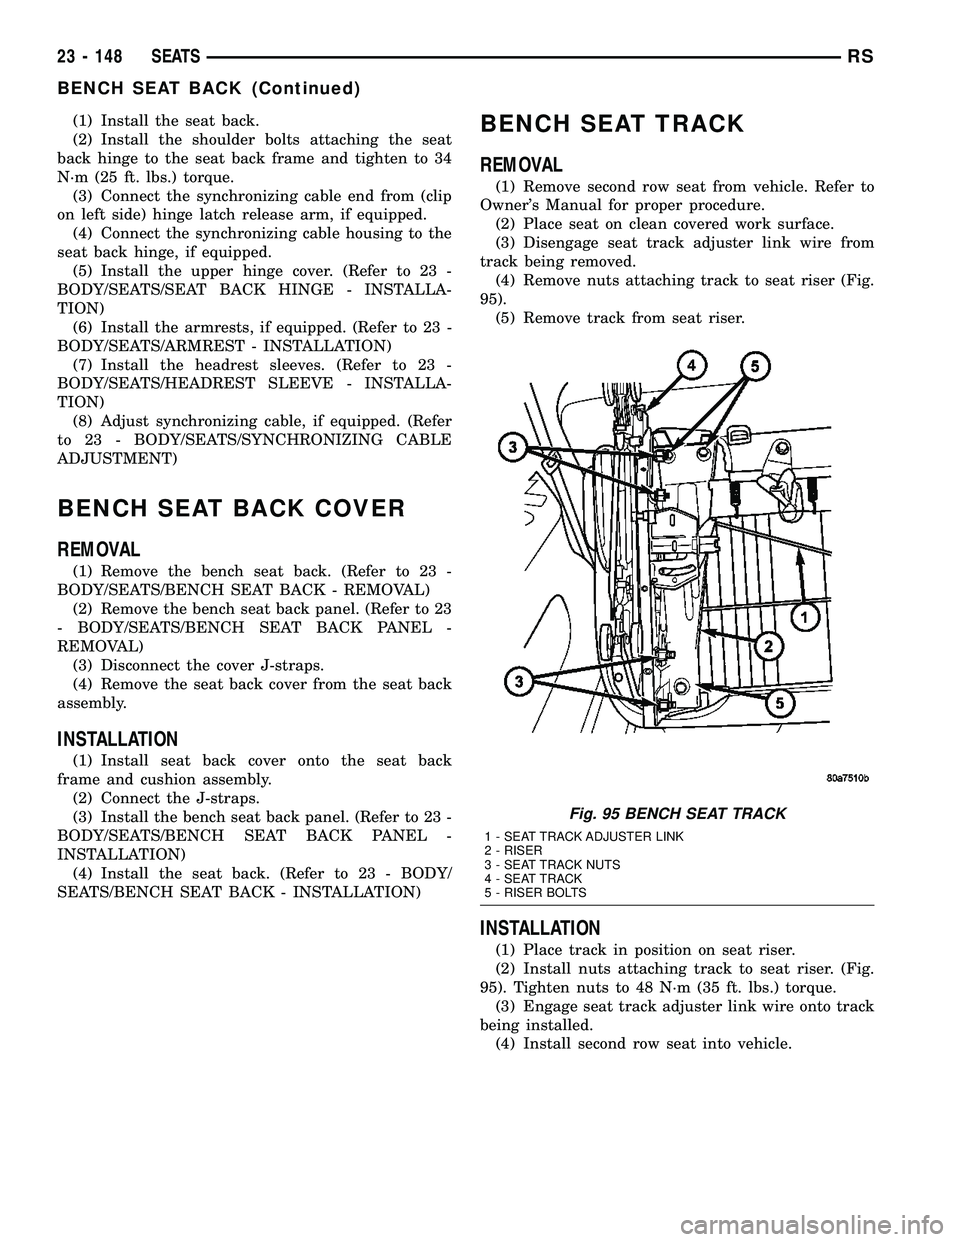
(4) Remove nuts attaching track to seat riser (Fig.
95).
(5) Remove track from seat riser.
INSTALLATION
(1) Place track in position on seat riser.
(2) Install nuts attaching track to seat riser. (Fig.
95). Tighten nuts to 48 N´m (35 ft. lbs.) torque.
(3) Engage seat track adjuster link wire onto track
being installed.
(4) Install second row seat into vehicle.
Fig. 95 BENCH SEAT TRACK
1 - SEAT TRACK ADJUSTER LINK
2 - RISER
3 - SEAT TRACK NUTS
4 - SEAT TRACK
5 - RISER BOLTS
23 - 148 SEATSRS
BENCH SEAT BACK (Continued)
Page 1931 of 2339

BOTTOM OF SEAT CUSHION
PAN PANEL-THIRD ROW -
FOLD-IN-FLOOR
REMOVAL
(1) Fold the third row seat with back down.
(2) Remove handle from cushion.
(3) Using a trim tool, remove bottom side of the
cushion pan panel (Fig. 105).
INSTALLATION
(1) Place bottom side of the cushion pan panel into
position (Fig. 106).
(2) Press on back of cushion pan panel to seat the
fasteners.
(3) Install handle on cushion.
(4) Place seat in the up right position.
HEADREST SLEEVE - THIRD
ROW - FOLD-IN-FLOOR
REMOVAL
(1) Remove headrest (Fig. 107).
(2) Using a trim tool remove sleeve by prying
sleeve away from the seat back frame to unlock it
(Fig. 108)
(3) Pull headrest sleeve upward and out the top of
the seat back frame and remove from seat.
Fig. 105 THIRD ROW CUSHION PAN & COVER
Fig. 106 THIRD ROW CUSHION PAN & COVER
Fig. 107 HEADREST
1 - HEADREST
2 - DEPRESS TAB
Fig. 108 REMOVING HEADREST SLEEVES
1 - HEADREST SLEEVES
2 - TRIM TOOL
23 - 152 SEATSRS