Page 288 of 472
Operating Tips A/C Air Filter—If Equipped
The climate control system filters out dust, pollen and
some odors from the air. Strong odors can not be totally
filtered out. Refer to MAINTAINING YOUR VEHICLE,
“Air Conditioner Maintenance”for filter replacement
instructions.
REAR WINDOW FEATURES
Intermittent Rear Wiper Operation—Manual
Temperature Control Only
The controls are located on the Manual Tempera-
ture Control head above the front blower control.
When the button is pressed and released and the
Ignition Switch in ON, the rear wiper will operate at a
fixed interval of about 8 seconds. As vehicle speed
increases, the time delay will shorten. The LED indicator
will light when the wiper is ON. Pressing and releasing
the button again with turn the wiper off.
288 UNDERSTANDING YOUR INSTRUMENT PANEL
Page 328 of 472

CHECK TPM SYSTEM
The Tire Pressure Monitor System (TPM) system requires
service.
See your authorized dealer for service.
CAUTION!
The TPM system has been optimized for the original
equipment tires and wheels. TPM system pressures
have been established for the tire size equipped on
your vehicle. Undesirable operation or sensor dam-
age may result when using replacement equipment
that is not of the same size, type, and/or style.
After-market wheels can cause sensor damage. Do
not use tire sealant or balance beads if your vehicle
is equipped with TPM system as damage to the
sensors may result.
NOTE:
•The TPM system can inform the driver of a low tire
pressure condition of 28 psi [1.9 bars] (193 kPa) or less,
or high a tire pressure condition of 48 psi [3.3 bars]
(330 kPa) or more.
•The TPM system is not intended to replace normal tire
care and maintenance, nor to provide warning of a tire
failure or condition.
•The TPM system should not be used as a tire pressure
gauge while adjusting your tire pressure.
CAUTION!
After inspecting or adjusting the tire pressure al-
ways reinstall the valve stem cap. This will prevent
moisture and dirt entry into the valve stem, which
could damage the wheel rim sensor.
328 STARTING AND OPERATING
Page 331 of 472

NOTE:In order to avoid damage to tires, chains, and
your vehicle do not drive for a prolonged period of time
on dry pavement. Observe the tire chain manufacturer’s
instructions on method of installation, operating speed,
and conditions for usage.
Always use the lower suggested operating speed if both
the chain manufacturer and vehicle manufacture suggest
a maximum speed. This notice applies to all chain
traction devices, including link and cable (radial) chains.
SNOW TIRES
Some areas of the country require the use of snow tires
during winter. Standard tires are of the all season type
and satisfy this requirement as indicated by the M+S
designation on the tire side wall.
If you need snow tires, select tires equivalent in size and
type to the original equipment tires. Use snow tires only
in sets of 4, failure to do so may adversely affect the
safety and handling of your vehicle.Snow tires generally have lower speed ratings than what
was originally equipped with your vehicle and should
not be operated at sustained speeds over 75 mph (120
km/h).
TIRE ROTATION RECOMMENDATIONS
Tires on the front and rear axles of vehicles operate at
different loads and perform different steering, driving,
and braking functions. For these reasons, they wear at
unequal rates, and tend to develop irregular wear pat-
terns.
These effects can be reduced by timely rotation of tires.
The benefits of rotation are especially worthwhile with
aggressive tread designs such as those on all season type
tires. Rotation will increase tread life, help to maintain
mud, snow, and wet traction levels, and contribute to a
smooth, quiet ride.
Follow the recommended tire rotation frequency for your
type of driving found in the“Maintenance Schedules”
STARTING AND OPERATING 331
5
Page 341 of 472

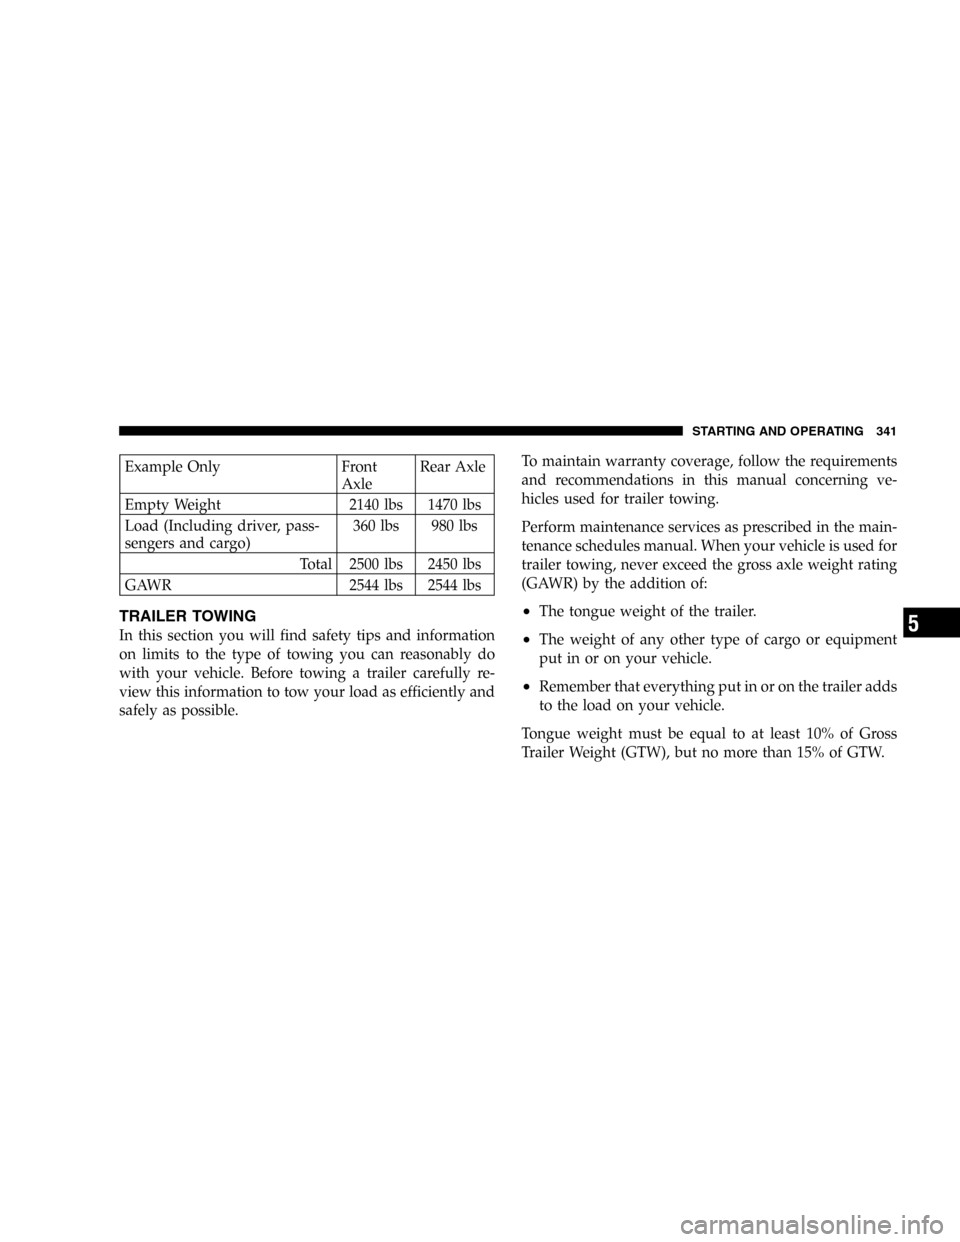
Example Only Front
AxleRear Axle
Empty Weight 2140 lbs 1470 lbs
Load (Including driver, pass-
sengers and cargo)360 lbs 980 lbs
Total 2500 lbs 2450 lbs
GAWR 2544 lbs 2544 lbs
TRAILER TOWING
In this section you will find safety tips and information
on limits to the type of towing you can reasonably do
with your vehicle. Before towing a trailer carefully re-
view this information to tow your load as efficiently and
safely as possible.To maintain warranty coverage, follow the requirements
and recommendations in this manual concerning ve-
hicles used for trailer towing.
Perform maintenance services as prescribed in the main-
tenance schedules manual. When your vehicle is used for
trailer towing, never exceed the gross axle weight rating
(GAWR) by the addition of:
•The tongue weight of the trailer.
•The weight of any other type of cargo or equipment
put in or on your vehicle.
•Remember that everything put in or on the trailer adds
to the load on your vehicle.
Tongue weight must be equal to at least 10% of Gross
Trailer Weight (GTW), but no more than 15% of GTW.
STARTING AND OPERATING 341
5
Page 348 of 472

WARNING!
A hot engine cooling system is dangerous. You or
others could be badly burned by steam or boiling
coolant. You may want to call a service center if your
vehicle overheats. If you decide to look under the
hood yourself, see Section 7, Maintenance, of this
manual. Follow the warnings under the Cooling
System Pressure Cap paragraph.
JACKING AND TIRE CHANGING
WARNING!
•Getting under a jacked-up vehicle is dangerous. The
vehicle could slip off the jack and fall on you. You
could be crushed. Never get any part of your body
under a vehicle that is on a jack. If you need to get
under a raised vehicle, take it to a service center
where it can be raised on a lift.
•The jack is designed to use as a tool for changing
tires only. The jack should not be used to lift the
vehicle for service purposes. The vehicle should be
jacked on a firm level surface only. Avoid ice or
slippery areas.
•For vehicles equipped with fold-in-floor seating, if it
is necessary to retrieve the spare tire from under the
vehicle on the side of the vehicle close to moving
traffic. Pull far enough off the road to avoid the
danger of being hit.
348 WHAT TO DO IN EMERGENCIES
Page 373 of 472
MAINTAINING YOUR VEHICLE
CONTENTS
�3.3L/3.8L Engines......................376
�Onboard Diagnostic System—OBDII........377
�Emissions Inspection And Maintenance
Programs............................378
�Replacement Parts......................379
�Dealer Service.........................379
�Maintenance Procedures..................380
▫Engine Oil..........................380
▫Engine Oil Filter......................384▫Drive Belts—Check Condition
And Tension.........................384
▫Spark Plugs.........................385
▫Engine Air Cleaner Filter................385
▫Catalytic Converter....................385
▫Maintenance-Free Battery................387
▫Air Conditioner Maintenance.............389
▫Power Steering—Fluid Check............390
▫Front Suspension Ball Joints..............391
7
Page 378 of 472

EMISSIONS INSPECTION AND MAINTENANCE
PROGRAMS
In some localities, it may be a legal requirement to pass
an inspection of your vehicle’s emissions control system.
Failure to pass could prevent vehicle registration.
For states which have an I/M (Inspection and
Maintenance) requirement, this check verifies the
following: the MIL (Malfunction Indicator Lamp)
is functioning and is not on when the engine is running,
and that the OBD (On Board Diagnostic) system is ready
for testing.
Normally, the OBD system will be ready. The OBD
system maynotbe ready if your vehicle was recently
serviced, if you recently had a dead battery, or a battery
replacement. If the OBD system should be determined
not ready for the I/M test, your vehicle may fail the test.Your vehicle has a simple ignition key actuated test
which you can use prior to going to the test station. To
check if your vehicle’s OBD system is ready, you must do
the following:
1. Insert your ignition key into the ignition switch.
2. Turn the ignition to the ON position, but do not crank
or start the engine.
3. If you crank or start the engine, you will have to start
this test over.
4. As soon as you turn your key to the ON position, you
will see your MIL symbol come on as part of a normal
bulb check.
5. Approximately 15 seconds later, one of two things will
happen:
a. The MIL will flash for about 10 seconds and then
return to being fully illuminated until you turn off the
378 MAINTAINING YOUR VEHICLE
Page 379 of 472

ignition key or start the engine. This means that your
vehicle’s OBD system isnot readyand you shouldnot
proceed to the I/M station.
b. The MIL will not flash at all and will remain fully
illuminated until you turn off the ignition key or start
the engine. This means that your vehicle’s OBD system
isreadyand you can proceed to the I/M station.
If your OBD system isnot ready,you should see your
authorized dealer or repair facility. If your vehicle was
recently serviced or had a battery failure or replacement,
you may need to do nothing more than drive your
vehicle as you normally would in order for your OBD
system to update. A recheck with the above test routine
may then indicate that the system is now ready.
Regardless of whether your vehicle’s OBD system is
ready or not ready, if the MIL symbol is illuminated
during normal vehicle operation, you should have yourvehicle serviced before going to the I/M station. The I/M
station can fail your vehicle because the MIL symbol is on
with the engine running.
REPLACEMENT PARTS
Use of genuine Mopar�parts for normal/scheduled
maintenance and repairs is highly recommended to in-
sure the designed performance. Damage or failures
caused by the use of non-Mopar�parts for maintenance
and repairs will not be covered by the manufacturer’s
warranty.
DEALER SERVICE
Your dealer has the qualified service personnel, special
tools and equipment to perform all service operations in
an expert manner. Service Manuals are available which
include detailed service information for your vehicle.
Refer to these manuals before attempting any procedure
yourself.
MAINTAINING YOUR VEHICLE 379
7