Page 401 of 472

Insure nylon tubing in these areas has not melted or
collapsed.
Inspect all hose connections such as clamps and cou-
plings to make sure they are secure and no leaks are
present.
NOTE:Often, fluid such as oil, power steering fluid,
and brake fluid are used during assembly plant opera-
tions to facilitate the assembly of hoses to couplings.
Therefore, oil wetness at the hose-coupling area is not
necessarily an indication of leakage. Actual dripping of
hot fluid when systems are under pressure (during
vehicle operation), should be noted before hose is re-
placed based on leakage.
NOTE:Inspection of brake hoses should be performed
whenever the brake system is serviced and every engine
oil change. Inspect hydraulic brake hoses for surface
cracking, scuffing, or worn spots. If there is any evidence
of cracking, scuffing, or worn spots, the hose should bereplaced immediately! Eventual deterioration of the hose
can take place resulting in a possibility of a burst failure.
WARNING!
Worn brake hoses can burst and cause brake failure.
You could have an accident. If you see any signs of
cracking, scuffing, or worn spots, have the brake
hoses replaced immediately.
Master Cylinder—ABS Brakes Brake Fluid Level
Check
The fluid level in the master cylinder should be checked
when performing underhood services, or immediately if
the brake system warning light indicates system failure.
Clean the top of the master cylinder area before removing
the cap. Add fluid to bring the level up to the top of the
“FULL”mark on the side of the master cylinder reservoir.
MAINTAINING YOUR VEHICLE 401
7
Page 402 of 472

Overfilling of fluid is not recommended because it may
cause leaking in the system.
Add enough fluid to bring the level up to the require-
ments described on the brake fluid reservoir. With disc
brakes, fluid level can be expected to fall as the brake
pads wear. However, low fluid level may be caused by a
leak and a checkup may be needed.
Use only manufacturers recommended brake fluid, refer
to Recommended Fluids, Lubricants and Genuine Parts
for correct fluid type.
WARNING!
Use of brake fluid that may have a lower initial
boiling point or unidentified as to specification, may
result in sudden brake failure during hard pro-
longed braking. You could have an accident.
WARNING!
Overfilling the brake fluid reservoir can result in
spilling brake fluid on hot engine parts and the
brake fluid catching fire.
Use only brake fluid that has been in a tightly closed
container to avoid contamination from foreign matter or
moisture.
CAUTION!
Do not allow petroleum base fluid to contaminate
the brake fluid—all brake seal components could
be damaged causing partial or complete brake fail-
ure.
402 MAINTAINING YOUR VEHICLE
Page 404 of 472

CAUTION!
Using a transmission fluid other than the manufac-
turers recommended fluid may cause deterioration
in transmission shift quality and/or torque converter
shudder. Using a transmission fluid other than the
manufacturers recommended fluid will result in
more frequent fluid and filter changes. Refer to
Recommended Fluids, Lubricants and Genuine Parts
for correct fluid type.
Procedure For Checking Fluid Level
The fluid level in the automatic transmission should be
checked whenever the vehicle is serviced. Operation with
an improper fluid level will greatly reduce the life of the
transmission and of the fluid.
To properly check the automatic transmission fluid level,
the following procedure must be used:
1. The vehicle must be on level ground.
2. The engine should be running at curb idle speed for a
minimum of 60 seconds.
3. Fully apply parking brake.
4. Place the gear selector momentarily in each gear
position ending with the lever in P (PARK). Wipe the area
around the dipstick clean to eliminate the possibility of
dirt entering the transmission.
404 MAINTAINING YOUR VEHICLE
Page 412 of 472

Cleaning
Soak the drawer, with the drawer front facing up, in a
mixture of medium hot tap water and one teaspoon of
mild liquid dish soap. Let soak for approximately one
hour. After one hour pull the drawer from the water and
dip it back into the water about six times. This will loosen
any remaining debris. Rinse the drawer thoroughly un-
der warm running water. Shake the excess water from the
drawer and dry the outer surfaces with a clean soft cloth.
Let the drawer sit in a dish drainer overnight to allow the
inside mechanism to dry.
Installation
Align the drawer so the plastic tracks on the drawer fit
into the steel retainer in the instrument panel. Push the
drawer forward. You may want to cycle the drawer open
and closed a few times to ensure proper operation.
INTEGRATED POWER MODULE (IPM)
An Integrated Power Module is located in the engine
compartment near the battery. This center contains maxi
fuses, mini fuses and relays. A label that identifies each
component is printed on the inside of the cover.
Integrated Power module (IPM)
412 MAINTAINING YOUR VEHICLE
Page 422 of 472
FLUIDS AND CAPACITIES
U.S. Metric
Fuel (Approximate) 87
Octane20 Gallons 76 Liters
Engine Oil-with filter
3.3 & 3.8 Liter Engines (SAE 5W-20, API Certified) 5.0 qts 4.7 Liters
Cooling System *
3.3 & 3.8 Liter Engines (Mopar�Antifreeze/Coolant 5 Year/
100,000 Mile Formula)13.4 qts 12.6 Liters
* Includes heater and coolant recovery bottle filled to MAX level.
* Add 2.9 quarts (2.8 liters) if equipped with a rear heater.
422 MAINTAINING YOUR VEHICLE
Page 423 of 472
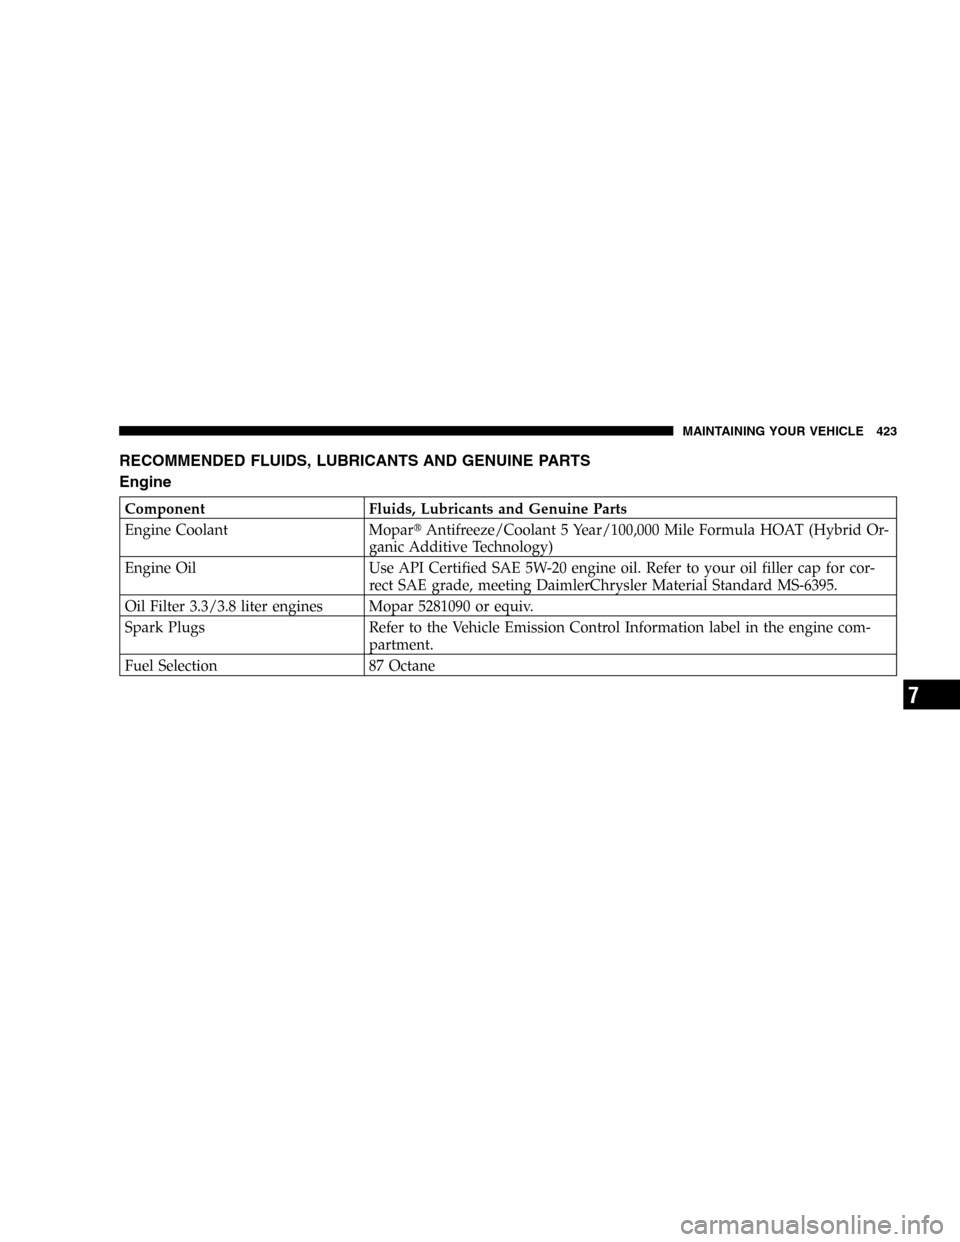
RECOMMENDED FLUIDS, LUBRICANTS AND GENUINE PARTS
Engine
Component Fluids, Lubricants and Genuine Parts
Engine Coolant Mopar�Antifreeze/Coolant 5 Year/100,000 Mile Formula HOAT (Hybrid Or-
ganic Additive Technology)
Engine Oil Use API Certified SAE 5W-20 engine oil. Refer to your oil filler cap for cor-
rect SAE grade, meeting DaimlerChrysler Material Standard MS-6395.
Oil Filter 3.3/3.8 liter engines Mopar 5281090 or equiv.
Spark Plugs Refer to the Vehicle Emission Control Information label in the engine com-
partment.
Fuel Selection 87 Octane
MAINTAINING YOUR VEHICLE 423
7
Page 426 of 472

EMISSION CONTROL SYSTEM MAINTENANCE
The“Scheduled”maintenance services, listed inbold
typemust be done at the times or mileages specified to
assure the continued proper functioning of the emission
control system. These, and all other maintenance services
included in this manual, should be done to provide best
vehicle performance and reliability. More frequent main-
tenance may be needed for vehicles in severe operating
conditions such as dusty areas and very short trip
driving.
Inspection and service also should be done any time a
malfunction is suspected.
NOTE:Maintenance, replacement, or repair of the emis-
sion control devices and systems on your vehicle may be
performed by any automotive repair establishment or
individual using any automotive part which has been
certified pursuant to U.S. EPA or, in the State of Califor-
nia, California Air Resources Board regulations.
MAINTENANCE SCHEDULES
There are two maintenance schedules that show the
requiredservice for your vehicle.
First is Schedule“B”. It is for vehicles that are operated
under the conditions that are listed below and at the
beginning of the schedule.
•Day or night temperatures are below 32°F(0°C).
•Stop and go driving.
•Extensive engine idling.
•Driving in dusty conditions.
•Short trips of less than 10 miles (16 km).
•More than 50% of your driving is at sustained high
speeds during hot weather, above 90°F (32°C).
•Trailer towing.�
426 MAINTENANCE SCHEDULES
8
M
A
I
N
T
E
N
A
N
C
E
S
C
H
E
D
U
L
E
S
Page 427 of 472
•Taxi, police, or delivery service (commercial ser-
vice).�
•Off-road or desert operation.
NOTE:Most vehicles are operated under the conditions
listed for Schedule�B�.
Second is Schedule“A”. It is for vehicles that are not
operated under any of the conditions listed under Sched-
ule�B�.
Use the schedule that best describes your driving condi-
tions. Where time and mileage are listed, follow the
interval that occurs first.
CAUTION!
Failure to perform the required maintenance items
may result in damage to the vehicle.
At Each Stop for Fuel
•Check the engine oil level about 5 minutes after a fully
warmed engine is shut off. Checking the oil level while
the vehicle is on level ground will improve the accu-
racy of the oil level reading. Add oil only when the
level is at or below the ADD or MIN mark.
•Check the windshield washer solvent and add if
required.
MAINTENANCE SCHEDULES 427
8
M
A
I
N
T
E
N
A
N
C
E
S
C
H
E
D
U
L
E
S
 87
Octane20 Gallons 76 Liters
Engine Oil-with filter
3.3 & 3.8 Liter Engines (SAE 5W-20, API Certified) 5.0 qts 4.7 Liters
Cooling System *
3.3 & 3")