Page 178 of 420

keyless entry unlock button. Pressing the STEP button
when in this display will select DRIVER’S DOOR 1ST or
ALL DOORS.
Remote Linked To Memory? (Available with
Memory Seat Only)
When this feature is selected the memory seat, mirror,
and radio settings will return to the memory set position
when the remote keyless entry“Unlock”button is
pressed. If this feature is not selected then the memory
seat, mirror, and radio settings can only return to the
memory set position using the door mounted switch.
Pressing the STEP button when in this display will select
“Ye s”or“No.”
Sound Horn On Lock?
When this feature is selected a short horn sound will
occur when the remote keyless entry“Lock”button is
pressed. This feature may be selected with or without the
flash lights on lock/unlock feature. Pressing the STEP
button when in this display will select“Ye s”or“No.”
Flash Lights On Lock/Unlock?
When this feature is selected, the front and rear turn
signals will flash when the doors are locked or unlocked
using the remote keyless entry transmitter. This feature
may be selected with or without the sound horn on lock
feature selected. Pressing the STEP button when in this
display will select“Ye s”or“No.”
Headlamp Delay
When this feature is selected the driver can choose, when
exiting the vehicle, to have the headlamps remain on for
30, 60, or 90 seconds, or not remain on. Pressing the STEP
button when in this display will select 30, 60, 90, or OFF.
Headlamp On With Wipers? (Available with Auto
Headlights Only)
When this feature is selected and the headlight switch
has at least once been moved to the AUTO position, the
headlights will turn on in approximately 10 seconds
when the wipers are turned on. The headlights will also
178 UNDERSTANDING YOUR INSTRUMENT PANEL
Page 179 of 420

turn off when the wipers are turned off if they were
turned on in this way. Pressing the STEP button when in
this display will select“Ye s”or“No.”
NOTE:Turning the headlights on during the daytime
causes the instrument panel lights to dim. To increase the
brightness, refer to“Lights”in this section.
Service Interval
When this feature is selected a service interval between
2,000 miles (3 200 km) and 6, 000 miles (10 000 km) in 500
mile (800 km) increments may be selected. Pressing the
STEP button when in this display will select distances
between 2,000 miles (3 200 km) and 6, 000 miles (10 000
km) in 500 mile (800 km) increments.
Reset Service Distance (Displays Only if Service
Interval was Changed)
When this feature is selected the current accumulated
service distance can be reset to the newly selected service
interval. Pressing the STEP button when in this display
will select“Ye s”or“No.”
Power Accessory Delay?
When this feature is selected, the power window
switches, radio, hands–free system, DVD video system,
power sunroof, and power outlets will remain active for
up to 45 seconds after the ignition switch has been turned
off. Opening a vehicle door or liftgate will cancel this
feature.
Easy Exit Seat? (Available with Memory Seat Only)
When this feature is selected, the driver’s seat moves
rearward 5 cm (2 inches) or to the farthest rearward
position if this distance is less than 5 cm (2 inches) when
the key is removed from the ignition switch so that the
UNDERSTANDING YOUR INSTRUMENT PANEL 179
4
Page 183 of 420
ELECTRONIC DIGITAL CLOCK
The clock and radio each use the display panel built into
the radio. A digital readout shows the time in hours and
minutes whenever the ignition switch is in the ON or
ACC position and the time button is pressed.
When the ignition switch is in the OFF position, or when
the radio frequency is being displayed, time keeping is
accurately maintained.
Clock Setting Procedure
1. Turn the ignition switch to the ON or ACC position
and press the time button. Using the tip of a ballpoint pen
or similar object, press either the hour (H) or minute (M)
buttons on the radio.
2. Press the H button to set hours or the M button to set
minutes. The time setting will increase each time you
press a button.
SALES CODE RAH—AM & FM STEREO RADIO
WITH CD PLAYER AND CD/DVD CHANGER
CONTROLS
RAH radio
UNDERSTANDING YOUR INSTRUMENT PANEL 183
4
Page 184 of 420

Radio Operation
Power/Volume Control
Press the ON/VOL control to turn the radio on. Turn the
volume control clockwise to increase the volume.
NOTE:Power to operate the radio is supplied through
the ignition switch. It must be in the ON or ACC position
to operate the radio.
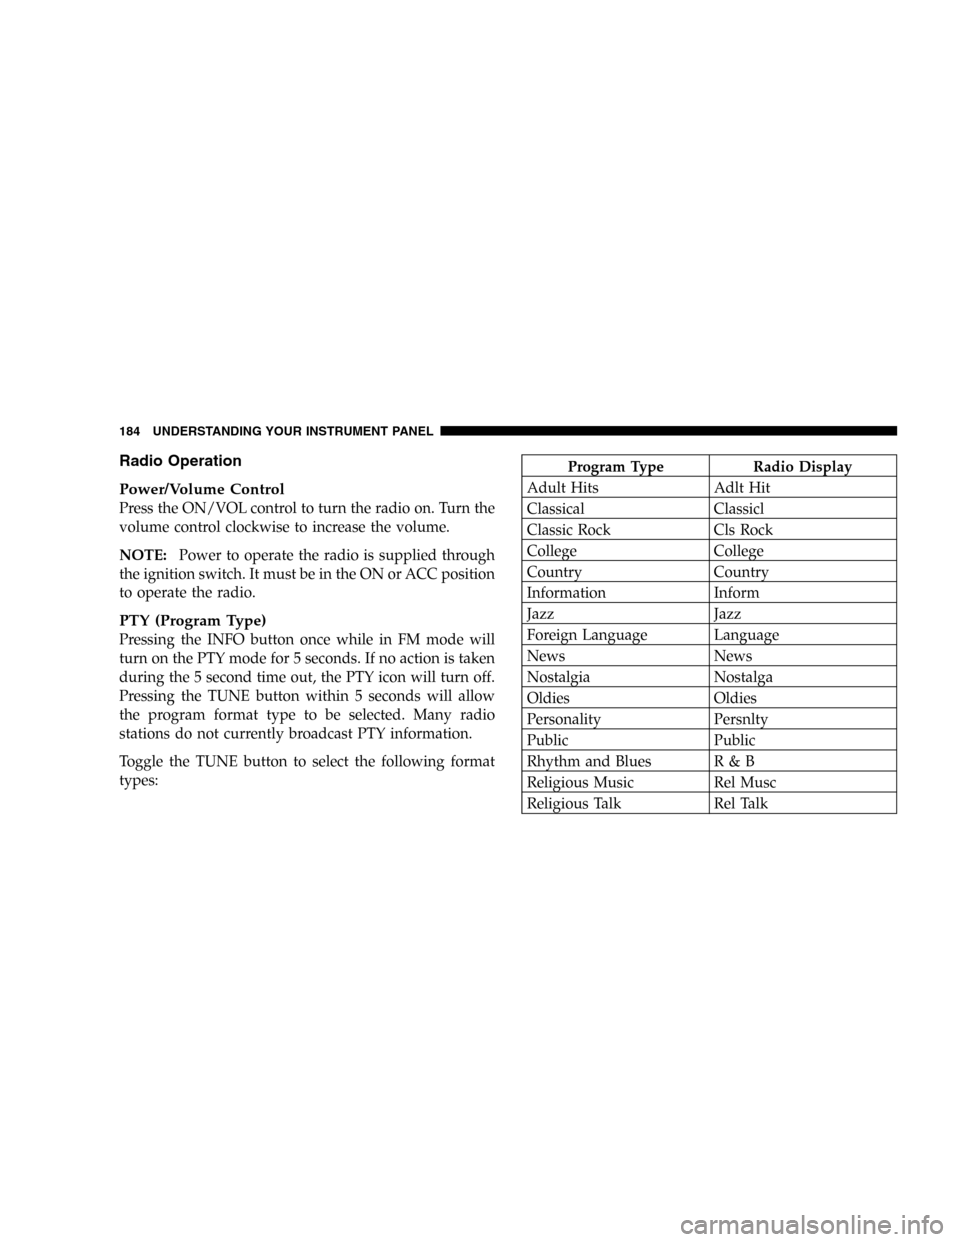
PTY (Program Type)
Pressing the INFO button once while in FM mode will
turn on the PTY mode for 5 seconds. If no action is taken
during the 5 second time out, the PTY icon will turn off.
Pressing the TUNE button within 5 seconds will allow
the program format type to be selected. Many radio
stations do not currently broadcast PTY information.
Toggle the TUNE button to select the following format
types:
Program Type Radio Display
Adult Hits Adlt Hit
Classical Classicl
Classic Rock Cls Rock
College College
Country Country
Information Inform
Jazz Jazz
Foreign Language Language
News News
Nostalgia Nostalga
Oldies Oldies
Personality Persnlty
Public Public
Rhythm and Blues R & B
Religious Music Rel Musc
Religious Talk Rel Talk
184 UNDERSTANDING YOUR INSTRUMENT PANEL
Page 185 of 420

Program Type Radio Display
Rock Rock
Soft Soft
Soft Rock Soft Rck
Soft Rhythm and Blues Soft R&B
Sports Sports
Talk Talk
Top 40 Top 40
Weather Weather
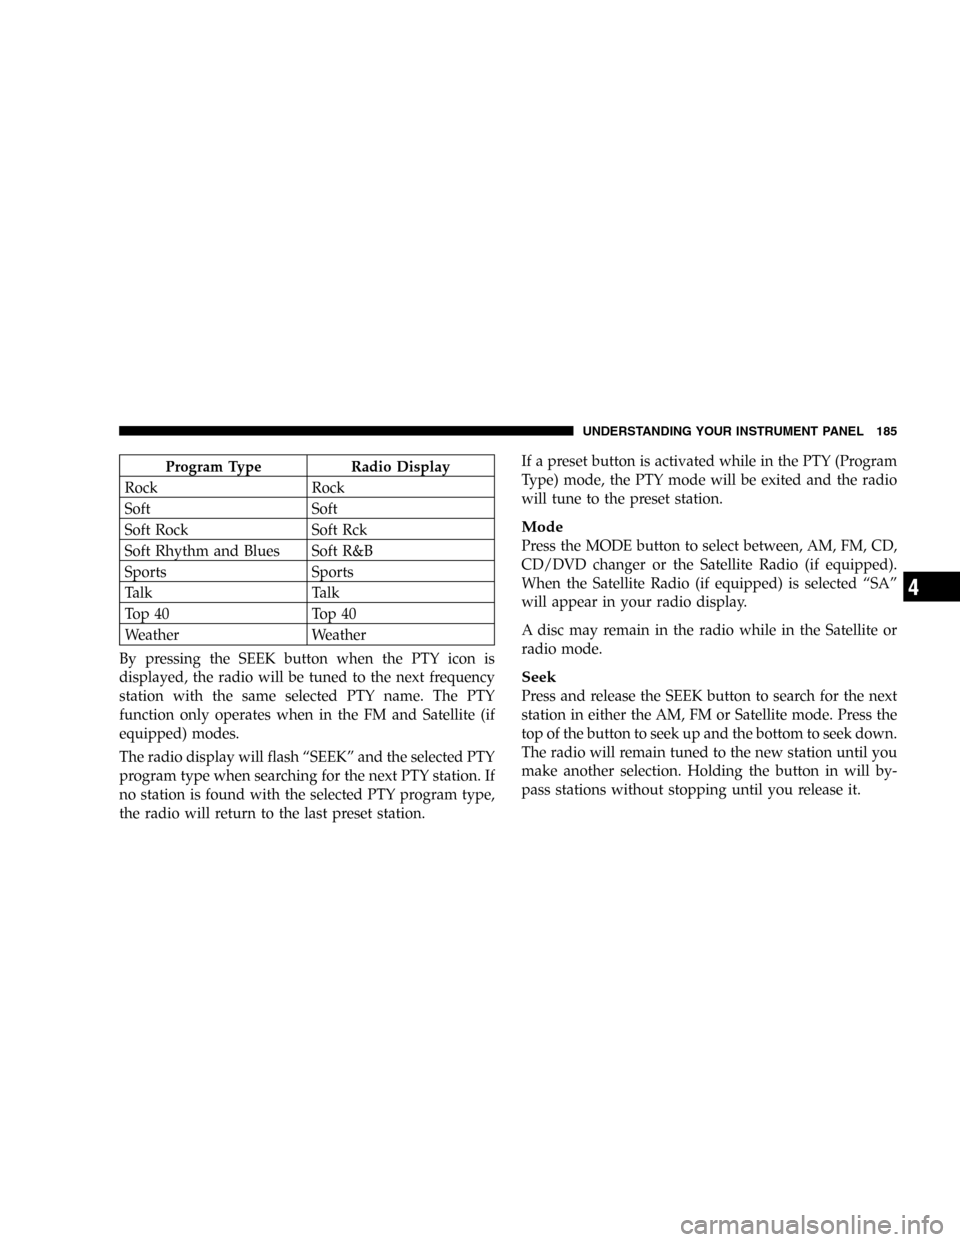
By pressing the SEEK button when the PTY icon is
displayed, the radio will be tuned to the next frequency
station with the same selected PTY name. The PTY
function only operates when in the FM and Satellite (if
equipped) modes.
The radio display will flash“SEEK”and the selected PTY
program type when searching for the next PTY station. If
no station is found with the selected PTY program type,
the radio will return to the last preset station.If a preset button is activated while in the PTY (Program
Type) mode, the PTY mode will be exited and the radio
will tune to the preset station.
Mode
Press the MODE button to select between, AM, FM, CD,
CD/DVD changer or the Satellite Radio (if equipped).
When the Satellite Radio (if equipped) is selected“SA”
will appear in your radio display.
A disc may remain in the radio while in the Satellite or
radio mode.
Seek
Press and release the SEEK button to search for the next
station in either the AM, FM or Satellite mode. Press the
top of the button to seek up and the bottom to seek down.
The radio will remain tuned to the new station until you
make another selection. Holding the button in will by-
pass stations without stopping until you release it.
UNDERSTANDING YOUR INSTRUMENT PANEL 185
4
Page 186 of 420

Tuning
Press the TUNE control up or down to increase or
decrease the frequency. If you press and hold the button,
the radio will continue to tune until you release the
button. The frequency will be displayed and continu-
ously updated while the button is pressed.
Balance
The Balance control adjusts the left-to-right speaker bal-
ance. Press the AUDIO button, select BALANCE, then
press SEEK + or SEEK�to adjust the balance.
Fade
The Fade control provides for balance between the front
and rear speakers. Press the AUDIO button, select FADE,
then press SEEK + or SEEK�to adjust the fade balance.
Tone Control
The Bass and/or Treble controls sound for the desired
tone. Press the AUDIO button, select Bass or TREBLE,
then press SEEK + or SEEK�to increase or decrease
amplification of the band.
To Set The Radio Push-Button Memory
When you are receiving a station that you wish to
commit to push-button memory, press the SET button.
SET 1 will show in the display window. Select the
push-button you wish to lock onto this station and press
and release that button. If a station is not selected within
5 seconds after pressing the SET button, the station will
continue to play but will not be locked into push-button
memory.
186 UNDERSTANDING YOUR INSTRUMENT PANEL
Page 187 of 420

You may add a second station to each push-button by
repeating the above procedure with this exception: Press
the SET button twice and SET 2 will show in the display
window. Each button can be set for SET 1 and SET 2 in
both AM and FM. This allows a total of 10 AM and 10 FM
stations to be locked into memory. You can recall the
stations stored in SET 2 memory by pressing the push-
button twice.
To Change From Clock To Radio Mode
Press the TIME button to change the display between
radio frequency and time.
General Information
This radio complies with Part 15 of FCC rules and with
RSS-210 of Industry Canada. Operation is subject to the
following conditions:
1. This device may not cause harmful interference,2. This device must accept any interference received,
including interference that may cause undesired opera-
tion.
NOTE:Changes or modifications not expressively ap-
proved by the party responsible for compliance could
void the user’s authority to operate the equipment.
CD Player Operation
NOTE:
•The ignition switch must be in the ON or ACC
position and the volume control ON before the CD
player will operate.
•This Radio is capable of playing compact discs (CD),
recordable compact discs (CD-R), rewritable compact
discs (CD-RW) compact discs with MP3 tracks and
multisession compact discs with CD and MP3 tracks.
UNDERSTANDING YOUR INSTRUMENT PANEL 187
4
Page 188 of 420

Inserting The Compact Disc
CAUTION!
This CD player will accept only 4–3/4 inch (12cm)
discs only. The use of other sized discs may damage
the CD player mechanism.
You may either insert or eject a disc with the radio OFF.
If you insert a disc with the ignition ON and the radio
OFF, the display will show the time of day. If you insert
a disc with the ignition OFF, the display will show the
time of day for about 5 seconds, then go out.
If the power is ON, the unit will switch from radio to CD
mode and begin to play when you insert the disc. The
display will show the track number and index time in
minutes and seconds. Play will begin at the start of track
one.
Seek
Press the top of the SEEK button for the next selection on
the CD. Press the bottom of the button to return to the
beginning of the current selection, or return to the
beginning of the previous selection if the CD is within the
first 10 seconds of the current selection.
EJT—Eject
Press the EJT button and the disc will unload and move
to the entrance for easy removal. The unit will switch to
the radio mode.
If you do not remove the disc within 15 seconds, it will be
reloaded. The radio mode will continue to appear.
The disc can be ejected with the radio OFF.
FF/TUNE/RW
Press FF (Fast Forward) and the CD player will begin to
fast forward until FF is released. The RW ( Reverse)
button works in a similar manner.
188 UNDERSTANDING YOUR INSTRUMENT PANEL