2005 CHRYSLER CARAVAN ECU
[x] Cancel search: ECUPage 2196 of 2339
INSTRUMENT PANEL OUTLETS
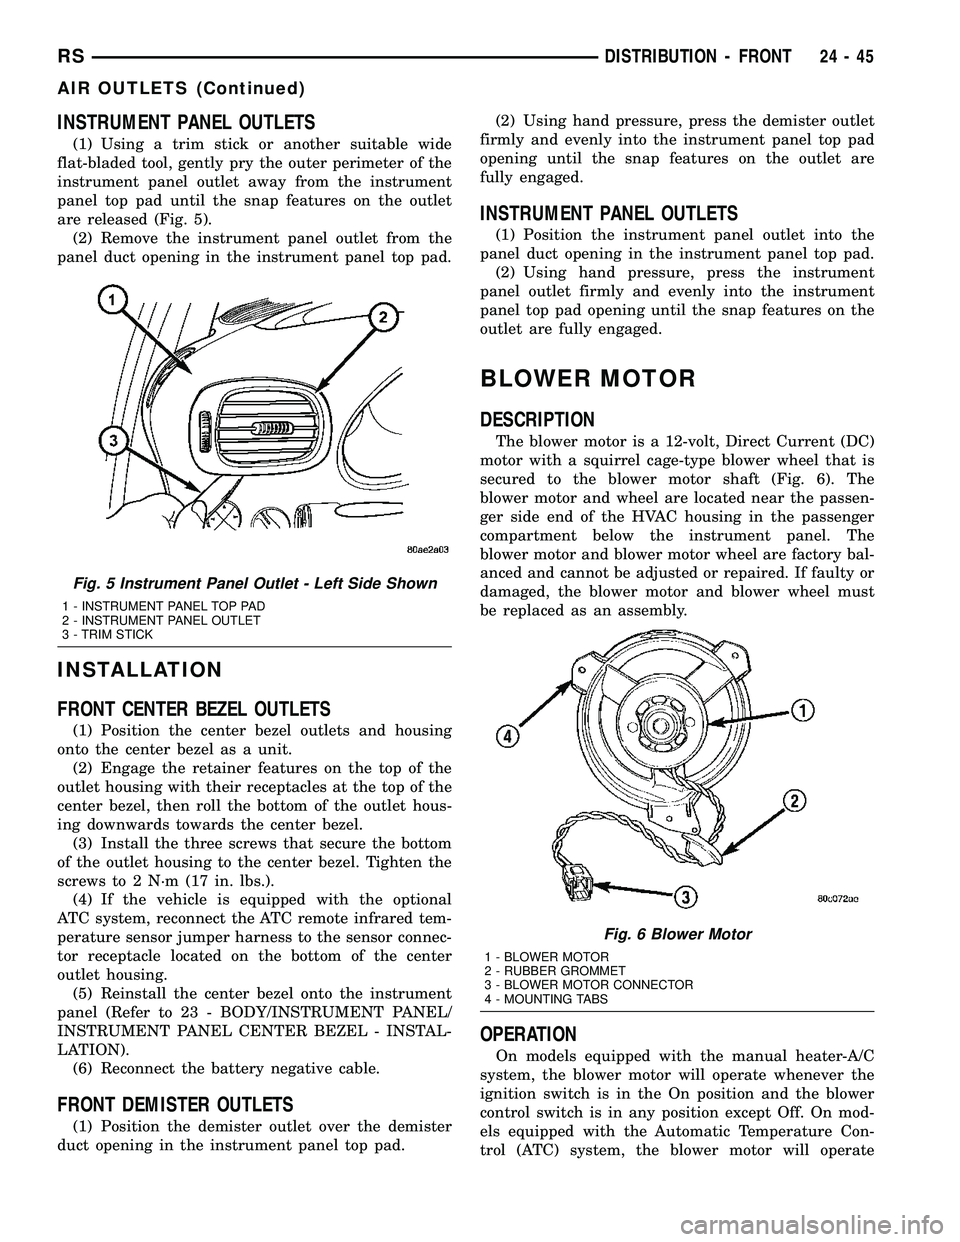
(1) Using a trim stick or another suitable wide
flat-bladed tool, gently pry the outer perimeter of the
instrument panel outlet away from the instrument
panel top pad until the snap features on the outlet
are released (Fig. 5).
(2) Remove the instrument panel outlet from the
panel duct opening in the instrument panel top pad.
INSTALLATION
FRONT CENTER BEZEL OUTLETS
(1) Position the center bezel outlets and housing
onto the center bezel as a unit.
(2) Engage the retainer features on the top of the
outlet housing with their receptacles at the top of the
center bezel, then roll the bottom of the outlet hous-
ing downwards towards the center bezel.
(3) Install the three screws that secure the bottom
of the outlet housing to the center bezel. Tighten the
screws to 2 N´m (17 in. lbs.).
(4) If the vehicle is equipped with the optional
ATC system, reconnect the ATC remote infrared tem-
perature sensor jumper harness to the sensor connec-
tor receptacle located on the bottom of the center
outlet housing.
(5) Reinstall the center bezel onto the instrument
panel (Refer to 23 - BODY/INSTRUMENT PANEL/
INSTRUMENT PANEL CENTER BEZEL - INSTAL-
LATION).
(6) Reconnect the battery negative cable.
FRONT DEMISTER OUTLETS
(1) Position the demister outlet over the demister
duct opening in the instrument panel top pad.(2) Using hand pressure, press the demister outlet
firmly and evenly into the instrument panel top pad
opening until the snap features on the outlet are
fully engaged.
INSTRUMENT PANEL OUTLETS
(1) Position the instrument panel outlet into the
panel duct opening in the instrument panel top pad.
(2) Using hand pressure, press the instrument
panel outlet firmly and evenly into the instrument
panel top pad opening until the snap features on the
outlet are fully engaged.
BLOWER MOTOR
DESCRIPTION
The blower motor is a 12-volt, Direct Current (DC)
motor with a squirrel cage-type blower wheel that is
secured to the blower motor shaft (Fig. 6). The
blower motor and wheel are located near the passen-
ger side end of the HVAC housing in the passenger
compartment below the instrument panel. The
blower motor and blower motor wheel are factory bal-
anced and cannot be adjusted or repaired. If faulty or
damaged, the blower motor and blower wheel must
be replaced as an assembly.
OPERATION
On models equipped with the manual heater-A/C
system, the blower motor will operate whenever the
ignition switch is in the On position and the blower
control switch is in any position except Off. On mod-
els equipped with the Automatic Temperature Con-
trol (ATC) system, the blower motor will operate
Fig. 5 Instrument Panel Outlet - Left Side Shown
1 - INSTRUMENT PANEL TOP PAD
2 - INSTRUMENT PANEL OUTLET
3 - TRIM STICK
Fig. 6 Blower Motor
1 - BLOWER MOTOR
2 - RUBBER GROMMET
3 - BLOWER MOTOR CONNECTOR
4 - MOUNTING TABS
RSDISTRIBUTION - FRONT24-45
AIR OUTLETS (Continued)
Page 2199 of 2339
REMOVAL
WARNING: ON VEHICLES EQUIPPED WITH AIR-
BAGS, DISABLE THE AIRBAG SYSTEM BEFORE
ATTEMPTING ANY STEERING WHEEL, STEERING
COLUMN, OR INSTRUMENT PANEL COMPONENT
DIAGNOSIS OR SERVICE. DISCONNECT AND ISO-
LATE THE BATTERY NEGATIVE (GROUND) CABLE,
THEN WAIT TWO MINUTES FOR THE AIRBAG SYS-
TEM CAPACITOR TO DISCHARGE BEFORE PER-
FORMING FURTHER DIAGNOSIS OR SERVICE. THIS
IS THE ONLY SURE WAY TO DISABLE THE AIRBAG
SYSTEM. FAILURE TO TAKE THE PROPER PRE-
CAUTIONS COULD RESULT IN AN ACCIDENTAL
AIRBAG DEPLOYMENT AND POSSIBLE PERSONAL
INJURY OR DEATH.
NOTE: The blower motor is located on the passen-
ger side of the vehicle under the instrument panel.
The blower motor can be removed from the vehicle
without having to remove the HVAC housing.
(1) Disconnect and isolate the negative battery
cable.
(2) Remove the passenger side cowl trim panel
(Refer to 23 - BODY/INTERIOR/COWL TRIM -
REMOVAL).
(3) Pull back the carpet to access the front upper
screw that secures the air inlet housing.
(4) Remove the recirculation door actuator (Refer
to 24 - HEATING & AIR CONDITIONING/CON-
TROLS - FRONT/RECIRCULATION DOOR ACTUA-
TOR - REMOVAL).
(5) Remove the recirculation door actuator wire
lead from the routing clip located on the lower air
inlet housing and position the wire lead aside.
(6) Disconnect the blower motor wire lead connec-
tor from the blower motor resistor block or power
module, depending on application.
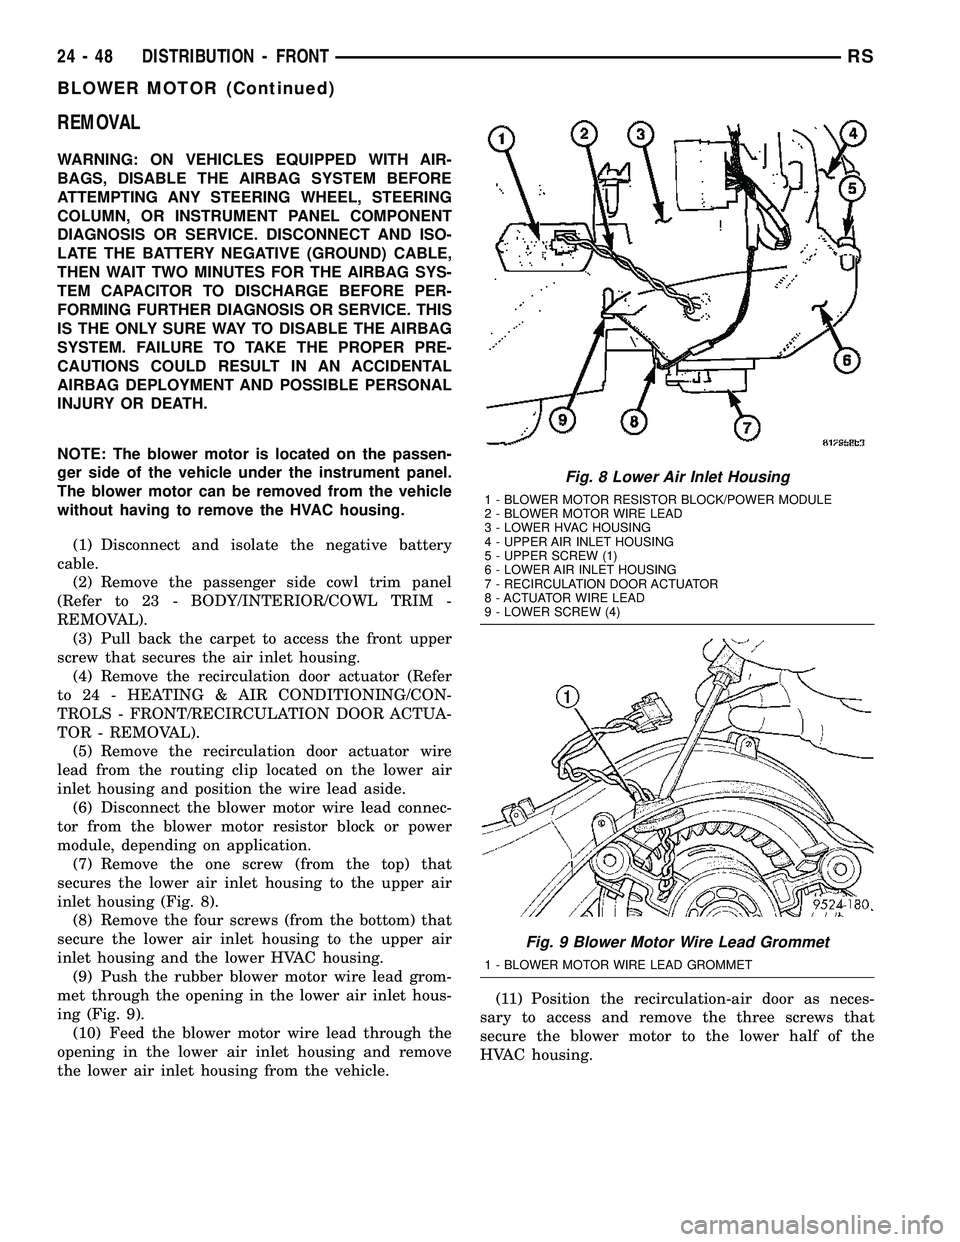
(7) Remove the one screw (from the top) that
secures the lower air inlet housing to the upper air
inlet housing (Fig. 8).
(8) Remove the four screws (from the bottom) that
secure the lower air inlet housing to the upper air
inlet housing and the lower HVAC housing.
(9) Push the rubber blower motor wire lead grom-
met through the opening in the lower air inlet hous-
ing (Fig. 9).
(10) Feed the blower motor wire lead through the
opening in the lower air inlet housing and remove
the lower air inlet housing from the vehicle.(11) Position the recirculation-air door as neces-
sary to access and remove the three screws that
secure the blower motor to the lower half of the
HVAC housing.
Fig. 8 Lower Air Inlet Housing
1 - BLOWER MOTOR RESISTOR BLOCK/POWER MODULE
2 - BLOWER MOTOR WIRE LEAD
3 - LOWER HVAC HOUSING
4 - UPPER AIR INLET HOUSING
5 - UPPER SCREW (1)
6 - LOWER AIR INLET HOUSING
7 - RECIRCULATION DOOR ACTUATOR
8 - ACTUATOR WIRE LEAD
9 - LOWER SCREW (4)
Fig. 9 Blower Motor Wire Lead Grommet
1 - BLOWER MOTOR WIRE LEAD GROMMET
24 - 48 DISTRIBUTION - FRONTRS
BLOWER MOTOR (Continued)
Page 2200 of 2339
(12) Gently flex the recirculation air door far down
enough to remove the blower motor and wheel from
the HVAC housing.
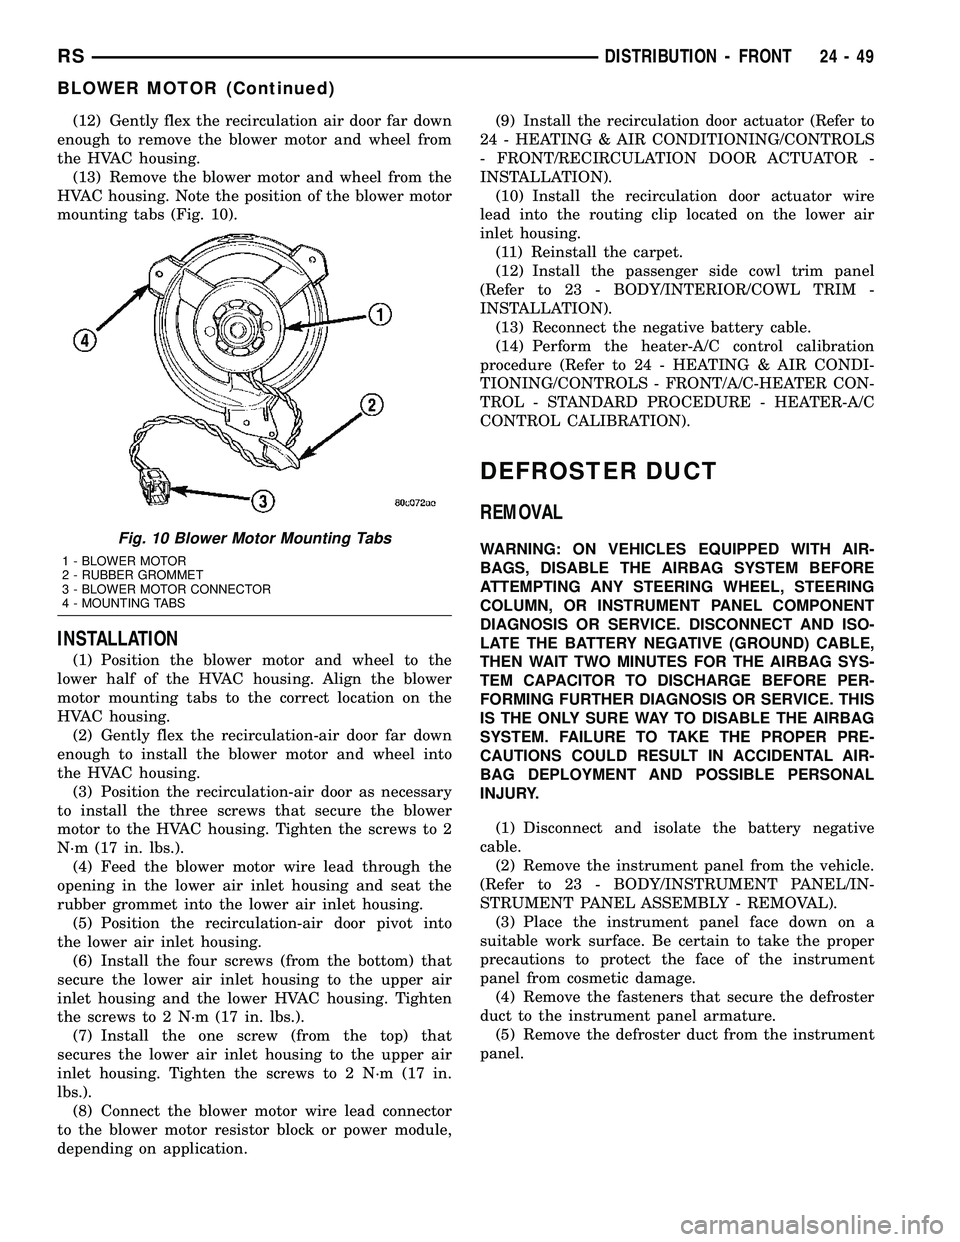
(13) Remove the blower motor and wheel from the
HVAC housing. Note the position of the blower motor
mounting tabs (Fig. 10).
INSTALLATION
(1) Position the blower motor and wheel to the
lower half of the HVAC housing. Align the blower
motor mounting tabs to the correct location on the
HVAC housing.
(2) Gently flex the recirculation-air door far down
enough to install the blower motor and wheel into
the HVAC housing.
(3) Position the recirculation-air door as necessary
to install the three screws that secure the blower
motor to the HVAC housing. Tighten the screws to 2
N´m (17 in. lbs.).
(4) Feed the blower motor wire lead through the
opening in the lower air inlet housing and seat the
rubber grommet into the lower air inlet housing.
(5) Position the recirculation-air door pivot into
the lower air inlet housing.
(6) Install the four screws (from the bottom) that
secure the lower air inlet housing to the upper air
inlet housing and the lower HVAC housing. Tighten
the screws to 2 N´m (17 in. lbs.).
(7) Install the one screw (from the top) that
secures the lower air inlet housing to the upper air
inlet housing. Tighten the screws to 2 N´m (17 in.
lbs.).
(8) Connect the blower motor wire lead connector
to the blower motor resistor block or power module,
depending on application.(9) Install the recirculation door actuator (Refer to
24 - HEATING & AIR CONDITIONING/CONTROLS
- FRONT/RECIRCULATION DOOR ACTUATOR -
INSTALLATION).
(10) Install the recirculation door actuator wire
lead into the routing clip located on the lower air
inlet housing.
(11) Reinstall the carpet.
(12) Install the passenger side cowl trim panel
(Refer to 23 - BODY/INTERIOR/COWL TRIM -
INSTALLATION).
(13) Reconnect the negative battery cable.
(14) Perform the heater-A/C control calibration
procedure (Refer to 24 - HEATING & AIR CONDI-
TIONING/CONTROLS - FRONT/A/C-HEATER CON-
TROL - STANDARD PROCEDURE - HEATER-A/C
CONTROL CALIBRATION).
DEFROSTER DUCT
REMOVAL
WARNING: ON VEHICLES EQUIPPED WITH AIR-
BAGS, DISABLE THE AIRBAG SYSTEM BEFORE
ATTEMPTING ANY STEERING WHEEL, STEERING
COLUMN, OR INSTRUMENT PANEL COMPONENT
DIAGNOSIS OR SERVICE. DISCONNECT AND ISO-
LATE THE BATTERY NEGATIVE (GROUND) CABLE,
THEN WAIT TWO MINUTES FOR THE AIRBAG SYS-
TEM CAPACITOR TO DISCHARGE BEFORE PER-
FORMING FURTHER DIAGNOSIS OR SERVICE. THIS
IS THE ONLY SURE WAY TO DISABLE THE AIRBAG
SYSTEM. FAILURE TO TAKE THE PROPER PRE-
CAUTIONS COULD RESULT IN ACCIDENTAL AIR-
BAG DEPLOYMENT AND POSSIBLE PERSONAL
INJURY.
(1) Disconnect and isolate the battery negative
cable.
(2) Remove the instrument panel from the vehicle.
(Refer to 23 - BODY/INSTRUMENT PANEL/IN-
STRUMENT PANEL ASSEMBLY - REMOVAL).
(3) Place the instrument panel face down on a
suitable work surface. Be certain to take the proper
precautions to protect the face of the instrument
panel from cosmetic damage.
(4) Remove the fasteners that secure the defroster
duct to the instrument panel armature.
(5) Remove the defroster duct from the instrument
panel.Fig. 10 Blower Motor Mounting Tabs
1 - BLOWER MOTOR
2 - RUBBER GROMMET
3 - BLOWER MOTOR CONNECTOR
4 - MOUNTING TABS
RSDISTRIBUTION - FRONT24-49
BLOWER MOTOR (Continued)
Page 2201 of 2339
INSTALLATION
WARNING: ON VEHICLES EQUIPPED WITH AIR-
BAGS, DISABLE THE AIRBAG SYSTEM BEFORE
ATTEMPTING ANY STEERING WHEEL, STEERING
COLUMN, OR INSTRUMENT PANEL COMPONENT
DIAGNOSIS OR SERVICE. DISCONNECT AND ISO-
LATE THE BATTERY NEGATIVE (GROUND) CABLE,
THEN WAIT TWO MINUTES FOR THE AIRBAG SYS-
TEM CAPACITOR TO DISCHARGE BEFORE PER-
FORMING FURTHER DIAGNOSIS OR SERVICE. THIS
IS THE ONLY SURE WAY TO DISABLE THE AIRBAG
SYSTEM. FAILURE TO TAKE THE PROPER PRECAU-
TIONS COULD RESULT IN ACCIDENTAL AIRBAG
DEPLOYMENT AND POSSIBLE PERSONAL INJURY.
(1) Position the defroster duct to the instrument
panel.
(2) Install the fasteners that secure the defroster
duct to the instrument panel armature.
(3) Reinstall the instrument panel in the vehicle.
(Refer to 23 - BODY/INSTRUMENT PANEL/INSTRU-
MENT PANEL ASSEMBLY - INSTALLATION).
(4) Reconnect the battery negative cable.
FLOOR DISTRIBUTION DUCTS
REMOVAL
(1) Roll back the carpet on the front floor from
under the instrument panel toward the rear of the
vehicle (Refer to 23 - BODY/INTERIOR/CARPETS
AND FLOOR MATS - REMOVAL).
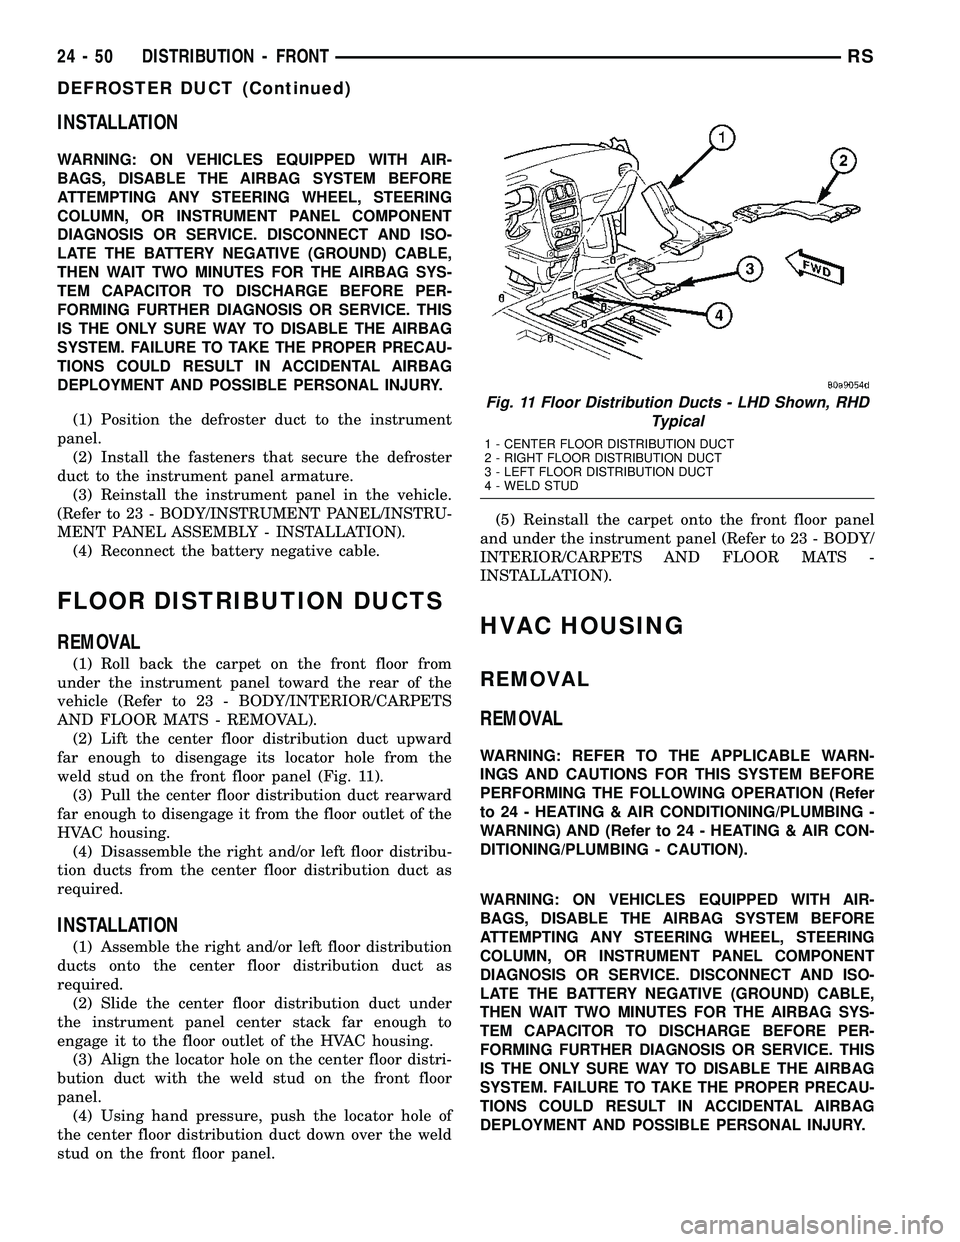
(2) Lift the center floor distribution duct upward
far enough to disengage its locator hole from the
weld stud on the front floor panel (Fig. 11).
(3) Pull the center floor distribution duct rearward
far enough to disengage it from the floor outlet of the
HVAC housing.
(4) Disassemble the right and/or left floor distribu-
tion ducts from the center floor distribution duct as
required.
INSTALLATION
(1) Assemble the right and/or left floor distribution
ducts onto the center floor distribution duct as
required.
(2) Slide the center floor distribution duct under
the instrument panel center stack far enough to
engage it to the floor outlet of the HVAC housing.
(3) Align the locator hole on the center floor distri-
bution duct with the weld stud on the front floor
panel.
(4) Using hand pressure, push the locator hole of
the center floor distribution duct down over the weld
stud on the front floor panel.(5) Reinstall the carpet onto the front floor panel
and under the instrument panel (Refer to 23 - BODY/
INTERIOR/CARPETS AND FLOOR MATS -
INSTALLATION).
HVAC HOUSING
REMOVAL
REMOVAL
WARNING: REFER TO THE APPLICABLE WARN-
INGS AND CAUTIONS FOR THIS SYSTEM BEFORE
PERFORMING THE FOLLOWING OPERATION (Refer
to 24 - HEATING & AIR CONDITIONING/PLUMBING -
WARNING) AND (Refer to 24 - HEATING & AIR CON-
DITIONING/PLUMBING - CAUTION).
WARNING: ON VEHICLES EQUIPPED WITH AIR-
BAGS, DISABLE THE AIRBAG SYSTEM BEFORE
ATTEMPTING ANY STEERING WHEEL, STEERING
COLUMN, OR INSTRUMENT PANEL COMPONENT
DIAGNOSIS OR SERVICE. DISCONNECT AND ISO-
LATE THE BATTERY NEGATIVE (GROUND) CABLE,
THEN WAIT TWO MINUTES FOR THE AIRBAG SYS-
TEM CAPACITOR TO DISCHARGE BEFORE PER-
FORMING FURTHER DIAGNOSIS OR SERVICE. THIS
IS THE ONLY SURE WAY TO DISABLE THE AIRBAG
SYSTEM. FAILURE TO TAKE THE PROPER PRECAU-
TIONS COULD RESULT IN ACCIDENTAL AIRBAG
DEPLOYMENT AND POSSIBLE PERSONAL INJURY.
Fig. 11 Floor Distribution Ducts - LHD Shown, RHD
Typical
1 - CENTER FLOOR DISTRIBUTION DUCT
2 - RIGHT FLOOR DISTRIBUTION DUCT
3 - LEFT FLOOR DISTRIBUTION DUCT
4 - WELD STUD
24 - 50 DISTRIBUTION - FRONTRS
DEFROSTER DUCT (Continued)
Page 2202 of 2339
(1) Recover the refrigerant from the refrigerant
system (Refer to 24 - HEATING & AIR CONDITION-
ING/PLUMBING - FRONT/REFRIGERANT - STAN-
DARD PROCEDURE - REFRIGERANT
RECOVERY).
(2) Drain the engine cooling system (Refer to 7 -
COOLING - STANDARD PROCEDURE - COOLING
SYSTEM DRAIN).
(3) Disconnect and isolate the negative battery
cable.
(4) Remove the windshield wiper module from the
vehicle (Refer to 8 - ELECTRICAL/WIPERS/WASH-
ERS/WIPER MODULE - REMOVAL).
(5) Disconnect the liquid line and suction line from
the expansion valve (Refer to 24 - HEATING & AIR
CONDITIONING/PLUMBING - FRONT/LIQUID
LINE - REMOVAL) and (Refer to 24 - HEATING &
AIR CONDITIONING/PLUMBING - FRONT/SUC-
TION LINE - REMOVAL).
(6) Disconnect the heater hoses from the heater
core tubes (Refer to 24 - HEATING & AIR CONDI-
TIONING/PLUMBING - FRONT/HEATER HOSE -
REMOVAL).
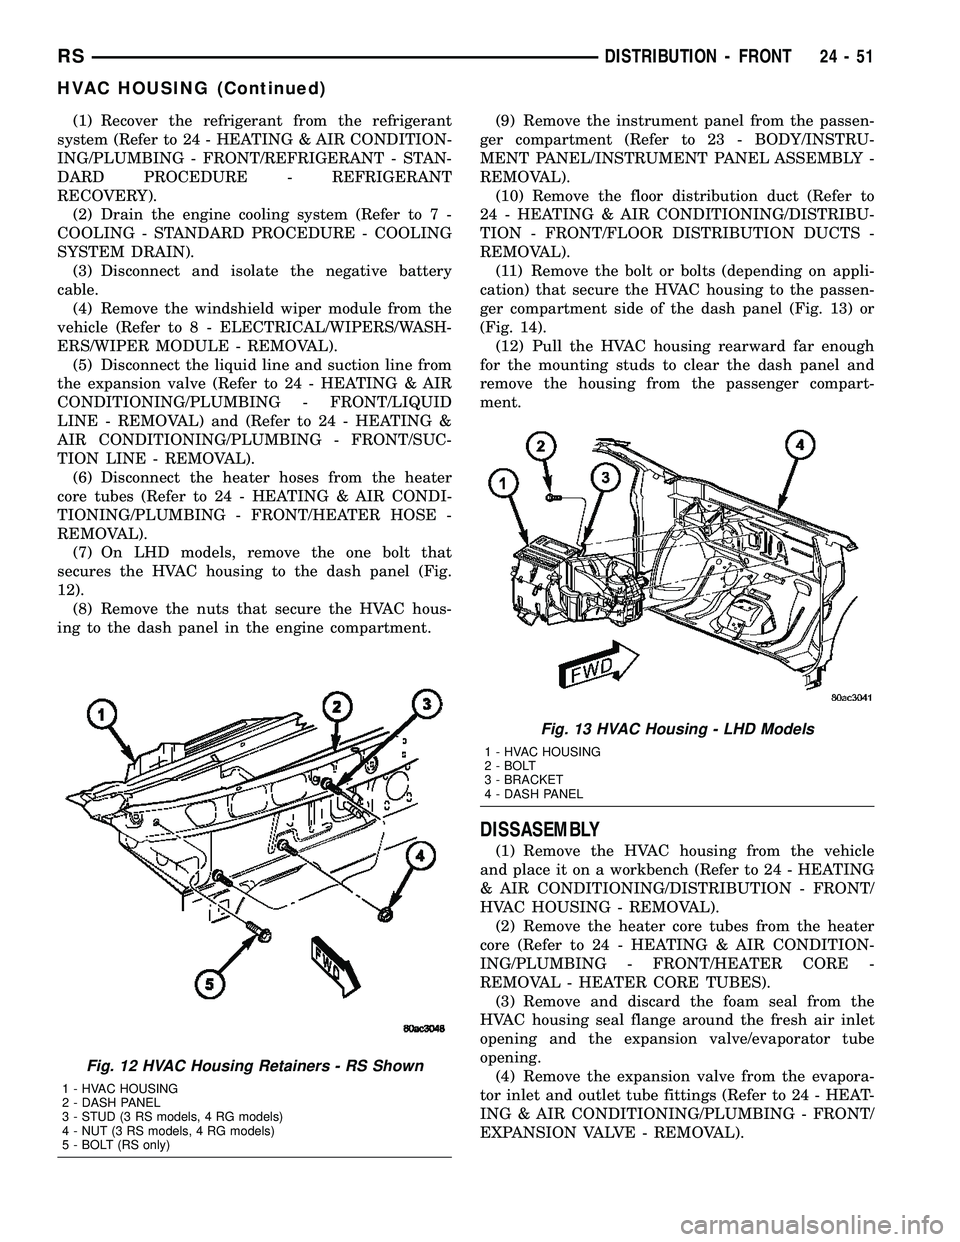
(7) On LHD models, remove the one bolt that
secures the HVAC housing to the dash panel (Fig.
12).
(8) Remove the nuts that secure the HVAC hous-
ing to the dash panel in the engine compartment.(9) Remove the instrument panel from the passen-
ger compartment (Refer to 23 - BODY/INSTRU-
MENT PANEL/INSTRUMENT PANEL ASSEMBLY -
REMOVAL).
(10) Remove the floor distribution duct (Refer to
24 - HEATING & AIR CONDITIONING/DISTRIBU-
TION - FRONT/FLOOR DISTRIBUTION DUCTS -
REMOVAL).
(11) Remove the bolt or bolts (depending on appli-
cation) that secure the HVAC housing to the passen-
ger compartment side of the dash panel (Fig. 13) or
(Fig. 14).
(12) Pull the HVAC housing rearward far enough
for the mounting studs to clear the dash panel and
remove the housing from the passenger compart-
ment.
DISSASEMBLY
(1) Remove the HVAC housing from the vehicle
and place it on a workbench (Refer to 24 - HEATING
& AIR CONDITIONING/DISTRIBUTION - FRONT/
HVAC HOUSING - REMOVAL).
(2) Remove the heater core tubes from the heater
core (Refer to 24 - HEATING & AIR CONDITION-
ING/PLUMBING - FRONT/HEATER CORE -
REMOVAL - HEATER CORE TUBES).
(3) Remove and discard the foam seal from the
HVAC housing seal flange around the fresh air inlet
opening and the expansion valve/evaporator tube
opening.
(4) Remove the expansion valve from the evapora-
tor inlet and outlet tube fittings (Refer to 24 - HEAT-
ING & AIR CONDITIONING/PLUMBING - FRONT/
EXPANSION VALVE - REMOVAL).
Fig. 12 HVAC Housing Retainers - RS Shown
1 - HVAC HOUSING
2 - DASH PANEL
3 - STUD (3 RS models, 4 RG models)
4 - NUT (3 RS models, 4 RG models)
5 - BOLT (RS only)
Fig. 13 HVAC Housing - LHD Models
1 - HVAC HOUSING
2 - BOLT
3 - BRACKET
4 - DASH PANEL
RSDISTRIBUTION - FRONT24-51
HVAC HOUSING (Continued)
Page 2203 of 2339
(5) Disconnect the HVAC wire harness connector
from the blower motor.
(6) Disengage the HVAC wire harness from the
routing clips molded into the outside of the HVAC
housing.
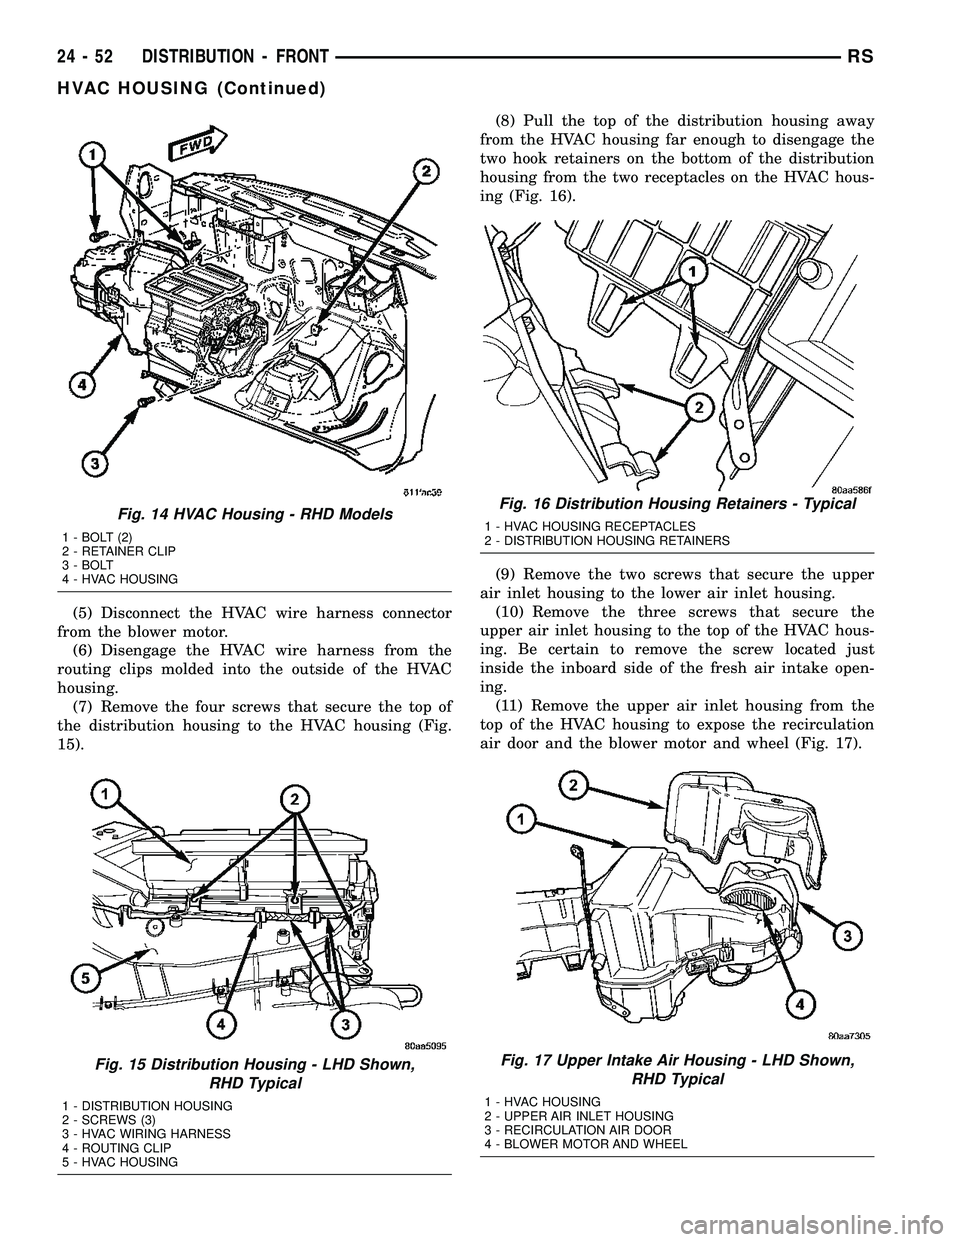
(7) Remove the four screws that secure the top of
the distribution housing to the HVAC housing (Fig.
15).(8) Pull the top of the distribution housing away
from the HVAC housing far enough to disengage the
two hook retainers on the bottom of the distribution
housing from the two receptacles on the HVAC hous-
ing (Fig. 16).
(9) Remove the two screws that secure the upper
air inlet housing to the lower air inlet housing.
(10) Remove the three screws that secure the
upper air inlet housing to the top of the HVAC hous-
ing. Be certain to remove the screw located just
inside the inboard side of the fresh air intake open-
ing.
(11) Remove the upper air inlet housing from the
top of the HVAC housing to expose the recirculation
air door and the blower motor and wheel (Fig. 17).
Fig. 15 Distribution Housing - LHD Shown,
RHD Typical
1 - DISTRIBUTION HOUSING
2 - SCREWS (3)
3 - HVAC WIRING HARNESS
4 - ROUTING CLIP
5 - HVAC HOUSING
Fig. 14 HVAC Housing - RHD Models
1 - BOLT (2)
2 - RETAINER CLIP
3 - BOLT
4 - HVAC HOUSING
Fig. 16 Distribution Housing Retainers - Typical
1 - HVAC HOUSING RECEPTACLES
2 - DISTRIBUTION HOUSING RETAINERS
Fig. 17 Upper Intake Air Housing - LHD Shown,
RHD Typical
1 - HVAC HOUSING
2 - UPPER AIR INLET HOUSING
3 - RECIRCULATION AIR DOOR
4 - BLOWER MOTOR AND WHEEL
24 - 52 DISTRIBUTION - FRONTRS
HVAC HOUSING (Continued)
Page 2204 of 2339
(12) Remove the screw and washer from the upper
pivot of the recirculation door.
(13) Remove the twelve screws that secure the
upper HVAC housing half to the lower half.
(14) Carefully separate and remove the upper half
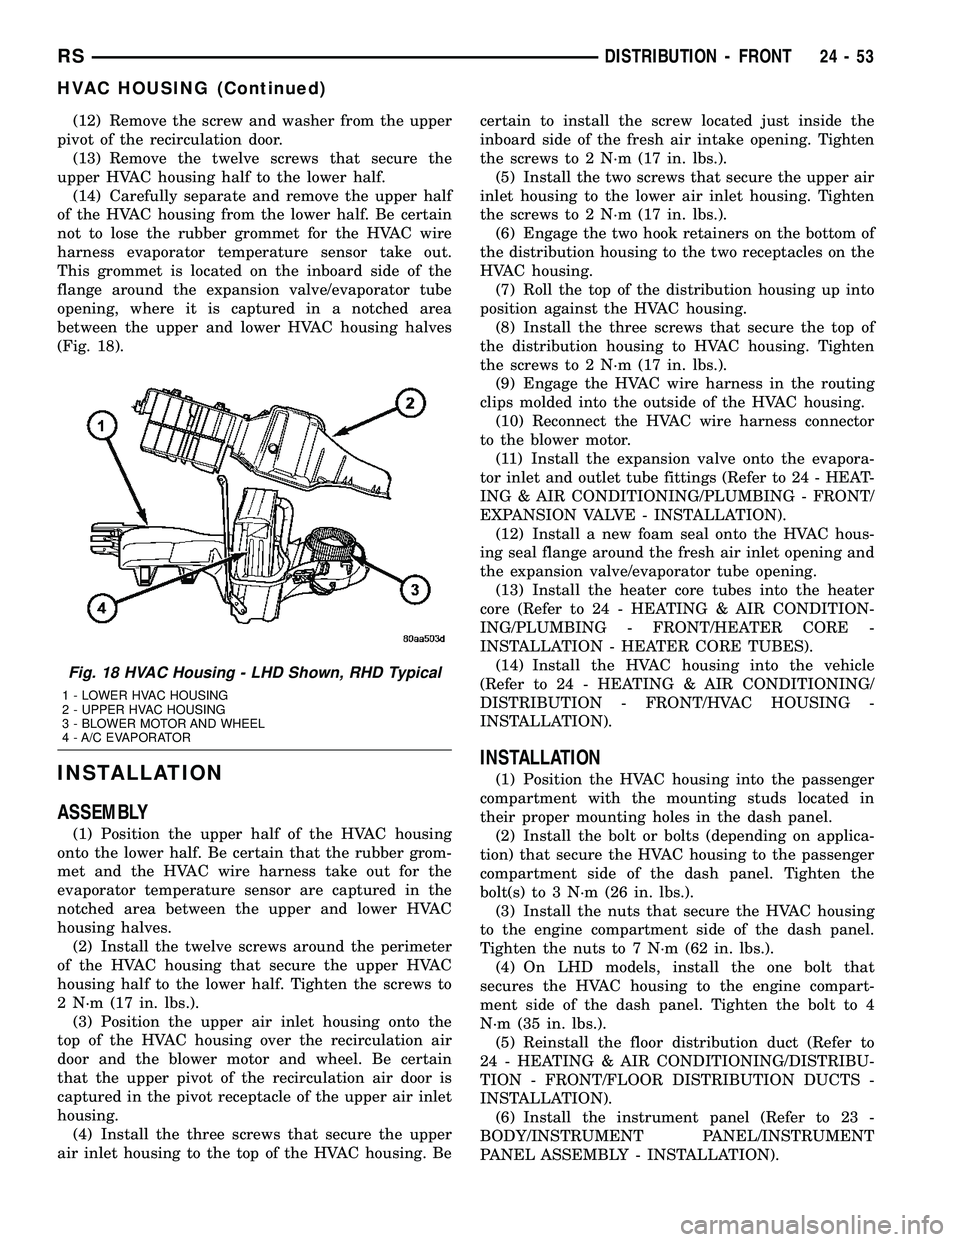
of the HVAC housing from the lower half. Be certain
not to lose the rubber grommet for the HVAC wire
harness evaporator temperature sensor take out.
This grommet is located on the inboard side of the
flange around the expansion valve/evaporator tube
opening, where it is captured in a notched area
between the upper and lower HVAC housing halves
(Fig. 18).
INSTALLATION
ASSEMBLY
(1) Position the upper half of the HVAC housing
onto the lower half. Be certain that the rubber grom-
met and the HVAC wire harness take out for the
evaporator temperature sensor are captured in the
notched area between the upper and lower HVAC
housing halves.
(2) Install the twelve screws around the perimeter
of the HVAC housing that secure the upper HVAC
housing half to the lower half. Tighten the screws to
2 N´m (17 in. lbs.).
(3) Position the upper air inlet housing onto the
top of the HVAC housing over the recirculation air
door and the blower motor and wheel. Be certain
that the upper pivot of the recirculation air door is
captured in the pivot receptacle of the upper air inlet
housing.
(4) Install the three screws that secure the upper
air inlet housing to the top of the HVAC housing. Becertain to install the screw located just inside the
inboard side of the fresh air intake opening. Tighten
the screws to 2 N´m (17 in. lbs.).
(5) Install the two screws that secure the upper air
inlet housing to the lower air inlet housing. Tighten
the screws to 2 N´m (17 in. lbs.).
(6) Engage the two hook retainers on the bottom of
the distribution housing to the two receptacles on the
HVAC housing.
(7) Roll the top of the distribution housing up into
position against the HVAC housing.
(8) Install the three screws that secure the top of
the distribution housing to HVAC housing. Tighten
the screws to 2 N´m (17 in. lbs.).
(9) Engage the HVAC wire harness in the routing
clips molded into the outside of the HVAC housing.
(10) Reconnect the HVAC wire harness connector
to the blower motor.
(11) Install the expansion valve onto the evapora-
tor inlet and outlet tube fittings (Refer to 24 - HEAT-
ING & AIR CONDITIONING/PLUMBING - FRONT/
EXPANSION VALVE - INSTALLATION).
(12) Install a new foam seal onto the HVAC hous-
ing seal flange around the fresh air inlet opening and
the expansion valve/evaporator tube opening.
(13) Install the heater core tubes into the heater
core (Refer to 24 - HEATING & AIR CONDITION-
ING/PLUMBING - FRONT/HEATER CORE -
INSTALLATION - HEATER CORE TUBES).
(14) Install the HVAC housing into the vehicle
(Refer to 24 - HEATING & AIR CONDITIONING/
DISTRIBUTION - FRONT/HVAC HOUSING -
INSTALLATION).
INSTALLATION
(1) Position the HVAC housing into the passenger
compartment with the mounting studs located in
their proper mounting holes in the dash panel.
(2) Install the bolt or bolts (depending on applica-
tion) that secure the HVAC housing to the passenger
compartment side of the dash panel. Tighten the
bolt(s) to 3 N´m (26 in. lbs.).
(3) Install the nuts that secure the HVAC housing
to the engine compartment side of the dash panel.
Tighten the nuts to 7 N´m (62 in. lbs.).
(4) On LHD models, install the one bolt that
secures the HVAC housing to the engine compart-
ment side of the dash panel. Tighten the bolt to 4
N´m (35 in. lbs.).
(5) Reinstall the floor distribution duct (Refer to
24 - HEATING & AIR CONDITIONING/DISTRIBU-
TION - FRONT/FLOOR DISTRIBUTION DUCTS -
INSTALLATION).
(6) Install the instrument panel (Refer to 23 -
BODY/INSTRUMENT PANEL/INSTRUMENT
PANEL ASSEMBLY - INSTALLATION).
Fig. 18 HVAC Housing - LHD Shown, RHD Typical
1 - LOWER HVAC HOUSING
2 - UPPER HVAC HOUSING
3 - BLOWER MOTOR AND WHEEL
4 - A/C EVAPORATOR
RSDISTRIBUTION - FRONT24-53
HVAC HOUSING (Continued)
Page 2205 of 2339
(7) Reconnect the heater hoses to the heater core
tubes (Refer to 24 - HEATING & AIR CONDITION-
ING/PLUMBING - FRONT/HEATER HOSE -
INSTALLATION).
(8) Reconnect the suction line and liquid line to
the expansion valve (Refer to 24 - HEATING & AIR
CONDITIONING/PLUMBING - FRONT/SUCTION
LINE - INSTALLATION) and (Refer to 24 - HEAT-
ING & AIR CONDITIONING/PLUMBING - FRONT/
LIQUID LINE - INSTALLATION).
(9) Install the windshield wiper module (Refer to 8
- ELECTRICAL/WIPERS/WASHERS/WIPER MOD-
ULE - INSTALLATION).
(10) Reconnect the negative battery cable.
(11) Refill the engine cooling system (Refer to 7 -
COOLING - STANDARD PROCEDURE - COOLING
SYSTEM REFILL).
(12) Evacuate the refrigerant system (Refer to 24 -
HEATING & AIR CONDITIONING/PLUMBING -
FRONT/REFRIGERANT - STANDARD PROCE-
DURE - REFRIGERANT SYSTEM EVACUATE).
(13) Charge the refrigerant system (Refer to 24 -
HEATING & AIR CONDITIONING/PLUMBING -
FRONT/REFRIGERANT - STANDARD PROCE-
DURE - REFRIGERANT SYSTEM CHARGE).
INSTRUMENT PANEL
DEMISTER DUCTS
REMOVAL
WARNING: ON VEHICLES EQUIPPED WITH AIR-
BAGS, DISABLE THE AIRBAG SYSTEM BEFORE
ATTEMPTING ANY STEERING WHEEL, STEERING
COLUMN, OR INSTRUMENT PANEL COMPONENT
DIAGNOSIS OR SERVICE. DISCONNECT AND ISO-
LATE THE BATTERY NEGATIVE (GROUND) CABLE,
THEN WAIT TWO MINUTES FOR THE AIRBAG SYS-
TEM CAPACITOR TO DISCHARGE BEFORE PER-
FORMING FURTHER DIAGNOSIS OR SERVICE. THIS
IS THE ONLY SURE WAY TO DISABLE THE AIRBAG
SYSTEM. FAILURE TO TAKE THE PROPER PRE-
CAUTIONS COULD RESULT IN ACCIDENTAL AIR-
BAG DEPLOYMENT AND POSSIBLE PERSONAL
INJURY.(1) Disconnect and isolate the battery negative
cable.
(2) Remove the instrument panel from the vehicle.
(Refer to 23 - BODY/INSTRUMENT PANEL/IN-
STRUMENT PANEL ASSEMBLY - REMOVAL).
(3) Place the instrument panel face down on a
suitable work surface. Be certain to take the proper
precautions to protect the face of the instrument
panel from cosmetic damage.
(4) Remove the fasteners that secure the demister
ducts to the instrument panel armature.
(5) Disengage the demister ducts from the demis-
ter outlets.
(6) Remove the demister ducts from the instru-
ment panel.
INSTALLATION
WARNING: ON VEHICLES EQUIPPED WITH AIR-
BAGS, DISABLE THE AIRBAG SYSTEM BEFORE
ATTEMPTING ANY STEERING WHEEL, STEERING
COLUMN, OR INSTRUMENT PANEL COMPONENT
DIAGNOSIS OR SERVICE. DISCONNECT AND ISO-
LATE THE BATTERY NEGATIVE (GROUND) CABLE,
THEN WAIT TWO MINUTES FOR THE AIRBAG SYS-
TEM CAPACITOR TO DISCHARGE BEFORE PER-
FORMING FURTHER DIAGNOSIS OR SERVICE. THIS
IS THE ONLY SURE WAY TO DISABLE THE AIRBAG
SYSTEM. FAILURE TO TAKE THE PROPER PRE-
CAUTIONS COULD RESULT IN ACCIDENTAL AIR-
BAG DEPLOYMENT AND POSSIBLE PERSONAL
INJURY.
(1) Position the demister ducts to the instrument
panel.
(2) Engage the demister ducts to the demister out-
lets.
(3) Install the fasteners that secure the demister
ducts to the instrument panel armature.
(4) Reinstall the instrument panel into the vehicle.
(Refer to 23 - BODY/INSTRUMENT PANEL/IN-
STRUMENT PANEL ASSEMBLY - INSTALLA-
TION).
(5) Reconnect the battery negative cable.
24 - 54 DISTRIBUTION - FRONTRS
HVAC HOUSING (Continued)