2005 CHRYSLER CARAVAN dimensions
[x] Cancel search: dimensionsPage 1956 of 2339
BODY STRUCTURE
TABLE OF CONTENTS
page page
GAP AND FLUSH
SPECIFICATIONS - GAP AND FLUSH
MEASUREMENTS....................177
OPENING DIMENSIONS
SPECIFICATIONS - BODY OPENING
DIMENSIONS........................180
SEALER LOCATIONS
SPECIFICATIONS
SPECIFICATIONS - BODY SEALING
LOCATIONS.........................183
SPECIFICATIONS - BODY SEALING
LOCATIONS - FOLD-IN-FLOOR ONLY.....209STRUCTURAL ADHESIVE LOCATIONS
SPECIFICATIONS
SPECIFICATIONS - STRUCTURAL
ADHESIVE LOCATIONS................218
SPECIFICATIONS - STRUCTURAL
ADHESIVE LOCATIONS - FOLD-IN-FLOOR
ONLY..............................228
WELD LOCATIONS
SPECIFICATIONS
SPECIFICATIONS - WELD LOCATIONS....234
SPECIFICATIONS - WELD LOCATIONS -
FOLD-IN-FLOOR.....................350
GAP AND FLUSH
SPECIFICATIONS - GAP AND FLUSH
MEASUREMENTS
INDEX
DESCRIPTION FIGURE
GAP & FLUSH MEASUREMENTS 1
RSBODY STRUCTURE23 - 177
Page 1959 of 2339
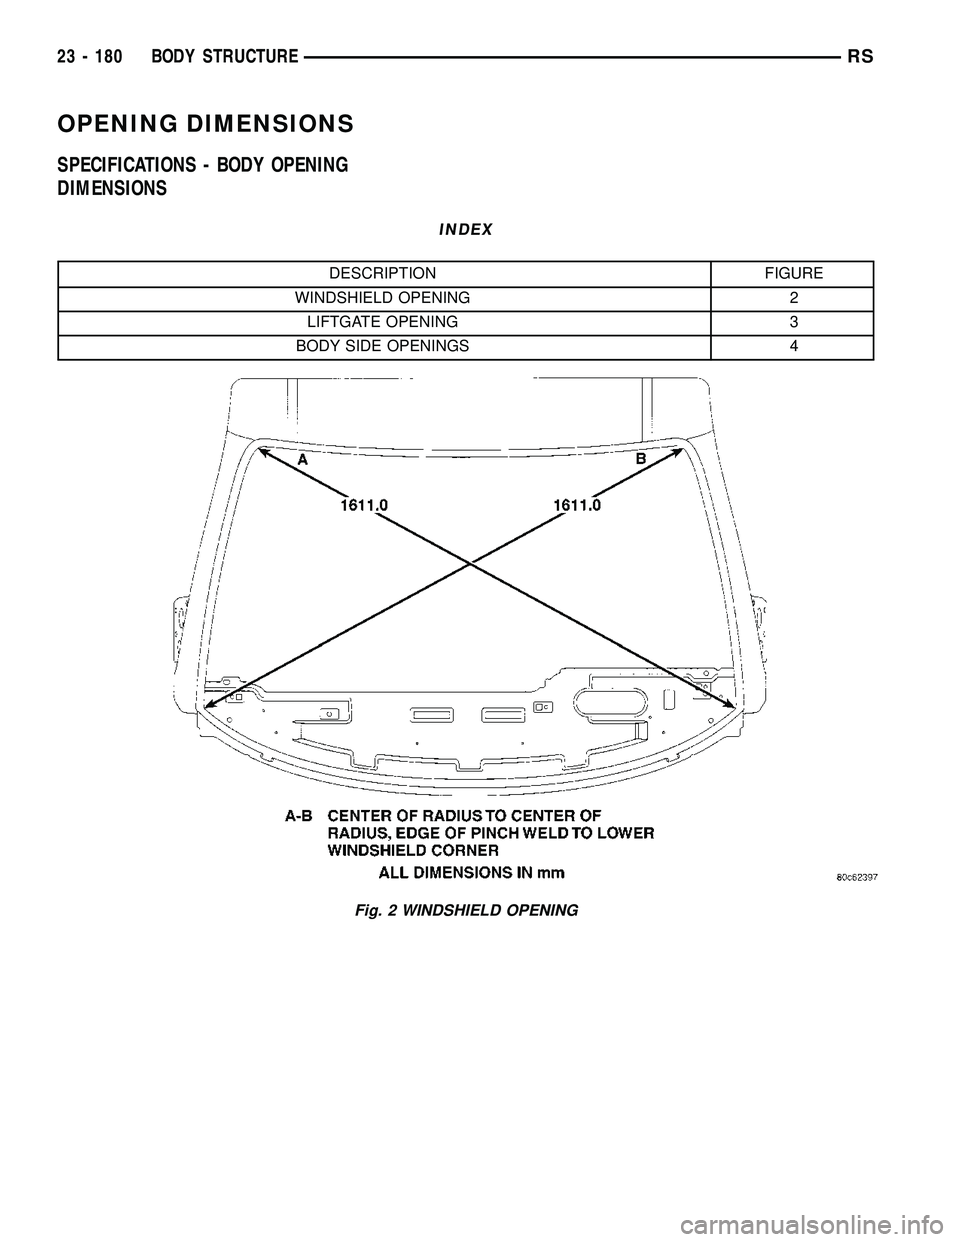
OPENING DIMENSIONS
SPECIFICATIONS - BODY OPENING
DIMENSIONS
INDEX
DESCRIPTION FIGURE
WINDSHIELD OPENING 2
LIFTGATE OPENING 3
BODY SIDE OPENINGS 4
Fig. 2 WINDSHIELD OPENING
23 - 180 BODY STRUCTURERS
Page 1960 of 2339
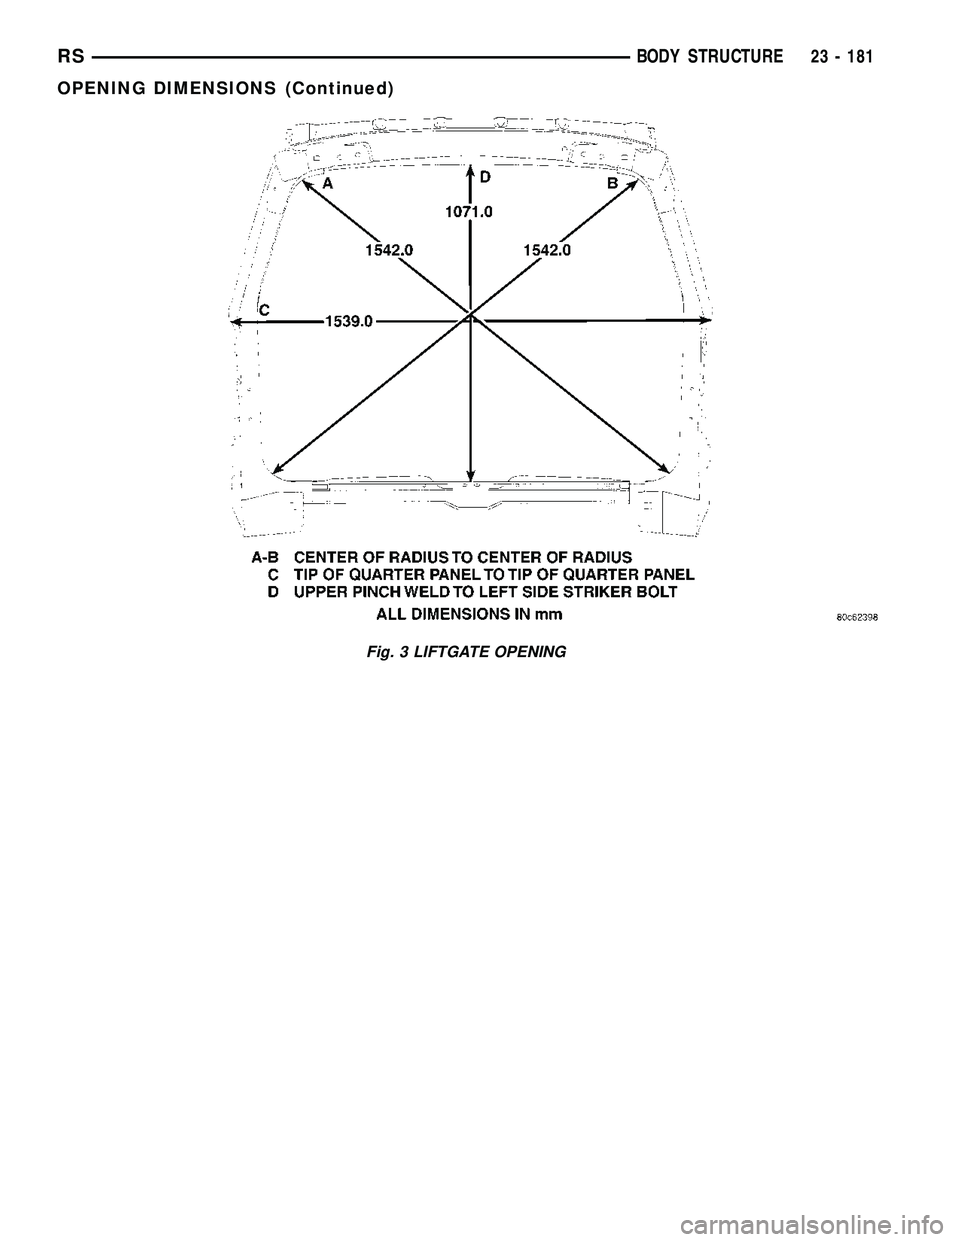
Fig. 3 LIFTGATE OPENING
RSBODY STRUCTURE23 - 181
OPENING DIMENSIONS (Continued)
Page 1961 of 2339
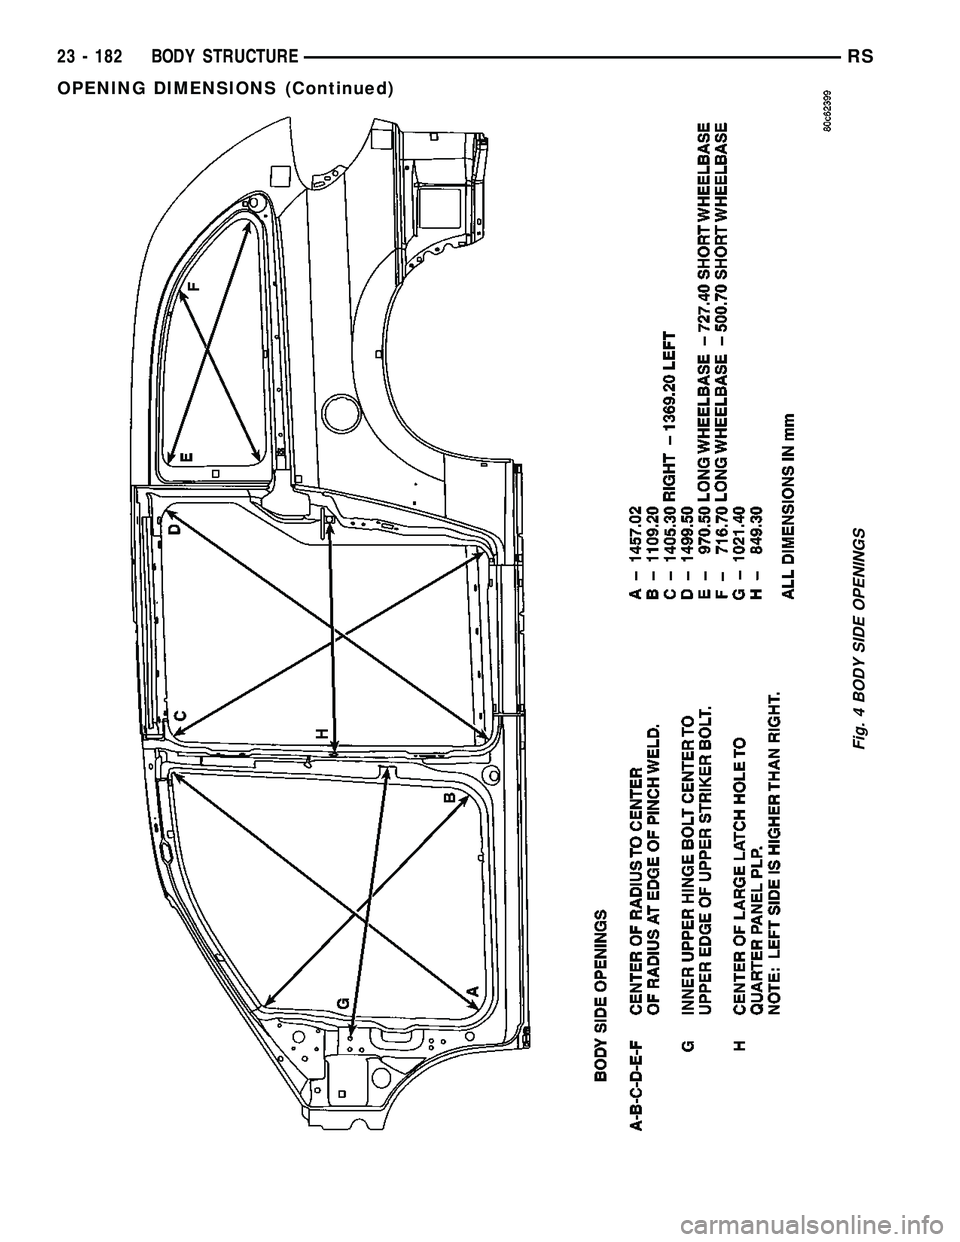
Fig. 4 BODY SIDE OPENINGS
23 - 182 BODY STRUCTURERS
OPENING DIMENSIONS (Continued)
Page 2169 of 2339
A/C COMPRESSOR CLUTCH
RELAY
DESCRIPTION
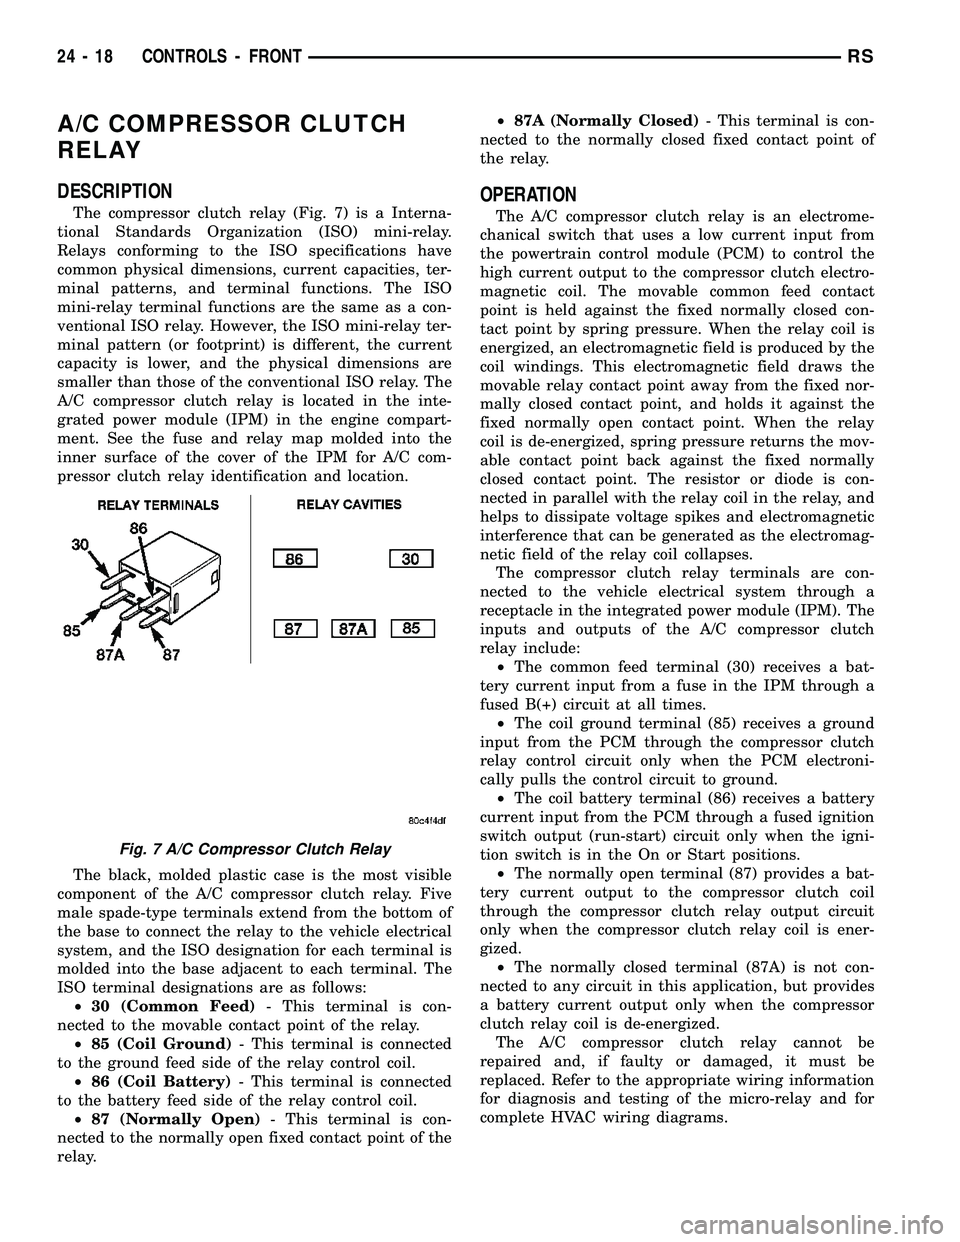
The compressor clutch relay (Fig. 7) is a Interna-
tional Standards Organization (ISO) mini-relay.
Relays conforming to the ISO specifications have
common physical dimensions, current capacities, ter-
minal patterns, and terminal functions. The ISO
mini-relay terminal functions are the same as a con-
ventional ISO relay. However, the ISO mini-relay ter-
minal pattern (or footprint) is different, the current
capacity is lower, and the physical dimensions are
smaller than those of the conventional ISO relay. The
A/C compressor clutch relay is located in the inte-
grated power module (IPM) in the engine compart-
ment. See the fuse and relay map molded into the
inner surface of the cover of the IPM for A/C com-
pressor clutch relay identification and location.
The black, molded plastic case is the most visible
component of the A/C compressor clutch relay. Five
male spade-type terminals extend from the bottom of
the base to connect the relay to the vehicle electrical
system, and the ISO designation for each terminal is
molded into the base adjacent to each terminal. The
ISO terminal designations are as follows:
²30 (Common Feed)- This terminal is con-
nected to the movable contact point of the relay.
²85 (Coil Ground)- This terminal is connected
to the ground feed side of the relay control coil.
²86 (Coil Battery)- This terminal is connected
to the battery feed side of the relay control coil.
²87 (Normally Open)- This terminal is con-
nected to the normally open fixed contact point of the
relay.²87A (Normally Closed)- This terminal is con-
nected to the normally closed fixed contact point of
the relay.
OPERATION
The A/C compressor clutch relay is an electrome-
chanical switch that uses a low current input from
the powertrain control module (PCM) to control the
high current output to the compressor clutch electro-
magnetic coil. The movable common feed contact
point is held against the fixed normally closed con-
tact point by spring pressure. When the relay coil is
energized, an electromagnetic field is produced by the
coil windings. This electromagnetic field draws the
movable relay contact point away from the fixed nor-
mally closed contact point, and holds it against the
fixed normally open contact point. When the relay
coil is de-energized, spring pressure returns the mov-
able contact point back against the fixed normally
closed contact point. The resistor or diode is con-
nected in parallel with the relay coil in the relay, and
helps to dissipate voltage spikes and electromagnetic
interference that can be generated as the electromag-
netic field of the relay coil collapses.
The compressor clutch relay terminals are con-
nected to the vehicle electrical system through a
receptacle in the integrated power module (IPM). The
inputs and outputs of the A/C compressor clutch
relay include:
²The common feed terminal (30) receives a bat-
tery current input from a fuse in the IPM through a
fused B(+) circuit at all times.
²The coil ground terminal (85) receives a ground
input from the PCM through the compressor clutch
relay control circuit only when the PCM electroni-
cally pulls the control circuit to ground.
²The coil battery terminal (86) receives a battery
current input from the PCM through a fused ignition
switch output (run-start) circuit only when the igni-
tion switch is in the On or Start positions.
²The normally open terminal (87) provides a bat-
tery current output to the compressor clutch coil
through the compressor clutch relay output circuit
only when the compressor clutch relay coil is ener-
gized.
²The normally closed terminal (87A) is not con-
nected to any circuit in this application, but provides
a battery current output only when the compressor
clutch relay coil is de-energized.
The A/C compressor clutch relay cannot be
repaired and, if faulty or damaged, it must be
replaced. Refer to the appropriate wiring information
for diagnosis and testing of the micro-relay and for
complete HVAC wiring diagrams.
Fig. 7 A/C Compressor Clutch Relay
24 - 18 CONTROLS - FRONTRS
Page 2174 of 2339
(3) Connect the HVAC wire harness connector to
the blend door actuator.
(4) Install the silencer under the driver side end of
the instrument panel (Refer to 23 - BODY/INSTRU-
MENT PANEL/INSTRUMENT PANEL SILENCER -
INSTALLATION).
(5) Reconnect the battery negative cable.
(6) Perform the heater-A/C control calibration pro-
cedure (Refer to 24 - HEATING & AIR CONDITION-
ING/CONTROLS - FRONT/A/C-HEATER CONTROL
- STANDARD PROCEDURE - HEATER-A/C CON-
TROL CALIBRATION).
BLOWER MOTOR RELAY
DESCRIPTION
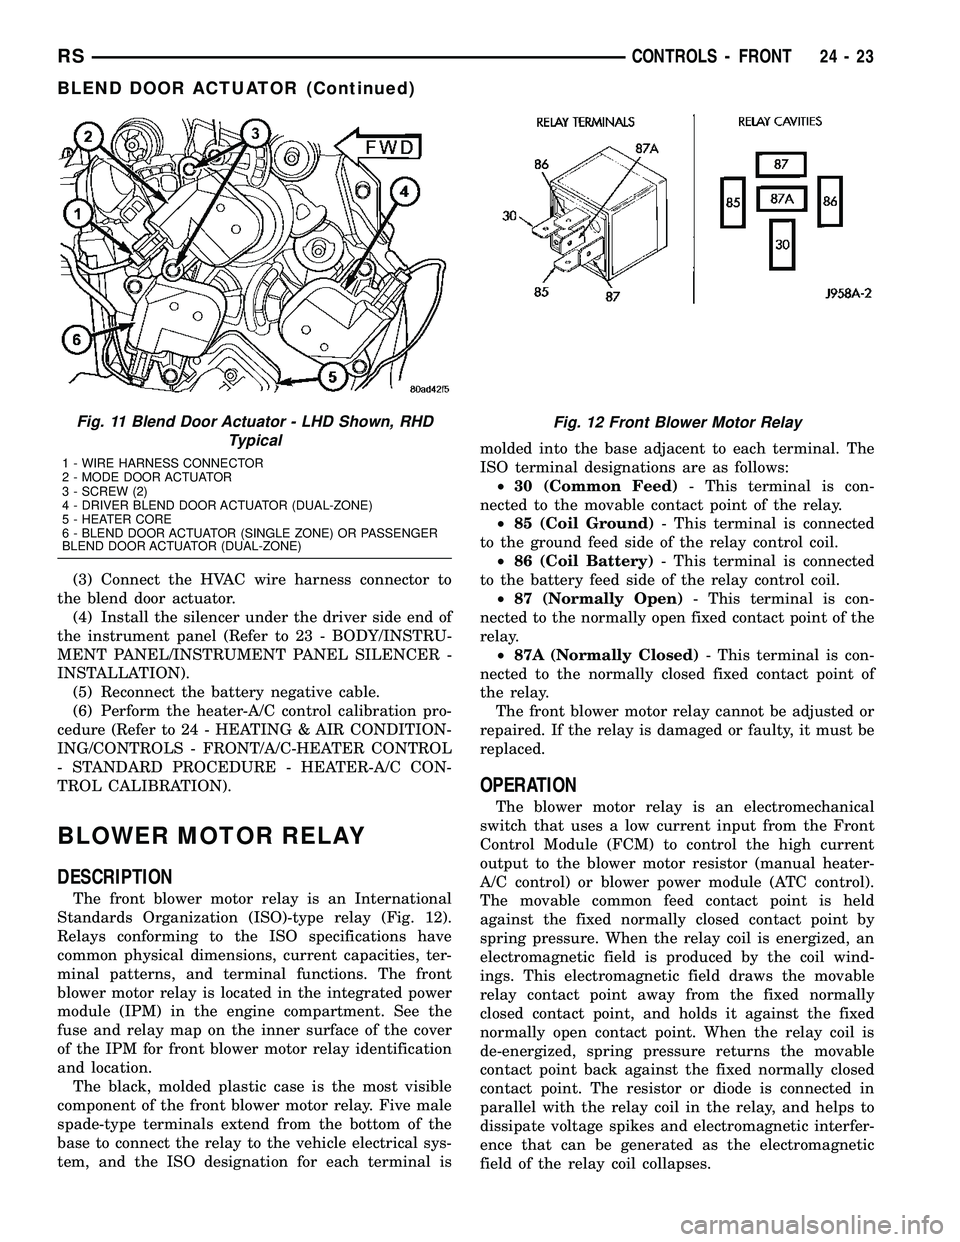
The front blower motor relay is an International
Standards Organization (ISO)-type relay (Fig. 12).
Relays conforming to the ISO specifications have
common physical dimensions, current capacities, ter-
minal patterns, and terminal functions. The front
blower motor relay is located in the integrated power
module (IPM) in the engine compartment. See the
fuse and relay map on the inner surface of the cover
of the IPM for front blower motor relay identification
and location.
The black, molded plastic case is the most visible
component of the front blower motor relay. Five male
spade-type terminals extend from the bottom of the
base to connect the relay to the vehicle electrical sys-
tem, and the ISO designation for each terminal ismolded into the base adjacent to each terminal. The
ISO terminal designations are as follows:
²30 (Common Feed)- This terminal is con-
nected to the movable contact point of the relay.
²85 (Coil Ground)- This terminal is connected
to the ground feed side of the relay control coil.
²86 (Coil Battery)- This terminal is connected
to the battery feed side of the relay control coil.
²87 (Normally Open)- This terminal is con-
nected to the normally open fixed contact point of the
relay.
²87A (Normally Closed)- This terminal is con-
nected to the normally closed fixed contact point of
the relay.
The front blower motor relay cannot be adjusted or
repaired. If the relay is damaged or faulty, it must be
replaced.
OPERATION
The blower motor relay is an electromechanical
switch that uses a low current input from the Front
Control Module (FCM) to control the high current
output to the blower motor resistor (manual heater-
A/C control) or blower power module (ATC control).
The movable common feed contact point is held
against the fixed normally closed contact point by
spring pressure. When the relay coil is energized, an
electromagnetic field is produced by the coil wind-
ings. This electromagnetic field draws the movable
relay contact point away from the fixed normally
closed contact point, and holds it against the fixed
normally open contact point. When the relay coil is
de-energized, spring pressure returns the movable
contact point back against the fixed normally closed
contact point. The resistor or diode is connected in
parallel with the relay coil in the relay, and helps to
dissipate voltage spikes and electromagnetic interfer-
ence that can be generated as the electromagnetic
field of the relay coil collapses.
Fig. 11 Blend Door Actuator - LHD Shown, RHD
Typical
1 - WIRE HARNESS CONNECTOR
2 - MODE DOOR ACTUATOR
3 - SCREW (2)
4 - DRIVER BLEND DOOR ACTUATOR (DUAL-ZONE)
5 - HEATER CORE
6 - BLEND DOOR ACTUATOR (SINGLE ZONE) OR PASSENGER
BLEND DOOR ACTUATOR (DUAL-ZONE)
Fig. 12 Front Blower Motor Relay
RSCONTROLS - FRONT24-23
BLEND DOOR ACTUATOR (Continued)
Page 2187 of 2339
(6) Install the screw that secures the front of the
rear HVAC housing to the right quarter inner panel.
Tighten the screw to 11 N´m (97 in. lbs.).
(7) Install the screw that secures the back of the
rear HVAC housing to the right D-pillar. Tighten the
screw to 11 N´m (97 in. lbs.).
(8) Install the two screws that secure the top of
the quarter trim panel attaching bracket to the quar-
ter inner panel. Tighten the screws to 2 N´m (17 in.
lbs.).
(9) Reinstall the right quarter trim panel and
right D-pillar trim panel onto the quarter inner
panel (Refer to 23 - BODY/INTERIOR/QUARTER
TRIM PANEL - INSTALLATION).
(10) Reconnect the battery negative cable.
(11) Perform the heater-A/C control calibration
procedure (Refer to 24 - HEATING & AIR CONDI-
TIONING/CONTROLS - FRONT/A/C-HEATER CON-
TROL - STANDARD PROCEDURE - HEATER-A/C
CONTROL CALIBRATION).
BLOWER MOTOR RELAY
DESCRIPTION
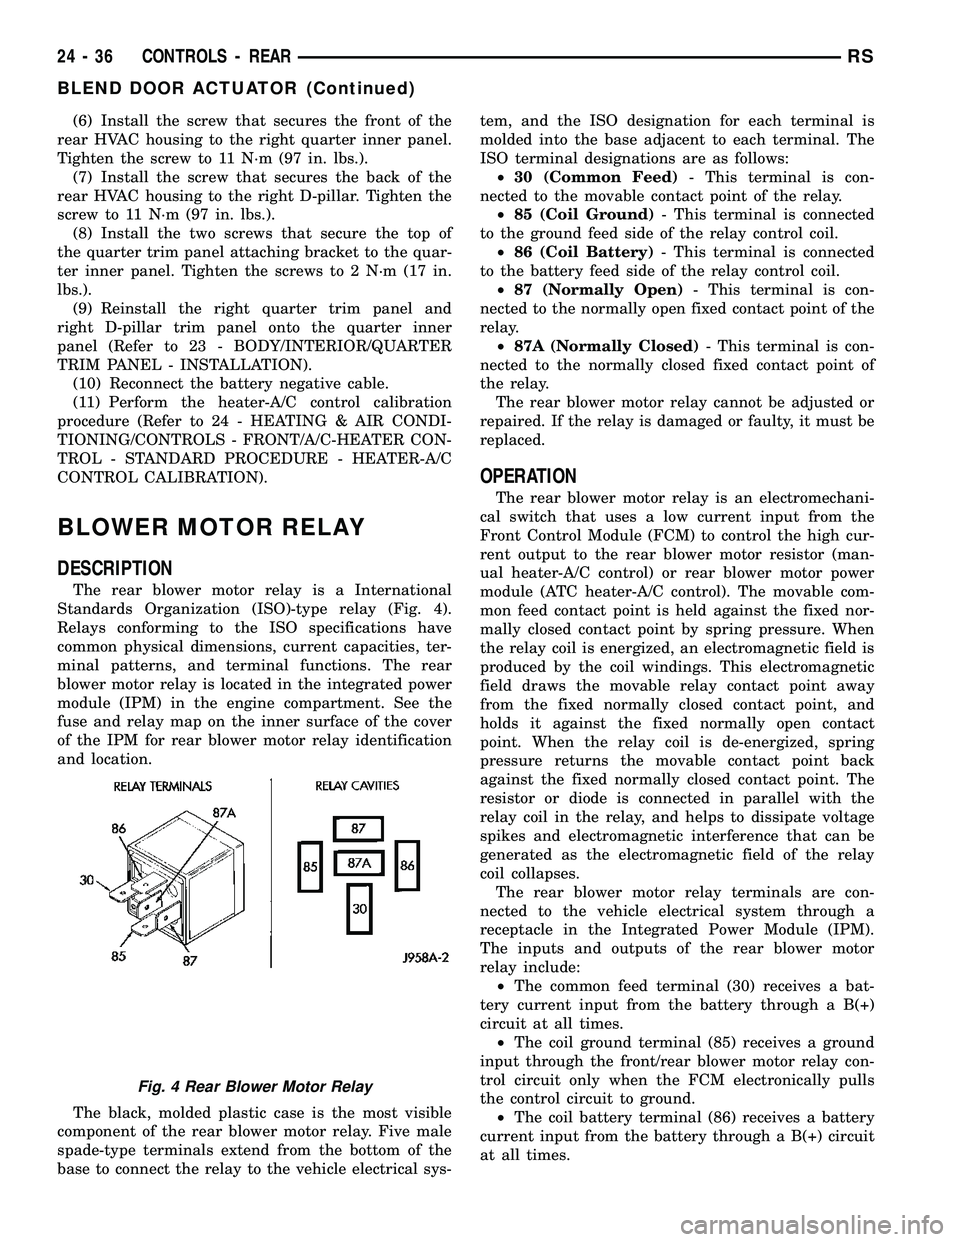
The rear blower motor relay is a International
Standards Organization (ISO)-type relay (Fig. 4).
Relays conforming to the ISO specifications have
common physical dimensions, current capacities, ter-
minal patterns, and terminal functions. The rear
blower motor relay is located in the integrated power
module (IPM) in the engine compartment. See the
fuse and relay map on the inner surface of the cover
of the IPM for rear blower motor relay identification
and location.
The black, molded plastic case is the most visible
component of the rear blower motor relay. Five male
spade-type terminals extend from the bottom of the
base to connect the relay to the vehicle electrical sys-tem, and the ISO designation for each terminal is
molded into the base adjacent to each terminal. The
ISO terminal designations are as follows:
²30 (Common Feed)- This terminal is con-
nected to the movable contact point of the relay.
²85 (Coil Ground)- This terminal is connected
to the ground feed side of the relay control coil.
²86 (Coil Battery)- This terminal is connected
to the battery feed side of the relay control coil.
²87 (Normally Open)- This terminal is con-
nected to the normally open fixed contact point of the
relay.
²87A (Normally Closed)- This terminal is con-
nected to the normally closed fixed contact point of
the relay.
The rear blower motor relay cannot be adjusted or
repaired. If the relay is damaged or faulty, it must be
replaced.
OPERATION
The rear blower motor relay is an electromechani-
cal switch that uses a low current input from the
Front Control Module (FCM) to control the high cur-
rent output to the rear blower motor resistor (man-
ual heater-A/C control) or rear blower motor power
module (ATC heater-A/C control). The movable com-
mon feed contact point is held against the fixed nor-
mally closed contact point by spring pressure. When
the relay coil is energized, an electromagnetic field is
produced by the coil windings. This electromagnetic
field draws the movable relay contact point away
from the fixed normally closed contact point, and
holds it against the fixed normally open contact
point. When the relay coil is de-energized, spring
pressure returns the movable contact point back
against the fixed normally closed contact point. The
resistor or diode is connected in parallel with the
relay coil in the relay, and helps to dissipate voltage
spikes and electromagnetic interference that can be
generated as the electromagnetic field of the relay
coil collapses.
The rear blower motor relay terminals are con-
nected to the vehicle electrical system through a
receptacle in the Integrated Power Module (IPM).
The inputs and outputs of the rear blower motor
relay include:
²The common feed terminal (30) receives a bat-
tery current input from the battery through a B(+)
circuit at all times.
²The coil ground terminal (85) receives a ground
input through the front/rear blower motor relay con-
trol circuit only when the FCM electronically pulls
the control circuit to ground.
²The coil battery terminal (86) receives a battery
current input from the battery through a B(+) circuit
at all times.
Fig. 4 Rear Blower Motor Relay
24 - 36 CONTROLS - REARRS
BLEND DOOR ACTUATOR (Continued)
Page 2305 of 2339
BENCH SEAT RISER - 50/50 SPLIT -INSTALLATION ...................... 23-145
BENCH SEAT RISER - 50/50 SPLIT - REMOVAL ......................... 23-145
BENCH SEAT RISER - SECOND ROW - INSTALLATION ...................... 23-145
BENCH SEAT RISER - SECOND ROW - REMOVAL ......................... 23-145
BENCH SEAT RISER - THIRD ROW - INSTALLATION ...................... 23-145
BENCH SEAT RISER - THIRD ROW - REMOVAL ......................... 23-145
BENCH SEAT TRACK - INSTALLATION . . . 23-148
BENCH SEAT TRACK - REMOVAL .......23-148
BEZEL - INSTALLATION, CLUSTER .......23-65
BEZEL - INSTALLATION, INSTRUMENT PANEL CENTER ...................... 23-72
BEZEL - INSTALLATION, SLIDING DOOR STOP BUMPER ...................... 23-25
BEZEL - REMOVAL, CLUSTER ...........23-65
BEZEL - REMOVAL, INSTRUMENT PANEL CENTER ............................ 23-71
BEZEL - REMOVAL, SLIDING DOOR STOP BUMPER ...................... 23-25
BEZEL OUTLETS, INSTALLATION - FRONT CENTER ...................... 24-45
BEZEL OUTLETS, REMOVAL - FRONT CENTER ............................ 24-44
BIN - INSTALLATION, UNDER SEAT STORAGE .......................... 23-149
BIN - REMOVAL, UNDER SEAT STORAGE . 23-149
BIN GUIDE - INSTALLATION, UNDER SEAT STORAGE ..................... 23-150
BIN GUIDE - REMOVAL, UNDER SEAT STORAGE .......................... 23-150
BIN LOCK/LATCH - INSTALLATION, UNDER SEAT STORAGE ...............23-150
BIN LOCK/LATCH - REMOVAL, UNDER SEAT STORAGE ..................... 23-150
BLADDER & PRESSURE SENSOR - DESCRIPTION, SEAT WEIGHT ...........8O-43
BLADDER & PRESSURE SENSOR - OPERATION, SEAT WEIGHT ............8O-44
BLADES - CLEANING, WIPER ...........8R-13
BLADES - INSTALLATION, WIPER ........8R-13
BLADES - REMOVAL, WIPER ...........8R-13
BLEEDING - STANDARD PROCEDURE, ANTILOCK BRAKE SYSTEM ..............5-90
BLEEDING - STANDARD PROCEDURE, BASE BRAKE ..........................5-8
BLEEDING - STANDARD PROCEDURE, MASTER CYLINDER ................... 5-36
BLEND DOOR ACTUATOR - DESCRIPTION .................. 24-22,24-34
BLEND DOOR ACTUATOR - INSTALLATION .................. 24-22,24-35
BLEND DOOR ACTUATOR - OPERATION . . 24-22, 24-35
BLEND DOOR ACTUATOR - REMOVAL ....24-22,
24-35
BLOCK - CLEANING, ENGINE .......9-115,9-37
BLOCK - DESCRIPTION, BLOWER MOTOR RESISTOR ..............24-24,24-37
BLOCK - DESCRIPTION, ENGINE .....9-115,9-36
BLOCK - DESCRIPTION, NON-ABS JUNCTION ........................... 5-33
BLOCK - INSPECTION, ENGINE ......9-115,9-37
BLOCK - INSTALLATION, NON-ABS JUNCTION ........................... 5-34
BLOCK - OPERATION, BLOWER MOTOR RESISTOR ..................... 24-24,24-37
BLOCK - OPERATION, NON-ABS JUNCTION ........................... 5-33
BLOCK - REMOVAL, NON-ABS JUNCTION . . 5-34
BLOCK, DIAGNOSIS AND TESTING - FRONT BLOWER MOTOR RESISTOR ......24-25
BLOCK, DIAGNOSIS AND TESTING - REAR BLOWER MOTOR RESISTOR ......24-38
BLOCK HEATER - DESCRIPTION, ENGINE . . . 7-20
BLOCK HEATER - INSTALLATION, ENGINE ............................. 7-21
BLOCK HEATER - OPERATION, ENGINE ....7-20
BLOCK HEATER - REMOVAL, ENGINE ......7-21
BLOCK HEATER TESTING - DIAGNOSIS AND TESTING, ENGINE .................7-21
BLOCKER AIRBAG - DESCRIPTION, KNEE . 8O-22
BLOCKER AIRBAG - INSTALLATION, KNEE .............................. 8O-23BLOCKER AIRBAG - OPERATION, KNEE . . . 8O-22
BLOCKER AIRBAG - REMOVAL, KNEE
....8O-23
BLOCKER- INFLATABLE KNEE - INSTALLATION ....................... 23-75
BLOCKER- INFLATABLE KNEE - REMOVAL .......................... 23-75
BLOCKER LATCH - INSTALLATION, FUEL FILL DOOR ......................... 23-53
BLOCKER LATCH - REMOVAL, FUEL FILL DOOR ............................. 23-53
BLOCKER LATCH STRIKER - INSTALLATION, FUEL FILL DOOR ........23-53
BLOCKER LATCH STRIKER - REMOVAL, FUEL FILL DOOR ..................... 23-53
BLOCKER LOCKOUT LINK - INSTALLATION, FUEL FILL DOOR ........23-54
BLOCKER LOCKOUT LINK - REMOVAL, FUEL FILL DOOR ..................... 23-54
BLOWER MOTOR - DESCRIPTION . . 24-45,24-57
BLOWER MOTOR - DESCRIPTION, POWER MODULE .................... 24-30
BLOWER MOTOR - DESCRIPTION, POWER MODULE - REAR ..............24-40
BLOWER MOTOR - INSTALLATION, POWER MODULE .................... 24-31
BLOWER MOTOR - INSTALLATION, POWER MODULE - REAR ..............24-41
BLOWER MOTOR - OPERATION ....24-45,24-57
BLOWER MOTOR - OPERATION, POWER MODULE ........................... 24-30
BLOWER MOTOR - OPERATION, POWER MODULE - REAR ..................... 24-40
BLOWER MOTOR - REMOVAL, POWER MODULE ........................... 24-30
BLOWER MOTOR - REMOVAL, POWER MODULE - REAR ..................... 24-41
BLOWER MOTOR, DIAGNOSIS AND TESTING - FRONT .................... 24-46
BLOWER MOTOR, DIAGNOSIS AND TESTING - REAR ..................... 24-58
BLOWER MOTOR RELAY - DESCRIPTION . 24-23, 24-36
BLOWER MOTOR RELAY - INSTALLATION .................. 24-24,24-37
BLOWER MOTOR RELAY - OPERATION . . . 24-23, 24-36
BLOWER MOTOR RELAY - REMOVAL ....24-24,
24-37
BLOWER MOTOR RESISTOR BLOCK - DESCRIPTION .................. 24-24,24-37
BLOWER MOTOR RESISTOR BLOCK - OPERATION .................... 24-24,24-37
BLOWER MOTOR RESISTOR BLOCK, DIAGNOSIS AND TESTING - FRONT ......24-25
BLOWER MOTOR RESISTOR BLOCK, DIAGNOSIS AND TESTING - REAR .......24-38
BODY - ASSEMBLY, VALVE ......21-139,21-291
BODY - DESCRIPTION, THROTTLE .......14-39
BODY - DESCRIPTION, VALVE ....21-132,21-283
BODY - DISASSEMBLY, VALVE . . . 21-135,21-286
BODY - INSTALLATION, THROTTLE .......14-40
BODY - INSTALLATION, VALVE . . . 21-144,21-295
BODY - OPERATION, THROTTLE .........14-39
BODY - OPERATION, VALVE .....21-132,21-283
BODY - REMOVAL, THROTTLE ..........14-40
BODY - REMOVAL, VALVE .......21-133,21-284
BODY AND CABLE - DESCRIPTION, ANTENNA ........................... 8A-7
BODY AND CABLE - OPERATION, ANTENNA ........................... 8A-7
BODY AND CABLE, DIAGNOSIS AND TESTING - ANTENNA ................... 8A-8
BODY CONTROL MODULE - DESCRIPTION ........................ 8E-2
BODY CONTROL MODULE - INSTALLATION ........................ 8E-4
BODY CONTROL MODULE - OPERATION . . . 8E-3
BODY CONTROL MODULE - REMOVAL .....8E-4
BODY LUBRICATION, SPECIFICATIONS ....23-12
BODY OPENING DIMENSIONS - SPECIFICATIONS .................... 23-180
BODY PANEL REPAIR - STANDARD PROCEDURE, PLASTIC .................23-3
BODY SEALING LOCATIONS - FOLD-IN- FLOOR ONLY - SPECIFICATIONS ........23-209
BODY SEALING LOCATIONS - SPECIFICATIONS .................... 23-183
BODY SIDE - INSTALLATION ............23-44BODY SIDE - REMOVAL
...............23-44
BODY SIDE MOLDINGS - INSTALLATION . . 23-46
BODY SIDE MOLDINGS - REMOVAL ......23-45
BODY, SPECIAL TOOLS ................23-13
BOLSTER - INSTALLATION, QUARTER TRIM .............................. 23-95
BOLSTER - REMOVAL, QUARTER TRIM . . . 23-95
BOOSTER - DESCRIPTION, POWER BRAKE .............................. 5-45
BOOSTER - DIAGNOSIS AND TESTING, POWER BRAKE ....................... 5-46
BOOSTER - OPERATION, POWER BRAKE . . . 5-46
BOOT - INNER - INSTALLATION, CV ........3-7
BOOT - INNER - REMOVAL, CV ...........3-6
BOOT - OUTER - INSTALLATION, CV ......3-11
BOOT - OUTER - REMOVAL, CV ..........3-10
BORE FITTING - STANDARD PROCEDURE, PISTON TO CYLINDER ......9-44
BORE HONING - STANDARD PROCEDURE, CYLINDER ...........9-115,9-36
BOTTOM OF SEAT CUSHION PAN PANEL-THIRD ROW - FOLD-IN-FLOOR
- INSTALLATION .................... 23-152
BOTTOM OF SEAT CUSHION PAN PANEL-THIRD ROW - FOLD-IN-FLOOR
- REMOVAL ........................ 23-152
BOX - INSTALLATION, GLOVE ...........23-66
BOX - REMOVAL, GLOVE ..............23-66
BOX LAMP SWITCH - INSTALLATION, GLOVE ............................. 8L-22
BOX LAMP SWITCH - REMOVAL, GLOVE . . 8L-22
BOX LATCH - INSTALLATION, GLOVE .....23-66
BOX LATCH - REMOVAL, GLOVE .........23-66
BOX LATCH STRIKER - INSTALLATION, GLOVE ............................. 23-66
BOX LATCH STRIKER - REMOVAL, GLOVE ............................. 23-66
B-PILLAR - INSTALLATION, A-PILLAR- HEADER, OR ........................ 23-17
B-PILLAR - REMOVAL, A-PILLAR- HEADER, OR ........................ 23-17
B-PILLAR LOWER TRIM - INSTALLATION . . 23-80
B-PILLAR LOWER TRIM - REMOVAL .....23-79
B-PILLAR SWITCH - DESCRIPTION ......8N-52
B-PILLAR SWITCH - INSTALLATION ......8N-52
B-PILLAR SWITCH - OPERATION ........8N-52
B-PILLAR SWITCH - REMOVAL .........8N-52
B-PILLAR UPPER TRIM - INSTALLATION . . 23-80
B-PILLAR UPPER TRIM - REMOVAL ......23-80
BRACKET - DESCRIPTION, TRANSVERSE . . 8N-19
BRACKET - INSTALLATION, TRANSVERSE . 8N-19
BRACKET - OPERATION, TRANSVERSE . . . 8N-19
BRACKET - REMOVAL, TRANSVERSE .....8N-19
BRACKET, 2.4L ENGINE - A/C COMPRESSOR MOUNTING ........24-74,24-75
BRAKE - DESCRIPTION, CONTROLLER ANTILOCK ........................... 8E-4
BRAKE - INSTALLATION, CONTROLLER ANTILOCK ........................... 8E-6
BRAKE - INSTALLATION, LEVER - PARKING ............................ 5-76
BRAKE - INSTALLATION, SHOES - PARKING ............................ 5-84
BRAKE - INSTALLATION, SUPPORT PLATE - DRUM ....................... 5-61
BRAKE - OPERATION, CONTROLLER ANTILOCK ........................... 8E-5
BRAKE - REMOVAL, CONTROLLER ANTILOCK ........................... 8E-5
BRAKE - REMOVAL, LEVER - PARKING ....5-75
BRAKE - REMOVAL, SHOES - PARKING ....5-78
BRAKE - REMOVAL, SUPPORT PLATE - DRUM .............................. 5-61
BRAKE AUTOMATIC ADJUSTER - DIAGNOSIS AND TESTING, DRUM ........5-14
BRAKE AUTOMATIC ADJUSTER TENSION RELEASE - STANDARD PROCEDURE,
PARKING ............................ 5-63
BRAKE AUTOMATIC ADJUSTER TENSION RESET - STANDARD PROCEDURE,
PARKING ............................ 5-64
BRAKE BLEEDING - STANDARD PROCEDURE, BASE .....................5-8
BRAKE BOOSTER - DESCRIPTION, POWER ............................. 5-45
BRAKE BOOSTER - DIAGNOSIS AND TESTING, POWER ..................... 5-46
BRAKE BOOSTER - OPERATION, POWER . . . 5-46
4 INDEXRS
Description Group-Page Description Group-Page Description Group-Page