2005 CHRYSLER CARAVAN ad blue
[x] Cancel search: ad bluePage 1052 of 2339
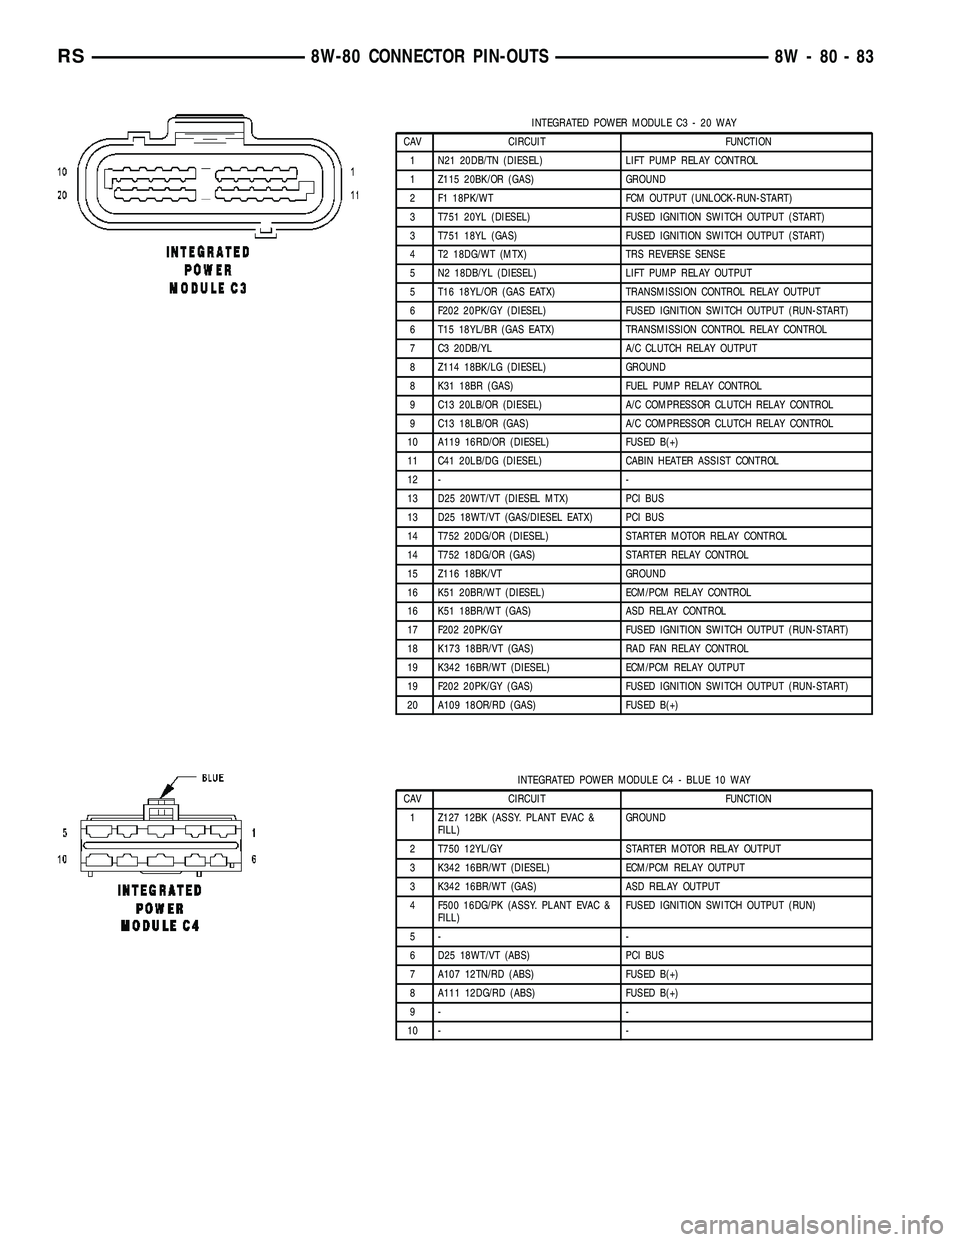
INTEGRATED POWER MODULE C3 - 20 WAY
CAV CIRCUIT FUNCTION
1 N21 20DB/TN (DIESEL) LIFT PUMP RELAY CONTROL
1 Z115 20BK/OR (GAS) GROUND
2 F1 18PK/WT FCM OUTPUT (UNLOCK-RUN-START)
3 T751 20YL (DIESEL) FUSED IGNITION SWITCH OUTPUT (START)
3 T751 18YL (GAS) FUSED IGNITION SWITCH OUTPUT (START)
4 T2 18DG/WT (MTX) TRS REVERSE SENSE
5 N2 18DB/YL (DIESEL) LIFT PUMP RELAY OUTPUT
5 T16 18YL/OR (GAS EATX) TRANSMISSION CONTROL RELAY OUTPUT
6 F202 20PK/GY (DIESEL) FUSED IGNITION SWITCH OUTPUT (RUN-START)
6 T15 18YL/BR (GAS EATX) TRANSMISSION CONTROL RELAY CONTROL
7 C3 20DB/YL A/C CLUTCH RELAY OUTPUT
8 Z114 18BK/LG (DIESEL) GROUND
8 K31 18BR (GAS) FUEL PUMP RELAY CONTROL
9 C13 20LB/OR (DIESEL) A/C COMPRESSOR CLUTCH RELAY CONTROL
9 C13 18LB/OR (GAS) A/C COMPRESSOR CLUTCH RELAY CONTROL
10 A119 16RD/OR (DIESEL) FUSED B(+)
11 C41 20LB/DG (DIESEL) CABIN HEATER ASSIST CONTROL
12 - -
13 D25 20WT/VT (DIESEL MTX) PCI BUS
13 D25 18WT/VT (GAS/DIESEL EATX) PCI BUS
14 T752 20DG/OR (DIESEL) STARTER MOTOR RELAY CONTROL
14 T752 18DG/OR (GAS) STARTER RELAY CONTROL
15 Z116 18BK/VT GROUND
16 K51 20BR/WT (DIESEL) ECM/PCM RELAY CONTROL
16 K51 18BR/WT (GAS) ASD RELAY CONTROL
17 F202 20PK/GY FUSED IGNITION SWITCH OUTPUT (RUN-START)
18 K173 18BR/VT (GAS) RAD FAN RELAY CONTROL
19 K342 16BR/WT (DIESEL) ECM/PCM RELAY OUTPUT
19 F202 20PK/GY (GAS) FUSED IGNITION SWITCH OUTPUT (RUN-START)
20 A109 18OR/RD (GAS) FUSED B(+)
INTEGRATED POWER MODULE C4 - BLUE 10 WAY
CAV CIRCUIT FUNCTION
1 Z127 12BK (ASSY. PLANT EVAC &
FILL)GROUND
2 T750 12YL/GY STARTER MOTOR RELAY OUTPUT
3 K342 16BR/WT (DIESEL) ECM/PCM RELAY OUTPUT
3 K342 16BR/WT (GAS) ASD RELAY OUTPUT
4 F500 16DG/PK (ASSY. PLANT EVAC &
FILL)FUSED IGNITION SWITCH OUTPUT (RUN)
5- -
6 D25 18WT/VT (ABS) PCI BUS
7 A107 12TN/RD (ABS) FUSED B(+)
8 A111 12DG/RD (ABS) FUSED B(+)
9- -
10 - -
RS8W-80 CONNECTOR PIN-OUTS8W-80-83
Page 1067 of 2339

LIFT PUMP MOTOR (DIESEL) - BLACK 2 WAY
CAV CIRCUIT FUNCTION
1 N2 18OR LIFT PUMP RELAY OUTPUT
2 Z201 18OR GROUND
LIFTGATE AJAR SWITCH (MANUAL RELEASE) - BLACK 2 WAY
CAV CIRCUIT FUNCTION
1 Z78 20BK/OR GROUND
2 G78 20VT/OR LIFTGATE AJAR SWITCH SENSE
LIFTGATE AJAR SWITCH (POWER RELEASE) - BLACK 4 WAY
CAV CIRCUIT FUNCTION
1 Z78 20BK/OR GROUND
2 G78 20VT/OR LIFTGATE AJAR SWITCH SENSE
3 P31 20TN/YL LIFTGATE RELEASE DRIVER
4 Z231 20BK/YL GROUND
LIFTGATE CINCH/RELEASE MOTOR (POWER LIFTGATE) - BLUE 7 WAY
CAV CIRCUIT FUNCTION
1 Z78 20BK/OR GROUND
2 G78 20VT/OR LIFTGATE AJAR SWITCH SENSE
3 Q60 20OR/YL LIFTGATE PAWL SWITCH SENSE
4 Z245 18BK/GY GROUND
5 Q85 18TN/WT LIFTGATE LATCH RELEASE DRIVER
6 Q84 18TN/GY LIFTGATE LATCH CINCH DRIVER
7 Q83 18OR/GY LIFTGATE LATCH CLUTCH DRIVER
8W - 80 - 98 8W-80 CONNECTOR PIN-OUTSRS
Page 1077 of 2339
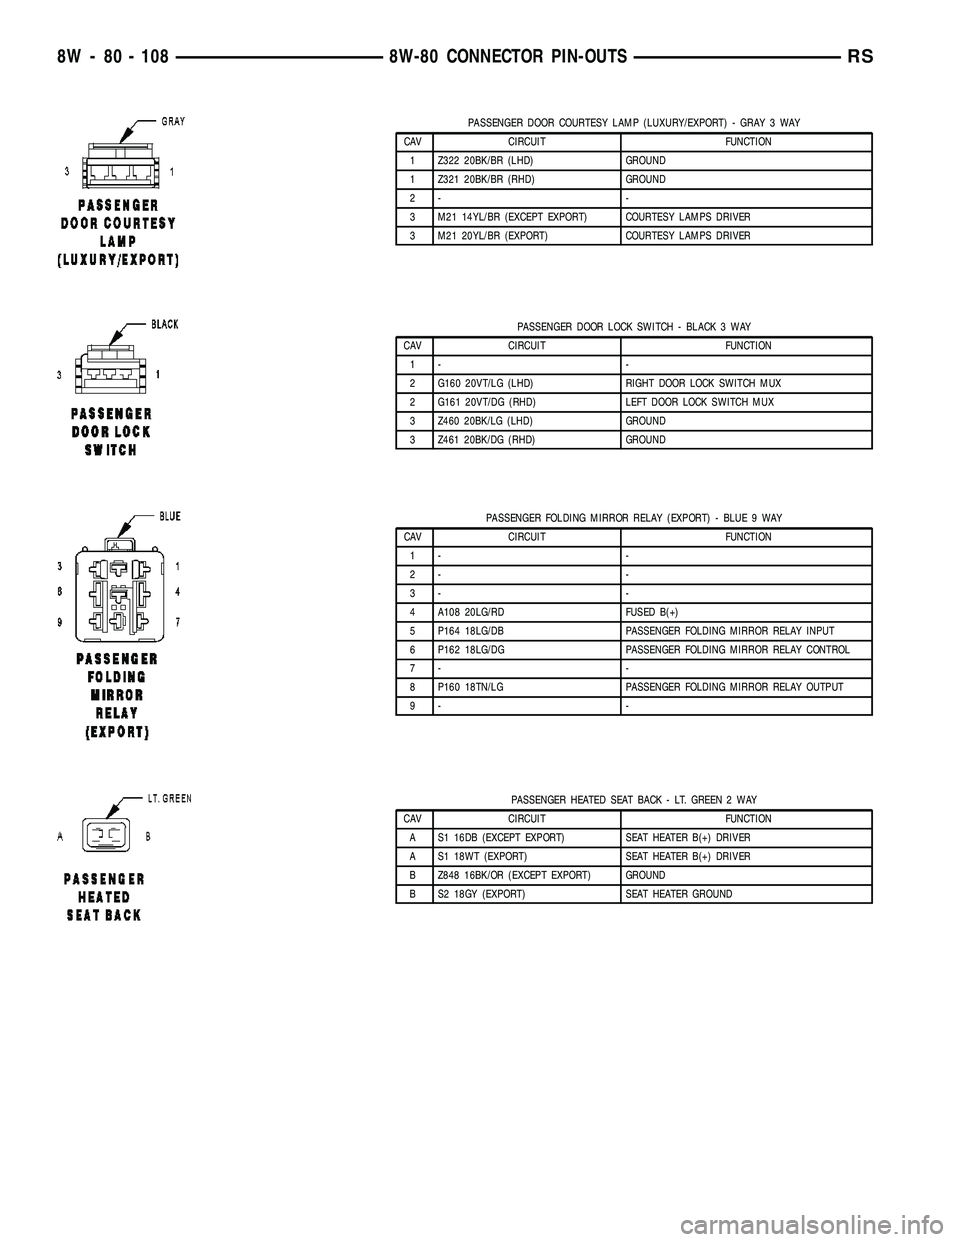
PASSENGER DOOR COURTESY LAMP (LUXURY/EXPORT) - GRAY 3 WAY
CAV CIRCUIT FUNCTION
1 Z322 20BK/BR (LHD) GROUND
1 Z321 20BK/BR (RHD) GROUND
2- -
3 M21 14YL/BR (EXCEPT EXPORT) COURTESY LAMPS DRIVER
3 M21 20YL/BR (EXPORT) COURTESY LAMPS DRIVER
PASSENGER DOOR LOCK SWITCH - BLACK 3 WAY
CAV CIRCUIT FUNCTION
1- -
2 G160 20VT/LG (LHD) RIGHT DOOR LOCK SWITCH MUX
2 G161 20VT/DG (RHD) LEFT DOOR LOCK SWITCH MUX
3 Z460 20BK/LG (LHD) GROUND
3 Z461 20BK/DG (RHD) GROUND
PASSENGER FOLDING MIRROR RELAY (EXPORT) - BLUE 9 WAY
CAV CIRCUIT FUNCTION
1- -
2- -
3- -
4 A108 20LG/RD FUSED B(+)
5 P164 18LG/DB PASSENGER FOLDING MIRROR RELAY INPUT
6 P162 18LG/DG PASSENGER FOLDING MIRROR RELAY CONTROL
7- -
8 P160 18TN/LG PASSENGER FOLDING MIRROR RELAY OUTPUT
9- -
PASSENGER HEATED SEAT BACK - LT. GREEN 2 WAY
CAV CIRCUIT FUNCTION
A S1 16DB (EXCEPT EXPORT) SEAT HEATER B(+) DRIVER
A S1 18WT (EXPORT) SEAT HEATER B(+) DRIVER
B Z848 16BK/OR (EXCEPT EXPORT) GROUND
B S2 18GY (EXPORT) SEAT HEATER GROUND
8W - 80 - 108 8W-80 CONNECTOR PIN-OUTSRS
Page 1090 of 2339
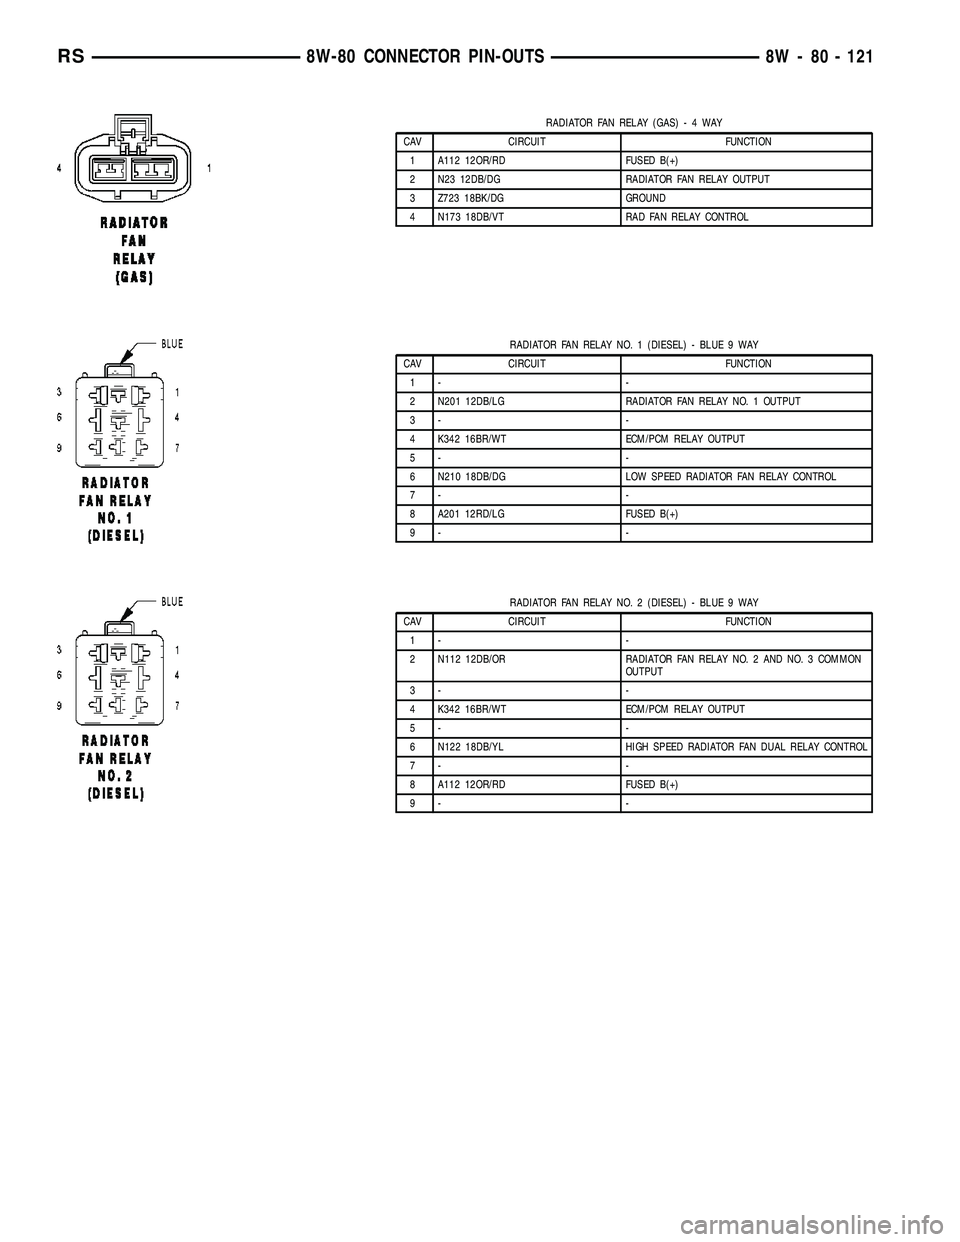
RADIATOR FAN RELAY (GAS)-4WAY
CAV CIRCUIT FUNCTION
1 A112 12OR/RD FUSED B(+)
2 N23 12DB/DG RADIATOR FAN RELAY OUTPUT
3 Z723 18BK/DG GROUND
4 N173 18DB/VT RAD FAN RELAY CONTROL
RADIATOR FAN RELAY NO. 1 (DIESEL) - BLUE 9 WAY
CAV CIRCUIT FUNCTION
1- -
2 N201 12DB/LG RADIATOR FAN RELAY NO. 1 OUTPUT
3- -
4 K342 16BR/WT ECM/PCM RELAY OUTPUT
5- -
6 N210 18DB/DG LOW SPEED RADIATOR FAN RELAY CONTROL
7- -
8 A201 12RD/LG FUSED B(+)
9- -
RADIATOR FAN RELAY NO. 2 (DIESEL) - BLUE 9 WAY
CAV CIRCUIT FUNCTION
1- -
2 N112 12DB/OR RADIATOR FAN RELAY NO. 2 AND NO. 3 COMMON
OUTPUT
3- -
4 K342 16BR/WT ECM/PCM RELAY OUTPUT
5- -
6 N122 18DB/YL HIGH SPEED RADIATOR FAN DUAL RELAY CONTROL
7- -
8 A112 12OR/RD FUSED B(+)
9- -
RS8W-80 CONNECTOR PIN-OUTS8W - 80 - 121
Page 1091 of 2339
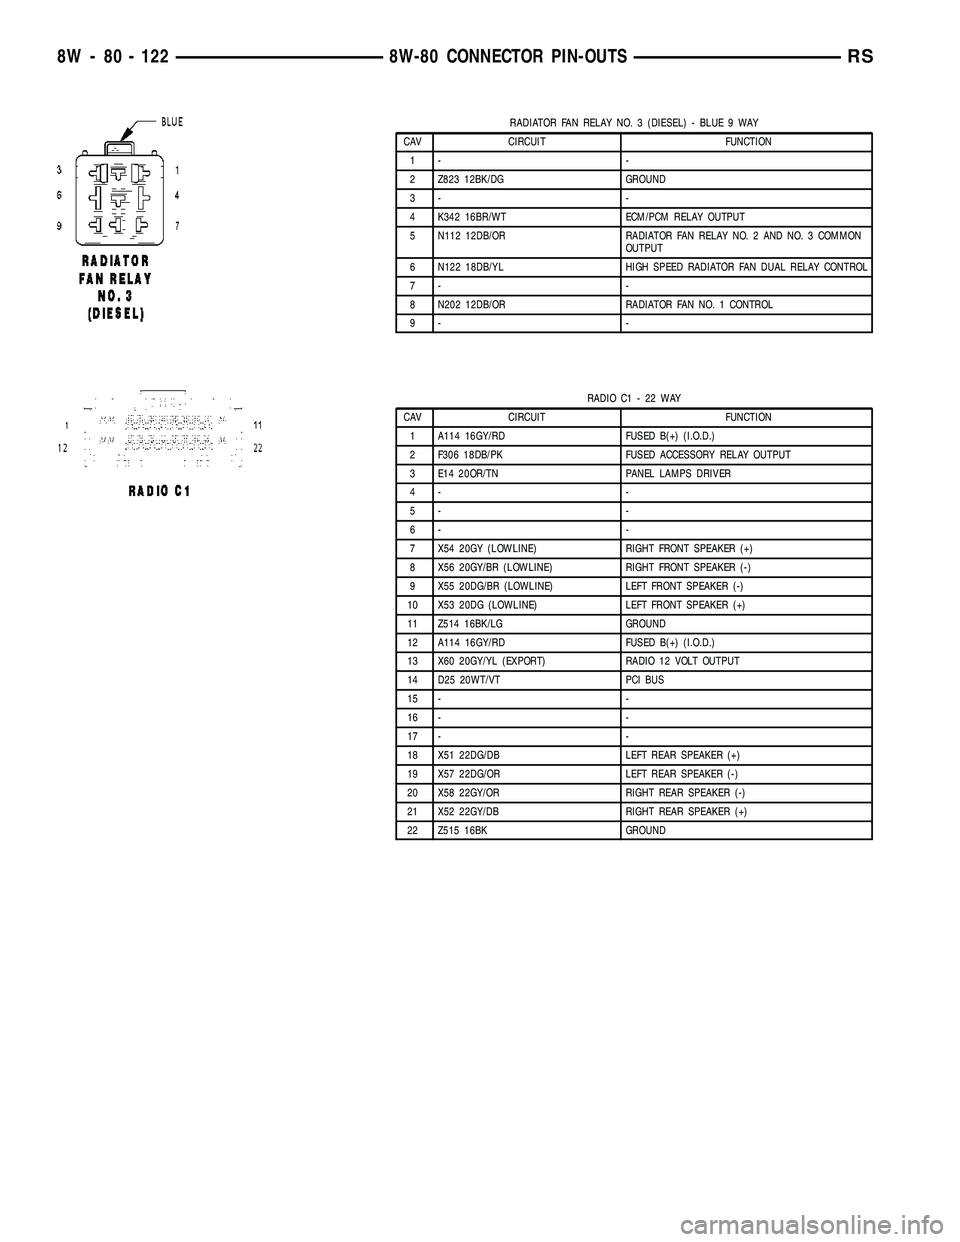
RADIATOR FAN RELAY NO. 3 (DIESEL) - BLUE 9 WAY
CAV CIRCUIT FUNCTION
1- -
2 Z823 12BK/DG GROUND
3- -
4 K342 16BR/WT ECM/PCM RELAY OUTPUT
5 N112 12DB/OR RADIATOR FAN RELAY NO. 2 AND NO. 3 COMMON
OUTPUT
6 N122 18DB/YL HIGH SPEED RADIATOR FAN DUAL RELAY CONTROL
7- -
8 N202 12DB/OR RADIATOR FAN NO. 1 CONTROL
9- -
RADIO C1 - 22 WAY
CAV CIRCUIT FUNCTION
1 A114 16GY/RD FUSED B(+) (I.O.D.)
2 F306 18DB/PK FUSED ACCESSORY RELAY OUTPUT
3 E14 20OR/TN PANEL LAMPS DRIVER
4- -
5- -
6- -
7 X54 20GY (LOWLINE) RIGHT FRONT SPEAKER (+)
8 X56 20GY/BR (LOWLINE) RIGHT FRONT SPEAKER (-)
9 X55 20DG/BR (LOWLINE) LEFT FRONT SPEAKER (-)
10 X53 20DG (LOWLINE) LEFT FRONT SPEAKER (+)
11 Z514 16BK/LG GROUND
12 A114 16GY/RD FUSED B(+) (I.O.D.)
13 X60 20GY/YL (EXPORT) RADIO 12 VOLT OUTPUT
14 D25 20WT/VT PCI BUS
15 - -
16 - -
17 - -
18 X51 22DG/DB LEFT REAR SPEAKER (+)
19 X57 22DG/OR LEFT REAR SPEAKER (-)
20 X58 22GY/OR RIGHT REAR SPEAKER (-)
21 X52 22GY/DB RIGHT REAR SPEAKER (+)
22 Z515 16BK GROUND
8W - 80 - 122 8W-80 CONNECTOR PIN-OUTSRS
Page 1186 of 2339
(3) Remove torque converter or clutch housing
cover and inspect rear of block for evidence of oil.
Use a black light to check for the oil leak. If a leak is
present in this area, remove transmission for further
inspection.
(a) Circular spray pattern generally indicates
seal leakage or crankshaft damage.
(b) Where leakage tends to run straight down,
possible causes are a porous block, oil gallery cup
plug, bedplate to cylinder block mating surfaces
and seal bore. See proper repair procedures for
these items.
(4) If no leaks are detected, pressurize the crank-
case as previously described.
CAUTION: Do not exceed 20.6 kPa (3 psi).
(5) If the leak is not detected, very slowly turn the
crankshaft and watch for leakage. If a leak is
detected between the crankshaft and seal while
slowly turning the crankshaft, it is possible the
crankshaft seal surface is damaged. The seal area on
the crankshaft could have minor nicks or scratches
that can be polished out with emery cloth.
CAUTION: Use extreme caution when crankshaft
polishing is necessary to remove minor nicks and
scratches. The crankshaft seal flange is especially
machined to complement the function of the rear oil
seal.
(6) For bubbles that remain steady with shaft
rotation, no further inspection can be done until dis-
assembled.
(7) After the oil leak root cause and appropriate
corrective action have been identified, replace compo-
nent(s) as necessary.
DIAGNOSIS AND TESTING - CYLINDER
COMPRESSION PRESSURE TEST
The results of a cylinder compression pressure test
can be utilized to diagnose several engine malfunc-
tions.
Ensure the battery is completely charged and the
engine starter motor is in good operating condition.
Otherwise the indicated compression pressures may
not be valid for diagnosis purposes.
(1) Check engine oil level and add oil if necessary.
(2) Drive the vehicle until engine reaches normal
operating temperature. Select a route free from traf-
fic and other forms of congestion, observe all traffic
laws, and accelerate through the gears several times
briskly.
(3) Remove all spark plugs from engine. As spark
plugs are being removed, check electrodes for abnor-
mal firing indicators fouled, hot, oily, etc. Record cyl-
inder number of spark plug for future reference.(4) Remove the Auto Shutdown (ASD) relay from
the PDC.
(5) Be sure throttle blade is fully open during the
compression check.
(6) Insert compression gauge adaptor Special Tool
8116 or the equivalent, into the #1 spark plug hole in
cylinder head. Connect the 0±500 psi (Blue) pressure
transducer (Special Tool CH7059) with cable adap-
tors to the DRBIIIt. For Special Tool identification,
(Refer to 9 - ENGINE - SPECIAL TOOLS).
(7) Crank engine until maximum pressure is
reached on gauge. Record this pressure as #1 cylin-
der pressure.
(8) Repeat the previous step for all remaining cyl-
inders.
(9) Compression should not be less than 689 kPa
(100 psi) and not vary more than 25 percent from cyl-
inder to cylinder.
(10) If one or more cylinders have abnormally low
compression pressures, repeat the compression test.
(11) If the same cylinder or cylinders repeat an
abnormally low reading on the second compression
test, it could indicate the existence of a problem in
the cylinder in question.The recommended com-
pression pressures are to be used only as a
guide to diagnosing engine problems. An engine
should not be disassembled to determine the
cause of low compression unless some malfunc-
tion is present.
DIAGNOSIS AND TESTING - CYLINDER
COMBUSTION PRESSURE LEAKAGE TEST
The combustion pressure leakage test provides an
accurate means for determining engine condition.
Combustion pressure leakage testing will detect:
²Exhaust and intake valve leaks (improper seat-
ing).
²Leaks between adjacent cylinders or into water
jacket.
²Any causes for combustion/compression pressure
loss.
WARNING: DO NOT REMOVE THE PRESSURE CAP
WITH THE SYSTEM HOT AND UNDER PRESSURE
BECAUSE SERIOUS BURNS FROM COOLANT CAN
OCCUR.
Check the coolant level and fill as required. DO
NOT install the pressure cap.
Start and operate the engine until it attains nor-
mal operating temperature, then turn the engine
OFF.
Clean spark plug recesses with compressed air.
Remove the spark plugs.
Remove the oil filler cap.
Remove the air cleaner.
RSENGINE 2.4L9-9
ENGINE 2.4L (Continued)
Page 1262 of 2339
(3) Remove torque converter or clutch housing
cover and inspect rear of block for evidence of oil.
Use a black light to check for the oil leak. If a leak is
present in this area, remove transmission for further
inspection.
(a) Circular spray pattern generally indicates
seal leakage or crankshaft damage.
(b) Where leakage tends to run straight down,
possible causes are a porous block, oil gallery cup
plug, bedplate to cylinder block mating surfaces
and seal bore. See proper repair procedures for
these items.
(4) If no leaks are detected, pressurize the crank-
case as previously described.
CAUTION: Do not exceed 20.6 kPa (3 psi).
(5) If the leak is not detected, very slowly turn the
crankshaft and watch for leakage. If a leak is
detected between the crankshaft and seal while
slowly turning the crankshaft, it is possible the
crankshaft seal surface is damaged. The seal area on
the crankshaft could have minor nicks or scratches
that can be polished out with emery cloth.
CAUTION: Use extreme caution when crankshaft
polishing is necessary to remove minor nicks and
scratches. The crankshaft seal flange is especially
machined to complement the function of the rear oil
seal.
(6) For bubbles that remain steady with shaft
rotation, no further inspection can be done until dis-
assembled.
(7) After the oil leak root cause and appropriate
corrective action have been identified, replace compo-
nent(s) as necessary.
DIAGNOSIS AND TESTING - CYLINDER
COMPRESSION PRESSURE TEST
The results of a cylinder compression pressure test
can be utilized to diagnose several engine malfunc-
tions.
Ensure the battery is completely charged and the
engine starter motor is in good operating condition.
Otherwise the indicated compression pressures may
not be valid for diagnosis purposes.
(1) Check engine oil level and add oil if necessary.
(2) Drive the vehicle until engine reaches normal
operating temperature. Select a route free from traf-
fic and other forms of congestion, observe all traffic
laws, and accelerate through the gears several times
briskly.
(3) Remove all spark plugs from engine. As spark
plugs are being removed, check electrodes for abnor-
mal firing indicators fouled, hot, oily, etc. Record cyl-
inder number of spark plug for future reference.(4) Remove the Auto Shutdown (ASD) relay from
the PDC.
(5) Be sure throttle blade is fully open during the
compression check.
(6) Insert compression gauge adaptor Special Tool
8116 or the equivalent, into the #1 spark plug hole in
cylinder head. Connect the 0±500 psi (Blue) pressure
transducer (Special Tool CH7059) with cable adap-
tors to the DRBIIIt. For Special Tool identification,
(Refer to 9 - ENGINE - SPECIAL TOOLS).
(7) Crank engine until maximum pressure is
reached on gauge. Record this pressure as #1 cylin-
der pressure.
(8) Repeat the previous step for all remaining cyl-
inders.
(9) Compression should not be less than 689 kPa
(100 psi) and not vary more than 25 percent from cyl-
inder to cylinder.
(10) If one or more cylinders have abnormally low
compression pressures, repeat the compression test.
(11) If the same cylinder or cylinders repeat an
abnormally low reading on the second compression
test, it could indicate the existence of a problem in
the cylinder in question.The recommended com-
pression pressures are to be used only as a
guide to diagnosing engine problems. An engine
should not be disassembled to determine the
cause of low compression unless some malfunc-
tion is present.
DIAGNOSIS AND TESTING - CYLINDER
COMBUSTION PRESSURE LEAKAGE TEST
The combustion pressure leakage test provides an
accurate means for determining engine condition.
Combustion pressure leakage testing will detect:
²Exhaust and intake valve leaks (improper seat-
ing).
²Leaks between adjacent cylinders or into water
jacket.
²Any causes for combustion/compression pressure
loss.
WARNING: DO NOT REMOVE THE PRESSURE CAP
WITH THE SYSTEM HOT AND UNDER PRESSURE
BECAUSE SERIOUS BURNS FROM COOLANT CAN
OCCUR.
Check the coolant level and fill as required. DO
NOT install the pressure cap.
Start and operate the engine until it attains nor-
mal operating temperature, then turn the engine
OFF.
Clean spark plug recesses with compressed air.
Remove the spark plugs.
Remove the oil filler cap.
Remove the air cleaner.
RSENGINE 3.3/3.8L9-85
ENGINE 3.3/3.8L (Continued)
Page 1284 of 2339
CYLINDER HEAD COVER -
LEFT
REMOVAL
(1) Disconnect spark plug wires from spark plugs.
(2) Disconnect crankcase vent hose from cylinder
head cover.
(3) Remove cylinder head cover bolts.
(4) Remove cylinder head cover and gasket.
INSTALLATION
(1) Clean cylinder head and cover mating surfaces.
Inspect cylinder head cover surface for flatness.
Replace gasket as necessary.
(2) Assemble gasket to cylinder cover by inserting
the fasteners through each bolt hole on cover and
gasket (Fig. 25).
(3) Install the cylinder head cover and bolts (Fig.
26).
(4) Tighten cylinder head cover bolts to 12 N´m
(105 in. lbs.) (Fig. 26).
(5) Connect crankcase vent hose.
(6) Connect spark plug wires to spark plugs.
INTAKE/EXHAUST VALVES &
SEATS
DESCRIPTION
The valves have chrome plated valve stems with
four-bead lock grooves. The valve stem seals are
made of Viton rubber.
OPERATION
The two valves per cylinder are opened using
hydraulic lifters, push rods, and rocker arms.
STANDARD PROCEDURE - REFACING VALVES
AND VALVE SEATS
The intake and exhaust valves and seats are
machined to specific angles (Fig. 27).
VALVES
(1) Inspect the remaining margin after the valves
are refaced (Fig. 28). (Refer to 9 - ENGINE - SPEC-
IFICATIONS)
VALVE SEATS
CAUTION: Remove metal from valve seat only. Do
not remove material from cylinder head (Fig. 29).
(1) When refacing valve seats, it is important that
the correct size valve guide pilot be used for reseat-
ing stones. A true and complete surface must be
obtained.(2) Measure the concentricity of valve seat using
dial indicator (Fig. 30). Total runout should not
exceed 0.051 mm (0.002 in.) total indicator reading.
(3) Inspect the valve seat using Prussian blue to
determine where the valve contacts the seat. To do
this, coat valve seatLIGHTLYwith Prussian blue
then set valve in place. Rotate the valve with light
pressure. If the blue is transferred to the center of
valve face, contact is satisfactory. If the blue is trans-
ferred to top edge of valve face, lower valve seat with
a 15 degree stone. If the blue is transferred to the
bottom edge of valve face raise valve seat with a 65
degrees stone.
Fig. 27 VALVE FACE AND SEAT
1 - VALVE FACE WIDTH
2 - VALVE FACE ANGLE
3 - SEAT ANGLE
4 - SEAT CONTACT AREA
Fig. 28 Valve Margin
1 - VALVE FACE
2 - VALVE MARGIN
RSENGINE 3.3/3.8L9 - 107