2005 CHRYSLER 300 service
[x] Cancel search: servicePage 308 of 374

WARNING!
Riding the brakes can lead to brake failure and
possibly an accident. Driving with your foot resting
or riding on the brake pedal can result in abnormally
high brake temperatures, excessive lining wear, and
possible brake damage. You wouldn't have your full
braking capacity in an emergency.
Brake And Power Steering Hoses
When the vehicle is serviced for scheduled maintenance,
inspect surface of hoses and nylon tubing for evidence of
heat and mechanical damage. Hard and brittle rubber,
cracking, tears, cuts, abrasion, and excessive swelling
indicate deterioration of the rubber. Particular attention
should be made to examining those hose surfaces nearest
to high heat sources, such as the exhaust manifold.
Insure nylon tubing in these areas has not melted or
collapsed.Inspect all hose connections such as clamps and cou-
plings to make sure they are secure and no leaks are
present.
NOTE:Often, fluid such as oil, power steering fluid,
and brake fluid are used during assembly plant opera-
tions to facilitate the assembly of hoses to couplings.
Therefore, oil wetness at the hose-coupling area is not
necessarily an indication of leakage. Actual dripping of
hot fluid when systems are under pressure (during
vehicle operation), should be noted before a hose is
replaced based on leakage.
NOTE:Inspection of brake hoses should be performed
whenever the brake system is serviced and at every
engine oil change. Inspect hydraulic brake hoses for
surface cracking, scuffing, or worn spots. If there is any
evidence of cracking, scuffing, or worn spots, the hose
should be replaced immediately! Eventual deterioration
of the hose can take place resulting in a possibility of a
burst failure.
308 MAINTAINING YOUR VEHICLE
Page 309 of 374

WARNING!
Worn brake hoses can burst and cause brake failure.
You could have an accident. If you see any signs of
cracking, scuffing, or worn spots, have the brake
hoses replaced immediately.
Brake Fluid Level Check
The fluid level in the master cylinder should be checked
when performing underhood services, or immediately if
the brake system warning light indicates system failure.
Clean the top of the master cylinder area before removing
the cap. Add fluid to bring the level up to the top of the
ªFULLº mark on the side of the master cylinder reservoir.
Overfilling of fluid is not recommended because it may
cause leaking in the system.
Add enough fluid to bring the level up to the require-
ments described on the brake fluid reservoir. With disc
brakes, fluid level can be expected to fall as the brake
pads wear. However, low fluid level may be caused by a
leak and a checkup may be needed.Use only manufacturers recommended brake fluid, refer
to Recommended Fluids, Lubricants and Genuine Parts
for correct fluid type.
WARNING!
²Overfilling the brake fluid reservoir can result in
spilling brake fluid on hot engine parts and the
brake fluid catching fire.
²Use of a brake fluid that has a lower initial boiling
point than the recommended MOPAR DOT 3
product or a brake fluid that is unidentified as to
FMVSS specification may result in sudden brake
failure during hard prolonged braking. You could
have an accident.
Use only brake fluid that has been in a tightly closed
container to avoid contamination from foreign matter or
moisture.
MAINTAINING YOUR VEHICLE 309
7
Page 310 of 374
CAUTION!
Do not allow petroleum base fluid to contaminate
the brake fluid, all brake seal components could be
damaged causing partial or complete brake failure.
Fuel System Hoses
Electronic Fuel Injection high pressure fuel systems are
designed with hoses and quick connect fittings which
have unique material characteristics to provide adequate
sealing and resist attack by deteriorated gasoline.
You are urged to use only the manufacture specified
hoses with quick connect fittings, or their equivalent in
material and specification, in any fuel system servicing. It
is mandatory to replace any damaged hoses or quick
connect fittings that have been removed during service.
Care should be taken in installing quick connect fittings
to insure they are properly installed and fully connected.
See your authorized dealer for service.
Automatic Transmission
Fluid Level Check
Regular automatic transmission fluid level checks are not
required. For this reason the dipstick is omitted.
If you notice fluid loss or gear shift malfunction, have
your authorized dealer check the transmission fluid level.
CAUTION!
Using a transmission fluid other than the manufac-
turer's recommended fluid may cause deterioration
in transmission shift quality and/or torque converter
shudder. Using a transmission fluid other than that
recommended by the manufacturer will result in
more frequent fluid and filter changes. Refer to the
Recommended Fluids, Lubricants and Genuine Parts
section for correct fluid type.
310 MAINTAINING YOUR VEHICLE
Page 321 of 374
Cavity Fuse Circuits
40 5 Amp
OrangePower Mirror
41 10 Amp
RedClimate Control Module/
Headlamp Leveling Ð if
equipped/Rear Park Assist Ð
if equipped/Tire Pressure
Monitoring Ð if equipped
42 30 Amp
PinkAutomatic Temperature Con-
trol (ATC) Blower Motor
43 30 Amp
PinkRear Defroster
44 20 Amp
Lt. BlueAudio AmplifierVEHICLE STORAGE
If you are leaving your vehicle dormant for more than 21
days you may want to take steps to protect your battery.
You may:
²Disconnect the negative cable from the battery.
²Anytime you store your vehicle, or keep it out of
service (i.e. vacation) for two weeks or more, run the
air conditioning system at idle for about five minutes
in the fresh air and high blower setting. This will
insure adequate system lubrication to minimize the
possibility of compressor damage when the system is
started again.
MAINTAINING YOUR VEHICLE 321
7
Page 322 of 374

REPLACEMENT LIGHT BULBS
LIGHT BULBS Ð Interior Bulb Number
Rear Courtesy/Reading Lights.............. W5W
Rear Compartment (Trunk) Light............. 579
Overhead Console Reading Lights............. 578
Visor Vanity Lights.....................A6220
Glove Box Light......................... 194
Door Courtesy.......................... 562
Shift Indicator Light.................JKLE14140
NOTE:For lighted switches, see your dealer for re-
placement instructions.
All of the interior bulbs are glass wedge base or glass
cartridge types. Aluminum base bulbs are not approved
and should not be used for replacement.
LIGHT BULBS Ð Exterior (300, 300 Touring) Bulb
Number
Low Beam Headlamp.....................9006
High Beam Headlamp....................9005
Front Park/Turn Lamp.................3757AK
Front Inner Park Lamp..................194NA
Front Outer Park Lamp..................194NAFront Fog LampÐIf Equipped...........9145/H10
(Serviced at Dealer)
Front Sidemarker......... W5W(Serviced at Dealer)
Tail/Stop/Turn Lamp.....................3057
Rear Sidemarker......................... 168
Backup Lamp..........................3057
Center High Mount Stop Lamp (CHMSL)....... LED
License................................ 168
LIGHT BULBS Ð Exterior (300C) Bulb Number
Low Beam Headlamp (Standard Halogen)....9006XS
Low Beam Headlamp ± High Intensity
Discharge (HID)........... D1S(Serviced at Dealer)
High Beam Headlamp....................9005
Front Park/Turn Lamp.................3157AK
Front Fog Lamp.......9145/H10 (Serviced at Dealer)
Front Sidemarker......... W5W(Serviced at Dealer)
Tail/Stop Lamp.........................3057
Tail Lamp.............................3057
Turn Signal Lamp.......................3057
Backup Lamp..........................3057
Center High Mount Stop Lamp (CHMSL)....... LED
License.............................. W5W
322 MAINTAINING YOUR VEHICLE
Page 324 of 374
CAUTION!
Do not touch the new bulb with your fingers. Oil
contamination will severely shorten bulb life. If the
bulb comes in contact with an oily surface, clean the
bulb with rubbing alcohol.
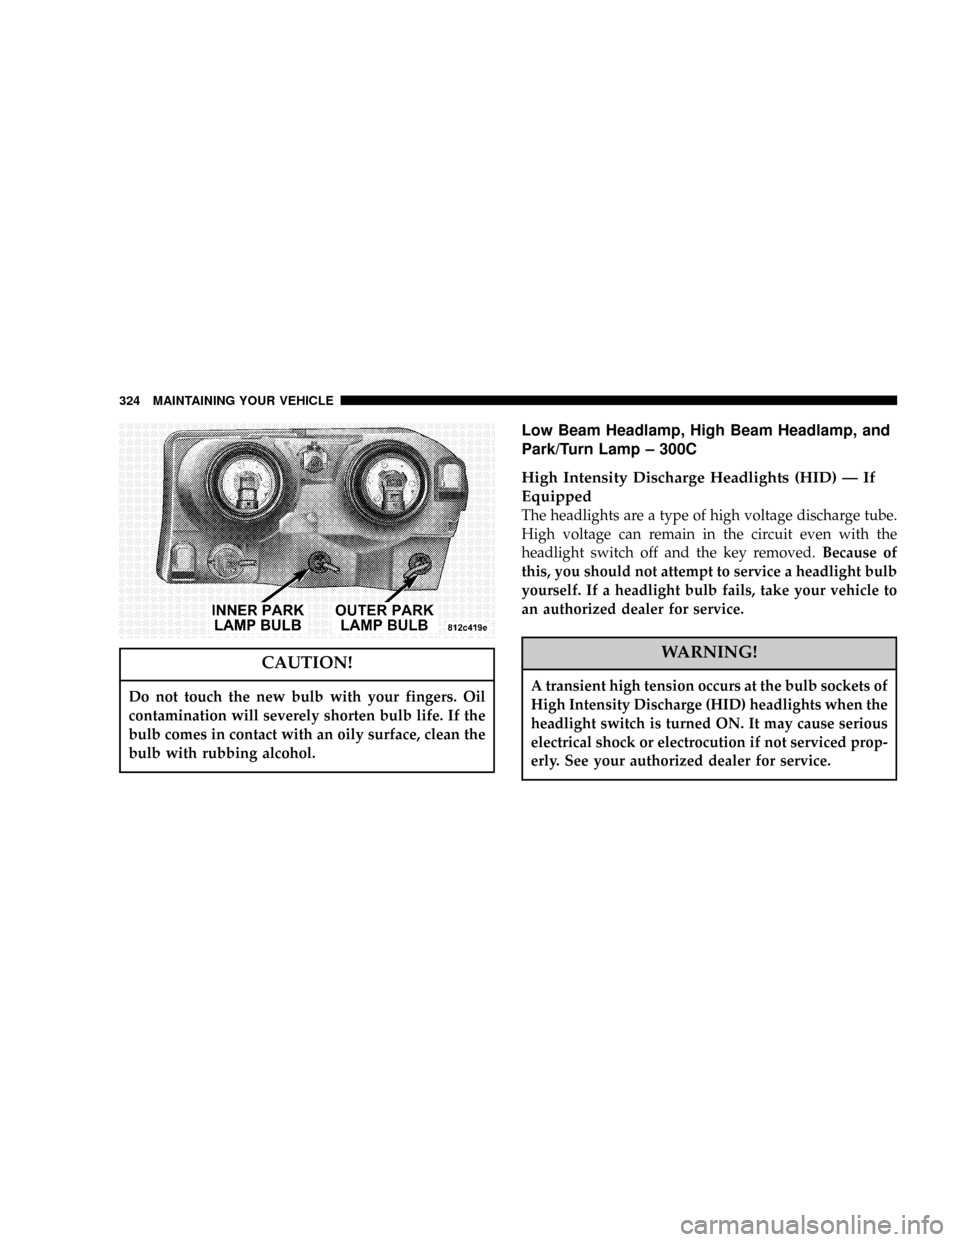
Low Beam Headlamp, High Beam Headlamp, and
Park/Turn Lamp ± 300C
High Intensity Discharge Headlights (HID) Ð If
Equipped
The headlights are a type of high voltage discharge tube.
High voltage can remain in the circuit even with the
headlight switch off and the key removed.Because of
this, you should not attempt to service a headlight bulb
yourself. If a headlight bulb fails, take your vehicle to
an authorized dealer for service.
WARNING!
A transient high tension occurs at the bulb sockets of
High Intensity Discharge (HID) headlights when the
headlight switch is turned ON. It may cause serious
electrical shock or electrocution if not serviced prop-
erly. See your authorized dealer for service.
324 MAINTAINING YOUR VEHICLE
Page 336 of 374
EMISSION CONTROL SYSTEM MAINTENANCE
The ªScheduledº maintenance services, listed inbold
typemust be done at the times or mileages specified to
assure the continued proper functioning of the emission
control system. These, and all other maintenance services
included in this manual, should be done to provide best
vehicle performance and reliability. More frequent main-
tenance may be needed for vehicles in severe operating
conditions such as dusty areas and very short trip
driving.
Inspection and service also should be done any time a
malfunction is suspected.
NOTE:Maintenance, replacement, or repair of the
emission control devices and systems on your vehicle
may be performed by any automotive repair establish-
ment or individual using any automotive part which has
been certified pursuant to U.S. EPA or, in the State of
California, California Air Resources Board regulations.
MAINTENANCE SCHEDULES
There are two maintenance schedules that show the
requiredservice for your vehicle.
First is ScheduleªBº. It is for vehicles that are operated
under the conditions that are listed below and at the
beginning of the schedule. Change the automatic trans-
mission fluid and filter every 60,000 miles (96 000 km) if
the vehicle is usually operated under one or more of the
conditions marked with anL.
²Day or night temperatures are below 32É F (0É C).
²Stop and go driving.
²Extensive engine idling.
²Driving in dusty conditions.
²Short trips of less than 10 miles (16 km).
²More than 50% of your driving is at sustained high
speeds during hot weather, above 90É F (32É C).
²Trailer towing.L
336 MAINTENANCE SCHEDULES
8
M
A
I
N
T
E
N
A
N
C
E
S
C
H
E
D
U
L
E
S
Page 337 of 374
²Taxi, police, or delivery service (commercial ser-
vice).L
²Off-road or desert operation.
NOTE:IfANYof these apply to you then change your
engine oil every 3,000 miles (5 000 km) or 3 months,
whichever comes first and follow schedule ªBº of the
9Maintenance Schedules9section of this manual.
NOTE:Most vehicles are operated under the conditions
listed for Schedule9B9.
Second is ScheduleªAº. It is for vehicles that are not
operated under any of the conditions listed under Sched-
ule9B9.
Use the schedule that best describes your driving condi-
tions. Where time and mileage are listed, follow the
interval that occurs first.
NOTE:Under no circumstances should oil change
intervals exceed 6000 miles (10 000 km) or 6 months
whichever comes first.
CAUTION!
Failure to perform the required maintenance items
may result in damage to the vehicle.
At Each Stop for Fuel
²
Check the engine oil level about 5 minutes after a fully
warmed engine is shut off. Checking the oil level while
the vehicle is on level ground will improve the accu-
racy of the oil level reading. Add oil only when the
level is at or below the ADD or MIN mark.
²Check the windshield washer solvent and add if
required.
Once a Month
²
Check tire pressure and look for unusual wear or
damage.
²Inspect the battery and clean and tighten the terminals
as required.
²Check the fluid levels of coolant reservoir, brake
master cylinder, and transmission and add as needed.
MAINTENANCE SCHEDULES 337
8
M
A
I
N
T
E
N
A
N
C
E
S
C
H
E
D
U
L
E
S