Page 246 of 374

NOTE:For vehicles with optional wheel/tire sizes and
significantly different tire placard pressures, the placard
pressure value and the low-pressure threshold value is
re-programmable at your authorized dealer to accommo-
date the customer selected wheel/tire combinations rec-
ommended by DaimlerChrysler.
The following9warnings9will cause a text message to be
displayed, an audible chime to sound and the tire pres-
sure Indicator Lamp to illuminate. The audible chime
will occur once every ignition cycle for each9warning9
detected. The tire pressure Indicator Lamp will illumi-
nate continuously (solid) and shall remain illuminated
until the warning condition is removed/reset.
NOTE:The Indicator Lamp will only illuminate for the
four active road tires. A low spare tire pressure will not
cause the Indicator Lamp to illuminate
When the appropriate conditions exist, the Electronic
Vehicle Information Center (EVIC) displays the following
messages.
LEFT FRONT, LEFT REAR, RIGHT FRONT,
RIGHT REAR LOW PRESSURE
One or more of these messages will be displayed in the
EVIC if a low tire pressure condition exists in one or more
tires.
Inspect all tires for proper inflation pressure, once the
proper tire pressure has been set, the TPM system
warning will reset automatically when the vehicle has
been driven for at least 2 minutes at or above 15 mph (24
km/h).
CHECK TPM SYSTEM
See your authorized dealer when this message appears in
the EVIC. This message indicates that a system fault
condition has been detected.
246 STARTING AND OPERATING
Page 247 of 374

CAUTION!
The TPM system has been optimized for the original
equipment tires and wheels. TPM system pressures
have been established for the tire size equipped on
your vehicle. Undesirable system operation or sen-
sor damage may result when using replacement
equipment that is not of the same size, type, and/or
style. After-market wheels can cause sensor damage.
Do not use tire sealant from a can, or balance beads
if your vehicle is equipped with a TPM system, as
damage to the sensors may result.
CAUTION!
After inspecting or adjusting the tire pressure al-
ways reinstall the valve stem cap. This will prevent
moisture and dirt from entering the valve stem,
which could damage the wheel rim sensor.
NOTE:
²
The TPM system can inform the driver of a low tire
pressure condition.
²The TPM system is not intended to replace normal tire
care and maintenance, nor to provide warning of a tire
failure or condition.
²The TPM system should not be used as a tire pressure
gauge while adjusting your tire pressure.
General Information
This device complies with part 15 of the FCC rules and
RSS 210 of Industry Canada. Operation is subject to the
following conditions:
²This device may not cause harmful interference.
²This device must accept any interference received,
including interference that may cause undesired op-
eration.
STARTING AND OPERATING 247
5
Page 248 of 374

The tire pressure sensors are covered under one of the
following licenses:
United States.....................KR5S120123
Canada........................2671-S120123
TIRE CHAINS
Use only compact chains, or other traction aids that meet
SAE type ªClass Sº specifications. Chains must be the
proper size for the vehicle, as recommended by the chain
manufacturer.
NOTE:Do not use tire chains on a compact spare tire.
CAUTION!
To avoid damage to your vehicle or tires, observe the
following precautions:
²Because of restricted chain clearance between tires
and other suspension components, it is important
that only chains in good condition are used. Broken
chains can cause serious damage. Stop the vehicle
immediately if noise occurs that could indicate chain
breakage. Remove the damaged parts of the chain
before further use.
²Install chains on the rear wheels as tightly as pos-
sible and then retighten after driving about1¤2mile
(0.8 km).
²Do not exceed 30 mph (48 km/h).
²Drive cautiously and avoid severe turns and large
bumps, especially with a loaded vehicle.
²Do not use on rear wheels of All Wheel Drive (AWD)
vehicles.
²Do not drive for prolonged period on dry pavement.
²Observe the tire chain manufacturer's instructions on
the method of installation, operating speed, and condi-
tions for use. Always use the lower suggested operating
speed of the chain manufacturer if different than the
speed recommended by the manufacture.
248 STARTING AND OPERATING
Page 257 of 374

The bar code allows a computer scanner to read the
Vehicle Identification Number (VIN).
Gross Vehicle Weight Rating (GVWR)
The GVWR is the total allowable weight of your vehicle.
This includes driver, passengers, and cargo. The total
load must be limited so that you do not exceed the
GVWR.
Gross Axle Weight Rating (GAWR)
The GAWR is the maximum capacity of the front and rear
axles. Distribute the load over the front and rear axles
evenly. Make sure that you do not exceed either front or
rear GAWR.
WARNING!
Because the front wheels steer the vehicle, it is
important that you do not exceed the maximum front
or rear GAWR. A dangerous driving condition can
result if either rating is exceeded. You could lose
control of the vehicle and have an accident.
Overloading
The load carrying components (axle, springs, tires,
wheels, etc.) of your vehicle will provide satisfactory
service as long as you do not exceed the GVWR and front
and rear GAWR.
The best way to figure out the total weight of your
vehicle is to weigh it when it is fully loaded and ready for
operation. Weigh it on a commercial scale to insure that it
is not over the GVWR.
Figure out the weight on the front and rear of the vehicle
separately. It is important that you distribute the load
evenly over the front and rear axles.
Overloading can cause potential safety hazards and
shorten useful service life. Heavier axles or suspension
components do not necessarily increase the vehicle's
GVWR.
Loading
To load your vehicle properly, first figure out its empty
weight, axle by axle and side by side. Store heavier items
down low and be sure you distribute their weight as
evenly as possible. Stow all loose items securely before
STARTING AND OPERATING 257
5
Page 261 of 374

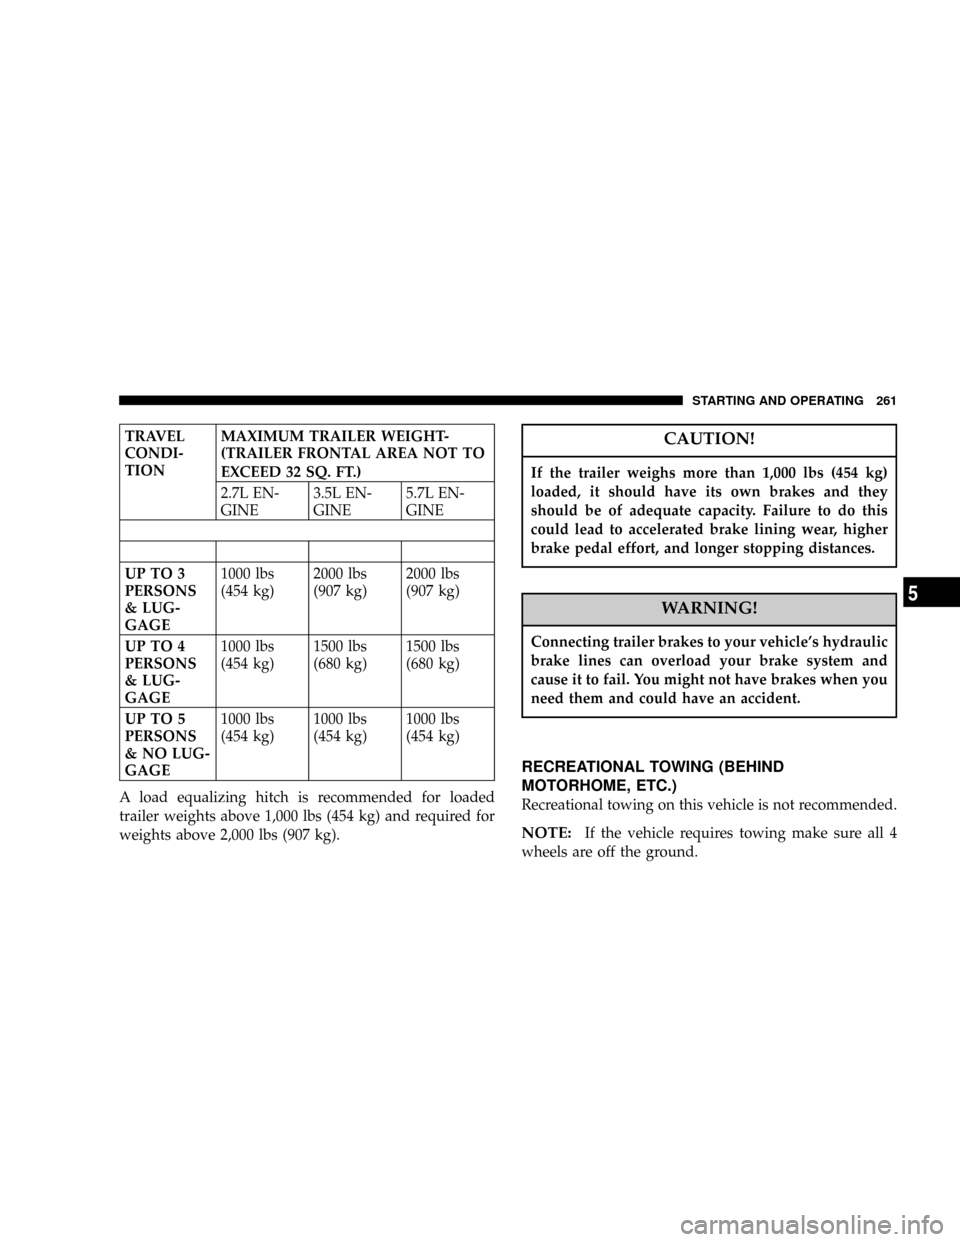
TRAVEL
CONDI-
TIONMAXIMUM TRAILER WEIGHT-
(TRAILER FRONTAL AREA NOT TO
EXCEED 32 SQ. FT.)
2.7L EN-
GINE3.5L EN-
GINE5.7L EN-
GINE
UP TO 3
PERSONS
& LUG-
GAGE1000 lbs
(454 kg)2000 lbs
(907 kg)2000 lbs
(907 kg)
UP TO 4
PERSONS
& LUG-
GAGE1000 lbs
(454 kg)1500 lbs
(680 kg)1500 lbs
(680 kg)
UP TO 5
PERSONS
& NO LUG-
GAGE1000 lbs
(454 kg)1000 lbs
(454 kg)1000 lbs
(454 kg)
A load equalizing hitch is recommended for loaded
trailer weights above 1,000 lbs (454 kg) and required for
weights above 2,000 lbs (907 kg).CAUTION!
If the trailer weighs more than 1,000 lbs (454 kg)
loaded, it should have its own brakes and they
should be of adequate capacity. Failure to do this
could lead to accelerated brake lining wear, higher
brake pedal effort, and longer stopping distances.
WARNING!
Connecting trailer brakes to your vehicle's hydraulic
brake lines can overload your brake system and
cause it to fail. You might not have brakes when you
need them and could have an accident.
RECREATIONAL TOWING (BEHIND
MOTORHOME, ETC.)
Recreational towing on this vehicle is not recommended.
NOTE:If the vehicle requires towing make sure all 4
wheels are off the ground.
STARTING AND OPERATING 261
5
Page 263 of 374

WHAT TO DO IN EMERGENCIES
CONTENTS
mHazard Warning Flasher.................264
mIf Your Engine Overheats................264
mJacking And Tire Changing...............265
NPreparations For Jacking................266
NJack Location........................267
NSpare Tire Stowage....................268
NJacking And Changing a Tire.............269
NCompact Spare Tire....................272
NWheel Cover Installation (If Required)......273
mJump-Starting Procedures If Battery Is Low...273
mDriving On Slippery Surfaces.............276NAcceleration.........................276
NTraction............................276
mFreeing A Stuck Vehicle.................277
mTowing A Disabled Vehicle...............278
NWith Ignition Key.....................278
NWithout The Ignition Key...............279
NTowing This Vehicle Behind Another Vehicle
(Flat Towing With All Four Wheels On The
Ground)............................279
NTowing This Vehicle Behind Another Vehicle
With A Tow Dolley....................2796
Page 265 of 374

NOTE:There are steps that you can take to slow down
an impending overheat condition. If your air conditioner
is on, turn it off. The air conditioning system adds heat to
the engine cooling system and turning off the A/C
removes this heat. You can also turn the Temperature
control to maximum heat, the Mode control to floor, and
the fan control to High. This allows the heater core to act
as a supplement to the radiator and aids in removing heat
from the engine cooling system.
CAUTION!
Driving with a hot cooling system could damage
your vehicle. If temperature gauge reads ªHº, pull
over and stop the vehicle. Idle the vehicle with the
air conditioner turned off until the pointer drops
back into the normal range. If the pointer remains on
the ªHº, turn the engine off immediately, and call for
service.
WARNING!
A hot engine cooling system is dangerous. You or
others could be badly burned by steam or boiling
coolant. You may want to call a service center if your
vehicle overheats. If you decide to look under the
hood yourself, see Section 7, Maintenance, of this
manual. Follow the warnings under the Cooling
System Pressure Cap paragraph.
JACKING AND TIRE CHANGING
WARNING!
Do not attempt to change a tire on the side of the
vehicle close to moving traffic. Pull far enough off
the road to avoid the danger of being hit when
operating the jack or changing the wheel.
WHAT TO DO IN EMERGENCIES 265
6
Page 266 of 374
WARNING!
Getting under a jacked-up vehicle is dangerous. The
vehicle could slip off the jack and fall on you. You
could be crushed. Never get any part of your body
under a vehicle that is on a jack. Never start or run
the engine while the vehicle is on a jack. If you need
to get under a raised vehicle, take it to a service
center where it can be raised on a lift.
Preparations For Jacking
²
Park the vehicle on a firm level surface, avoid ice or
slippery areas,set the parking brakeand place the
gear selector in PARK. Turn OFF the ignition.
²Turn on the Hazard Warning Flasher.
²Passengers should not remain in the vehicle when the
vehicle is being jacked.
²Block both the front and rear of the wheel diagonally
opposite the jacking position. For example, if changing
the right front tire, block the left rear wheel.
Hazard Warning Flasher
266 WHAT TO DO IN EMERGENCIES