2005 CHEVROLET VENTURE instrument panel
[x] Cancel search: instrument panelPage 151 of 470

Vehicle Personalization
Your vehicle’s locks and lighting systems can be programmed with several different features. The features you can
program depend on the options that came with your vehicle. The following chart shows the features that can be
programmed. To determine which features your vehicle is equipped with, follow the steps listed for entering
the programming mode.
Feature
Number of
chimes
soundedDelayed
Illumination/
Exit
LightingAutomatic
Door LocksLast Door
Closed
Locking/
Lockout
DeterrentRemote
Driver’s
Door
Unlock
ControlRemote
Lock/Unlock
Con�rmationContent
TheftContent
Theft
Arming/
Disarming
2 X X X ————
3XXXX———
4XXXXXXX
Entering Programming Mode
To program features, your vehicle must be in the
programming mode. Follow these steps:
1. The content theft-deterrent system must be
disarmed. SeeContent Theft-Deterrent on
page 2-25.
2. Remove the BCM PRGRM fuse from the instrument
panel fuse block, located to the right of the glove
box. SeeFuses and Circuit Breakers on page 5-92.3. Close the driver’s door.
4. Turn the ignition key to ACCESSORY.
5. Count the number of chimes you hear. You will
hear two to four chimes depending on the features
your vehicle is equipped with. Refer to the chart
shown previously.
You can now program your choices.
To exit the programming mode, follow the steps listed
underExiting Programming Mode on page 2-64.
2-55
Page 152 of 470
Delayed Illumination and Exit
Lighting
This feature allows you to customize the interior lamps
when entering and exiting the vehicle.
Programmable Modes
Mode 1:Both Features Off. The interior lamps will turn
on or off at the same instant that a door is opened or
closed.
Mode 2:Delayed Illumination Only. The interior lamps
will stay on for about 25 seconds after all the doors
and liftgate are closed, or until you lock the doors.
Mode 3:Exit Lighting Only. The interior lamps will come
on whenever you remove the key from the ignition
and stay on for about 25 seconds, or until you lock the
doors.
Mode 4:Both Features On. This combines
Modes 2 and 3.Your vehicle was originally programmed to Mode 4.
The mode may have been changed since then.
To determine the current mode, or to change the mode,
do the following:
1. Follow the instructions for “Entering Programming
Mode” earlier in this section.
2. Turn the interior lamps on by turning the instrument
panel brightness control all the way up.
3. Count the number of chimes you hear. The number
of chimes indicates the vehicle’s current
programmed mode. If you do not wish to change
the current mode, you can either exit the
programming mode by following the instructions
later in this section or program the next feature
available on your vehicle.
4. Turn the interior lamps off to change the
current mode.
5. Turn the interior lamps from on to off until you hear
the number of chimes corresponding to the mode
selection you want.
The mode you selected is now set. You can either exit
the programming mode by following the instructions
later in this section or program the next feature available
on your vehicle.
2-56
Page 160 of 470
3. Press the button with the horn symbol on the
remote keyless entry transmitter.
4. Count the number of chimes you hear. The number
of chimes indicates the vehicle’s current
programmed mode. If you do not wish to change
the current mode, you can either exit the
programming mode by following the instructions
later in this section or program the next feature
available on your vehicle.
5. Press the panic button to change the current mode.
6. Press the panic button until you hear the number
of chimes corresponding to the mode selection
you want.
7. Remove your key from the door key cylinder.
The mode you selected is now set. You can either exit
the programming mode by following the instructions
next in this section or program the next feature available
on your vehicle.Exiting Programming Mode
To exit programming mode, turn the key from
ACCESSORY to OFF and put the BCM PRGRM fuse
back into the instrument panel fuse block.
After programming a feature, you can exit the
programming mode at anytime. Also, if your vehicle is
equipped with the content theft-deterrent system,
remember to arm the system before exiting.
2-64
Page 161 of 470

Instrument Panel Overview...............................3-4
Hazard Warning Flashers................................3-6
Other Warning Devices...................................3-6
Horn.............................................................3-6
Tilt Wheel.....................................................3-6
Turn Signal/Multifunction Lever.........................3-7
Turn and Lane-Change Signals........................3-7
Headlamp High/Low-Beam Changer..................3-8
Flash-to-Pass.................................................3-8
Windshield Wipers..........................................3-9
Windshield Washer.........................................3-9
Cruise Control..............................................3-10
Exterior Lamps.............................................3-14
Daytime Running Lamps (DRL)/Automatic
Headlamp System.....................................3-14
Instrument Panel Brightness...........................3-15
Interior Lamps Control...................................3-15
Interior Lamp Override...................................3-16
Dome Lamp.................................................3-16
Entry Lighting...............................................3-16
Delayed Lighting...........................................3-17
Exit Lighting.................................................3-17
Front Reading Lamps....................................3-18
Rear Reading Lamps....................................3-18
Cargo Lamp.................................................3-18
Battery Run-Down Protection..........................3-19
Switchbanks.................................................3-19Instrument Panel Switchbank..........................3-19
Overhead Console Switchbank.......................3-20
Ultrasonic Rear Parking Assist (URPA)............3-20
Accessory Power Outlets...............................3-23
Climate Controls............................................3-24
Climate Control System.................................3-24
Outlet Adjustment.........................................3-26
Rear Climate Control System
(Without Entertainment System)...................3-27
Rear Climate Control System
(With Entertainment System).......................3-29
Passenger Compartment Air Filter...................3-30
Warning Lights, Gages, and Indicators............3-32
Instrument Panel Cluster................................3-33
Speedometer and Odometer...........................3-35
Dual Trip Odometers.....................................3-35
Tachometer.................................................3-37
Safety Belt Reminder Light.............................3-37
Airbag Readiness Light..................................3-38
Brake System Warning Light..........................3-39
Anti-Lock Brake System Warning Light.............3-40
Traction Control System (TCS) Warning Light......3-40
Engine Coolant Temperature Gage..................3-41
Malfunction Indicator Lamp.............................3-42
Highbeam On Light.......................................3-45
Fuel Gage...................................................3-45
Section 3 Instrument Panel
3-1
Page 162 of 470

Message Center.............................................3-46
Service Traction System Warning Message......3-46
Traction Active Message................................3-47
Engine Coolant Temperature Warning
Message..................................................3-48
Charging System Indicator Message................3-48
Low Oil Pressure Message............................3-49
Change Engine Oil Message..........................3-50
Power Sliding Door Warning Message.............3-50
Door Ajar Warning Message...........................3-51
Rear Hatch Ajar Warning Message..................3-51
PASS-Key
®III Security Message....................3-52
Low Fuel Warning Message...........................3-52
Driver Information Center (DIC).......................3-53
Audio System(s).............................................3-56
Setting the Time for Radios without
Radio Data Systems (RDS)........................3-56
Setting the Time for Radios with Radio
Data Systems (RDS)..................................3-56
AM-FM Radio...............................................3-57Radio with CD (Base Level)...........................3-59
Radio with CD (MP3)....................................3-69
Radio with Cassette and CD..........................3-84
Radio with Six-Disc CD.................................3-94
Entertainment System..................................3-108
Rear Seat Audio (RSA) (Without
Entertainment System)..............................3-114
Rear Seat Audio (RSA) (With
Entertainment System)..............................3-116
Theft-Deterrent Feature
(Non-RDS Radios)...................................3-118
Theft-Deterrent Feature
(RDS Radios)..........................................3-118
Audio Steering Wheel Controls......................3-118
Radio Reception.........................................3-119
Care of Your Cassette Tape Player...............3-120
Care of Your CDs and DVDs........................3-121
Care of Your CD and DVD Player.................3-121
Fixed Mast Antenna....................................3-121
XM™ Satellite Radio Antenna System............3-121
Section 3 Instrument Panel
3-2
Page 164 of 470
Instrument Panel Overview
3-4
Page 165 of 470
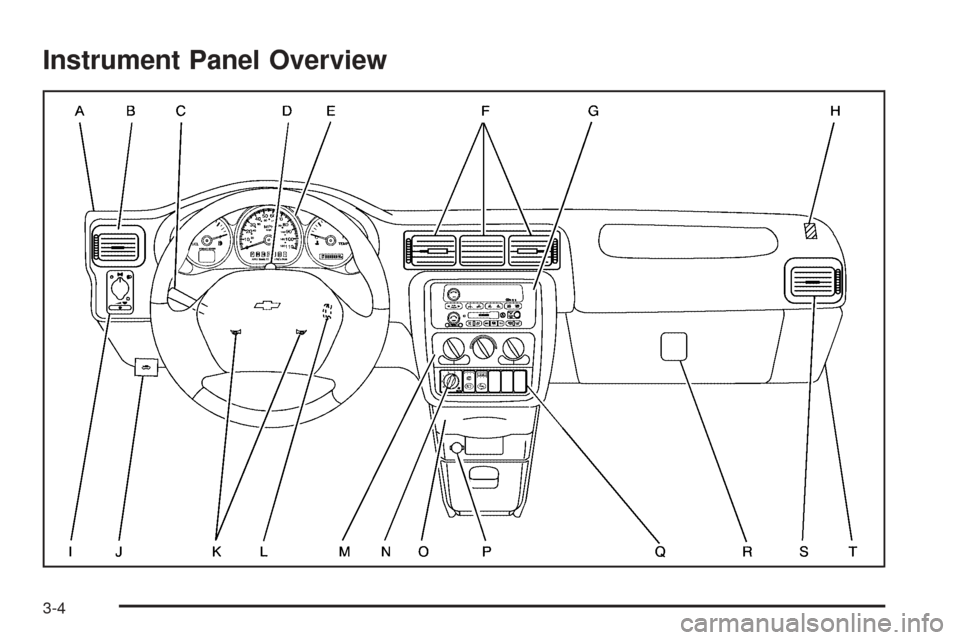
The main components of the instrument panel are the following:
A. Side Outlets. SeeOutlet Adjustment on page 3-26.
B. Front Outlets. SeeOutlet Adjustment on page 3-26.
C. Turn Signal/Multifunction Lever. SeeTurn
Signal/Multifunction Lever on page 3-7.
D. Hazard Warning Flasher Switch. SeeHazard
Warning Flashers on page 3-6.
E. Instrument Panel Cluster. SeeInstrument Panel
Cluster on page 3-33.
F. Center Outlets. SeeOutlet Adjustment on page 3-26.
G. Audio System. SeeAudio System(s) on page 3-56.
H. Side Outlets. SeeOutlet Adjustment on page 3-26.
I. Exterior Lamps Control. SeeExterior Lamps on
page 3-14.
J. Hood Release. SeeHood Release on page 5-11.
K. Horn. SeeHorn on page 3-6.L. Ignition Switch. SeeIgnition Positions on page 2-30.
M. Climate Controls. SeeClimate Control System on
page 3-24.
N. Rear Fan Controls. SeeRear Climate Control
System (Without Entertainment System) on
page 3-27orRear Climate Control System (With
Entertainment System) on page 3-29.
O. Cupholder Tray. SeeCupholder(s) on page 2-48.
P. Accessory Power Outlet. SeeAccessory Power
Outlets on page 3-23.
Q. Instrument Panel Switchbank. SeeInstrument Panel
Switchbank on page 3-19.
R. Glove Box. SeeGlove Box on page 2-47.
S. Front Outlets. SeeOutlet Adjustment on page 3-26.
T. Instrument Panel Fuse Block. SeeFuses and
Circuit Breakers on page 5-92.
3-5
Page 167 of 470
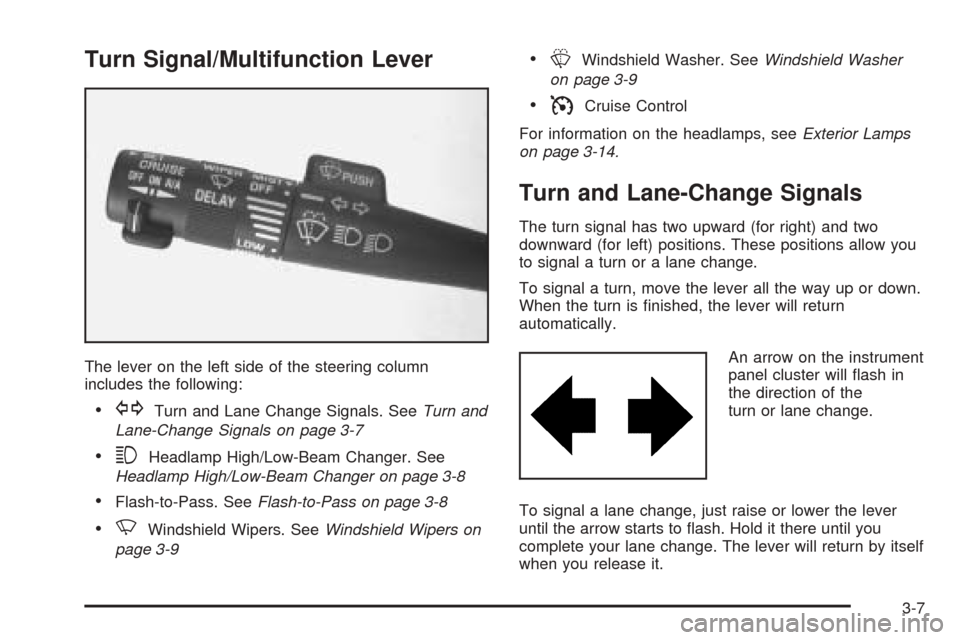
Turn Signal/Multifunction Lever
The lever on the left side of the steering column
includes the following:
GTurn and Lane Change Signals. SeeTurn and
Lane-Change Signals on page 3-7
3Headlamp High/Low-Beam Changer. See
Headlamp High/Low-Beam Changer on page 3-8
Flash-to-Pass. SeeFlash-to-Pass on page 3-8
NWindshield Wipers. SeeWindshield Wipers on
page 3-9
LWindshield Washer. SeeWindshield Washer
on page 3-9
ICruise Control
For information on the headlamps, seeExterior Lamps
on page 3-14.
Turn and Lane-Change Signals
The turn signal has two upward (for right) and two
downward (for left) positions. These positions allow you
to signal a turn or a lane change.
To signal a turn, move the lever all the way up or down.
When the turn is �nished, the lever will return
automatically.
An arrow on the instrument
panel cluster will �ash in
the direction of the
turn or lane change.
To signal a lane change, just raise or lower the lever
until the arrow starts to �ash. Hold it there until you
complete your lane change. The lever will return by itself
when you release it.
3-7