2005 CHEVROLET UPLANDER spare tire
[x] Cancel search: spare tirePage 204 of 460
If there are any active warning messages when the
vehicle is turned off, two chimes will sound and the DIC
will go into a reminder mode. The reminder mode
displays any active message. If there are multiple
messages, the DIC will display each message for
�ve seconds. After each active message is displayed
once, the reminder mode will turn off.
You should take any messages that appear on the
display seriously and remember that clearing the
messages will only make the messages disappear, not
correct the problem.
The following are the possible messages that can be
displayed and some information about them.
A/C OFF FOR ENGINE PROTECTION
This message will display when the engine coolant
becomes hotter than the normal operating temperature.
SeeEngine Coolant Temperature Gage on page 3-39.
To avoid added strain on a hot engine, the air
conditioning compressor is automatically turned off.
When the coolant temperature returns to normal, the air
conditioning compressor will turn back on. You can
continue to drive your vehicle.
This message will come on while the ignition is in RUN.
Press any of the DIC buttons to acknowledge this
warning message and to clear it from the screen.This message will continue to display for two seconds if
it has not been acknowledged when the engine is
turned off. It will also re-display for two seconds if the
message has been acknowledged, but the condition still
exists when the engine is turned off.
If the condition still exists, the message will re-appear
when the engine is turned on. If this message continues
to appear, have the system repaired by your GM dealer
as soon as possible to avoid damage to your engine.
ALL WHEEL DRIVE DISABLED
If your vehicle has the all-wheel drive system, this
message will display when there is a spare tire on the
vehicle, or when the anti-lock brake system warning light
comes on, or when the rear differential �uid is
overheating. This message will turn off when the
differential �uid cools.
The all-wheel drive system will be disabled until the
compact spare tire is replaced by a full-size tire. If the
warning message is still on after putting on the full-size
tire, you need to reset the warning message. To
reset the warning message, turn the ignition off and
then back on again. If the message stays on, see your
GM dealer right away. SeeAll-Wheel Drive (AWD)
System on page 4-12for more information.
3-52
Page 318 of 460

Wheel Replacement......................................5-63
Tire Chains..................................................5-64
Accessory In�ator.........................................5-65
If a Tire Goes Flat........................................5-67
Changing a Flat Tire.....................................5-68
Removing the Spare Tire and Tools................5-69
Removing the Flat Tire and Installing the
Spare Tire................................................5-72
Secondary Latch System...............................5-78
Storing a Flat or Spare Tire and Tools............5-80
Compact Spare Tire......................................5-84
Appearance Care............................................5-85
Cleaning the Inside of Your Vehicle.................5-86
Fabric/Carpet...............................................5-87
Leather.......................................................5-88
Instrument Panel, Vinyl, and Other Plastic
Surfaces..................................................5-88
Glass Surfaces.............................................5-89
Care of Safety Belts and Built-in Child
Restraint Harness......................................5-89
Weatherstrips...............................................5-89
Washing Your Vehicle...................................5-89
Cleaning Exterior Lamps/Lenses.....................5-90Finish Care..................................................5-90
Windshield, Backglass, and Wiper Blades.........5-90
Aluminum Wheels.........................................5-91
Tires...........................................................5-91
Sheet Metal Damage.....................................5-92
Finish Damage.............................................5-92
Underbody Maintenance................................5-92
Chemical Paint Spotting.................................5-92
Vehicle Care/Appearance Materials..................5-93
Vehicle Identi�cation......................................5-94
Vehicle Identi�cation Number (VIN).................5-94
Service Parts Identi�cation Label.....................5-94
Electrical System............................................5-95
Add-On Electrical Equipment..........................5-95
Headlamp Wiring..........................................5-95
Windshield Wiper Fuses................................5-95
Power Windows and Other Power Options.......5-95
Fuses and Circuit Breakers............................5-96
Instrument Panel Fuse Block..........................5-96
Underhood Fuse Block..................................5-98
Capacities and Speci�cations........................5-101
Section 5 Service and Appearance Care
5-2
Page 368 of 460
Tire Sidewall Labelling
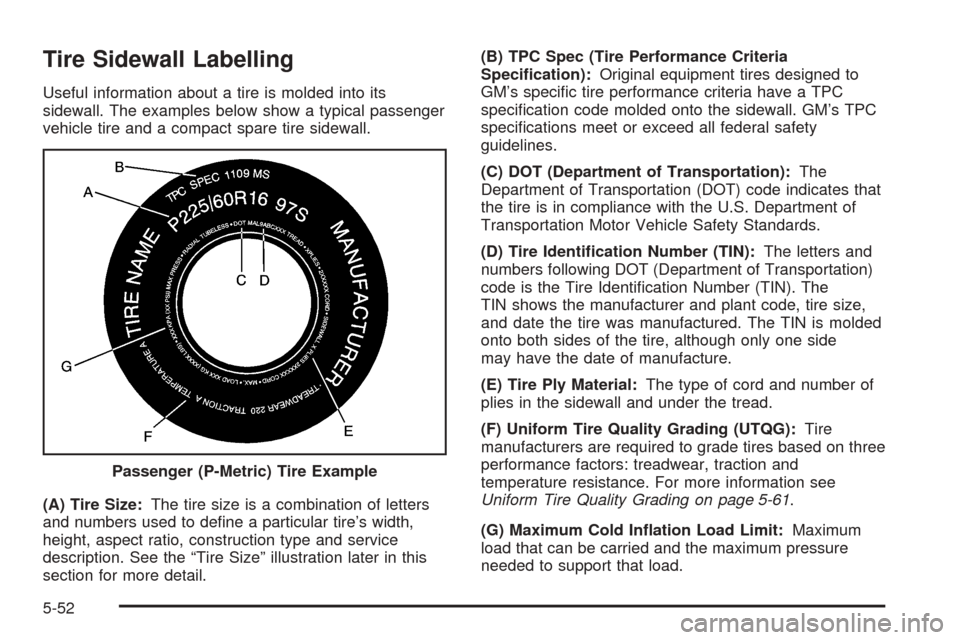
Useful information about a tire is molded into its
sidewall. The examples below show a typical passenger
vehicle tire and a compact spare tire sidewall.
(A) Tire Size:The tire size is a combination of letters
and numbers used to de�ne a particular tire’s width,
height, aspect ratio, construction type and service
description. See the “Tire Size” illustration later in this
section for more detail.(B) TPC Spec (Tire Performance Criteria
Speci�cation):Original equipment tires designed to
GM’s speci�c tire performance criteria have a TPC
speci�cation code molded onto the sidewall. GM’s TPC
speci�cations meet or exceed all federal safety
guidelines.
(C) DOT (Department of Transportation):The
Department of Transportation (DOT) code indicates that
the tire is in compliance with the U.S. Department of
Transportation Motor Vehicle Safety Standards.
(D) Tire Identi�cation Number (TIN):The letters and
numbers following DOT (Department of Transportation)
code is the Tire Identi�cation Number (TIN). The
TIN shows the manufacturer and plant code, tire size,
and date the tire was manufactured. The TIN is molded
onto both sides of the tire, although only one side
may have the date of manufacture.
(E) Tire Ply Material:The type of cord and number of
plies in the sidewall and under the tread.
(F) Uniform Tire Quality Grading (UTQG):Tire
manufacturers are required to grade tires based on three
performance factors: treadwear, traction and
temperature resistance. For more information see
Uniform Tire Quality Grading on page 5-61.
(G) Maximum Cold In�ation Load Limit:Maximum
load that can be carried and the maximum pressure
needed to support that load. Passenger (P-Metric) Tire Example
5-52
Page 369 of 460
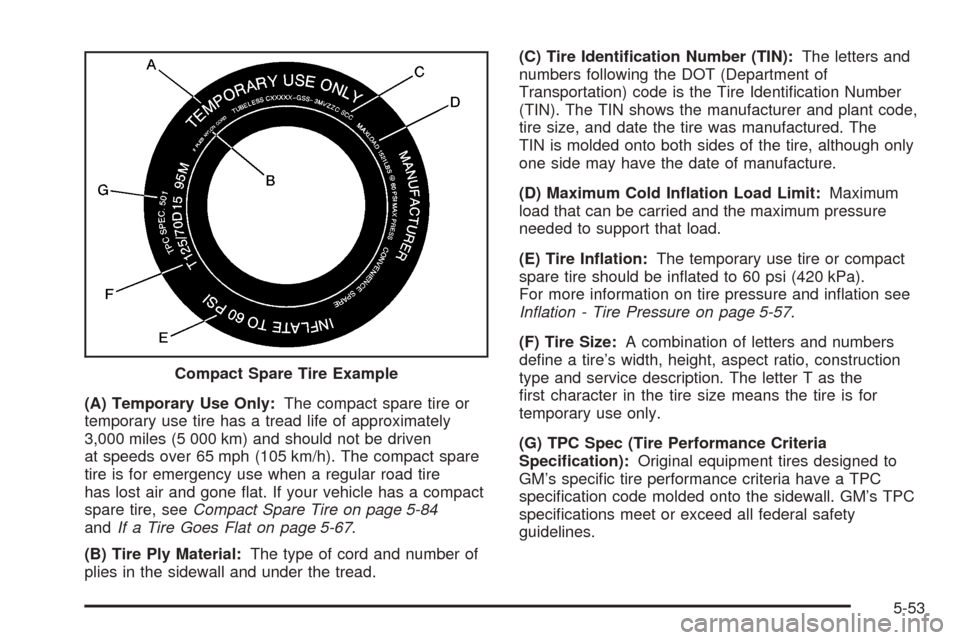
(A) Temporary Use Only:The compact spare tire or
temporary use tire has a tread life of approximately
3,000 miles (5 000 km) and should not be driven
at speeds over 65 mph (105 km/h). The compact spare
tire is for emergency use when a regular road tire
has lost air and gone �at. If your vehicle has a compact
spare tire, seeCompact Spare Tire on page 5-84
andIf a Tire Goes Flat on page 5-67.
(B) Tire Ply Material:The type of cord and number of
plies in the sidewall and under the tread.(C) Tire Identi�cation Number (TIN):The letters and
numbers following the DOT (Department of
Transportation) code is the Tire Identi�cation Number
(TIN). The TIN shows the manufacturer and plant code,
tire size, and date the tire was manufactured. The
TIN is molded onto both sides of the tire, although only
one side may have the date of manufacture.
(D) Maximum Cold In�ation Load Limit:Maximum
load that can be carried and the maximum pressure
needed to support that load.
(E) Tire In�ation:The temporary use tire or compact
spare tire should be in�ated to 60 psi (420 kPa).
For more information on tire pressure and in�ation see
In�ation - Tire Pressure on page 5-57.
(F) Tire Size:A combination of letters and numbers
de�ne a tire’s width, height, aspect ratio, construction
type and service description. The letter T as the
�rst character in the tire size means the tire is for
temporary use only.
(G) TPC Spec (Tire Performance Criteria
Speci�cation):Original equipment tires designed to
GM’s speci�c tire performance criteria have a TPC
speci�cation code molded onto the sidewall. GM’s TPC
speci�cations meet or exceed all federal safety
guidelines. Compact Spare Tire Example
5-53
Page 374 of 460
A Tire and Loading Information label is attached to the
vehicle’s center pillar (B-pillar), below the driver’s
door latch. This label shows your vehicle’s original
equipment tires and the correct in�ation pressures for
your tires when they are cold. The recommended
cold tire in�ation pressure, shown on the label, is the
minimum amount of air pressure needed to support your
vehicle’s maximum load carrying capacity.
For additional information regarding how much weight
your vehicle can carry, and an example of the tire
and loading information label, seeLoading Your Vehicle
on page 4-33. How you load your vehicle affects
vehicle handling and ride comfort, never load your
vehicle with more weight than it was designed to carry.
When to Check
Check your tires once a month or more. Do not forget to
check the compact spare tire, it should be at 60 psi
(420 kPa). For additional information regarding
the compact spare tire, seeCompact Spare Tire on
page 5-84.
How to Check
Use a good quality pocket-type gage to check tire
pressure. You cannot tell if your tires are properly
in�ated simply by looking at them. Radial tires may look
properly in�ated even when they are under-in�ated.
Check the tire’s in�ation pressure when the tires
are cold. Cold means your vehicle has been sitting for
at least three hours or driven no more than 1 mile
(1.6 km).
Remove the valve cap from the tire valve stem. Press
the tire gage �rmly onto the valve to get a pressure
measurement. If the cold tire in�ation pressure matches
the recommended pressure on the Tire and Loading
Information label, no further adjustment is necessary. If
the in�ation pressure is low, add air until you reach
the recommended amount.
If you over�ll the tire, release air by pushing on the
metal stem in the center of the tire valve. Re-check the
tire pressure with the tire gage.
Be sure to put the valve caps back on the valve stems.
They help prevent leaks by keeping out dirt and
moisture.
5-58
Page 375 of 460

Tire Inspection and Rotation
Tires should be rotated every 5,000 to 8,000 miles
(8 000 to 13 000 km).
Any time you notice unusual wear, rotate your tires as
soon as possible and check wheel alignment. Also
check for damaged tires or wheels. SeeWhen It Is Time
for New Tires on page 5-60andWheel Replacement
on page 5-63for more information.
The purpose of regular rotation is to achieve more
uniform wear for all tires on the vehicle. The �rst rotation
is the most important. SeeScheduled Maintenance
on page 6-4.
When rotating your tires, always use the correct rotation
pattern shown here.Do not include the compact spare tire in your tire
rotation.
After the tires have been rotated, adjust the front and
rear in�ation pressures as shown on the Tire and
Loading Information label.
Make certain that all wheel nuts are properly tightened.
See “Wheel Nut Torque” underCapacities and
Speci�cations on page 5-101.
{CAUTION:
Rust or dirt on a wheel, or on the parts to
which it is fastened, can make wheel nuts
become loose after a time. The wheel could
come off and cause an accident. When you
change a wheel, remove any rust or dirt from
places where the wheel attaches to the vehicle.
In an emergency, you can use a cloth or a
paper towel to do this; but be sure to use a
scraper or wire brush later, if needed, to get all
the rust or dirt off. SeeChanging a Flat Tire on
page 5-68.
5-59
Page 377 of 460
{CAUTION:
Mixing tires could cause you to lose control
while driving. If you mix tires of different sizes
or types (radial and bias-belted tires), the
vehicle may not handle properly, and you
could have a crash. Using tires of different
sizes may also cause damage to your vehicle.
Be sure to use the same size and type tires on
all wheels. It’s all right to drive with your
compact spare temporarily, it was developed
for use on your vehicle. SeeCompact Spare
Tire on page 5-84.
{CAUTION:
If you use bias-ply tires on your vehicle, the
wheel rim �anges could develop cracks after
many miles of driving. A tire and/or wheel
could fail suddenly, causing a crash. Use only
radial-ply tires with the wheels on your vehicle.
Uniform Tire Quality Grading
Quality grades can be found where applicable on the
tire sidewall between tread shoulder and maximum
section width. For example:
Treadwear 200 Traction AA Temperature A
The following information relates to the system
developed by the United States National Highway
Traffic Safety Administration, which grades tires by
treadwear, traction and temperature performance. (This
applies only to vehicles sold in the United States.)
The grades are molded on the sidewalls of most
passenger car tires. The Uniform Tire Quality Grading
system does not apply to deep tread, winter-type
snow tires, space-saver or temporary use spare tires,
tires with nominal rim diameters of 10 to 12 inches
(25 to 30 cm), or to some limited-production tires.
While the tires available on General Motors passenger
cars and light trucks may vary with respect to these
grades, they must also conform to federal safety
requirements and additional General Motors Tire
Performance Criteria (TPC) standards.
5-61
Page 385 of 460
Removing the Spare Tire and Tools
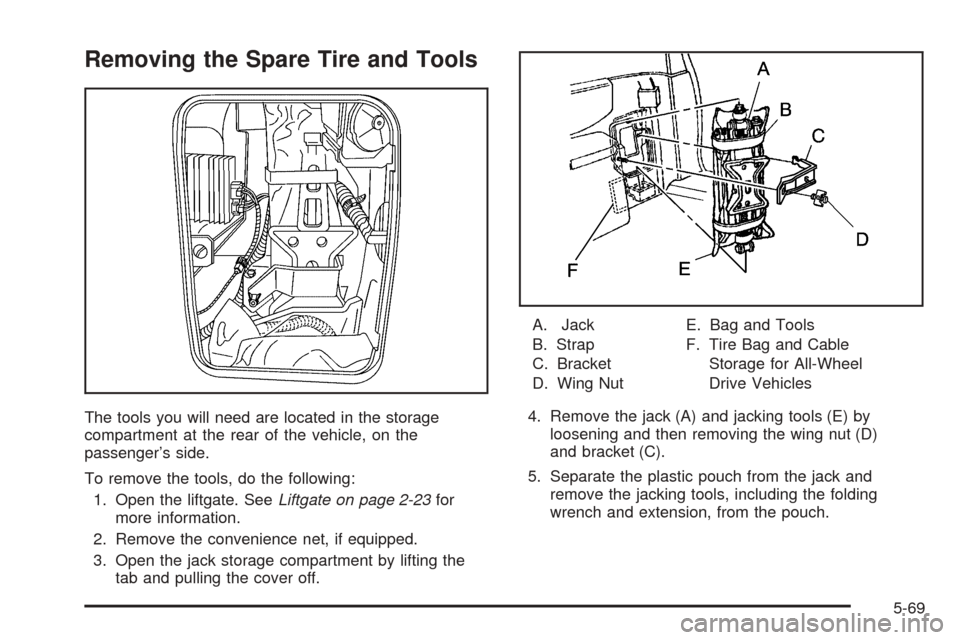
The tools you will need are located in the storage
compartment at the rear of the vehicle, on the
passenger’s side.
To remove the tools, do the following:
1. Open the liftgate. SeeLiftgate on page 2-23for
more information.
2. Remove the convenience net, if equipped.
3. Open the jack storage compartment by lifting the
tab and pulling the cover off.A. Jack
B. Strap
C. Bracket
D. Wing NutE. Bag and Tools
F. Tire Bag and Cable
Storage for All-Wheel
Drive Vehicles
4. Remove the jack (A) and jacking tools (E) by
loosening and then removing the wing nut (D)
and bracket (C).
5. Separate the plastic pouch from the jack and
remove the jacking tools, including the folding
wrench and extension, from the pouch.
5-69