2005 CHEVROLET TAHOE door lock
[x] Cancel search: door lockPage 1 of 536

Seats and Restraint Systems........................... 1-1
Front Seats
............................................... 1-3
Rear Seats
............................................... 1-8
Safety Belts
.............................................1-23
Child Restraints
.......................................1-44
Airbag System
.........................................1-68
Restraint System Check
............................1-83
Features and Controls..................................... 2-1
Keys
........................................................ 2-3
Doors and Locks
....................................... 2-8
Windows
.................................................2-15
Theft-Deterrent Systems
............................2-17
Starting and Operating Your Vehicle
...........2-19
Mirrors
....................................................2-41
OnStar
®System
......................................2-50
HomeLink®Wireless Control System
...........2-52
Storage Areas
.........................................2-56
Sunroof
..................................................2-60
Vehicle Personalization
.............................2-61
Instrument Panel............................................. 3-1
Instrument Panel Overview
.......................... 3-4
Climate Controls
......................................3-21
Warning Lights, Gages, and Indicators
........3-36
Driver Information Center (DIC)
..................3-56
Audio System(s)
.......................................3-78Driving Your Vehicle....................................... 4-1
Your Driving, the Road, and Your Vehicle
..... 4-2
Towing
...................................................4-62
Service and Appearance Care.......................... 5-1
Service
..................................................... 5-3
Fuel
......................................................... 5-5
Checking Things Under the Hood
...............5-10
All-Wheel Drive
........................................5-47
Rear Axle
...............................................5-48
Four-Wheel Drive
.....................................5-49
Front Axle
...............................................5-50
Bulb Replacement
....................................5-52
Windshield Wiper Blade Replacement
.........5-59
Tires
......................................................5-60
Appearance Care
.....................................5-97
Vehicle Identi�cation
...............................5-106
Electrical System
....................................5-107
Capacities and Speci�cations
...................5-116
Maintenance Schedule..................................... 6-1
Maintenance Schedule
................................ 6-2
Customer Assistance and Information.............. 7-1
Customer Assistance and Information
........... 7-2
Reporting Safety Defects
...........................7-10
Index................................................................ 1
2005 Chevrolet Tahoe/Suburban Owner ManualM
Page 12 of 536
Heated Seats
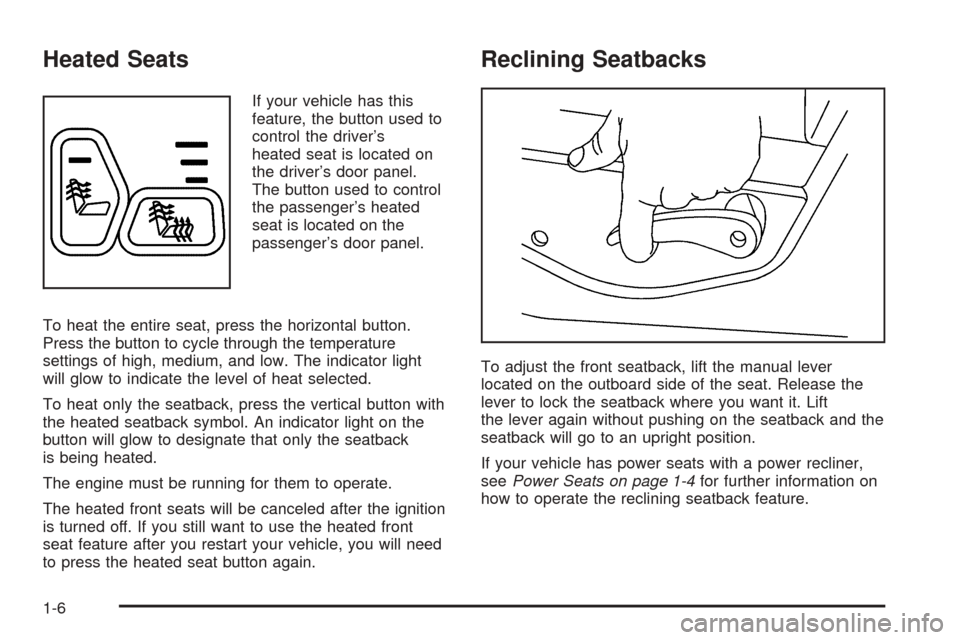
If your vehicle has this
feature, the button used to
control the driver’s
heated seat is located on
the driver’s door panel.
The button used to control
the passenger’s heated
seat is located on the
passenger’s door panel.
To heat the entire seat, press the horizontal button.
Press the button to cycle through the temperature
settings of high, medium, and low. The indicator light
will glow to indicate the level of heat selected.
To heat only the seatback, press the vertical button with
the heated seatback symbol. An indicator light on the
button will glow to designate that only the seatback
is being heated.
The engine must be running for them to operate.
The heated front seats will be canceled after the ignition
is turned off. If you still want to use the heated front
seat feature after you restart your vehicle, you will need
to press the heated seat button again.
Reclining Seatbacks
To adjust the front seatback, lift the manual lever
located on the outboard side of the seat. Release the
lever to lock the seatback where you want it. Lift
the lever again without pushing on the seatback and the
seatback will go to an upright position.
If your vehicle has power seats with a power recliner,
seePower Seats on page 1-4for further information on
how to operate the reclining seatback feature.
1-6
Page 19 of 536
To return the seat to the seating position do the
following:
1. Push forward on the seat and release the support
lock rod.
2. Secure the support rod in its stored position on the
underside of the seat.
3. Lower the seat to the �oor and let the seat drop
into place.
4. Lift up on the carrying handle to make sure the seat
is locked in place.
5. Return the seatback to the upright position by
pulling up on the release lever labeled 1 before
the back can be folded upright.
6. Pull the seatback forward to make sure it is locked
in place.Removing the 50/50 Split Bench Seat
To remove the 50/50 split bench seat, do the following:
1. Open the rear doors and enter the rear of the
vehicle.
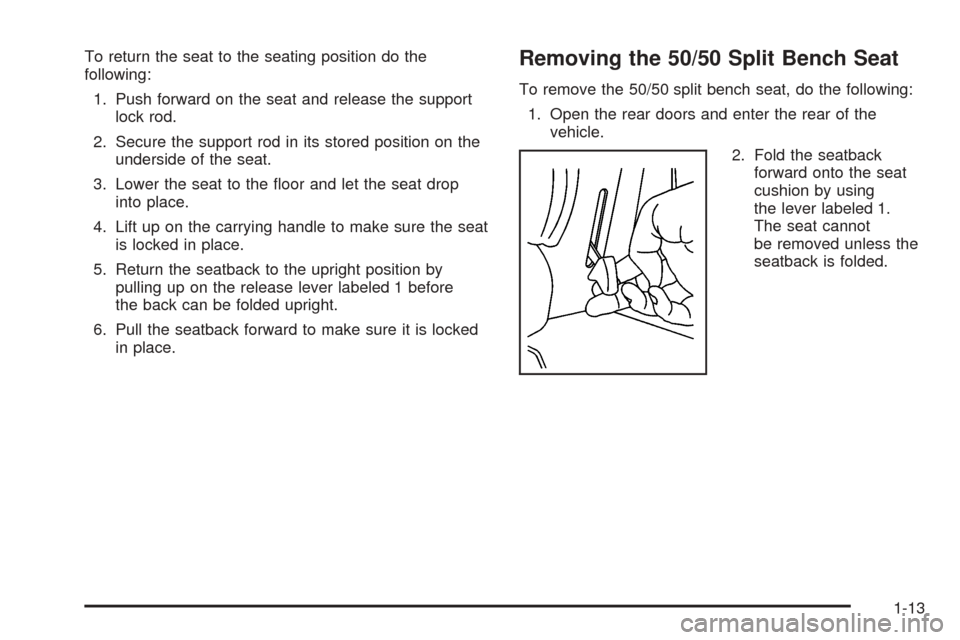
2. Fold the seatback
forward onto the seat
cushion by using
the lever labeled 1.
The seat cannot
be removed unless the
seatback is folded.
1-13
Page 35 of 536
Driver Position
Lap-Shoulder Belt
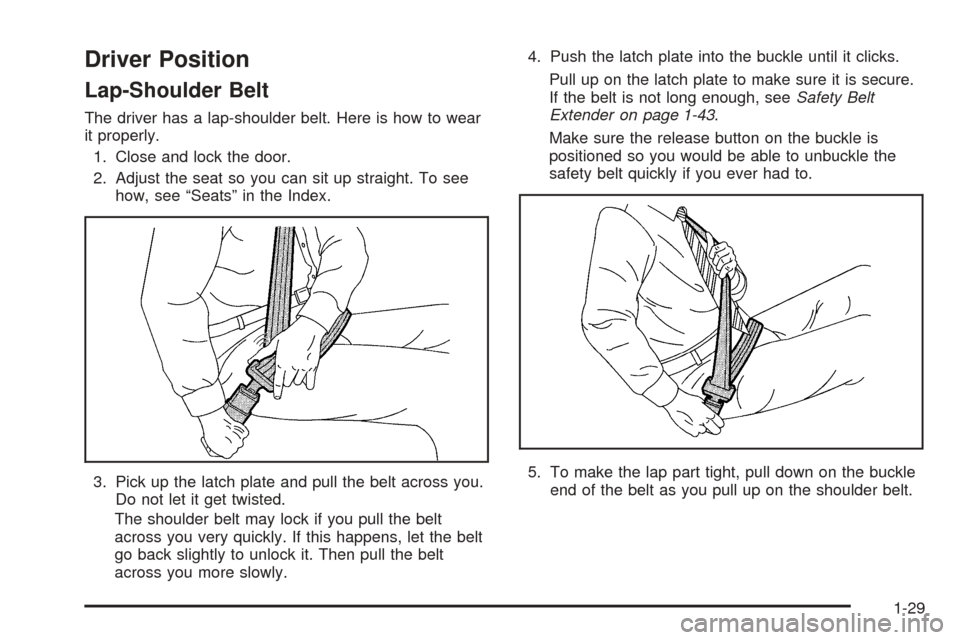
The driver has a lap-shoulder belt. Here is how to wear
it properly.
1. Close and lock the door.
2. Adjust the seat so you can sit up straight. To see
how, see “Seats” in the Index.
3. Pick up the latch plate and pull the belt across you.
Do not let it get twisted.
The shoulder belt may lock if you pull the belt
across you very quickly. If this happens, let the belt
go back slightly to unlock it. Then pull the belt
across you more slowly.4. Push the latch plate into the buckle until it clicks.
Pull up on the latch plate to make sure it is secure.
If the belt is not long enough, seeSafety Belt
Extender on page 1-43.
Make sure the release button on the buckle is
positioned so you would be able to unbuckle the
safety belt quickly if you ever had to.
5. To make the lap part tight, pull down on the buckle
end of the belt as you pull up on the shoulder belt.
1-29
Page 91 of 536
Keys...............................................................2-3
Remote Keyless Entry System.........................2-5
Remote Keyless Entry System Operation...........2-6
Doors and Locks.............................................2-8
Door Locks....................................................2-8
Power Door Locks..........................................2-9
Delayed Locking...........................................2-10
Programmable Automatic Door Locks..............2-11
Rear Door Security Locks..............................2-13
Lockout Protection........................................2-13
Liftgate........................................................2-14
Windows........................................................2-15
Manual Windows..........................................2-15
Power Windows............................................2-16
Sun Visors...................................................2-17
Theft-Deterrent Systems..................................2-17
Content Theft-Deterrent.................................2-17
Passlock
®....................................................2-19Starting and Operating
Your Vehicle...............................................2-19
New Vehicle Break-In....................................2-19
Ignition Positions..........................................2-20
Retained Accessory Power (RAP)...................2-21
Starting the Engine.......................................2-21
Adjustable Throttle and Brake Pedal................2-22
Engine Coolant Heater..................................2-23
Automatic Transmission Operation...................2-24
Tow/Haul Mode............................................2-27
Four-Wheel Drive..........................................2-28
All-Wheel Drive with StabiliTrak
®.....................2-32
Parking Brake..............................................2-35
Shifting Into Park (P).....................................2-36
Shifting Out of Park (P).................................2-38
Parking Over Things That Burn.......................2-38
Engine Exhaust............................................2-39
Running the Engine While Parked...................2-40
Section 2 Features and Controls
2-1
Page 94 of 536

Your vehicle has one
double-sided key for the
ignition and all door
locks as well as the spare
tire hoist lock, if equipped.
If you ever lose your keys, your dealer will be able to
assist you with obtaining replacements.Notice:If you ever lock your keys in your vehicle,
you may have to damage the vehicle to get in.
Be sure you have spare keys.
If you ever do get locked out of your vehicle, call the
GM Roadside Assistance Center. SeeRoadside
Assistance Program on page 7-6. If your vehicle is
equipped with the OnStar
®system with an active
subscription and you lock your keys inside the vehicle,
OnStar
®may be able to send a command to unlock
your vehicle. SeeOnStar®System on page 2-50
for more information.
2-4
Page 96 of 536

Remote Keyless Entry System
Operation
You can lock and unlock your doors from about 3 feet
(1 m) up to 100 feet (30 m) away using the remote
keyless entry transmitter supplied with your vehicle.
K(Unlock):Press this
button once to unlock
the driver’s door.
The interior lamps will
come on. Pressing
unlock again within
three seconds will
cause the remaining
doors to unlock.
You can choose different feedback options for each
press of the unlock button. See “Lock Feedback” and
“Unlock Feedback” underDIC Vehicle Customization
on page 3-72for more information.
Q(Lock):Press this button once to lock all of the
doors. Pressing lock again within three seconds
may cause the horn to chirp for lock con�rmation. You
can choose different feedback options for each press
of the lock button. See “Lock Feedback” and “Unlock
Feedback” underDIC Vehicle Customization on
page 3-72for more information.
L(Panic):Press this button to sound the horn and
�ash the headlamps and taillamps for up to 30 seconds.
Panic can be turned off by pressing the button again,
by waiting for 30 seconds, or by starting the vehicle.
Matching Transmitter(s) to Your
Vehicle
Each remote keyless entry transmitter is coded to
prevent another transmitter from unlocking your vehicle.
If a transmitter is lost or stolen, a replacement can
be purchased through your dealer. Remember to bring
any remaining transmitters with you when you go to
your dealer. When the dealer matches the replacement
transmitter to your vehicle, any remaining transmitters
must also be matched. Once your dealer has coded
the new transmitter, the lost transmitter will not unlock
your vehicle. Each vehicle can have a maximum of
four transmitters matched to it.
2-6
Page 98 of 536
Resynchronization
Resynchronization may be necessary due to the
security method used by this system. The transmitter
does not send the same signal twice to the receiver.
The receiver will not respond to a signal that has been
sent previously. This prevents anyone from recording
and playing back the signal from the transmitter.
To resynchronize your transmitter, stand close to your
vehicle and press and hold the lock and unlock
buttons on the transmitter at the same time for
15 seconds. The door locks should cycle to con�rm
synchronization. If the locks do not cycle, see your
dealer for service.
Doors and Locks
Door Locks
{CAUTION:
Unlocked doors can be dangerous.
Passengers — especially children — can
easily open the doors and fall out of a
moving vehicle. When a door is locked,
the handle will not open it. You increase
the chance of being thrown out of the
vehicle in a crash if the doors are not
locked. So, wear safety belts properly and
lock the doors whenever you drive.
Young children who get into unlocked
vehicles may be unable to get out. A child
can be overcome by extreme heat and can
suffer permanent injuries or even death
from heat stroke. Always lock your vehicle
whenever you leave it.
Outsiders can easily enter through an
unlocked door when you slow down or
stop your vehicle. Locking your doors can
help prevent this from happening.
2-8