2005 CHEVROLET TAHOE door lock
[x] Cancel search: door lockPage 173 of 536

Ashtrays and Cigarette Lighter
The front ashtray is located near the center of the
instrument panel or on the front console, if equipped.
Pull on the ashtray door to open it.
Notice:If you put papers, pins, or other �ammable
items in the ashtray, hot cigarettes or other
smoking materials could ignite them and possibly
damage your vehicle. Never put �ammable items in
the ashtray.
To remove the front ashtray pull the ashtray up.
To use the cigarette lighter, push it in all the way, and
let go. When it’s ready, it will pop back out by itself.
Notice:Holding a cigarette lighter in while it
is heating will not allow the lighter to back away
from the heating element when it is hot. Damage
from overheating may occur to the lighter or heating
element, or a fuse could be blown. Do not hold a
cigarette lighter in while it is heating.
Climate Controls
Climate Control System
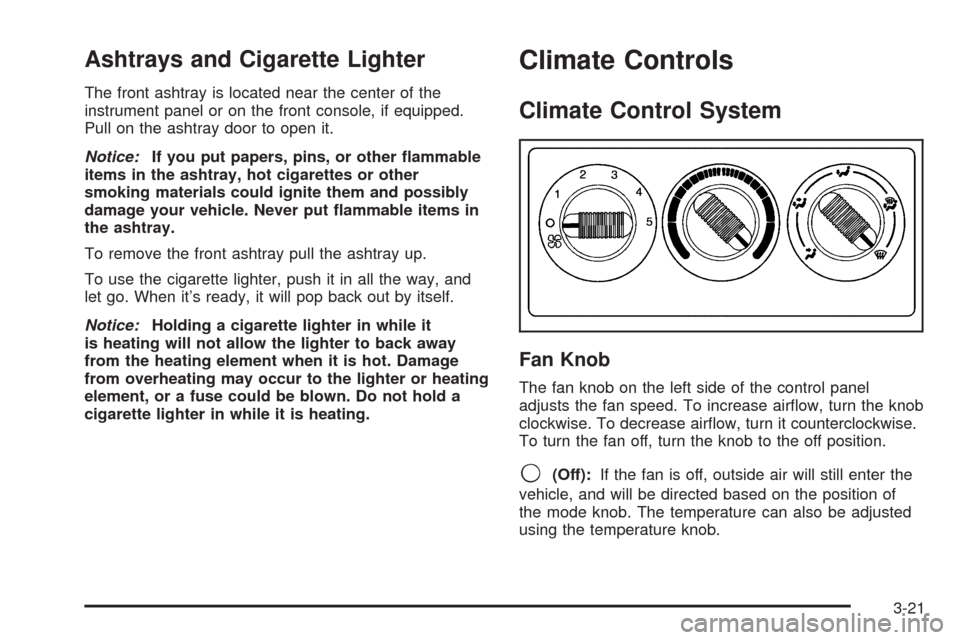
Fan Knob
The fan knob on the left side of the control panel
adjusts the fan speed. To increase air�ow, turn the knob
clockwise. To decrease air�ow, turn it counterclockwise.
To turn the fan off, turn the knob to the off position.
9(Off):If the fan is off, outside air will still enter the
vehicle, and will be directed based on the position of
the mode knob. The temperature can also be adjusted
using the temperature knob.
3-21
Page 217 of 536

OIL PRESSURE LOW
If low oil pressure levels occur, this message will be
displayed on the DIC and a chime will sound. Stop the
vehicle as soon as safely possible and do not operate
it until the cause of the low oil pressure has been
corrected. Check your oil as soon as possible and have
your vehicle serviced by your GM dealer. SeeEngine
Oil on page 5-16.
Notice:If you drive your vehicle while the engine
oil pressure is low, severe engine damage may
occur. If a low oil pressure warning appears on the
Driver Information Center (DIC), stop the vehicle
as soon as possible. Do not drive the vehicle until
the cause of the low oil pressure is corrected.
SeeEngine Oil on page 5-16for more information.
PASSENGER DOOR AJAR
If the passenger’s door is not fully closed, this message
will appear on the display and you will hear a chime.
Stop and turn off the vehicle, check the door for
obstacles, and close the door again. Check to see if the
message still appears on the DIC. Pressing any of
the four DIC buttons, if equipped, will acknowledge the
message and clear it from the DIC display. If your
vehicle is not equipped with the four DIC buttons,
pressing the trip odometer reset stem will acknowledge
the message and clear it from the DIC display.
REAR ACCESS OPEN
If the liftgate is open while the ignition is in RUN, this
message will appear on the DIC and you will hear
a chime. Turn off the vehicle and check the liftgate.
Restart the vehicle and check for the message on the
DIC display. Pressing any of the four DIC buttons,
if equipped, will acknowledge the message and clear it
from the DIC display. If your vehicle is not equipped
with the four DIC buttons, pressing the trip odometer
reset stem will acknowledge the message and clear it
from the DIC display.
REDUCED ENGINE POWER
This message is displayed when the cooling system
temperature gets too hot and the engine further enters
the engine coolant protection mode. SeeEngine
Overheating on page 5-28for further information.
REPLACE LIFTGATE FUSE
This message will be displayed if the liftgate lock
malfunctions and/or the liftgate fuse blows. For more
information on fuses, seeFuses and Circuit Breakers on
page 5-107. If the message returns after replacing the
fuse, see your GM dealer for service.
3-65
Page 224 of 536

DIC Vehicle Customization
Your vehicle may have customization capabilities that
allow you to program some features to one setting
based on your preference. All of the customizable
options listed may not be available on your vehicle. Only
the options available will be displayed on your Driver
Information Center (DIC).
The default settings for the customization features were
set when your vehicle left the factory, but may have
been changed from their default state since then.
To change feature preferences, make sure the ignition
is on and the vehicle is in PARK (P). Press the
customization button to scroll through the available
customizable options.
After pressing the customization button, VEHICLE
SETTINGS will momentarily display before going to a
customization option.
Lock Doors
Press the customization button until LOCK DOORS
appears in the display. To select your preference
for automatic locking, press the select button while
LOCK DOORS is displayed on the DIC. Pressing the
select button will scroll through the following choices:
LOCK DOORS: IN GEAR (default):The doors will lock
when the vehicle is shifted out of PARK (P).LOCK DOORS: WITH SPEED:The doors will lock
when the vehicle speed is above 8 mph (13 km/h) for
three seconds.
Choose one of the available options and press the
customization button while it is displayed on the DIC to
select it and move on to the next feature. For more
information on automatic door locks, seeProgrammable
Automatic Door Locks on page 2-11.
Unlock Doors
Press the customization button until UNLOCK DOORS
appears in the display. To select your preference for
automatic unlocking, press the select button while
UNLOCK DOORS is displayed on the DIC. Pressing the
select button will scroll through the following choices:
UNLOCK DOORS: IN PARK (default):All of the doors
will unlock when the vehicle is shifted into PARK (P).
UNLOCK DRIVER: IN PARK:The driver’s door will be
unlocked when the vehicle is shifted into PARK (P).
UNLOCK DOORS: KEY OUT:All of the doors
will unlock when the key is taken out of the ignition.
UNLOCK DOORS: MANUALLY:The doors will not be
unlocked automatically.
Choose one of the available options and press the
customization button while it is displayed on the DIC to
select it and move on to the next feature. For more
information on automatic door locks, seeProgrammable
Automatic Door Locks on page 2-11.
3-72
Page 225 of 536

Door Lock Delay
If your DIC does not have this feature, you can still
program the delayed locking feature. SeeDelayed
Locking on page 2-10for more information.
When locking the doors with the power lock switch or
the remote keyless entry transmitter and a door or
the liftgate is open, the delayed locking feature will delay
locking the doors and liftgate until �ve seconds after
the last door is closed.
Press the customization button until DOOR LOCK
DELAY appears in the display. To select your
preference for delayed locking, press the select button
while DOOR LOCK DELAY is displayed on the DIC.
Pressing the select button will scroll through the
following choices:
DOOR LOCK DELAY: OFF (default):The doors will
lock immediately when pressing the power lock switch or
the lock button on the remote keyless entry transmitter.
DOOR LOCK DELAY: ON:The doors will not lock
until �ve seconds after the last door or the liftgate
is closed. You will hear three chimes to signal that the
delayed locking feature is in use. You can temporarily
override delayed locking by pressing the lock button on
the door or the remote keyless entry transmitter a
second time.Choose one of the available options and press the
customization button while it is displayed on the DIC to
select it and move on to the next feature.
This feature will not operate if the key is in the ignition.
Lock Feedback
Press the customization button until LOCK FEEDBACK
appears in the display. To select your preference for
the feedback you receive when locking the vehicle with
the remote keyless entry transmitter, press the select
button while LOCK FEEDBACK is displayed on the DIC.
Pressing the select button will scroll through the
following choices:
LOCK FEEDBACK: BOTH (default):The parking
lamps will �ash each time you press the button with the
lock symbol on the remote keyless entry transmitter
and the horn will chirp the second time you press the
lock button.
LOCK FEEDBACK: LAMPS:The parking lamps will
�ash each time you press the button with the lock
symbol on the remote keyless entry transmitter.
LOCK FEEDBACK: HORN:The horn will chirp the
second time you press the button with the lock symbol
on the remote keyless entry transmitter.
3-73
Page 342 of 536

Loading Your Vehicle
It is very important to know how much weight your
vehicle can carry. This weight is called the vehicle
capacity weight and includes the weight of all occupants,
cargo and all nonfactory-installed options. Two labels
on your vehicle show how much weight it was designed
to carry, the Tire and Loading Information label and
the Certi�cation/Tire label.
{CAUTION:
Do not load your vehicle any heavier than the
Gross Vehicle Weight Rating (GVWR), or either
the maximum front or rear Gross Axle Weight
Rating (GAWR). If you do, parts on your
vehicle can break, and it can change the way
your vehicle handles. These could cause you
to lose control and crash. Also, overloading
can shorten the life of your vehicle.
Tire and Loading Information Label
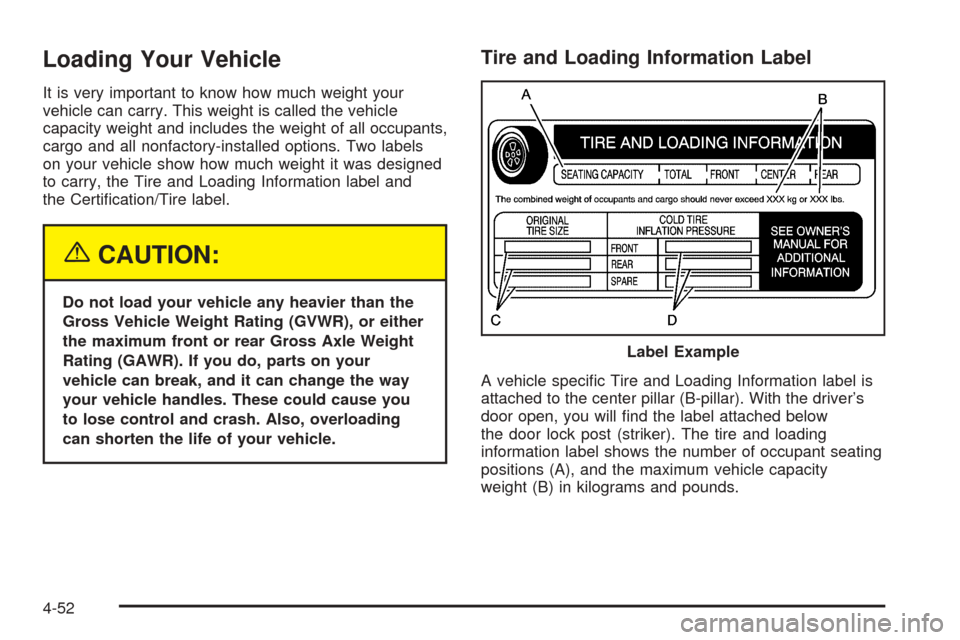
A vehicle speci�c Tire and Loading Information label is
attached to the center pillar (B-pillar). With the driver’s
door open, you will �nd the label attached below
the door lock post (striker). The tire and loading
information label shows the number of occupant seating
positions (A), and the maximum vehicle capacity
weight (B) in kilograms and pounds.Label Example
4-52
Page 441 of 536

A Tire and Loading Information label is attached to the
vehicle’s center pillar (B-pillar), below the driver’s
door lock post (striker). This label lists your vehicle’s
original equipment tires and their recommended cold tire
in�ation pressures. The recommended cold tire
in�ation pressure, shown on the label, is the minimum
amount of air pressure needed to support your vehicle’s
maximum load carrying capacity.
For additional information regarding how much weight
your vehicle can carry, and an example of the tire
and loading information label, seeLoading Your Vehicle
on page 4-52.
When to Check
Check your tires once a month or more. Do not forget to
check the spare tire. For additional information
regarding the spare tire, seeSpare Tire on page 5-97.
How to Check
Use a good quality pocket-type gage to check tire
pressure. You cannot tell if your tires are properly in�ated
simply by looking at them. Radial tires may look properly
in�ated even when they’re underin�ated. Check the tire’s
in�ation pressure when the tires are cold. Cold means
your vehicle has been sitting for at least three hours or
driven no more than 1 mile (1.6 km).Remove the valve cap from the tire valve stem. Press
the tire gage �rmly onto the valve to get a pressure
measurement. If the cold tire in�ation pressure matches
the recommended pressure on the Tire and Loading
Information label, no further adjustment is necessary.
If the in�ation pressure is low, add air until you reach the
recommended amount.
If you over�ll the tire, release air by pushing on the
metal stem in the center of the tire valve. Recheck the
tire pressure with the tire gage.
Be sure to put the valve caps back on the valve stems.
They help prevent leaks by keeping out dirt and moisture.
Tire Pressure Monitor System
The Tire Pressure Monitor (TPM) system uses radio
and sensor technology to check tire pressure levels. If
your vehicle has this feature, sensors are mounted
on each tire and wheel assembly, except the spare tire.
The TPM sensors transmit tire pressure readings to
a receiver located in the vehicle.
When a low tire pressure condition is detected, the TPM
system will display the CHECK TIRE PRESSURE
warning message on the Driver Information
Center (DIC); and at the same time illuminate the low
tire pressure warning symbol. For additional information
and details about the DIC operation and displays see
DIC Operation and Displays on page 3-57andDIC
Warnings and Messages on page 3-60.
5-67
Page 454 of 536

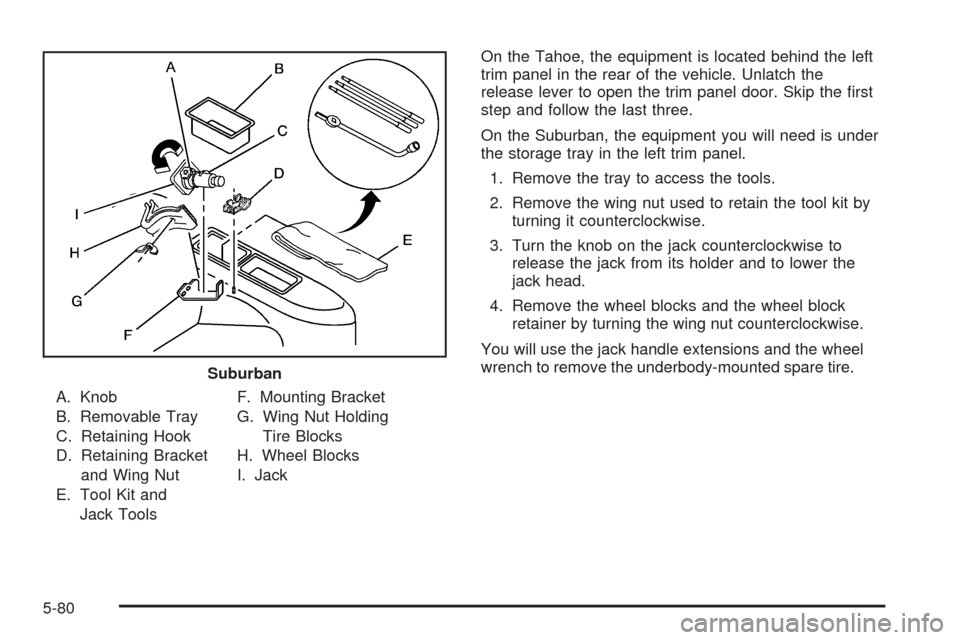
A. Knob
B. Removable Tray
C. Retaining Hook
D. Retaining Bracket
and Wing Nut
E. Tool Kit and
Jack ToolsF. Mounting Bracket
G. Wing Nut Holding
Tire Blocks
H. Wheel Blocks
I. JackOn the Tahoe, the equipment is located behind the left
trim panel in the rear of the vehicle. Unlatch the
release lever to open the trim panel door. Skip the �rst
step and follow the last three.
On the Suburban, the equipment you will need is under
the storage tray in the left trim panel.
1. Remove the tray to access the tools.
2. Remove the wing nut used to retain the tool kit by
turning it counterclockwise.
3. Turn the knob on the jack counterclockwise to
release the jack from its holder and to lower the
jack head.
4. Remove the wheel blocks and the wheel block
retainer by turning the wing nut counterclockwise.
You will use the jack handle extensions and the wheel
wrench to remove the underbody-mounted spare tire.
Suburban
5-80
Page 482 of 536

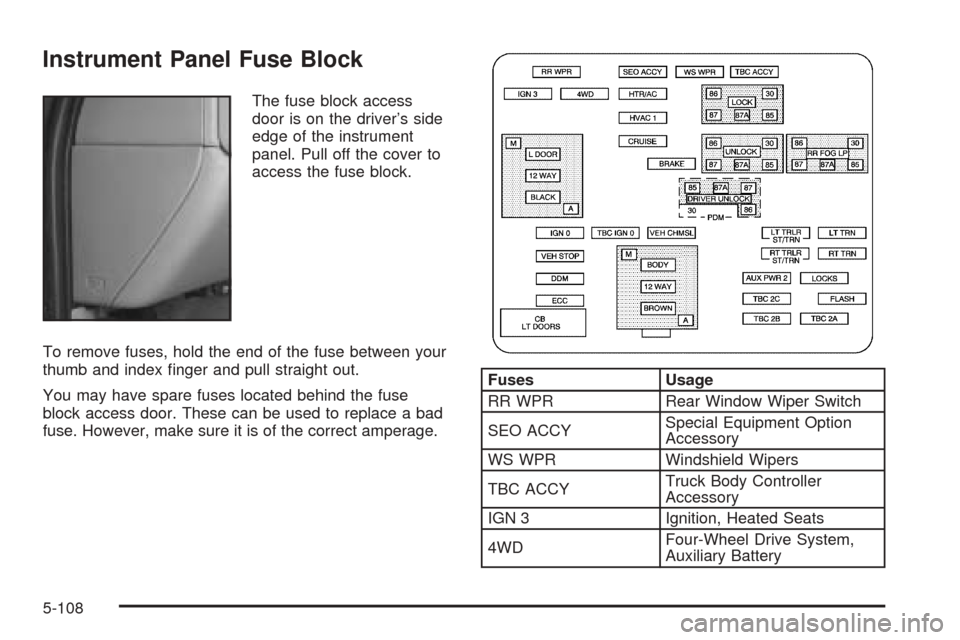
Instrument Panel Fuse Block
The fuse block access
door is on the driver’s side
edge of the instrument
panel. Pull off the cover to
access the fuse block.
To remove fuses, hold the end of the fuse between your
thumb and index �nger and pull straight out.
You may have spare fuses located behind the fuse
block access door. These can be used to replace a bad
fuse. However, make sure it is of the correct amperage.
Fuses Usage
RR WPR Rear Window Wiper Switch
SEO ACCYSpecial Equipment Option
Accessory
WS WPR Windshield Wipers
TBC ACCYTruck Body Controller
Accessory
IGN 3 Ignition, Heated Seats
4WDFour-Wheel Drive System,
Auxiliary Battery
5-108