2005 CHEVROLET SSR AUX
[x] Cancel search: AUXPage 120 of 388

Change Engine Oil Light................................3-37
Security Light...............................................3-37
Cruise Control Light......................................3-37
Reduced Engine Power Light.........................3-38
Highbeam On Light.......................................3-38
Check Gages Warning Light...........................3-38
Fuel Gage...................................................3-39
Auxiliary Gage Package.................................3-40
Driver Information Center (DIC).......................3-42
DIC Controls and Displays.............................3-42
DIC Warnings and Messages.........................3-45
DIC Vehicle Personalization............................3-52Audio System(s).............................................3-58
Setting the Time...........................................3-59
Radio with CD..............................................3-59
Radio with Six-Disc CD.................................3-71
Theft-Deterrent Feature..................................3-82
Audio Steering Wheel Controls.......................3-82
Radio Reception...........................................3-83
Care of Your CDs.........................................3-83
Care of Your CD Player................................3-83
Integrated Windshield Antenna........................3-83
Section 3 Instrument Panel
3-2
Page 136 of 388

Center Console Switchbank
The following controls are located on your center
console switchbank:A. Driver Power Window. See
Power Windows on
page 2-12.
B. Traction Control System (TCS) (Automatic Transmission Only). See
Traction Control System
(TCS) (Automatic Transmission) on page 4-8. C. Convertible Top. See
Convertible Top on page 2-51.
D. Power Door Locks. See
Power Door Locks on
page 2-10.
E. Passenger Power Window. See
Power Windows on
page 2-12.
Accessory Power Outlets
With accessory power outlets you can plug in auxiliary
electrical equipment such as a cellular telephone or
CB radio.
There is an accessory power outlet located on either
side of the ashtray on the instrument panel, and there
is an outlet in the rear cargo area. A small cap must
be removed to access an accessory power outlet.
When not using an outlet be sure to cover it with the
protective cap.
Notice:Leaving electrical equipment on for
extended periods will drain the battery. Always turn
off electrical equipment when not in use and do
not plug in equipment that exceeds the maximum
amperage rating.
Automatic Transmission shown,
Manual Transmission similar
3-18
Page 158 of 388

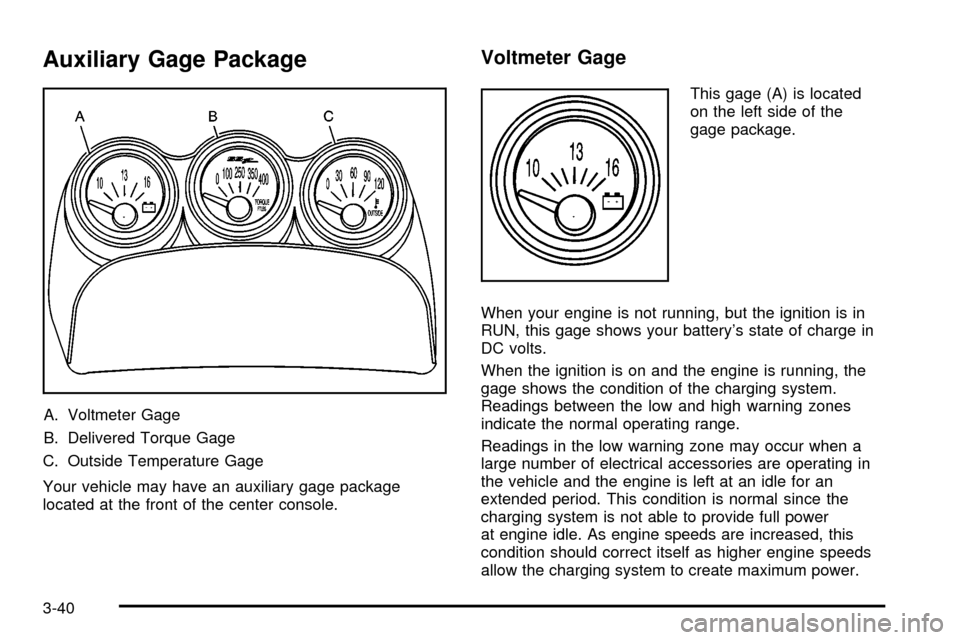
Auxiliary Gage Package
A. Voltmeter Gage
B. Delivered Torque Gage
C. Outside Temperature Gage
Your vehicle may have an auxiliary gage package
located at the front of the center console.
Voltmeter Gage
This gage (A) is located
on the left side of the
gage package.
When your engine is not running, but the ignition is in
RUN, this gage shows your battery's state of charge in
DC volts.
When the ignition is on and the engine is running, the
gage shows the condition of the charging system.
Readings between the low and high warning zones
indicate the normal operating range.
Readings in the low warning zone may occur when a
large number of electrical accessories are operating in
the vehicle and the engine is left at an idle for an
extended period. This condition is normal since the
charging system is not able to provide full power
at engine idle. As engine speeds are increased, this
condition should correct itself as higher engine speeds
allow the charging system to create maximum power.
3-40
Page 183 of 388

2 FLDw(Next):Press this pushbutton to go to the
next track. TRACK and the track number will appear
on the display. If this pushbutton is held or pressed more
than once, the player will continue moving forward
through the CD.
3 REV (Reverse): Press and hold this pushbutton
to reverse quickly within a track. Press and hold this
pushbutton for less than two seconds to reverse
at 10 times the normal playing speed. Press and hold
it for more than two seconds to reverse at 20 times
the normal playing speed. Release this pushbutton to
play the passage. REV and the elapsed time of the track
will appear on the display.
4 FWD (Forward): Press and hold this pushbutton to
advance quickly within a track. Press and hold this
pushbutton for less than two seconds to advance at
six times the normal playing speed. Press and hold it for
more than two seconds to advance at 17 times the
normal playing speed. Release this pushbutton to play
the passage. ET and the elapsed time of the track
will appear on the display.
6 RDM (Random): Press this pushbutton to hear
the tracks in random, rather than sequential, order.
RDM ON will appear on the display. RDM T and
the track number will appear on the display when
each track starts to play. Press RDM again to turn off
random play. RDM OFF will appear on the display.oSEEKp: Press the left arrow to go to the start
of the current or the previous track. Press the right
arrow to go to the start of the next track. Pressing
either arrow for more than two seconds will search
the previous or next tracks at two tracks per second.
Release the button to stop searching and to play
the track.
oTUNEp: Turning the TUNE knob will fast track
reverse or advance through tracks. The track number
will appear on the display for each track.
DISPL (Display): Press this knob to see how long the
current track has been playing. ET and the elapsed
time of the track will appear on the display. To change
the default on the display, track or elapsed time,
press this knob until you see the display you want, then
hold the knob for two seconds. The radio will produce
one beep and the selected display will now be the
default.
BAND: Press this button to listen to the radio when
a CD is playing. The inactive CD will remain safely
inside the radio for future listening.
CD AUX (Auxiliary): Press this button to play a CD
when listening to the radio. The CD symbol will appear
on the display when a CD is loaded.
3-65
Page 188 of 388

BAND:Press this button to listen to the radio when a
CD is playing. The inactive CD will remain safely
inside the radio for future listening.
CD AUX (Auxiliary): Press this button to play a CD
when listening to the radio. The CD symbol will appear
on the display when a CD is loaded.
ZEJT (Eject): Press this button to eject a CD.
Eject may be activated with either the ignition or radio
off. CDs may be loaded with the ignition and radio
off if this button is pressed ®rst.
CD Messages
CHECK CD: If this message appears on the display
and/or the CD comes out, it could be for one of the
following reasons:
·It is very hot. When the temperature returns to
normal, the CD should play.
·You are driving on a very rough road. When the
road becomes smoother, the CD should play.
·The CD is dirty, scratched, wet, or upside down.
·The air is very humid. If so, wait about an hour
and try again.
·The format of the CD may not be compatible.
See ªMP3 Formatº earlier in this section.
·There may have been a problem while burning
the CD.
·The label may be caught in the CD player.
If the CD is not playing correctly, for any other reason,
try a known good CD.
If any error occurs repeatedly or if an error cannot be
corrected, contact your GM dealer. If the radio displays
an error message, write it down and provide it to
your GM dealer when reporting the problem.
3-70
Page 196 of 388

To load more than one CD but less than six, complete
Steps 1 through 3. When ®nished loading CDs,
press the LOAD button to cancel the loading function.
The radio will begin to play the last CD loaded.
If more than one CD has been loaded, a number for
each CD will appear on the display.
Playing a Speci®c Loaded CD
For every CD loaded, a number will appear on the
display. To play a speci®c CD, ®rst press the CD AUX
button, then press the numbered pushbutton that
corresponds to the CD. A small bar will appear under
the CD number that is playing and the track number will
appear on the display.
If an error appears on the display, see ªCD Messagesº
later in this section.
CD
Z(Eject):Press this button to eject CD(s).
To eject the CD that is currently playing, press and
release this button.
To eject multiple CDs, do the following: 1. Press and hold the CD eject button for ®ve seconds. You will hear a beep and the indicator light, located
to the right of the slot, will begin to ¯ash and
EJECT ALL will appear on the display. 2. Once the light stops ¯ashing and turns green,
REMOVE CD # will appear on the display. The
CD will eject and can be removed.
Once the CD is removed, the indicator light will
begin ¯ashing again and another CD will eject.
To stop ejecting the CDs, press the LOAD or the
eject button.
If the CD is not removed, after 25 seconds, the CD will
be automatically pulled back into the player. If CD is
pushed back into the player, before the 25-second time
period is complete, the player will sense an error
and will try to eject the CD several times before
stopping.
Do not repeatedly press the CD eject button to eject a
CD after you have tried to push it in manually. The
player's 25-second eject timer will reset at each press of
eject, causing the player to not eject the CD until the
25-second time period has elapsed.
{REV (Reverse): Press and hold this button to
reverse quickly within a track. You will hear sound at
a reduced volume. Release the button to play the
passage. The elapsed time of the track will appear on
the display.
3-78
Page 271 of 388

Automatic Transmission Fluid
When to Check and Change the
Automatic Transmission Fluid
A good time to check your automatic transmission �uid
level is when the engine oil is changed.
Change both the �uid and �lter at the �rst oil change
after 25,000 miles (41 500 km) if the vehicle is mainly
driven under one or more of these conditions:
In heavy city traffic where the outside temperature
regularly reaches 90°F (32°C) or higher.
In hilly or mountainous terrain.
When doing frequent trailer towing.
Uses such as found in taxi, police or delivery
service.
If you do not use your vehicle under any of these
conditions, change the �uid and �lter at the �rst oil
change after 50,000 miles (83 000 km).
SeeScheduled Maintenance on page 6-4.
How to Check the Automatic
Transmission Fluid
Because this operation can be difficult, you may choose
to have this done at the dealership service department.
If you do it yourself, be sure to follow all the instructions
here, or you could get a false reading on the dipstick.
Notice:Too much or too little �uid can damage
your transmission. Too much can mean that some
of the �uid could come out and fall on hot engine
part or exhaust system parts, starting a �re.
Too little �uid could cause the transmission to
overheat. Be sure to get an accurate reading if you
check your transmission �uid.
Wait at least 30 minutes before checking the
transmission �uid level if you have been driving:
When outside temperatures are above 90°F (32°C).
At high speed for quite a while.
In heavy traffic — especially in hot weather.
While pulling a trailer.
To get the right reading, the �uid should be at normal
operating temperature, which is 180°F to 200°F
(82°C to 93°C). If your vehicle has the auxiliary
gage package, you can check the transmission �uid
temperature. SeeAuxiliary Gage Package on
page 3-40for more information.
5-21
Page 339 of 388

Fuses Usage
1 Auxiliary Power 2
2Passenger’s Side High Beam
Headlamp
3Passenger’s Side Low Beam
Headlamp
4 Driver’s Side High Beam Headlamp
5 Driver’s Side Low Beam Headlamp
6 Cargo Cover Release
7Transmission Control
Module/Canister
Fuses Usage
8 Truck Body Controller
9 Windshield Washer
10 Driver’s Side Stoplamp/Turn Signals
11 Fuel Pump
12 Fog Lamps
13 Stoplamps
14 Headlamp Driver Module (HDM)
15Passenger’s Side Stoplamp/Turn
Signals
16 Cigarette Lighter
17 Hazard Warning Flashers
18 Coils
19 Truck Body Control, Ignition 1
20 Starter
21 Airbag System
22 Horn
23 Ignition E
24Instrument Panel Cluster,
Driver Information Center (DIC)
5-89