Page 362 of 580
4. Follow the dolly manufacturer’s instructions to
attach and secure the vehicle being towed to
the dolly and then the loaded dolly to the tow
vehicle. Make sure the wheels are straight before
towing.
For manual transmission vehicles, make sure the
wheels are straight before proceeding to the
next steps. On automatic transmission vehicles, use
an adequate clamping device to ensure that the
front wheels are locked into the straight position.
5. Release the parking brake only after the vehicle
being towed is �rmly attached to the tow vehicle.
6. Turn the ignition to LOCK.
Four-Wheel-Drive Vehicles
Use the following procedure to tow your vehicle from
the rear:
1. Drive the vehicle onto the dolly.
2. Firmly set the parking brake. SeeParking Brake on
page 2-51for more information.
3. Put an automatic transmission in PARK (P) or a
manual transmission in FIRST (1).4. Follow the dolly manufacturer’s instructions to
attach and secure the vehicle being towed to
the dolly and then the loaded dolly to the tow
vehicle.
For manual transmission vehicles, make sure the
wheels are straight before proceeding to the
next steps. On automatic transmission vehicles, use
an adequate clamping device to ensure that the
front wheels are locked into the straight position.
{CAUTION:
Shifting a four-wheel-drive vehicle’s transfer
case into NEUTRAL can cause your vehicle to
roll even if the transmission is in PARK (P) for
an automatic transmission, or if your vehicle is
in gear, for a manual transmission. You or
others could be injured. Make sure the parking
brake is �rmly set before you shift the transfer
case to NEUTRAL.
4-68
Page 384 of 580
Driving with a Trailer
{CAUTION:
If you have a rear-most window open and you
pull a trailer with your vehicle, carbon
monoxide (CO) could come into your vehicle.
You cannot see or smell CO. It can cause
unconsciousness or death. SeeEngine
Exhaust on page 2-56. To maximize your safety
when towing a trailer:
Have your exhaust system inspected for
leaks, and make necessary repairs before
starting on your trip.
Keep the rear-most windows closed.
If exhaust does come into your vehicle
through a window in the rear or another
opening, drive with your front, main
heating or cooling system on and with the
fan on any speed. This will bring fresh,
outside air into your vehicle. Do not use
the climate control setting for maximum air
because it only recirculates the air inside
your vehicle. SeeClimate Control System
on page 3-20.Towing a trailer requires a certain amount of experience.
Before setting out for the open road, you’ll want to get
to know your rig. Acquaint yourself with the feel of
handling and braking with the added weight of the trailer.
And always keep in mind that the vehicle you are
driving is now a good deal longer and not nearly as
responsive as your vehicle is by itself.
Before you start, check all trailer hitch parts and
attachments, safety chains, electrical connector, lamps,
tires and mirror adjustment. If the trailer has electric
brakes, start your vehicle and trailer moving and then
apply the trailer brake controller by hand to be sure
the brakes are working. This lets you check your
electrical connection at the same time.
During your trip, check occasionally to be sure that the
load is secure, and that the lamps and any trailer
brakes are still working.
While towing a trailer or when exposed to long periods
of sunshine, the �oor of the truck bed may become
very warm. Avoid putting items in the truck bed
that might be affected by high ambient temperatures.
4-90
Page 436 of 580
Coolant Surge Tank Pressure Cap
Notice:If the pressure cap is not tightly installed,
coolant loss and possible engine damage may
occur. Be sure the cap is properly and tightly
secured.
The coolant surge tank pressure cap must be fully
installed on the coolant surge tank. SeeEngine
Compartment Overview on page 5-14for more
information on location.
Engine Overheating
You will �nd a coolant temperature gage on your
vehicle’s instrument panel. SeeEngine Coolant
Temperature Gage on page 3-42.
In addition, you will �nd an ENGINE OVERHEATED
and a REDUCED ENGINE POWER message in
the Driver Information Center (DIC) on the instrument
panel. SeeDIC Warnings and Messages on page 3-54.
If Steam Is Coming From Your Engine
{CAUTION:
Steam from an overheated engine can burn
you badly, even if you just open the hood.
Stay away from the engine if you see or hear
steam coming from it. Just turn it off and get
everyone away from the vehicle until it cools
down. Wait until there is no sign of steam or
coolant before you open the hood.
If you keep driving when your engine is
overheated, the liquids in it can catch �re.
You or others could be badly burned. Stop
your engine if it overheats, and get out of the
vehicle until the engine is cool.
SeeOverheated Engine Protection Operating
Mode (V8 Engines Only) on page 5-40for
information on driving to a safe place in an
emergency.
Notice:If your engine catches �re because you
keep driving with no coolant, your vehicle can
be badly damaged. The costly repairs would not be
5-38
Page 480 of 580
Tire Inspection and Rotation
Tires should be rotated every 5,000 to 8,000 miles
(8 000 to 13 000 km).
Any time you notice unusual wear, rotate your tires as
soon as possible and check wheel alignment. Also
check for damaged tires or wheels. SeeWhen It Is Time
for New Tires on page 5-84andWheel Replacement
on page 5-87for more information.
Make sure the spare tire is stored securely. Push, pull,
and then try to rotate or turn the tire. If it moves,
use the wheel wrench/hoist shaft to tighten the cable.
SeeChanging a Flat Tire on page 5-91.
If your vehicle has dual rear wheels, also seeDual Tire
Operation on page 5-81.
The purpose of regular rotation is to achieve more
uniform wear for all tires on the vehicle. The �rst rotation
is the most important. SeeScheduled Maintenance
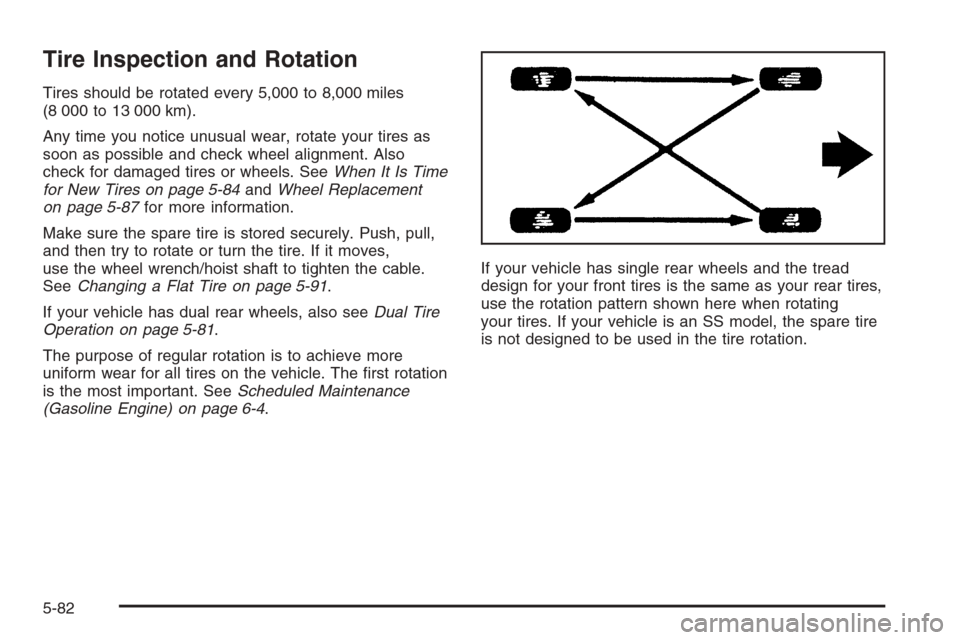
(Gasoline Engine) on page 6-4.If your vehicle has single rear wheels and the tread
design for your front tires is the same as your rear tires,
use the rotation pattern shown here when rotating
your tires. If your vehicle is an SS model, the spare tire
is not designed to be used in the tire rotation.
5-82
Page 487 of 580
Tire Chains
{CAUTION:
If your vehicle has dual wheels or P265/75R16,
LT265/75R16, P265/70R17 or P275/55R20 size
tires, do not use tire chains. They can damage
your vehicle because there is not enough
clearance. Tire chains used on a vehicle
without the proper amount of clearance can
cause damage to the brakes, suspension or
other vehicle parts. The area damaged by the
tire chains could cause you to lose control of
your vehicle and you or others may be injured
in a crash.
Use another type of traction device only if its
manufacturer recommends it for use on your
vehicle and tire size combination and road
conditions. Follow that manufacturer’s
instructions. To help avoid damage to your
vehicle, drive slowly, readjust or remove the
device if it is contacting your vehicle, and do
not spin your vehicle’s wheels.
If you do �nd traction devices that will �t,
install them on the rear tires.Notice:If your vehicle does not have dual wheels
and is equipped with a tire size other than
P265/75R16, LT265/75R16, P265/70R17 or
P275/55R20, use tire chains only where legal and
only when you must. Use chains that are the proper
size for your tires. Install them on the tires of the
rear axle. Don’t use chains on the tires of the front
axle. Tighten them as tightly as possible with
the ends securely fastened. Drive slowly and follow
the chain manufacturer’s instructions. If you can
hear the chains contacting your vehicle, stop
and retighten them. If the contact continues, slow
down until it stops. Driving too fast or spinning the
wheels with chains on will damage your vehicle.
5-89
Page 498 of 580
4. Make sure the jack head is positioned so that the
rear axle is resting securely between the grooves
that are on the jack head. Turn the wheel
wrench clockwise to raise the vehicle. Raise the
vehicle far enough off the ground so there is enough
room for the spare tire to �t under the wheel well. Front Position — All Other Models
Rear Position
5-100
Page 504 of 580
4. Repeat this procedure at least two times. If the
spare tire lowers to the ground, continue with
Step 5 ofRemoving the Spare Tire and Tools on
page 5-92.
5. Turn the wrench counterclockwise until
approximately 6 inches (15 cm) of cable is exposed.
6. Stand the wheel blocks on their shortest ends, with
the backs facing each other.
7. Place the bottom edge
of the jack (A) on the
wheel blocks (B),
separating them so that
the jack is balanced
securely.
8. Attach the jack handle, extension, and wheel
wrench to the jack and place it (with the wheel
blocks) under the vehicle towards the front of the
rear bumper.
5-106
Page 508 of 580
4. Insert the hoist end (F)
through the hole (G) in
the rear bumper
and into the hoist
shaft.
5. Raise the tire part way upward. Make sure the
retainer is seated in the wheel opening.
6. Raise the tire fully against the underside of the
vehicle by turning the wheel wrench clockwise
until you hear two clicks or feel it skip twice. You
cannot overtighten the cable.7. Make sure the tire is stored securely. Push, pull (A),
and then try to turn (B) the tire. If the tire moves,
use the wheel wrench to tighten the cable.
8. Reinstall the spare tire lock (if equipped).
5-110