2005 CHEVROLET SILVERADO buttons
[x] Cancel search: buttonsPage 234 of 580
Choose one of the available options and press the
customization button while your choice is displayed on
the DIC to select it and move on to the next feature.
For more information on alarm warning type, see
Content Theft-Deterrent on page 2-19.
Language
To select your preference for display language, press
the select button while LANGUAGE is displayed on the
DIC. Pressing the select button will scroll through the
following languages:
ENGLISH
FRANCAIS (French)
ESPANOL (Spanish)
Choose one of the available options and press the
customization button while it is displayed on the DIC
to select it.
If you accidentally choose a language that you do not
want or understand, press and hold the customization
button and the trip information button at the same
time. The DIC will begin scrolling through the languages
in their particular language. English will be in English,
Francais will be in French and Espanol will be in
Spanish. When you see the language that you would
like, release both buttons. The DIC will then display the
information in the language you chose.You can also scroll through the different languages
by pressing and holding the trip reset stem for
four seconds, as long as you are in the odometer mode.
Display Units
Press the customization button until DISPLAY UNITS
appears in the display. To select English or metric, press
the select button while DISPLAY UNITS is displayed
on the DIC. Pressing the select button will scroll through
the following choices:
DISPLAY UNITS: ENGLISH
DISPLAY UNITS: METRIC
If you choose English, all information will be displayed
in English units. For example, distance in miles and
fuel economy in miles per gallon. If you choose metric,
all information will be displayed in metric units. For
example, distance in kilometers and fuel economy in
liters per 100 kilometers.
Choose one of the available options and press the
customization button while it is displayed on the DIC
to select it and end out of the customizable options.
3-68
Page 236 of 580
Setting the Time for Radios with
Radio Data Systems (RDS)
The radio may have a button marked with an H or HR
to represent hours and an M or MN to represent
minutes.
Press and hold the hour button until the correct hour
appears on the display. Press and hold the minute
button until the correct minute appears on the display.
The time can be set with the ignition on or off.
To synchronize the time with an FM station broadcasting
Radio Data System (RDS) information, press and
hold the hour and minute buttons at the same time
until RDS TIME appears on the display. To accept this
time, press and hold the hour and minute buttons,
at the same time, for another two seconds. If the time is
not available from the station, NO UPDAT will appear
on the display.
RDS time is broadcast once a minute. After tuning to an
RDS broadcast station, it may take a few minutes for
the time to update.
AM-FM Radio
Playing the Radio
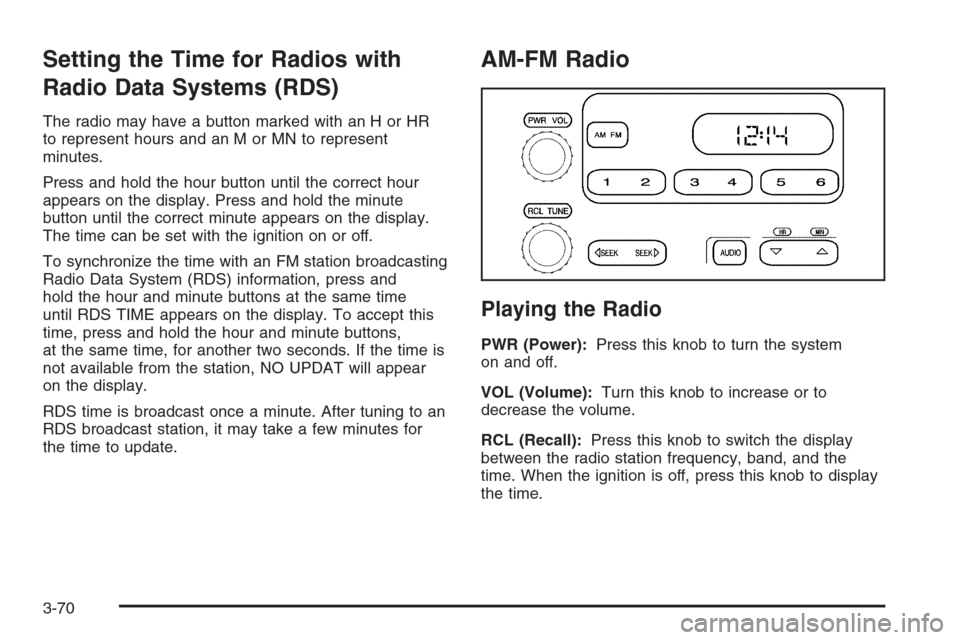
PWR (Power):Press this knob to turn the system
on and off.
VOL (Volume):Turn this knob to increase or to
decrease the volume.
RCL (Recall):Press this knob to switch the display
between the radio station frequency, band, and the
time. When the ignition is off, press this knob to display
the time.
3-70
Page 237 of 580
Finding a Station
AM FM:Press this button to switch between FM1, FM2,
or AM. The display will show the selection.
TUNE:Turn this knob to select radio stations.
oSEEKp:Press the right or the left arrow to go to
the next or to the previous station and stay there.
To scan stations, press and hold either SEEK arrow for
two seconds until you hear a beep. The radio will go
to a station, play for a few seconds, then go on to
the next station. Press either SEEK arrow again to stop
scanning.
To scan preset stations, press and hold either SEEK
arrow for more than four seconds until you hear
two beeps. The radio will go to the �rst preset station
stored on the pushbuttons, play for a few seconds, then
go on to the next preset station. Press either SEEK
arrow again to stop scanning presets.
The radio will only seek and scan stations with a strong
signal that are in the selected band.
Setting Preset Stations
Up to 18 stations (six FM1, six FM2, and six AM) can be
programmed on the six numbered pushbuttons, by
performing the following steps:
1. Turn the radio on.
2. Press AM FM to select FM1, FM2, or AM.
3. Tune in the desired station.
4. Press and hold one of the six numbered
pushbuttons until you hear a beep. Whenever that
numbered pushbutton is pressed, the station
that was set will return.
5. Repeat the steps for each pushbutton.
Setting the Tone (Bass/Treble)
AUDIO:To adjust bass or treble, press and release
AUDIO until BAS or TRE appears on the display. Then
press and hold the up or the down arrow to increase
or to decrease. If a station is weak or noisy, decrease
the treble.
To adjust bass or treble to the middle position, select
BAS or TRE. Then press and hold AUDIO for more than
two seconds until you hear a beep. B and a zero or T
and a zero will appear on the display.
3-71
Page 241 of 580
Finding a Station
BAND:Press this button to switch between FM1, FM2,
AM, or XM1 or XM2 (if equipped). The display will
show the selection.
oTUNEp:Turn this knob to select radio stations.
©SEEK¨:Press either the SEEK or the TYPE
arrows to go to the next or to the previous station and
stay there.
The radio will only seek stations with a strong signal
that are in the selected band.
©SCAN¨:Press and hold either the SCAN or the
TYPE arrows for two seconds until SCAN appears
on the display and you hear a beep. The radio will go
to a station, play for a few seconds, then go on to
the next station. Press either the SCAN or the TYPE
arrows again to stop scanning.
To scan preset stations, press and hold either the
SCAN or the TYPE arrows for more than four seconds.
PSCN will appear on the display and you will hear a
double beep. The radio will go to a preset station, play
for a few seconds, then go on to the next preset
station. Press either the SCAN or the TYPE arrows
again to stop scanning presets.
The radio will only scan stations with a strong signal
that are in the selected band.
Setting Preset Stations
Up to 30 stations (six FM1, six FM2, and six AM,
six XM1 and six XM2 (if equipped)), can be programed
on the six numbered pushbuttons, by performing the
following steps:
1. Turn the radio on.
2. Press BAND to select FM1, FM2, AM, or XM1
or XM2.
3. Tune in the desired station.
4. Press and hold one of the six numbered
pushbuttons until you hear a beep. Whenever
that numbered pushbutton is pressed, the station
that was set will return for that pushbutton.
5. Repeat the steps for each pushbutton.
To store an equalization setting to a preset station
perform the following:
1. Tune to the preset station.
2. Press and release the AUTO EQ button to select
the equalization setting.
Once the equalization no longer appears on the
display, the equalization will be set for that preset
station.
3-75
Page 244 of 580
Setting Preset PTYs (RDS Only)
These buttons have factory PTY presets. Up to
12 PTYs (six FM1 and six FM2), can be programmed
on the six numbered pushbuttons, by performing
the following steps:
1. Press BAND to select FM1 or FM2.
2. Press the TYPE button to activate program type
select mode. TYPE and the last selected PTY will
appear on the display.
3. Turn the TYPE knob or press and release the
TYPE button to select a PTY.
4. Press and hold one of the six numbered
pushbuttons until you hear a beep. Whenever that
numbered pushbutton is pressed, the PTY that
was set will return.
5. Repeat the steps for each pushbutton.
RDS Messages
INFO (Information):If the current station has a
message, the information symbol will appear on the
display. Press this button to see the message.
The message may display the artist, song title,
call in phone numbers, etc.If the entire message is not displayed, parts of the
message will appear every three seconds. To scroll
through the message, press and release the INFO
button. A new group of words will appear on the display
after every press of the button. Once the complete
message has been displayed, the information symbol
will disappear from the display until another new
message is received. The last message can be
displayed by pressing the INFO button. You can view
the last message until a new message is received
or a different station is tuned to.
Radio Messages
CAL ERR (Calibration Error):The audio system
has been calibrated for your vehicle from the factory.
If CAL ERR appears on the display, it means that
the radio has not been con�gured properly for the
vehicle and must be returned to your GM dealer
for service.
LOCKED:This message is displayed when the
THEFTLOCK
®system has locked up. Take the vehicle
to your GM dealer for service.
If any error occurs repeatedly, or if an error cannot be
corrected, contact your GM dealer.
3-78
Page 252 of 580
Setting Preset Stations
Up to 30 stations (six FM1, six FM2, and six AM,
six XM1 and six XM2 (if equipped)), can be programed
on the six numbered pushbuttons, by performing the
following steps:
1. Turn the radio on.
2. Press BAND to select FM1, FM2, AM, or XM1
or XM2.
3. Tune in the desired station.
4. Press and hold one of the six numbered
pushbuttons until you hear a beep. Whenever that
numbered pushbutton is pressed, the station
that was set will return for that pushbutton.
5. Repeat the steps for each pushbutton.
To store an equalization setting to a preset station
perform the following:
1. Tune to the preset station.
2. Press and release the AUTO EQ button to select
the equalization setting.
Once the equalization no longer appears on the
display, the equalization will be set for that
preset station.
Setting the Tone (Bass/Treble)
AUDIO:Push and release the AUDIO knob until BASS
or TREB appears on the display. Turn the knob to
increase or to decrease. The display will show the bass
or treble level. If a station is weak or noisy, decrease
the treble.
To adjust the bass or treble to the middle position while
it is displayed, while it is displayed, push and hold
the AUDIO knob. The radio will produce one beep and
adjust the display level to the middle position.
To adjust all tone and speaker controls to the middle
position, push and hold the AUDIO knob when no tone
or speaker control is displayed. ALL CENTERED will
appear on the display, you will hear a beep, and
the display level will be adjusted to the middle position.
AUTO EQ (Automatic Equalization):Press this button
to select customized equalization settings designed for
country/western, jazz, talk, pop, rock, and classical.
Selecting CUSTOM or changing bass or treble, returns
the EQ to the manual bass and treble settings.
The radio will save separate AUTO EQ settings for each
preset and source.
If the radio is equipped with the Bose
®audio system, the
AUTO EQ settings are either CUSTOM or TALK.
3-86
Page 254 of 580
SCAN:Scan the stations within a PTY by performing
the following:
1. Press the TYPE button to activate program type
select mode. TYPE and the last selected PTY will
appear on the display.
2. Turn the TYPE knob or press and release the
TYPE button to select a PTY.
3. Once the desired PTY is displayed, press and
hold either the TYPE or the SCAN arrows for
two seconds, and the radio will begin scanning
the stations in the PTY.
4. Press either the TYPE or the SCAN arrows to
stop scanning.
BAND (Alternate Frequency):Alternate frequency
allows the radio to switch to a stronger station with the
same program type. To turn alternate frequency on,
press and hold BAND for two seconds. AF ON will
appear on the display. The radio may switch to stations
with a stronger frequency.
To turn alternate frequency off, press and hold BAND
again for two seconds. AF OFF will appear on the
display. The radio will not switch to other stations.
This function does not apply for XM™ Satellite
Radio Service.Setting Preset PTYs (RDS Only)
These buttons have factory PTY presets. Up to 12 PTYs
(six FM1 and six FM2), can be programmed on the
six numbered pushbuttons, by performing the
following steps:
1. Press BAND to select FM1 or FM2.
2. Press the TYPE button to activate program type
select mode. TYPE and the last selected PTY will
appear on the display.
3. Turn the TYPE knob or press and release the
TYPE button to select a PTY.
4. Press and hold one of the six numbered
pushbuttons until you hear a beep. Whenever that
numbered pushbutton is pressed, while in PTY
select mode, the PTY that was set will return.
5. Repeat the steps for each pushbutton.
3-88
Page 266 of 580
Finding a Station
BAND:Press this button to switch between FM1, FM2,
AM, or XM1 or XM2 (if equipped). The display will
show the selection.
oTUNEp:Turn this knob to select radio stations.
©SEEK¨:Press either the SEEK or the TYPE
arrows to go to the next or to the previous station and
stay there.
The radio will only seek stations with a strong signal
that are in the selected band.
©SCAN¨:Press and hold either the SCAN or the
TYPE arrows for two seconds until SCN appears on
the display and you hear a beep. The radio will go to a
station, play for a few seconds, then go on to the
next station. Press either the SCAN or the TYPE arrows
again to stop scanning.
To scan preset stations, press and hold either the
SCAN or the TYPE arrows for more than four seconds.
PSC will appear on the display and you will hear a
double beep. The radio will go to a preset station, play
for a few seconds, then go on to the next preset
station. Press either the SCAN or the TYPE arrows
again to stop scanning presets.
The radio will only scan stations with a strong signal
that are in the selected band.
Setting Preset Stations
Up to 30 stations (six FM1, six FM2, and six AM,
six XM1 and six XM2 (if equipped)), can be programed
on the six numbered pushbuttons, by performing the
following steps:
1. Turn the radio on.
2. Press BAND to select FM1, FM2, AM, or XM1
or XM2.
3. Tune in the desired station.
4. Press and hold one of the six numbered
pushbuttons until you hear a beep. Whenever that
numbered pushbutton is pressed, the station
that was set will return for that pushbutton.
5. Repeat the steps for each pushbutton.
To store an equalization setting to a preset station
perform the following:
1. Tune to the preset station.
2. Press and release the AUTO EQ button to select
the equalization setting.
Once the equalization no longer appears on
the display, the equalization will be set for that
preset station.
3-100