2005 CHEVROLET MALIBU change time
[x] Cancel search: change timePage 217 of 434
RPT (Repeat):Press this button once to hear a track
over again. REPEAT ON and RPT will appear on
the display. The current track will continue to repeat.
Press RPT again to turn off repeat play. REPEAT OFF
will appear on the display and RPT will disappear
from the display.
RDM (Random):Press this button to hear the tracks in
random, rather than sequential, order. T#, RANDOM,
and RDM will appear on the display. T and the
track number will appear on the display when each
track starts to play. Press RDM again to turn off random
play. RANDOM OFF will appear on the display and
RDM will disappear from the display.
xSEEKw:Press the down arrow to go to the start
of the current track if it has been playing for more
than eight seconds. If this arrow is pressed more than
once, the player will continue moving backward
through the CD.
Press the up arrow to go to the start of the next track.
If this arrow is pressed more than once, the player
will continue moving forward through the CD.
If either arrow is held for more than two seconds, the
CD will enter CD scan mode and the CD will play
the �rst 10 seconds of each track. Press either arrow
again to stop scanning.DISP (Display):Press this knob to see how long the
current track has been playing. T, the track number, and
the elapsed time of the track will appear on the
display. To change the default on the display, time or
elapsed time, press the knob until you see the display
you want, then hold the knob for two seconds. The radio
will produce one beep and the selected display will
now be the default. Pressing this button will also display
text on commercially recorded CDs (if available).
AUTO TONE/AUTO EQ (Automatic Equalization):
Press this button to select the desired equalization
setting while playing a CD. The equalization will
be recalled whenever a CD is played. For more
information, see AUTO TONE/AUTO EQ listed
previously in this section.
BAND:Press this button to listen to the radio when a
cassette tape or CD is playing. The inactive tape or CD
will remain safely inside the radio for future listening.
SRCE (Source):Press this button to play a tape, CD,
or a remote device (if installed) when listening to the
radio. The inactive tape or CD will remain safely inside
the radio for future listening.
EJECT /
Z(Eject):Press this button, located to the
left of the CD slot, to eject a CD. Eject may be
activated with either the ignition or radio off. CDs may
be loaded with the ignition and radio off if this button
is pressed �rst.
3-87
Page 219 of 434
Radio Data System (RDS)
The audio system has a Radio Data System (RDS).
RDS features are available for use only on FM stations
that broadcast RDS information.
With RDS, the radio can do the following:
Seek to stations broadcasting the selected type of
programming
Receive announcements concerning local and
national emergencies
Display messages from radio stations
Seek to stations with traffic announcements
This system relies upon receiving speci�c information
from these stations and will only work when the
information is available. In rare cases, a radio station
may broadcast incorrect information that will cause
the radio features to work improperly. If this happens,
contact the radio station.
While the radio is tuned to an RDS station, the station
name or call letters will appear on the display instead of
the frequency. RDS stations may also provide the
time of day, a program type (PTY) for current
programming, and the name of the program being
broadcast.
XM™ Satellite Radio Service
XM™ is a satellite radio service that is based in the
48 contiguous United States. XM™ offers
100 coast-to-coast channels including music, news,
sports, talk, and children’s programming. XM™ provides
digital quality audio and text information that includes
song title and artist name. A service fee is required
in order to receive the XM™ service. For more
information, contact XM™ at www.xmradio.com or
call 1-800-852-XMXM (9696).
Playing the Radio
O
(Power):Press this knob to turn the system on
and off.
u(Volume):Turn this knob to increase or to
decrease the volume.
DISP (Display):Press this knob to switch the display
between time and temperature or radio station frequency
and temperature. When the ignition is off, press this
knob to display the time.
For RDS, press the DISP knob to change what appears
on the display while using RDS. The display options
are station name, RDS station frequency, PTY, and the
name of the program (if available).
3-89
Page 230 of 434
RDM (Random):With random, you can listen to the
tracks in random, rather than sequential, order, on
one CD or on all of the CDs.
To use random, do one of the following:
To play the tracks on the CD you are listening to in
random order, press the RDM button. RANDOM
TRACKS and RDM will appear on the display. Press
RDM again to turn off random play. RANDOM
OFF will appear on the display and RDM will
disappear from the display.
To play the tracks on all of the CDs that are loaded,
in random order, press and hold the RDM button for
more than two seconds. You will hear a beep,
RANDOM ALL CDS, and RDM will appear on the
display. Press RDM again to turn off random
play. RANDOM OFF will appear on the display and
RDM will disappear from the display.
xSEEKw:Press the down arrow to go to the start
of the current track, if more than eight seconds have
played. Press the up arrow to go to the beginning of the
next track. If either arrow is held or pressed more
than once, the player will continue moving backward or
forward through the CD.
To scan the current CD, press and hold either SEEK
arrow for more than two seconds. The CD will go to the
next track, play the �rst 10 seconds, then go on to
the next track. Press either SEEK arrow again to stop
scanning.To scan all of the CDs loaded, press and hold either
SEEK arrow for more than four seconds. The CD will go
to the next CD, play the �rst 10 seconds of the �rst
track, then go on to the next CD. Press either SEEK
arrow again to stop scanning.
DISP (Display):Press this knob to switch between
time, temperature, and the elapsed time of the track. To
change the default on the display (CD#/Track#/Time,
CD#/Track#/Temperature, or Track#/Elapsed
Time/Temperature), press the knob until you see the
display you want, then hold the knob for two seconds.
The radio will produce one beep and the selected
display will now be the default.
AUTO TONE/AUTO EQ (Automatic Equalization):
Press this button to select the desired equalization
setting while playing a CD. The equalization will be set
whenever a CD is played. For more information, see
“AUTO TONE” or “AUTO EQ” listed previously in
this section.
BAND:Press this button to listen to the radio when a
CD is playing. The inactive CD(s) will remain safely
inside the radio for future listening.
SRCE (Source):Press this button to play a CD or to
access the remote device, when listening to the radio.
3-100
Page 234 of 434
Notice:Do not store the headphones in heat or
direct sunlight. This could damage the headphones
and repairs will not be covered by your warranty.
Keep the headphones stored in a cool, dry place.
If your vehicle is the MAXX, your vehicle may have
a rear seat storage compartment. Store the headphones
and the remote control in this compartment when not
in use.
If there is a decreased audio signal during CD or DVD
play, there may be a low hissing noise through the
speakers and/or headphones. If the hissing sound in the
wireless headphones seems excessive, make sure
that the headphone batteries are fully charged. Some
amount of hissing is normal.
Battery Replacement
To change the batteries, do the following:
1. Loosen the screw on the battery compartment door
located on the left side of the headphone earpiece.
2. Replace the two AAA batteries in the compartment.
Make sure that they are installed correctly using the
diagram on the inside of the battery compartment.
3. Replace the battery compartment door and tighten
the screw.
If the headphones are to be stored for a long period of
time, remove the batteries, and keep them in a cool,
dry place.
Stereo RCA Jacks
The RCA jacks are located on the DVD faceplate on the
�oor console. The RCA jacks allow audio and video
signals to be connected from an auxiliary device such as
a camcorder or a video game unit to the RSE system.
The yellow RCA jack is used for video inputs, the
red RCA jack for right audio inputs, and the white RCA
jack for left audio inputs. The system requires
standard RCA cables, not included, to connect the
auxiliary device to the RCA jacks. Refer to the
manufacturer’s instructions for proper usage.
To use the auxiliary audio and video inputs, connect an
external auxiliary device such as a camcorder to the
RCA jacks and turn on both the auxiliary device power
and the power on the front of the RSE system. Press
the play and source buttons at the same time or
the AUX button on the remote control to switch to the
auxiliary device. See “DVD Player” and “Remote
Control” later in this section for more information.
3-104
Page 241 of 434
b(Size):Press this button to change the display
mode for 4:3 aspect ratio movies. This function cycles
between NORMAL, WIDE, and FULL video modes.
NormalThe horizontal image is not stretched. The
borders at the left and the right of the picture are
blanked. All lines of the vertical image are displayed.
WideThe horizontal image is non-lineraly stretched.
The image tends to be stretched more at the
borders then the middle. The borders are not
displayed.
FullThe horizontal image is linearly stretched. All
vertical lines are displayed. No borders are
present.
z(Display):Press this button to display the title,
chapter, the time of a DVD or track number, the time of
a CD, and the menu functions on the video screen.
Press this button again to turn off the display item.
}(Audio Compression):DVDs have a wide dynamic
audio range. Audio compression may be used to
reduce the difference between soft and loud selections
of the DVD. Press this button to switch the audio
compression on and off.
AUX (Auxiliary):Press this button to switch the system
between the DVD player and an auxiliary source.
Setup Menu
To access the setup menu, ensure that a DVD is in the
player and the video is stopped. Press the display
button. Once the menu is activated, use the directional
arrows and the enter button to navigate the screen.
Picture Preferences
The USER PREFERENCE SETTINGS menu allows the
default viewing preferences to be modi�ed. Use the
remote control up and down arrow buttons to select. The
movie may stop while selections are being made.
TV Shape:The default video screen display may be
selected from 4:3 letterbox, 4:3 panscan, or 16:9.
Black Level Shift:The default black level to the video
screen may be adjusted.
Video Shift:The default position of the video on the
display may be adjusted.
Color Settings:The default color setting of the video
screen may be selected from Personal, Rich, Natural,
Soft, or Animation.
Personal Color:The default setting for Saturation,
Brightness, and Contrast may be adjusted.
3-111
Page 244 of 434
Title:Move between DVD titles by using the remote
control arrow buttons.
Chapter:Move between DVD chapters by using the
remote control arrow buttons.
Time Search:The user can jump to different areas of a
DVD by using the remote control arrow and enter
buttons to select a speci�c time position.
Favorite Track Selection (FTS):You may program the
unit to play only your favorite track selections from a DVD
or Audio CD. For a DVD, FTS is accessed from the Menu
bar. For a CD, the FTS screen will appear on the display
immediately when the CD is inserted. From the screen,
choose the tracks on the CD that you wish to store, using
the remote control right and left arrows and the ENTER
button to select. The player will remember the selections
and each time the CD is inserted in the player, only those
tracks will be played, if FTS is turned on. The player can
remember selections for up to 50 discs. To remove FTS
for a disc, the disc must be in the player and the
highlighted tracks must be de-selected. Use the right and
left arrow buttons and the ENTER button or select
CLEAR ALL on the display.Not all DVDs support all of the feature defaults in the
setup menus. In the event a feature is not supported,
defaults will be provided by the DVD media.
Exit the setup menu by pressing the return button on the
remote control. If changes are made to the setup menu,
the DVD will resume play from the beginning.
Battery Replacement
To change the remote control batteries, do the following:
1. Unclip the battery door located on the back of the
remote control.
2. Replace the two AA batteries. Make sure that they
are installed correctly, using the diagram on the
inside of the battery compartment.
3. Close the battery door.
If the remote control is to be stored for a long period of
time, remove the batteries and keep them in a cool,
dry place.
3-114
Page 246 of 434
Problem Recommended Action
How do I get subtitles on
or off?Press the display button
on the remote control to
go to the DVDs main
menu. Then follow the
screen prompts.
After stopping the player, I
push the play button but
sometimes the DVD starts
where I left off, and
sometimes at the
beginning.Press the stop button on
the remote control to
resume where the DVD
left off. Press the stop
button twice to start the
DVD at the beginning. If
the power is off and the
DVD is still in the player,
press the play button.
The DVD is playing but
there is no picture or
sound. The auxiliary
source is running but
there is no picture or
sound.Press and release the
AUX button on the remote
control or the SRCE and
play buttons on the DVD
player to get to auxiliary
input. Check to make sure
that the auxiliary source is
connected to the inputs
properly.
The audio or video skips
or jumps.The DVD could be dirty or
scratched. Try cleaning
the DVD.Problem Recommended Action
When I return to the DVD
from the system menu,
sometimes it plays from
the beginning and
sometimes from where it
left off.If the stop button was
pressed once, it resumes
play from where it left off.
If the stop button was
pressed twice, it will start
at the beginning of the
DVD. However, if a
change was made to the
menu the DVD will start
from where it left off, even
if the stop button was only
pressed once.
The fast forward, reverse,
previous, and next
functions do not work.Some commands that do
one thing for DVDs will
not always work or
perform the same function
for audio CDs or games.
These functions may also
be disabled when the
DVD is playing the
copyright information or
the previews.
3-116
Page 263 of 434
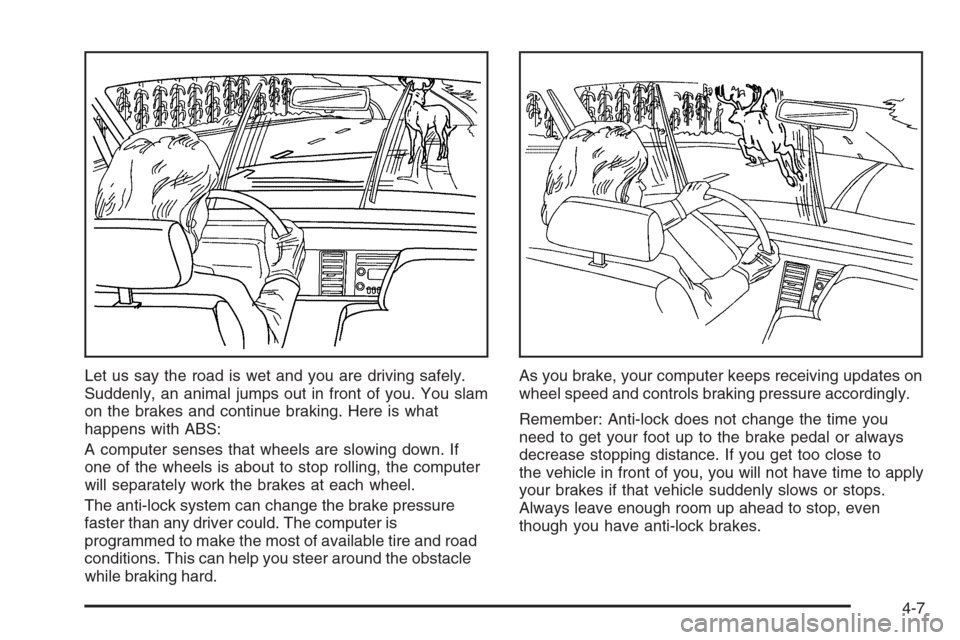
Let us say the road is wet and you are driving safely.
Suddenly, an animal jumps out in front of you. You slam
on the brakes and continue braking. Here is what
happens with ABS:
A computer senses that wheels are slowing down. If
one of the wheels is about to stop rolling, the computer
will separately work the brakes at each wheel.
The anti-lock system can change the brake pressure
faster than any driver could. The computer is
programmed to make the most of available tire and road
conditions. This can help you steer around the obstacle
while braking hard.As you brake, your computer keeps receiving updates on
wheel speed and controls braking pressure accordingly.
Remember: Anti-lock does not change the time you
need to get your foot up to the brake pedal or always
decrease stopping distance. If you get too close to
the vehicle in front of you, you will not have time to apply
your brakes if that vehicle suddenly slows or stops.
Always leave enough room up ahead to stop, even
though you have anti-lock brakes.
4-7