2005 CHEVROLET KODIAK recommended oil
[x] Cancel search: recommended oilPage 240 of 374

What Kind of Engine Oil to Use
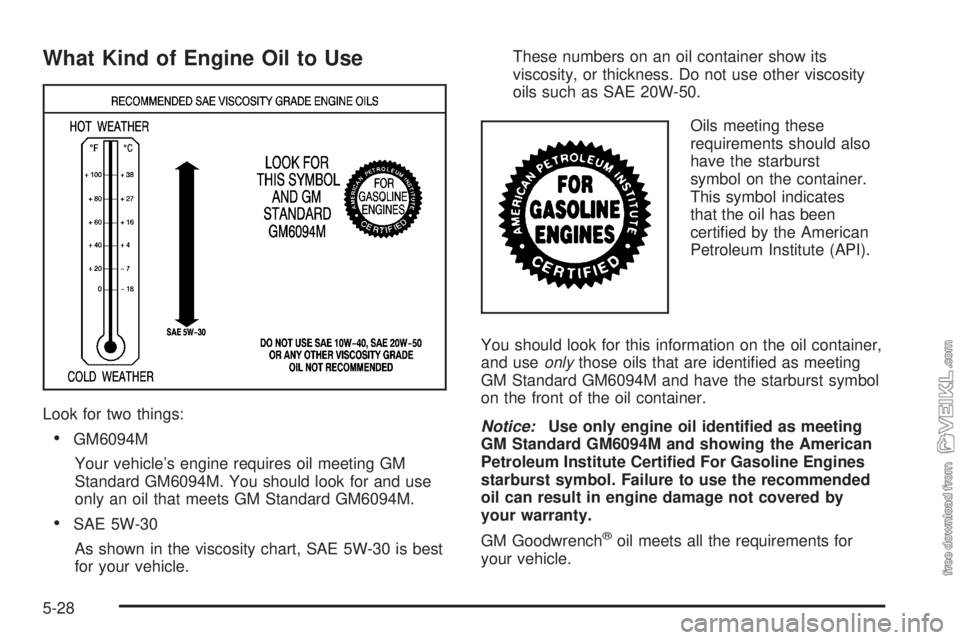
Look for two things:
•GM6094M
Your vehicle’s engine requires oil meeting GM
Standard GM6094M. You should look for and use
only an oil that meets GM Standard GM6094M.
•SAE 5W-30
As shown in the viscosity chart, SAE 5W-30 is best
for your vehicle.These numbers on an oil container show its
viscosity, or thickness. Do not use other viscosity
oils such as SAE 20W-50.
Oils meeting these
requirements should also
have the starburst
symbol on the container.
This symbol indicates
that the oil has been
certified by the American
Petroleum Institute (API).
You should look for this information on the oil container,
and useonlythose oils that are identified as meeting
GM Standard GM6094M and have the starburst symbol
on the front of the oil container.
Notice:Use only engine oil identi�ed as meeting
GM Standard GM6094M and showing the American
Petroleum Institute Certi�ed For Gasoline Engines
starburst symbol. Failure to use the recommended
oil can result in engine damage not covered by
your warranty.
GM Goodwrench®oil meets all the requirements for
your vehicle.
5-28
Page 241 of 374

If you are in an area of extreme cold, where the
temperature falls below−20°F (−29°C), it is
recommended that you use either an SAE 5W-30
synthetic oil or an SAE 0W-30 oil. Both will provide
easier cold starting and better protection for your engine
at extremely low temperatures.
Engine Oil Additives
Do not add anything to your oil. The recommended oils
with the API service symbol are all you will need for
good performance and engine protection.
Engine Oil Life System
(Gasoline Engine)
When to Change Engine Oil
Your vehicle has a computer system that lets you know
when to change the engine oil and filter. This is based
on engine revolutions and engine temperature, and
not on mileage. Based on driving conditions, the mileage
at which an oil change will be indicated can vary
considerably. For the oil life system to work properly,
you must reset the system every time the oil is changed.When the system has calculated that oil life has been
diminished, it will indicate that an oil change is
necessary. A change engine oil light will come on.
SeeChange Engine Oil Light on page 3-38.
Change your oil as soon as possible within the
next 600 miles (1 000 km). It is possible that, if you are
driving under the best conditions, the oil life system
may not indicate that an oil change is necessary for
over a year. However, your engine oil and filter must be
changed at least once a year and at this time the
system must be reset. Your dealer has GM-trained
service people who will perform this work using genuine
GM parts and reset the system. It is also important to
check your oil regularly and keep it at the proper level.
If the system is ever reset accidentally, you must
change your oil at 3,000 miles (5 000 km) since your
last oil change. Remember to reset the oil life system
whenever the oil is changed.
5-29
Page 247 of 374

Manual Transmission Fluid
When to Check
A good time to have it checked is when the engine oil is
checked. Refer to the Maintenance Schedule to find out
when to check and change your manual transmission
fluid. SeeScheduled Maintenance on page 6-5.
How to Check and What to Use
Check the fluid level only when your engine is off, the
vehicle is parked on a level place, and the transmission
is cool enough for you to rest your fingers on the
transmission case.
To check the transmission fluid level, do the following:
1. Remove the filler plug.
2. Check to be sure that the lubricant level is up to the
bottom of the fill opening. On heavy duty
transmissions, an inch of oil level equals about
one gallon of fluid.
3. If the fluid level is good, reinstall the plug and be
sure it is fully seated. If the fluid level is low, add
more fluid as described in the next steps. Refer to
the Maintenance Schedule to determine what
kind of fluid to use. SeePart C: Recommended
Fluids and Lubricants on page 6-32.
How to Add Fluid
To add transmission fluid, do the following:
1. Remove the filler plug.
2. Add fluid at the filler plug hole. Add only enough
fluid to bring the fluid level up to the bottom of the
fill opening. Refer to the Maintenance Schedule
to determine the proper fluid to use. SeePart C:
Recommended Fluids and Lubricants on page 6-32.
3. Reinstall the filler plug. Be sure the plug is
fully seated.
5-35
Page 255 of 374

{CAUTION:
Adding only plain water to your cooling
system can be dangerous. Plain water, or
some other liquid such as alcohol, can boil
before the proper coolant mixture will. Your
vehicle’s coolant warning system is set for the
proper coolant mixture. With plain water or the
wrong mixture, your engine could get too hot
but you would not get the overheat warning.
Your engine could catch �re and you or others
could be burned. Use a 50/50 mixture of clean,
drinkable water and DEX-COOL
®coolant.
Notice:In cold weather, water can freeze and crack
the engine, radiator, heater core and other parts.
Use the recommended coolant and the proper
coolant mixture.
{CAUTION:
You can be burned if you spill coolant on hot
engine parts. Coolant contains ethylene glycol
and it will burn if the engine parts are hot
enough. Do not spill coolant on a hot engine.
1. You can remove the
coolant surge tank
pressure cap when
the cooling system,
including the coolant
surge tank pressure
cap and upper radiator
hose, is no longer hot.
Turn the pressure cap slowly counterclockwise
(left) about one full turn. If you hear a hiss, wait for
that to stop. A hiss means there is still some
pressure left.
2. Then keep turning the pressure cap slowly, and
remove it.
5-43
Page 274 of 374

Rear Axle Shift Motor
When to Check and Change Fluid
If you have an optional air-shift two-speed, controlled
traction, or locking differential type rear axle, a good time
to check the fluid level in the axle shift motor is when
the rear axle lubricant is checked. Use refrigerant
oil (shift motor only).
How to Check Fluid
Remove the plug on the front plate of the axle shift
motor, add enough fluid to raise the level to the bottom
of the filler plug hole, then replace the plug.
What to Use
Refer to your Maintenance Schedule to determine what
kind of lubricant to use. SeePart C: Recommended
Fluids and Lubricants on page 6-32.
Four-Wheel Drive
Transfer Case
When to Check Lubricant
It is not necessary to regularly check transfer case fluid
unless you suspect there is a leak or you hear an
unusual noise. A fluid loss could indicate a problem.
Have it inspected and repaired.
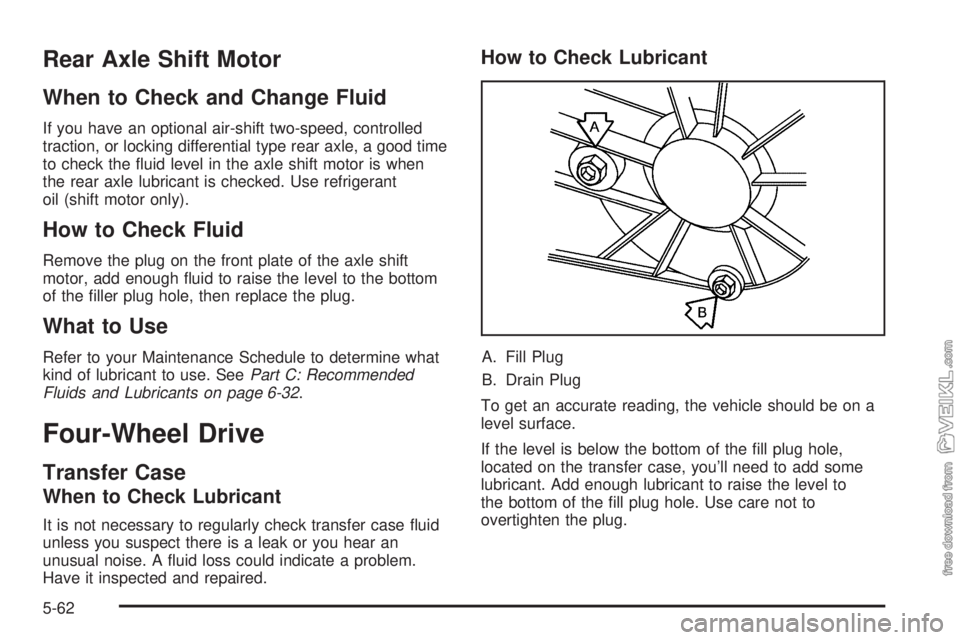
How to Check Lubricant
A. Fill Plug
B. Drain Plug
To get an accurate reading, the vehicle should be on a
level surface.
If the level is below the bottom of the fill plug hole,
located on the transfer case, you’ll need to add some
lubricant. Add enough lubricant to raise the level to
the bottom of the fill plug hole. Use care not to
overtighten the plug.
5-62
Page 279 of 374

Fuel Filter (Diesel Engines)
If you have a diesel engine, your fuel filter is located in
the engine compartment on the driver’s side of the
vehicle, or along the driver’s side frame rail. SeeFuel
Filter Replacementearlier in this section for further
information.
Also seeScheduled Maintenance on page 6-5for
recommended service intervals.
Primary Fuel Filter and Water
Separator
If you have a diesel
engine, you may have this
spin-on filter. It is located
on the driver’s side
frame rail.It has a clear plastic drain bowl at the bottom. Check
the drain bowl occasionally for any water or particles.
To drain the bowl, do the following:
1. Shut off the engine.
2. Partially open the drain valve at the bottom of
the filter.
SeeEngine Oil (Caterpillar
®Diesel Engine) on
page 5-22orEngine Oil (DURAMAX®Diesel) on
page 5-22orEngine Oil (Gasoline Engine) on page 5-26
for proper disposal procedures.
5-67
Page 281 of 374

6. Install a new gasket whenever you take out the
cylinder. Use only one gasket and spread a light
film of clean oil on it before installation.
7. Put in the new cylinder. Turn it clockwise until it just
starts to contact the gasket.
8. Tighten the cylinder another half turn (180 degrees).
Don’t over-tighten.
9. Retighten the cylinder clamp.
Front Wheel Bearings with
Oil-Filled Hubs
Notice:If you drive your vehicle through deep
water that is higher than the front or rear axle, water
may enter the axle housing and cause the axle
lubricant to break down. This could damage
the gears inside. Avoid driving your vehicle through
deep water.
You should avoid driving your vehicle through deep
puddles or standing water. If you must drive through
water that is higher than the front or rear axle, see your
dealer immediately afterward to have the condition of
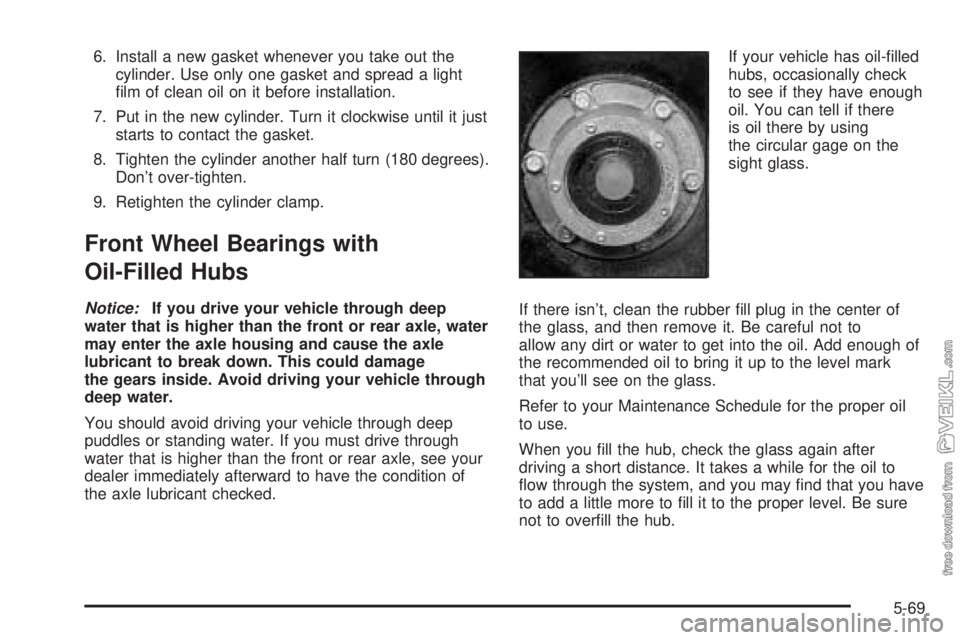
the axle lubricant checked.If your vehicle has oil-filled
hubs, occasionally check
to see if they have enough
oil. You can tell if there
is oil there by using
the circular gage on the
sight glass.
If there isn’t, clean the rubber fill plug in the center of
the glass, and then remove it. Be careful not to
allow any dirt or water to get into the oil. Add enough of
the recommended oil to bring it up to the level mark
that you’ll see on the glass.
Refer to your Maintenance Schedule for the proper oil
to use.
When you fill the hub, check the glass again after
driving a short distance. It takes a while for the oil to
flow through the system, and you may find that you have
to add a little more to fill it to the proper level. Be sure
not to overfill the hub.
5-69
Page 292 of 374

They can all be hazardous — some more than
others —and they can all damage the vehicle, too.
Do not use any of these products unless this manual
says you can. In many uses, these will damage
the vehicle:
•Alcohol
•Laundry Soap
•Bleach
•Reducing Agents
Cleaning the Inside of Your Vehicle
Your vehicle’s interior will continue to look its best if
it is cleaned often. Although not always visible, dust and
dirt can accumulate on your upholstery. Dirt can
damage carpet, fabric, leather, and plastic surfaces.
Regular vacuuming is recommended to remove particles
from your upholstery. It is important to keep your
upholstery from becoming and remaining heavily soiled.
Soils should be removed as quickly as possible. Your
vehicle’s interior may experience extremes of heat
that could cause stains to set rapidly.
Lighter colored interiors may require more frequent
cleaning. Use care because newspapers and garments
that transfer color to your home furnishings may also
transfer color to your vehicle’s interior.When cleaning your vehicle’s interior, only use cleaners
specifically designed for the surfaces being cleaned.
Permanent damage may result from using cleaners on
surfaces for which they were not intended. Use glass
cleaner only on glass. Remove any accidental over-spray
from other surfaces immediately. To prevent over-spray,
apply cleaner directly to the cleaning cloth.
Notice:If you use abrasive cleaners when cleaning
glass surfaces on your vehicle, you could scratch
the glass and/or cause damage to the rear window
defogger. When cleaning the glass on your
vehicle, use only a soft cloth and glass cleaner.
Many cleaners contain solvents that may become
concentrated in your vehicle’s breathing space. Before
using cleaners, read and adhere to all safety
instructions on the label. While cleaning your vehicle’s
interior, maintain adequate ventilation by opening
your vehicle’s doors and windows.
Dust may be removed from small buttons and knobs
using a small brush with soft bristles.
Your GM dealer has a product for cleaning your
vehicle’s glass. Should it become necessary, you can
also obtain a product from your GM dealer to remove
odors from your vehicle’s upholstery.
5-80