2005 CHEVROLET EXPRESS PASSANGER tire type
[x] Cancel search: tire typePage 180 of 388

Setting Preset PTYs (RDS Only)
These pushbuttons have factory PTY presets. Up to
12 PTYs (six FM1 and six FM2), can be programmed on
the six numbered pushbuttons, by performing the
following steps:
1. Press BAND to select FM1 or FM2.
2. Press the TYPE button to activate program type
select mode. P-TYPE and the last selected PTY
will appear on the display.
3. Turn the TYPE knob or press and release the
TYPE button to select a PTY.
4. Press and hold one of the six numbered
pushbuttons until you hear a beep. Whenever that
numbered pushbutton is pressed, the PTY that
was set will return.
5. Repeat the steps for each pushbutton.
RDS Messages
INFO (Information):If the current station has a
message, INFO will appear on the display. Press this
button to see the message. The message may display
the artist, song title, call in phone numbers, etc.
If the entire message is not displayed, parts of the
message will appear every three seconds. To scroll
through the message, press and release the INFO
button. A new group of words will appear on the displayafter every press of this button. Once the complete
message has been displayed, INFO will disappear from
the display until another new message is received.
The last message can be displayed by pressing
the INFO button. You can view the last message until a
new message is received or a different station is
tuned to.
Radio Messages
CAL ERR (Calibration Error):The audio system has
been calibrated for your vehicle from the factory. If
CAL ERR appears on the display, it means that the radio
has not been con�gured properly for the vehicle and
must be returned to your GM dealer for service.
LOCKED:This message is displayed when the
THEFTLOCK
®system has locked up. Take the vehicle
to your GM dealer for service.
If any error occurs repeatedly, or if an error cannot be
corrected, contact your GM dealer.
3-64
Page 185 of 388

To play the song list, press the SONG LIST button.
One beep will be heard and S-LIST will appear on the
display. The recorded tracks will begin to play in
the order they were saved.
Seek through the song list by using the SEEK or TYPE
arrows. Seeking past the last saved track will return
to the �rst saved track.
To delete tracks from the song list, perform the following
steps:
1. Turn the CD player on.
2. Press the SONG LIST button to turn song list on.
S-LIST will appear on the display.
3. Press either SEEK or TYPE arrow to select the
desired track to be deleted.
4. Press and hold the SONG LIST button for
two seconds. When SONG LIST is pressed,
one beep will be heard immediately. After
two seconds of continuously pressing the SONG
LIST button, two beeps will be heard to con�rm that
the track has been deleted.
After a track has been deleted, the remaining tracks are
moved up the list. When another track is added to the
song list, the track will be added to the end of the list.To delete the entire song list, perform the following
steps:
1. Turn the CD player on.
2. Press the SONG LIST button to turn song list on.
S-LIST will appear on the display.
3. Press and hold the SONG LIST button for more
than four seconds. One beep will be heard,
followed by two beeps after two seconds, and a
�nal beep will be heard after four seconds. S-LIST
EMPTY will appear on the display indicating the
song list has been deleted.
If a CD is ejected, and the song list contains saved
tracks from that CD, those tracks are automatically
deleted from the song list. Any tracks saved to the song
list again are added to the bottom of the list.
To end song list mode, press the SONG LIST button.
One beep will be heard and S-LIST will be removed from
the display.
3-69
Page 205 of 388
Check your mirrors, glance over your shoulder, and
start your left lane change signal before moving out
of the right lane to pass. When you are far enough
ahead of the passed vehicle to see its front in your
inside mirror, activate your right lane change signal
and move back into the right lane. Remember that
your right outside mirror is convex. The vehicle you
just passed may seem to be farther away from you
than it really is.
Try not to pass more than one vehicle at a time on
two-lane roads. Reconsider before passing the next
vehicle.
Do not overtake a slowly moving vehicle too rapidly.
Even though the brake lamps are not �ashing, it may
be slowing down or starting to turn.
If you are being passed, make it easy for the
following driver to get ahead of you. Perhaps
you can ease a little to the right.
Loss of Control
Let us review what driving experts say about what
happens when the three control systems — brakes,
steering, and acceleration — do not have enough friction
where the tires meet the road to do what the driver has
asked.
In any emergency, do not give up. Keep trying to steer
and constantly seek an escape route or area of less
danger.
Skidding
In a skid, a driver can lose control of the vehicle.
Defensive drivers avoid most skids by taking reasonable
care suited to existing conditions, and by not overdriving
those conditions. But skids are always possible.
The three types of skids correspond to your vehicle’s
three control systems. In the braking skid, your wheels
are not rolling. In the steering or cornering skid, too much
speed or steering in a curve causes tires to slip and lose
cornering force. And in the acceleration skid, too much
throttle causes the driving wheels to spin.
A cornering skid is best handled by easing your foot off
the accelerator pedal.
4-15
Page 296 of 388
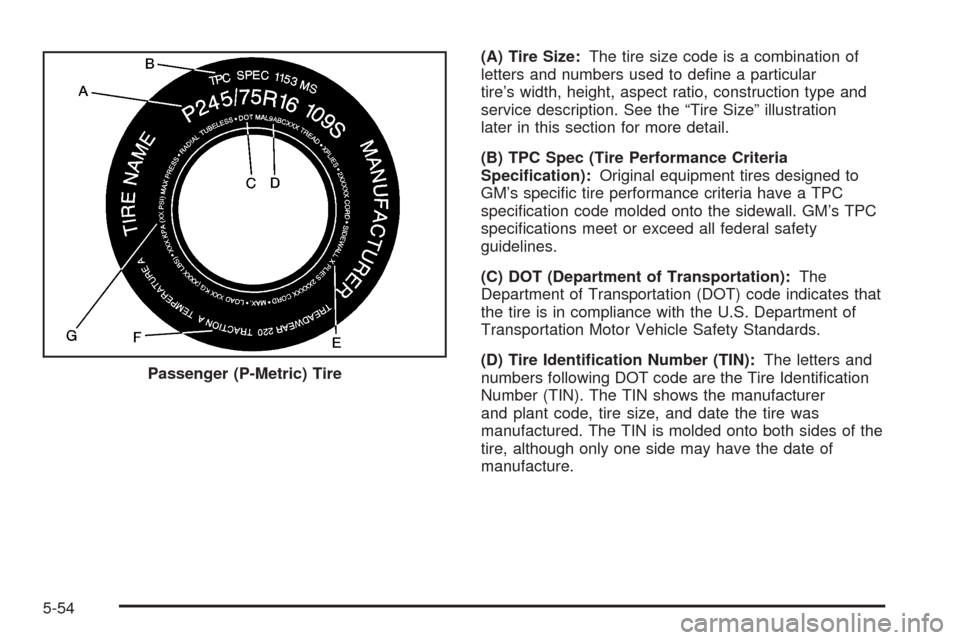
(A) Tire Size:The tire size code is a combination of
letters and numbers used to de�ne a particular
tire’s width, height, aspect ratio, construction type and
service description. See the “Tire Size” illustration
later in this section for more detail.
(B) TPC Spec (Tire Performance Criteria
Speci�cation):Original equipment tires designed to
GM’s speci�c tire performance criteria have a TPC
speci�cation code molded onto the sidewall. GM’s TPC
speci�cations meet or exceed all federal safety
guidelines.
(C) DOT (Department of Transportation):The
Department of Transportation (DOT) code indicates that
the tire is in compliance with the U.S. Department of
Transportation Motor Vehicle Safety Standards.
(D) Tire Identi�cation Number (TIN):The letters and
numbers following DOT code are the Tire Identi�cation
Number (TIN). The TIN shows the manufacturer
and plant code, tire size, and date the tire was
manufactured. The TIN is molded onto both sides of the
tire, although only one side may have the date of
manufacture. Passenger (P-Metric) Tire
5-54
Page 297 of 388
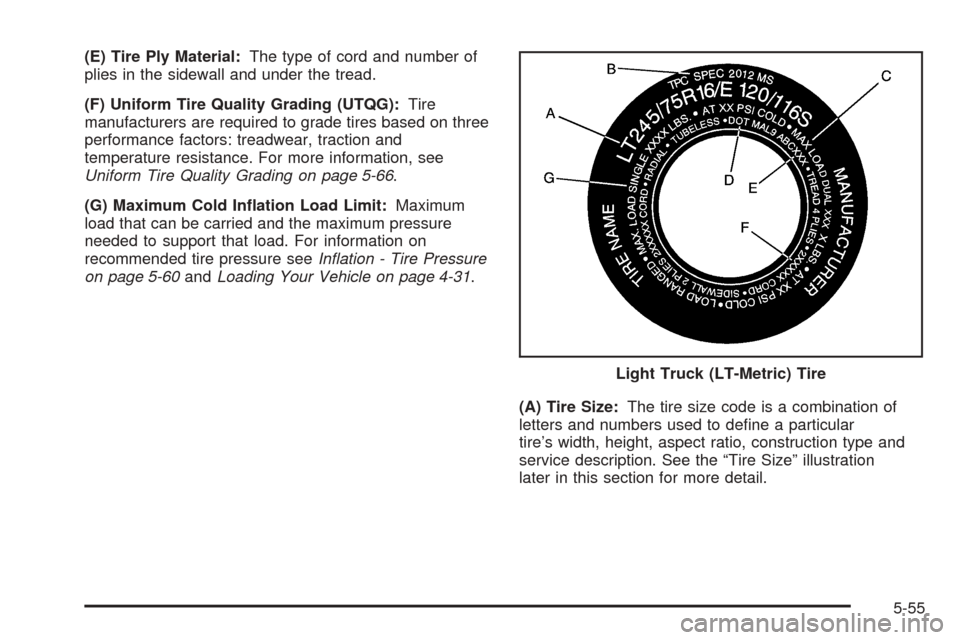
(E) Tire Ply Material:The type of cord and number of
plies in the sidewall and under the tread.
(F) Uniform Tire Quality Grading (UTQG):Tire
manufacturers are required to grade tires based on three
performance factors: treadwear, traction and
temperature resistance. For more information, see
Uniform Tire Quality Grading on page 5-66.
(G) Maximum Cold In�ation Load Limit:Maximum
load that can be carried and the maximum pressure
needed to support that load. For information on
recommended tire pressure seeIn�ation - Tire Pressure
on page 5-60andLoading Your Vehicle on page 4-31.
(A) Tire Size:The tire size code is a combination of
letters and numbers used to de�ne a particular
tire’s width, height, aspect ratio, construction type and
service description. See the “Tire Size” illustration
later in this section for more detail.Light Truck (LT-Metric) Tire
5-55
Page 298 of 388
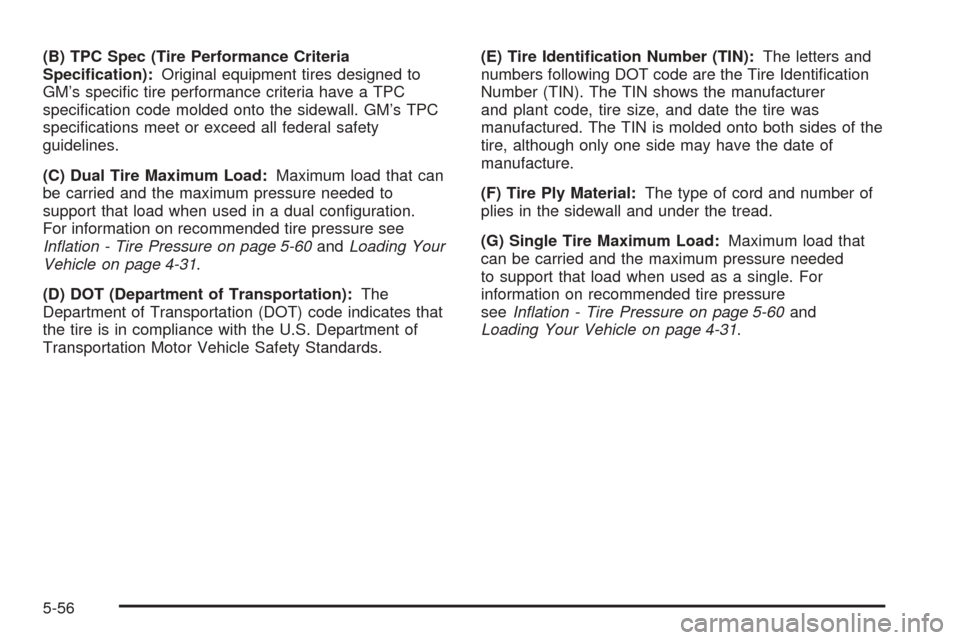
(B) TPC Spec (Tire Performance Criteria
Speci�cation):Original equipment tires designed to
GM’s speci�c tire performance criteria have a TPC
speci�cation code molded onto the sidewall. GM’s TPC
speci�cations meet or exceed all federal safety
guidelines.
(C) Dual Tire Maximum Load:Maximum load that can
be carried and the maximum pressure needed to
support that load when used in a dual con�guration.
For information on recommended tire pressure see
In�ation - Tire Pressure on page 5-60andLoading Your
Vehicle on page 4-31.
(D) DOT (Department of Transportation):The
Department of Transportation (DOT) code indicates that
the tire is in compliance with the U.S. Department of
Transportation Motor Vehicle Safety Standards.(E) Tire Identi�cation Number (TIN):The letters and
numbers following DOT code are the Tire Identi�cation
Number (TIN). The TIN shows the manufacturer
and plant code, tire size, and date the tire was
manufactured. The TIN is molded onto both sides of the
tire, although only one side may have the date of
manufacture.
(F) Tire Ply Material:The type of cord and number of
plies in the sidewall and under the tread.
(G) Single Tire Maximum Load:Maximum load that
can be carried and the maximum pressure needed
to support that load when used as a single. For
information on recommended tire pressure
seeIn�ation - Tire Pressure on page 5-60and
Loading Your Vehicle on page 4-31.
5-56
Page 299 of 388
Tire Size
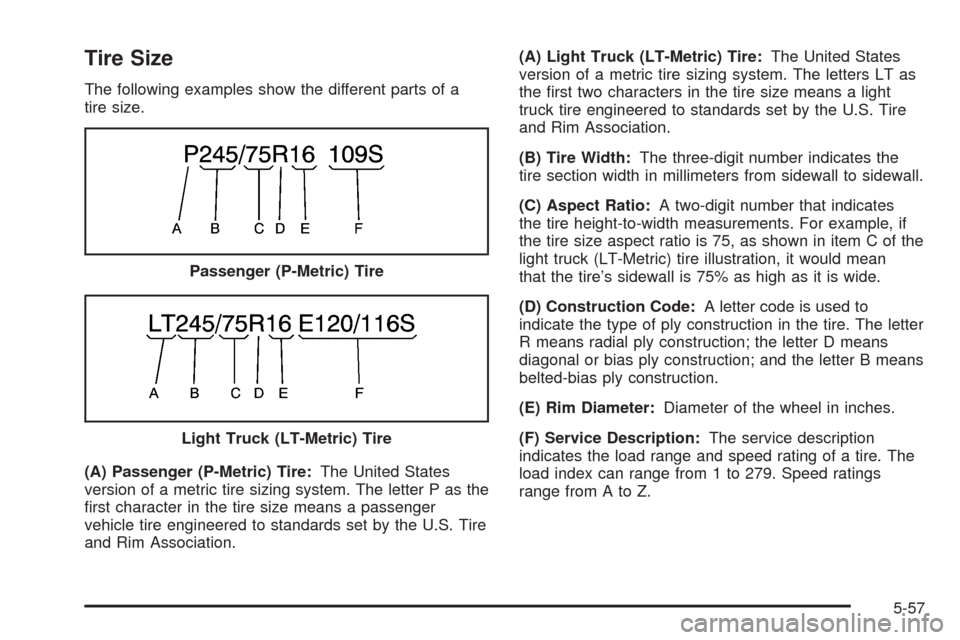
The following examples show the different parts of a
tire size.
(A) Passenger (P-Metric) Tire:The United States
version of a metric tire sizing system. The letter P as the
�rst character in the tire size means a passenger
vehicle tire engineered to standards set by the U.S. Tire
and Rim Association.(A) Light Truck (LT-Metric) Tire:The United States
version of a metric tire sizing system. The letters LT as
the �rst two characters in the tire size means a light
truck tire engineered to standards set by the U.S. Tire
and Rim Association.
(B) Tire Width:The three-digit number indicates the
tire section width in millimeters from sidewall to sidewall.
(C) Aspect Ratio:A two-digit number that indicates
the tire height-to-width measurements. For example, if
the tire size aspect ratio is 75, as shown in item C of the
light truck (LT-Metric) tire illustration, it would mean
that the tire’s sidewall is 75% as high as it is wide.
(D) Construction Code:A letter code is used to
indicate the type of ply construction in the tire. The letter
R means radial ply construction; the letter D means
diagonal or bias ply construction; and the letter B means
belted-bias ply construction.
(E) Rim Diameter:Diameter of the wheel in inches.
(F) Service Description:The service description
indicates the load range and speed rating of a tire. The
load index can range from 1 to 279. Speed ratings
range from A to Z. Passenger (P-Metric) Tire
Light Truck (LT-Metric) Tire
5-57
Page 303 of 388
A Tire and Loading Information label is attached to the
vehicle’s center pillar (B-pillar), below the driver’s
door latch. This label shows your vehicle’s original
equipment tires and the correct in�ation pressures for
your tires when they are cold. The recommended
cold tire in�ation pressure, shown on the label, is the
minimum amount of air pressure needed to support your
vehicle’s maximum load carrying capacity.
For additional information regarding how much weight
your vehicle can carry, and an example of the tire
and loading information label, seeLoading Your Vehicle
on page 4-31. How you load your vehicle affects
vehicle handling and ride comfort, never load your
vehicle with more weight than it was designed to carry.
When to Check
Check your tires once a month or more.
Also, check the tire pressure of the spare tire.
How to Check
Use a good quality pocket-type gage to check tire
pressure. You cannot tell if your tires are properly in�ated
simply by looking at them. Radial tires may look properly
in�ated even when they’re underin�ated. Check the tire’s
in�ation pressure when the tires are cold. Cold means
your vehicle has been sitting for at least three hours or
driven no more than 1 mile (1.6 km).
Remove the valve cap from the tire valve stem. Press
the tire gage �rmly onto the valve to get a pressure
measurement. If the cold tire in�ation pressure matches
the recommended pressure on the tire and loading
information label, no further adjustment is necessary.
If the pressure is low, add air until you reach the
recommended amount.
If you over�ll the tire, release air by pushing on the
metal stem in the center of the tire valve. Recheck the
tire pressure with the tire gage.
Be sure to put the valve caps back on the valve stems.
They help prevent leaks by keeping out dirt and moisture.
5-61