2005 CHEVROLET EQUINOX turn signal bulb
[x] Cancel search: turn signal bulbPage 117 of 364
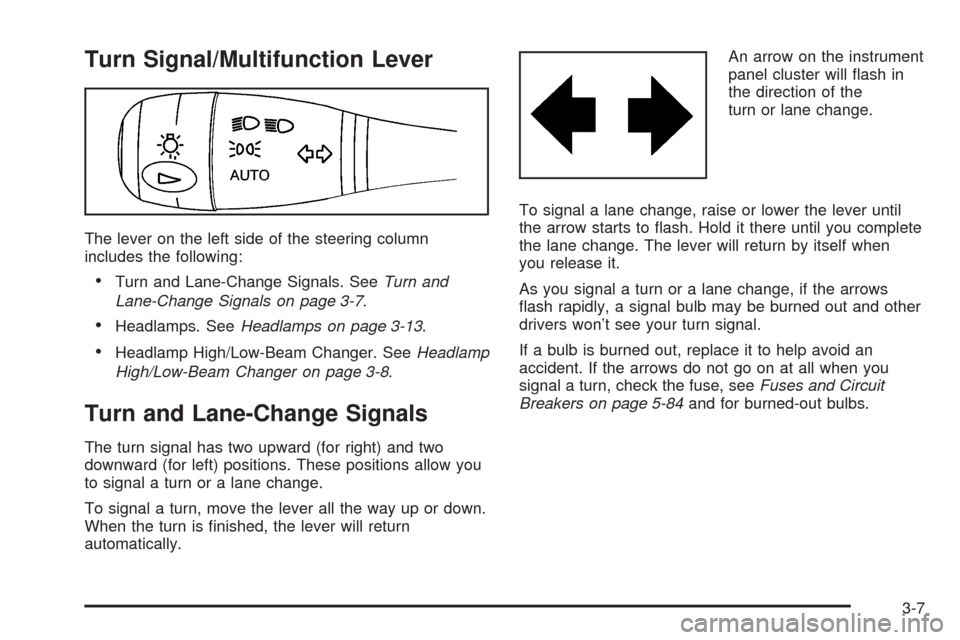
Turn Signal/Multifunction Lever
The lever on the left side of the steering column
includes the following:
Turn and Lane-Change Signals. SeeTurn and
Lane-Change Signals on page 3-7.
Headlamps. SeeHeadlamps on page 3-13.
Headlamp High/Low-Beam Changer. SeeHeadlamp
High/Low-Beam Changer on page 3-8.
Turn and Lane-Change Signals
The turn signal has two upward (for right) and two
downward (for left) positions. These positions allow you
to signal a turn or a lane change.
To signal a turn, move the lever all the way up or down.
When the turn is �nished, the lever will return
automatically.An arrow on the instrument
panel cluster will �ash in
the direction of the
turn or lane change.
To signal a lane change, raise or lower the lever until
the arrow starts to �ash. Hold it there until you complete
the lane change. The lever will return by itself when
you release it.
As you signal a turn or a lane change, if the arrows
�ash rapidly, a signal bulb may be burned out and other
drivers won’t see your turn signal.
If a bulb is burned out, replace it to help avoid an
accident. If the arrows do not go on at all when you
signal a turn, check the fuse, seeFuses and Circuit
Breakers on page 5-84and for burned-out bulbs.
3-7
Page 231 of 364
Passing
You will need more passing distance up ahead when
you are towing a trailer. And, because you are a
good deal longer, you will need to go much farther
beyond the passed vehicle before you can return to
your lane.
Backing Up
Hold the bottom of the steering wheel with one hand.
Then, to move the trailer to the left, just move that hand
to the left. To move the trailer to the right, move your
hand to the right. Always back up slowly and, if possible,
have someone guide you.
Making Turns
Notice:Making very sharp turns while trailering
could cause the trailer to come in contact with the
vehicle. Your vehicle could be damaged. Avoid
making very sharp turns while trailering.
When you are turning with a trailer, make wider turns
than normal. Do this so your trailer will not strike
soft shoulders, curbs, road signs, trees or other objects.
Avoid jerky or sudden maneuvers. Signal well in
advance.
Turn Signals When Towing a Trailer
When you tow a trailer, your vehicle has to have
extra wiring.
The arrows on your instrument panel will �ash whenever
you signal a turn or lane change. Properly hooked up,
the trailer lamps will also �ash, telling other drivers
you are about to turn, change lanes or stop.
When towing a trailer, the arrows on your instrument
panel will �ash for turns even if the bulbs on the trailer
are burned out. Thus, you may think drivers behind
you are seeing your signal when they are not. It’s
important to check occasionally to be sure the trailer
bulbs are still working.
Driving On Grades
Reduce speed and shift to a lower gear before you start
down a long or steep downgrade. If you do not shift
down, you might have to use your brakes so much that
they would get hot and no longer work well.
If you are towing a trailer that weighs more than
1,000 lbs (450 kg), drive in L4 instead of AUTOMATIC
OVERDRIVE (D) or, as you need to, a lower gear.
This will minimize heat build-up and extend the life of
your transaxle.
4-41
Page 235 of 364
Service............................................................5-3
Doing Your Own Service Work.........................5-4
Adding Equipment to the Outside of Your
Vehicle......................................................5-5
Fuel................................................................5-5
Gasoline Octane............................................5-5
Gasoline Speci�cations....................................5-5
California Fuel...............................................5-6
Additives.......................................................5-6
Fuels in Foreign Countries...............................5-7
Filling the Tank..............................................5-8
Filling a Portable Fuel Container.....................5-10
Checking Things Under the Hood....................5-10
Hood Release..............................................5-10
Engine Compartment Overview.......................5-12
Engine Oil...................................................5-13
Engine Oil Life System..................................5-16
Engine Air Cleaner/Filter................................5-17
Automatic Transaxle Fluid..............................5-21
Engine Coolant.............................................5-21
Engine Overheating.......................................5-24
Overheated Engine Protection
Operating Mode........................................5-26
Cooling System............................................5-26
Windshield Washer Fluid................................5-31
Brakes........................................................5-33Battery........................................................5-35
Jump Starting...............................................5-36
All-Wheel Drive..............................................5-41
Bulb Replacement..........................................5-43
Halogen Bulbs..............................................5-43
Headlamps, Front Turn Signal, Sidemarker,
and Parking Lamps....................................5-43
Taillamps, Turn Signal, Stoplamps and
Back-up Lamps.........................................5-46
Replacement Bulbs.......................................5-47
Windshield Wiper Blade Replacement..............5-48
Tires..............................................................5-49
Tire Sidewall Labelling...................................5-50
Tire Terminology and De�nitions.....................5-52
In�ation - Tire Pressure.................................5-55
Tire Inspection and Rotation...........................5-56
When It Is Time for New Tires.......................5-57
Buying New Tires.........................................5-58
Uniform Tire Quality Grading..........................5-59
Wheel Alignment and Tire Balance..................5-60
Wheel Replacement......................................5-61
Tire Chains..................................................5-62
If a Tire Goes Flat........................................5-63
Changing a Flat Tire.....................................5-64
Removing the Spare Tire and Tools................5-65
Section 5 Service and Appearance Care
5-1
Page 277 of 364
Bulb Replacement
For the proper type of replacement bulbs, see
Replacement Bulbs on page 5-47.
For any bulb changing procedure not listed in this
section, contact your dealer.
Halogen Bulbs
{CAUTION:
Halogen bulbs have pressurized gas inside
and can burst if you drop or scratch the bulb.
You or others could be injured. Be sure to read
and follow the instructions on the bulb
package.
Headlamps, Front Turn Signal,
Sidemarker, and Parking Lamps
To replace one of these bulbs, do the following:
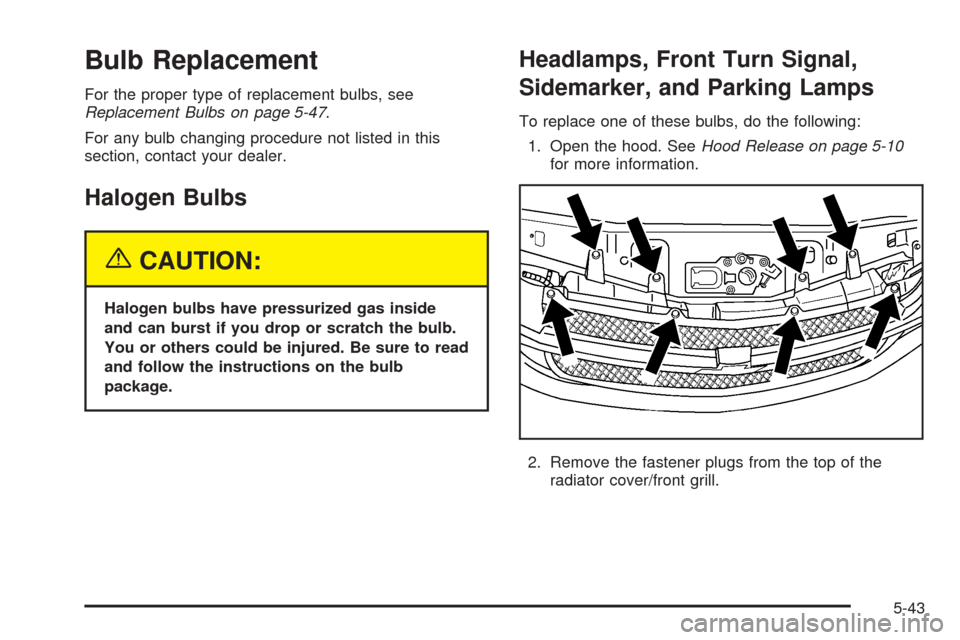
1. Open the hood. SeeHood Release on page 5-10
for more information.
2. Remove the fastener plugs from the top of the
radiator cover/front grill.
5-43
Page 279 of 364
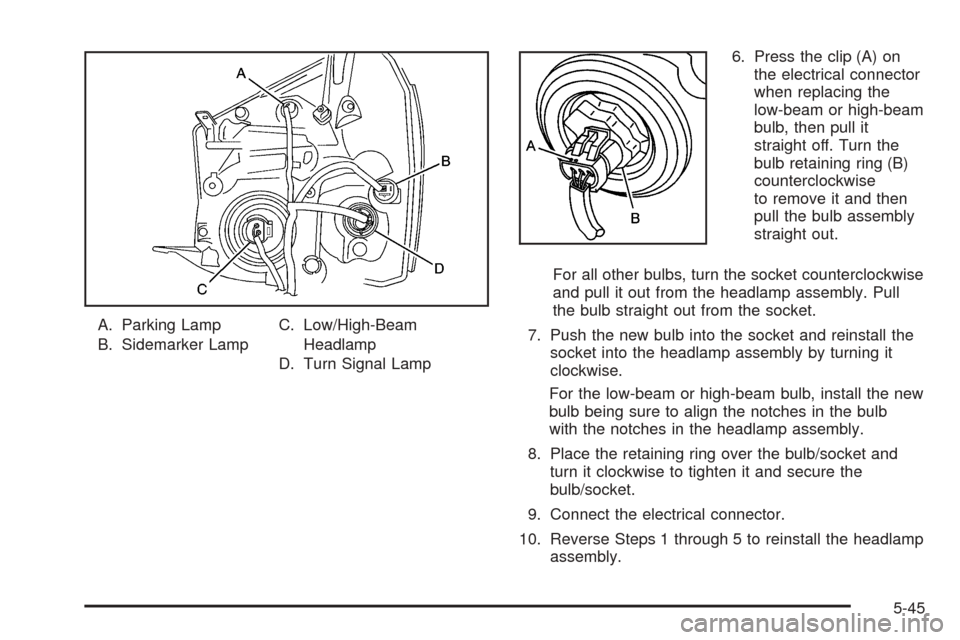
A. Parking Lamp
B. Sidemarker LampC. Low/High-Beam
Headlamp
D. Turn Signal Lamp6. Press the clip (A) on
the electrical connector
when replacing the
low-beam or high-beam
bulb, then pull it
straight off. Turn the
bulb retaining ring (B)
counterclockwise
to remove it and then
pull the bulb assembly
straight out.
For all other bulbs, turn the socket counterclockwise
and pull it out from the headlamp assembly. Pull
the bulb straight out from the socket.
7. Push the new bulb into the socket and reinstall the
socket into the headlamp assembly by turning it
clockwise.
For the low-beam or high-beam bulb, install the new
bulb being sure to align the notches in the bulb
with the notches in the headlamp assembly.
8. Place the retaining ring over the bulb/socket and
turn it clockwise to tighten it and secure the
bulb/socket.
9. Connect the electrical connector.
10. Reverse Steps 1 through 5 to reinstall the headlamp
assembly.
5-45
Page 280 of 364
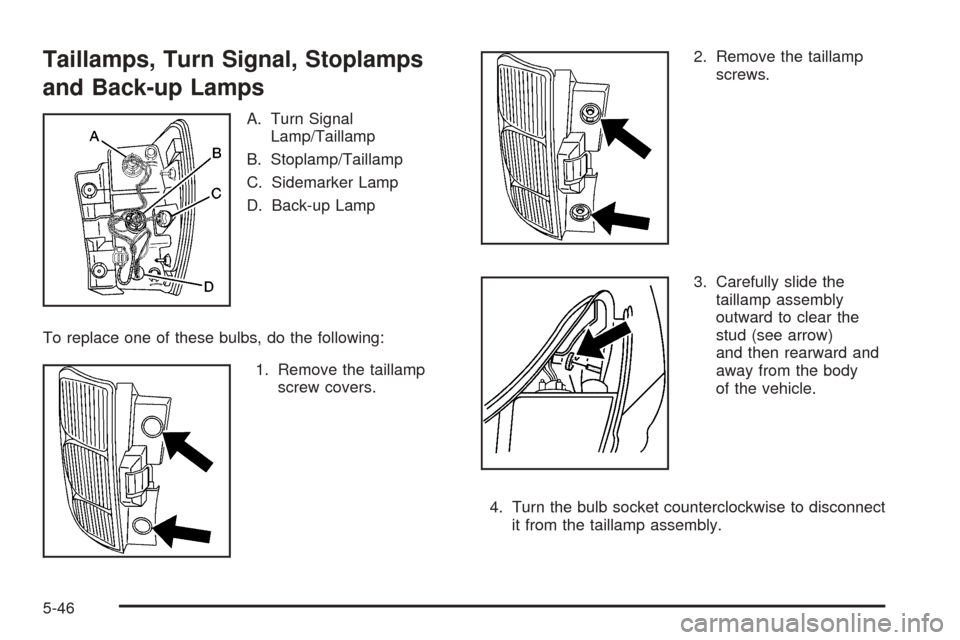
Taillamps, Turn Signal, Stoplamps
and Back-up Lamps
A. Turn Signal
Lamp/Taillamp
B. Stoplamp/Taillamp
C. Sidemarker Lamp
D. Back-up Lamp
To replace one of these bulbs, do the following:
1. Remove the taillamp
screw covers.2. Remove the taillamp
screws.
3. Carefully slide the
taillamp assembly
outward to clear the
stud (see arrow)
and then rearward and
away from the body
of the vehicle.
4. Turn the bulb socket counterclockwise to disconnect
it from the taillamp assembly.
5-46
Page 281 of 364
5. Pull the bulb out of the bulb socket.
6. Push the new bulb into the bulb socket.
7. Insert the bulb socket into the taillamp housing and
turn it clockwise to secure.
8. Reverse Steps 1 through 3 to reinstall the taillamp
assembly.Replacement Bulbs
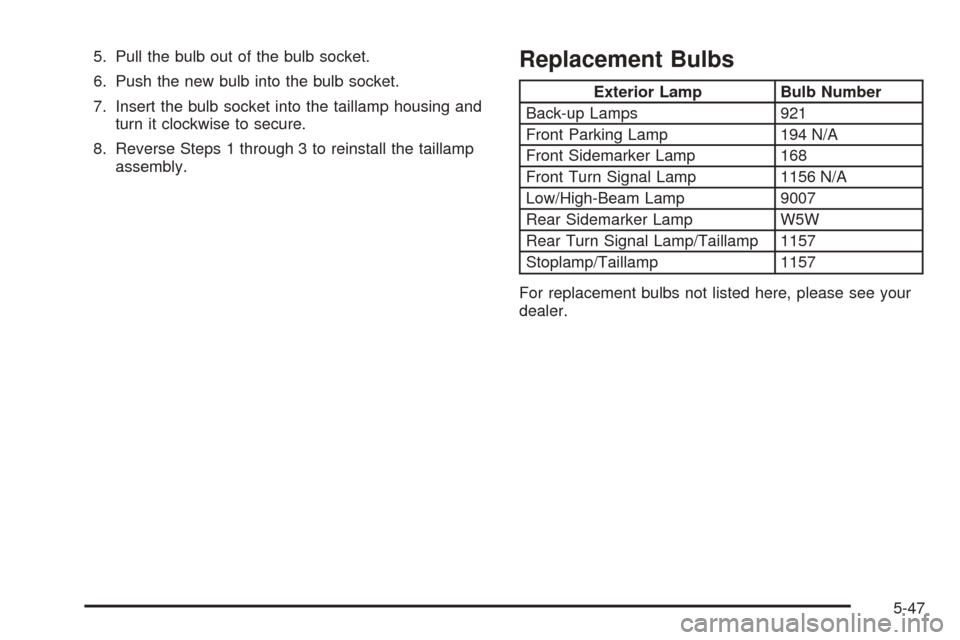
Exterior Lamp Bulb Number
Back-up Lamps 921
Front Parking Lamp 194 N/A
Front Sidemarker Lamp 168
Front Turn Signal Lamp 1156 N/A
Low/High-Beam Lamp 9007
Rear Sidemarker Lamp W5W
Rear Turn Signal Lamp/Taillamp 1157
Stoplamp/Taillamp 1157
For replacement bulbs not listed here, please see your
dealer.
5-47
Page 354 of 364
Automatic Transaxle
Fluid..........................................................5-21
Operation...................................................2-19
B
Battery..........................................................5-35
Run-Down Protection...................................3-17
Battery Warning Light......................................3-27
Before Leaving on a Long Trip.........................4-21
Brake
Anti-Lock Brake System (ABS)........................ 4-6
Emergencies................................................ 4-8
Parking......................................................2-22
System Warning Light..................................3-28
Brakes..........................................................5-33
Braking........................................................... 4-5
Braking in Emergencies..................................... 4-8
Break-In, New Vehicle.....................................2-15
Bulb Replacement...........................................5-43
Halogen Bulbs............................................5-43
Headlamps, Front Turn Signal, Sidemarker,
and Parking Lamps..................................5-43
Replacement Bulbs......................................5-47
Taillamps, Turn Signal, Stoplamps and
Back-up Lamps........................................5-46
Buying New Tires...........................................5-58
C
California Fuel.................................................. 5-6
Canadian Owners................................................ ii
Capacities and Speci�cations............................5-89
Carbon Monoxide...................2-10, 2-25, 4-24, 4-36
Care of
Safety Belts................................................5-78
Your CD Player...........................................3-79
Your CDs ...................................................3-79
Cargo Lamp...................................................3-17
Cargo Tie Downs............................................2-41
Center Console Storage Area...........................2-34
Chains, Tire...................................................5-62
Check
Engine Light...............................................3-32
Chemical Paint Spotting...................................5-81
Child Restraints
Child Restraint Systems...............................1-36
Infants and Young Children...........................1-32
Lower Anchorages and Top Tethers for
Children (LATCH System)..........................1-43
Older Children.............................................1-30
Securing a Child Restraint Designed for the
LATCH System........................................1-45
Securing a Child Restraint in a Rear Seat
Position..................................................1-45
Securing a Child Restraint in the Right Front
Seat Position...........................................1-48
2