2005 CHEVROLET EPICA heater
[x] Cancel search: heaterPage 54 of 340
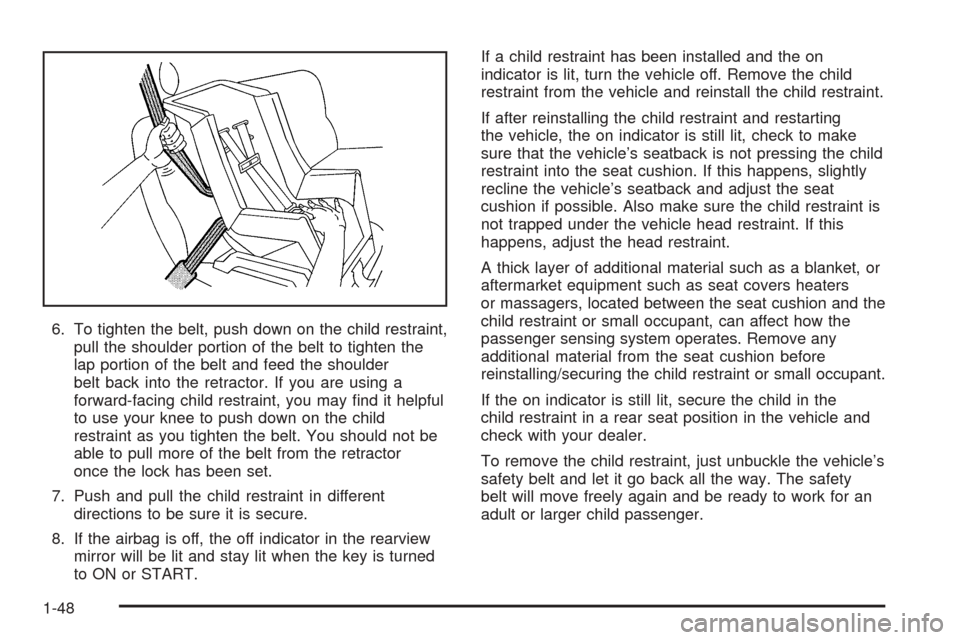
6. To tighten the belt, push down on the child restraint,
pull the shoulder portion of the belt to tighten the
lap portion of the belt and feed the shoulder
belt back into the retractor. If you are using a
forward-facing child restraint, you may find it helpful
to use your knee to push down on the child
restraint as you tighten the belt. You should not be
able to pull more of the belt from the retractor
once the lock has been set.
7. Push and pull the child restraint in different
directions to be sure it is secure.
8. If the airbag is off, the off indicator in the rearview
mirror will be lit and stay lit when the key is turned
to ON or START.If a child restraint has been installed and the on
indicator is lit, turn the vehicle off. Remove the child
restraint from the vehicle and reinstall the child restraint.
If after reinstalling the child restraint and restarting
the vehicle, the on indicator is still lit, check to make
sure that the vehicle’s seatback is not pressing the child
restraint into the seat cushion. If this happens, slightly
recline the vehicle’s seatback and adjust the seat
cushion if possible. Also make sure the child restraint is
not trapped under the vehicle head restraint. If this
happens, adjust the head restraint.
A thick layer of additional material such as a blanket, or
aftermarket equipment such as seat covers heaters
or massagers, located between the seat cushion and the
child restraint or small occupant, can affect how the
passenger sensing system operates. Remove any
additional material from the seat cushion before
reinstalling/securing the child restraint or small occupant.
If the on indicator is still lit, secure the child in the
child restraint in a rear seat position in the vehicle and
check with your dealer.
To remove the child restraint, just unbuckle the vehicle’s
safety belt and let it go back all the way. The safety
belt will move freely again and be ready to work for an
adult or larger child passenger.
1-48
Page 68 of 340
A thick layer of additional material such as a blanket, or
aftermarket equipment such as seat covers, seat
heaters and seat massagers can affect how well the
passenger sensing system operates. Remove any
additional material from the seat cushion before
reinstalling or securing the child restraint or small
occupant. You may want to consider not using seat
covers or other aftermarket equipment if your vehicle
has the passenger sensing system. SeeAdding
Equipment to Your Airbag-Equipped Vehicle on
page 1-63for more information about modifications that
can affect how the system operates.Servicing Your Airbag-Equipped
Vehicle
Airbags affect how your vehicle should be serviced.
There are parts of the airbag system in several places
around your vehicle. Your dealer and the service manual
have information about servicing your vehicle and the
airbag system. To purchase a service manual, see
Service Publications Ordering Information on page 7-11.
{CAUTION:
For up to 10 seconds after the ignition key is
turned off and the battery is disconnected, an
airbag can still in�ate during improper service.
You can be injured if you are close to an
airbag when it in�ates. Avoid yellow
connectors. They are probably part of the
airbag system. Be sure to follow proper
service procedures, and make sure the person
performing work for you is quali�ed to do so.
The airbag system does not need regular maintenance.
1-62
Page 71 of 340
Keys...............................................................2-2
Remote Keyless Entry System.........................2-4
Remote Keyless Entry System Operation...........2-5
Doors and Locks.............................................2-7
Door Locks....................................................2-7
Central Door Unlocking System........................2-8
Power Door Locks..........................................2-8
Door Ajar Reminder........................................2-9
Rear Door Security Locks................................2-9
Lockout Protection........................................2-10
Trunk..........................................................2-10
Windows........................................................2-12
Power Windows............................................2-13
Sun Visors...................................................2-13
Theft-Deterrent Systems..................................2-14
Theft-Deterrent System..................................2-14
Immobilizer..................................................2-15
Immobilizer Operation....................................2-16
Starting and Operating Your Vehicle................2-17
New Vehicle Break-In....................................2-17
Ignition Positions..........................................2-17Starting Your Engine.....................................2-18
Engine Coolant Heater..................................2-19
Automatic Transaxle Operation.......................2-20
Parking Brake..............................................2-24
Shifting Into Park (P).....................................2-25
Shifting Out of Park (P).................................2-26
Parking Over Things That Burn.......................2-27
Engine Exhaust............................................2-27
Running Your Engine While You Are Parked. . . .2-28
Mirrors...........................................................2-29
Manual Rearview Mirror.................................2-29
Automatic Dimming Rearview Mirror................2-29
Outside Power Mirrors...................................2-30
Outside Convex Mirror...................................2-31
Outside Heated Mirrors..................................2-32
Storage Areas................................................2-32
Glove Box...................................................2-32
Cupholder(s)................................................2-32
Coinholder(s)................................................2-32
Sunglasses Storage Compartment...................2-33
Center Console Storage Area.........................2-33
Rear Seat Armrest........................................2-33
Sunroof.........................................................2-34
Section 2 Features and Controls
2-1
Page 89 of 340
Notice:Your engine is designed to work with the
electronics in your vehicle. If you add electrical
parts or accessories, you could change the way the
engine operates. Before adding electrical equipment,
check with your dealer. If you do not, your engine
might not perform properly.
Engine Coolant Heater
Your vehicle has an engine coolant heater. In very cold
weather, 0°F (−18°C) or colder, the engine coolant
heater can help. You will get easier starting and better
fuel economy during engine warm-up. Usually, the
coolant heater should be plugged in a minimum
of four hours prior to starting your vehicle. At
temperatures above 32°F (0°C), use of the coolant
heater is not required.
To Use the Engine Coolant Heater
1. Turn off the engine.
2. Open the hood and unwrap the electrical cord. The
cord is located on the driver’s side of the engine
compartment, behind the battery.
3. Plug it into a normal, grounded 110-Volt AC outlet.
{CAUTION:
Plugging the cord into an ungrounded outlet
could cause an electrical shock. Also, the
wrong kind of extension cord could overheat
and cause a �re. You could be seriously
injured. Plug the cord into a properly grounded
three-prong 110-volt AC outlet. If the cord will
not reach, use a heavy-duty three-prong
extension cord rated for at least 15 amps.
4. Before starting the engine, be sure to unplug and
store the cord as it was before to keep it away
from moving engine parts. If you do not, it could
be damaged.
How long should you keep the coolant heater plugged
in? The answer depends on the outside temperature, the
kind of oil you have, and some other things. Instead
of trying to list everything here, we ask that you contact
your dealer in the area where you will be parking
your vehicle. The dealer can give you the best advice
for that particular area.
2-19
Page 126 of 340
Rear Window and Outside Mirror
Defogger
Your vehicle has a rear window and outside mirror
defogger. This feature will only work when the ignition is
turned to ON.
The rear window defogger uses a warming grid to
remove fog or frost from the rear window. Before using
this feature, clear as much snow from the rear
window as possible.
button is located below the audio system. An indicator
light in the button will come on to let your know that the
feature is activated.
The rear window and outside mirror defogger will turn
off about 10 minutes after the button is pressed.
The defogger can also be turned off by pressing the
button again or by turning off the engine.
Notice:Don’t use anything sharp on the inside of
the rear window. If you do, you could cut or damage
the warming grid, and the repairs wouldn’t be
covered by your warranty. Do not attach a temporary
vehicle license, tape, a decal or anything similar
to the defogger grid.
Front Heated Windshield
Your vehicle may have a heated front windshield which
can be used to defrost it. This feature will only work
when the ignition is turned to ON.
There is a heated element along the bottom of the
windshield used to heat the windshield.
system. An indicator light in the button will come on to
let your know that the feature is activated.
The front windshield heater will turn off about 10 minutes
after the button is pressed. It can also be turned off
by pressing the button again or by turning off the engine.
Automatic Climate Control System
Your vehicle may have an automatic climate control
system. With this system you can control the heating,
cooling and ventilation for your vehicle.
This is the display for the automatic climate control
system.
3-22
Page 132 of 340
button is located below the audio system. An indicator
light in the button will come on to let you know that
the feature is activated.
The rear window and outside mirror defogger will turn
off about 15 minutes after the button is pressed.
The defogger can also be turned off by pressing the
button again or by turning off the engine.
Notice:Don’t use anything sharp on the inside of
the rear window. If you do, you could cut or damage
the warming grid, and the repairs wouldn’t be
covered by your warranty. Do not attach a temporary
vehicle license, tape, a decal or anything similar
to the defogger grid.
Front Heated Windshield
Your vehicle may have a heated front windshield which
can be used to defrost it. This feature will only work
when the ignition is turned to ON.
There is a heated element along the bottom of the
windshield used to heat the windshield.
system. An indicator light in the button will come on to
let you know that the feature is activated.
The front windshield heater will turn off about 10 minutes
after the button is pressed. It can also be turned off
by pressing the button again or by turning off the engine.
Outlet Adjustment
Use the lever located in the center of each outlet to
change the direction of the airflow. Use the thumbwheel
located above the side outlets to turn them on and off.
Operation Tips
•
Clear away any ice, snow or leaves from the air
inlets at the base of the windshield that may
block the flow of air into your vehicle.
•Use of non-GM approved hood deflectors may
adversely affect the performance of the system.
•Keep the path under the front seats clear of objects
to help circulate the air inside of your vehicle more
effectively.
3-28
Page 193 of 340
{CAUTION:
Snow can trap exhaust gases under your
vehicle. This can cause deadly CO (carbon
monoxide) gas to get inside. CO could
overcome you and kill you. You cannot see it
or smell it, so you might not know it is in your
vehicle. Clear away snow from around the
base of your vehicle, especially any that is
blocking your exhaust pipe. And check around
again from time to time to be sure snow does
not collect there.
Open a window just a little on the side of the
vehicle that is away from the wind. This will
help keep CO out.Run your engine only as long as you must. This saves
fuel. When you run the engine, make it go a little
faster than just idle. That is, push the accelerator
slightly. This uses less fuel for the heat that you get and
it keeps the battery charged. You will need a
well-charged battery to restart the vehicle, and possibly
for signaling later on with your headlamps. Let the
heater run for a while.
Then, shut the engine off and close the window almost
all the way to preserve the heat. Start the engine
again and repeat this only when you feel really
uncomfortable from the cold. But do it as little as
possible. Preserve the fuel as long as you can. To help
keep warm, you can get out of the vehicle and do
some fairly vigorous exercises every half hour or so until
help comes.
4-27
Page 222 of 340
What to Use
Use a 50/50 mixture ofclean, drinkable waterand
coolant that meets GM specification 1825M, which will
not damage aluminum parts. You can also use a
recycled coolant conforming to GM specification 1825M
with a complete coolant flush and refill. If you use
this coolant mixture, you do not need to add
anything else.
{CAUTION:
Adding only plain water to your cooling
system can be dangerous. Plain water, or
some other liquid such as alcohol, can boil
before the proper coolant mixture will. Your
vehicle’s coolant warning system is set for the
proper coolant mixture. With plain water or the
wrong mixture, your engine could get too hot
but you would not get the overheat warning.
Your engine could catch �re and you or others
could be burned. Use a 50/50 mixture of clean,
drinkable water and the proper coolant.Notice:If you use an improper coolant mixture,
your engine could overheat and be badly damaged.
The repair cost would not be covered by your
warranty. Too much water in the mixture can freeze
and crack the engine, radiator, heater core and
other parts.
If you have to add coolant more than four times a year,
have your dealer check your cooling system.
Notice:If you use the proper coolant, you do not
have to add extra inhibitors or additives which claim
to improve the system. These can be harmful.
5-20