Page 343 of 436

If a Tire Goes Flat
It’s unusual for a tire to “blowout” while you’re driving,
especially if you maintain your tires properly. If air goes
out of a tire, it’s much more likely to leak out slowly.
But if you should ever have a “blowout,” here are a few
tips about what to expect and what to do:
If a front tire fails, the �at tire will create a drag that
pulls the vehicle toward that side. Take your foot off the
accelerator pedal and grip the steering wheel �rmly.
Steer to maintain lane position, and then gently brake to
a stop well out of the traffic lane.
A rear blowout, particularly on a curve, acts much like a
skid and may require the same correction you’d use
in a skid. In any rear blowout, remove your foot from the
accelerator pedal. Get the vehicle under control by
steering the way you want the vehicle to go. It may be
very bumpy and noisy, but you can still steer. Gently
brake to a stop, well off the road if possible.{CAUTION:
Lifting a vehicle and getting under it to do
maintenance or repairs is dangerous without
the appropriate safety equipment and training.
The jack provided with your vehicle is
designed only for changing a �at tire. If it is
used for anything else, you or others could be
badly injured or killed if the vehicle slips off
the jack. Use the jack provided with your
vehicle only for changing a �at tire.
If a tire goes �at, the next part shows how to use your
jacking equipment to change a �at tire safely.
5-71
Page 345 of 436

Removing the Spare Tire and Tools
The jacking equipment you’ll need is stored along
the driver’s side inner rear quarter panel. In some cases,
you may have to remove the spare tire in order to
reach the jack.
The following instructions explain how to remove the
spare tire, depending on where it is mounted on
your vehicle. SeeSpare Tire on page 5-84.
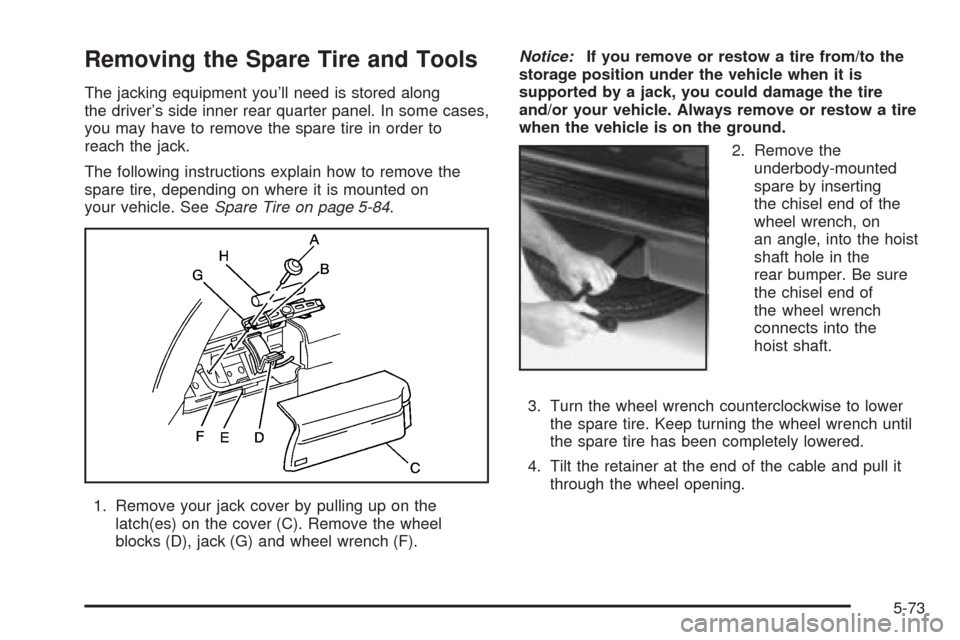
1. Remove your jack cover by pulling up on the
latch(es) on the cover (C). Remove the wheel
blocks (D), jack (G) and wheel wrench (F).Notice:If you remove or restow a tire from/to the
storage position under the vehicle when it is
supported by a jack, you could damage the tire
and/or your vehicle. Always remove or restow a tire
when the vehicle is on the ground.
2. Remove the
underbody-mounted
spare by inserting
the chisel end of the
wheel wrench, on
an angle, into the hoist
shaft hole in the
rear bumper. Be sure
the chisel end of
the wheel wrench
connects into the
hoist shaft.
3. Turn the wheel wrench counterclockwise to lower
the spare tire. Keep turning the wheel wrench until
the spare tire has been completely lowered.
4. Tilt the retainer at the end of the cable and pull it
through the wheel opening.
5-73
Page 356 of 436

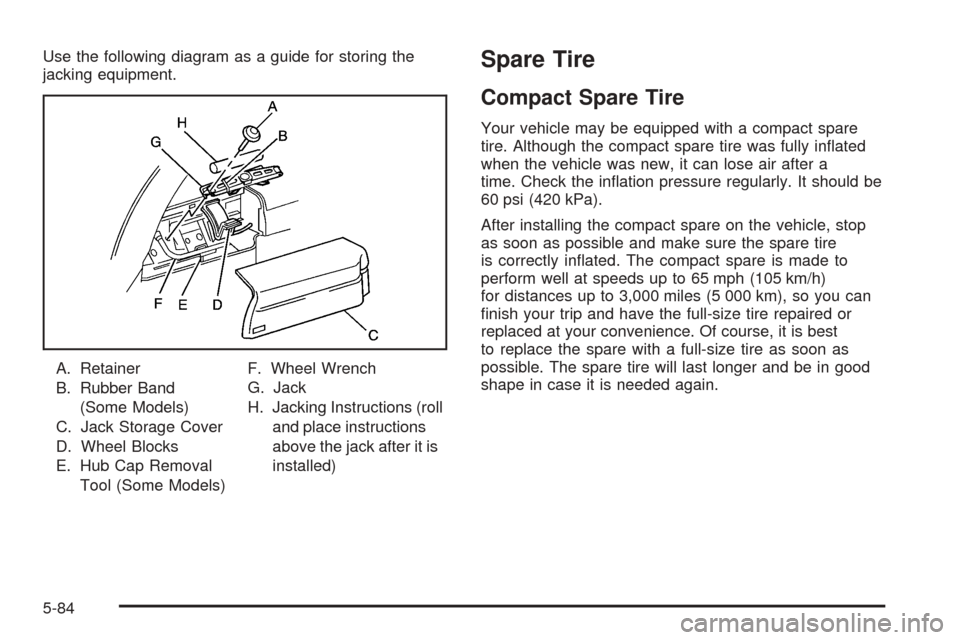
Use the following diagram as a guide for storing the
jacking equipment.
A. Retainer
B. Rubber Band
(Some Models)
C. Jack Storage Cover
D. Wheel Blocks
E. Hub Cap Removal
Tool (Some Models)F. Wheel Wrench
G. Jack
H. Jacking Instructions (roll
and place instructions
above the jack after it is
installed)Spare Tire
Compact Spare Tire
Your vehicle may be equipped with a compact spare
tire. Although the compact spare tire was fully in�ated
when the vehicle was new, it can lose air after a
time. Check the in�ation pressure regularly. It should be
60 psi (420 kPa).
After installing the compact spare on the vehicle, stop
as soon as possible and make sure the spare tire
is correctly in�ated. The compact spare is made to
perform well at speeds up to 65 mph (105 km/h)
for distances up to 3,000 miles (5 000 km), so you can
�nish your trip and have the full-size tire repaired or
replaced at your convenience. Of course, it is best
to replace the spare with a full-size tire as soon as
possible. The spare tire will last longer and be in good
shape in case it is needed again.
5-84