2005 CHEVROLET AVEO light
[x] Cancel search: lightPage 215 of 316
4. Open the hoods and locate the batteries. Find the
positive (+) and negative (−) terminal locations on
each vehicle. Your vehicle’s positive (+) terminal is
located under a red tethered cap on the battery.
SeeEngine Compartment Overview on page 5-12
for more information on location.
Flip the cap up to access the positive (+) terminal.
{CAUTION:
An electric fan can start up even when the
engine is not running and can injure you.
Keep hands, clothing and tools away from
any underhood electric fan.
{CAUTION:
Using a match near a battery can cause battery
gas to explode. People have been hurt doing
this, and some have been blinded. Use a
�ashlight if you need more light.
Be sure the battery has enough water. You do
not need to add water to the battery installed
in your new vehicle. But if a battery has �ller
caps, be sure the right amount of �uid is there.
If it is low, add water to take care of that �rst.
If you don’t, explosive gas could be present.
Battery �uid contains acid that can burn you.
Do not get it on you. If you accidentally get it
in your eyes or on your skin, �ush the place
with water and get medical help immediately.
5-37
Page 229 of 316
Belt:A rubber coated layer of cords that is located
between the plies and the tread. Cords may be made
from steel or other reinforcing materials.
Bead:The tire bead contains steel wires wrapped by
steel cords that hold the tire onto the rim.
Bias Ply Tire:A pneumatic tire in which the plies are
laid at alternate angles less than 90 degrees to the
centerline of the tread.
Cold In�ation Pressure:The amount of air pressure in
a tire, measured in pounds per square inch (psi) or
kilopascals (kPa) before a tire has built up heat
from driving. SeeInflation - Tire Pressure on page 5-53.
Curb Weight:This means the weight of a motor
vehicle with standard and optional equipment including
the maximum capacity of fuel, oil and coolant, but
without passengers and cargo.
DOT Markings:A code molded into the sidewall of a
tire signifying that the tire is in compliance with the
U.S. Department of Transportation (DOT) motor vehicle
safety standards. The DOT code includes the Tire
Identification Number (TIN), an alphanumeric designator
which can also identify the tire manufacturer, production
plant, brand and date of production.
GVWR:Gross Vehicle Weight Rating, seeLoading
Your Vehicle on page 4-28.GAWR FRT:Gross Axle Weight Rating for the front
axle, seeLoading Your Vehicle on page 4-28.
GAWR RR:Gross Axle Weight Rating for the rear axle,
seeLoading Your Vehicle on page 4-28.
Intended Outboard Sidewall:The side of an
asymmetrical tire, that must always face outward when
mounted on a vehicle.
Kilopascal (kPa):The metric unit for air pressure.
Light Truck (LT-Metric) Tire:A tire used on light duty
trucks and some multipurpose passenger vehicles.
Load Index:An assigned number ranging from 1 to 279
that corresponds to the load carrying capacity of a tire.
Maximum In�ation Pressure:The maximum air
pressure to which a cold tire may be inflated. The
maximum air pressure is molded onto the sidewall.
Maximum Load Rating:The load rating for a tire at the
maximum permissible inflation pressure for that tire.
Maximum Loaded Vehicle Weight:The sum of curb
weight; accessory weight; vehicle capacity weight;
and production options weight.
Normal Occupant Weight:The number of occupants a
vehicle is designed to seat multiplied by 150 lbs (68 kg).
SeeLoading Your Vehicle on page 4-28.
5-51
Page 230 of 316
Occupant Distribution:Designated seating positions.
Outward Facing Sidewall:The side of an
asymmetrical tire that has a particular side that faces
outward when mounted on a vehicle. The side of the tire
that contains a whitewall, bears white lettering or
bears manufacturer, brand, and/or model name molding
that is higher or deeper than the same moldings on
the other sidewall of the tire.
Passenger (P-Metric) Tire:A tire used on passenger
cars and some light duty trucks and multipurpose
vehicles.
Recommended In�ation Pressure:Vehicle
manufacturer’s recommended tire inflation pressure and
shown on the tire placard. SeeInflation - Tire Pressure
on page 5-53andLoading Your Vehicle on page 4-28.
Radial Ply Tire:A pneumatic tire in which the ply cords
that extend to the beads are laid at 90 degrees to the
centerline of the tread.
Rim:A metal support for a tire and upon which the tire
beads are seated.
Sidewall:The portion of a tire between the tread and
the bead.
Speed Rating:An alphanumeric code assigned to a
tire indicating the maximum speed at which a tire
can operate.Traction:The friction between the tire and the road
surface. The amount of grip provided.
Tread:The portion of a tire that comes into contact
with the road.
Treadwear Indicators:Narrow bands, sometimes
called “wear bars,” that show across the tread of a tire
when only 1/16 inch (1.6 mm) of tread remains. See
When It Is Time for New Tires on page 5-55.
UTQGS (Uniform Tire Quality Grading Standards):
A tire information system that provides consumers
with ratings for a tire’s traction, temperature, and
treadwear. Ratings are determined by tire manufacturers
using government testing procedures. The ratings are
molded into the sidewall of the tire. SeeUniform
Tire Quality Grading on page 5-56.
Vehicle Capacity Weight:The number of designated
seating positions multiplied by 150 lbs (68 kg) plus
the rated cargo load. SeeLoading Your Vehicle
on page 4-28.
Vehicle Maximum Load on the Tire:Load on an
individual tire due to curb weight, accessory weight,
occupant weight, and cargo weight.
Vehicle Placard:A label permanently attached to a
vehicle showing the vehicle’s capacity weight and
the original equipment tire size and recommended
inflation pressure. See “Tire and Loading Information
Label” underLoading Your Vehicle on page 4-28.
5-52
Page 235 of 316
While the tires available on General Motors passenger
cars and light trucks may vary with respect to these
grades, they must also conform to federal safety
requirements.
Treadwear
The treadwear grade is a comparative rating based on
the wear rate of the tire when tested under controlled
conditions on a specified government test course.
For example, a tire graded 150 would wear one and
a half (1
1⁄2) times as well on the government course as
a tire graded 100. The relative performance of tires
depends upon the actual conditions of their use,
however, and may depart significantly from the norm
due to variations in driving habits, service practices and
differences in road characteristics and climate.
Traction — AA, A, B, C
The traction grades, from highest to lowest, are AA, A,
B, and C. Those grades represent the tire’s ability
to stop on wet pavement as measured under controlled
conditions on specified government test surfaces of
asphalt and concrete. A tire marked C may have poor
traction performance. Warning: The traction grade
assigned to this tire is based on straight-ahead braking
traction tests, and does not include acceleration,
cornering, hydroplaning, or peak traction characteristics.
Temperature — A, B, C
The temperature grades are A (the highest), B, and C,
representing the tire’s resistance to the generation
of heat and its ability to dissipate heat when tested
under controlled conditions on a specified indoor
laboratory test wheel. Sustained high temperature can
cause the material of the tire to degenerate and
reduce tire life, and excessive temperature can lead to
sudden tire failure. The grade C corresponds to a
level of performance which all passenger car tires must
meet under the Federal Motor Vehicle Safety Standard
No. 109. Grades B and A represent higher levels of
performance on the laboratory test wheel than the
minimum required by law.
Warning: The temperature grade for this tire is
established for a tire that is properly inflated and not
overloaded. Excessive speed, underinflation, or
excessive loading, either separately or in combination,
can cause heat buildup and possible tire failure.
5-57
Page 247 of 316

Do not use any of these products unless this manual
says you can. In many uses, these will damage
the vehicle:
•Alcohol
•Laundry Soap
•Bleach
•Reducing Agents
Cleaning the Inside of Your Vehicle
Your vehicle’s interior will continue to look its best if
it is cleaned often. Although not always visible, dust
and dirt can accumulate on your upholstery. Dirt
can damage carpet, fabric, leather, and plastic surfaces.
Regular vacuuming is recommended to remove
particles from your upholstery. It is important to keep
your upholstery from becoming and remaining heavily
soiled. Soils should be removed as quickly as possible.
Your vehicle’s interior may experience extremes of
heat that could cause stains to set rapidly.
Lighter colored interiors may require more frequent
cleaning. Use care because newspapers and garments
that transfer color to your home furnishings may also
transfer color to your vehicle’s interior.When cleaning your vehicle’s interior, only use
cleaners specifically designed for the surfaces being
cleaned. Permanent damage may result from using
cleaners on surfaces for which they were not intended.
Use glass cleaner only on glass. Remove any
accidental over-spray from other surfaces immediately.
To prevent over-spray, apply cleaner directly to the
cleaning cloth.
Notice:If you use abrasive cleaners when cleaning
glass surfaces on your vehicle, you could scratch
the glass and/or cause damage to the rear window
defogger. When cleaning the glass on your
vehicle, use only a soft cloth and glass cleaner.
Many cleaners contain solvents that may become
concentrated in your vehicle’s breathing space.
Before using cleaners, read and adhere to all safety
instructions on the label. While cleaning your vehicle’s
interior, maintain adequate ventilation by opening
your vehicle’s doors and windows.
Dust may be removed from small buttons and knobs
using a small brush with soft bristles.
Your GM dealer has a product for cleaning your
vehicle’s glass. Should it become necessary, you can
also obtain a product from your GM dealer to remove
odors from your vehicle’s upholstery.
5-69
Page 253 of 316
Chemical Paint Spotting
Some weather and atmospheric conditions can create a
chemical fallout. Airborne pollutants can fall upon and
attack painted surfaces on the vehicle. This damage can
take two forms: blotchy, ring-shaped discolorations, and
small, irregular dark spots etched into the paint surface.
Although no defect in the paint job causes this, GM will
repair, at no charge to the owner, the surfaces of
new vehicles damaged by this fallout condition within
12 months or 12,000 miles (20 000 km) of purchase,
whichever occurs first.
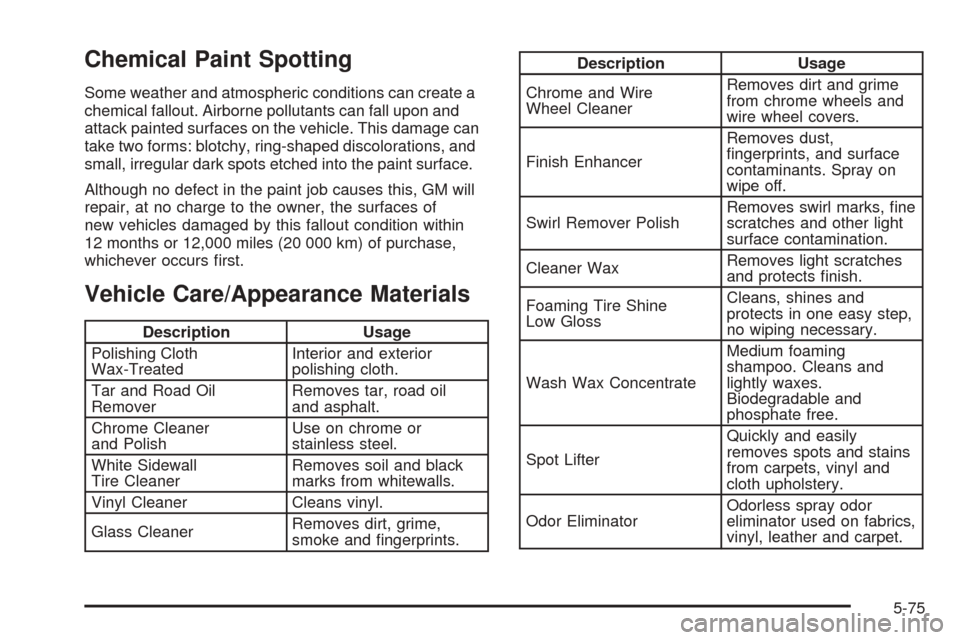
Vehicle Care/Appearance Materials
Description Usage
Polishing Cloth
Wax-TreatedInterior and exterior
polishing cloth.
Tar and Road Oil
RemoverRemoves tar, road oil
and asphalt.
Chrome Cleaner
and PolishUse on chrome or
stainless steel.
White Sidewall
Tire CleanerRemoves soil and black
marks from whitewalls.
Vinyl Cleaner Cleans vinyl.
Glass CleanerRemoves dirt, grime,
smoke and fingerprints.
Description Usage
Chrome and Wire
Wheel CleanerRemoves dirt and grime
from chrome wheels and
wire wheel covers.
Finish EnhancerRemoves dust,
fingerprints, and surface
contaminants. Spray on
wipe off.
Swirl Remover PolishRemoves swirl marks, fine
scratches and other light
surface contamination.
Cleaner WaxRemoves light scratches
and protects finish.
Foaming Tire Shine
Low GlossCleans, shines and
protects in one easy step,
no wiping necessary.
Wash Wax ConcentrateMedium foaming
shampoo. Cleans and
lightly waxes.
Biodegradable and
phosphate free.
Spot LifterQuickly and easily
removes spots and stains
from carpets, vinyl and
cloth upholstery.
Odor EliminatorOdorless spray odor
eliminator used on fabrics,
vinyl, leather and carpet.
5-75
Page 255 of 316
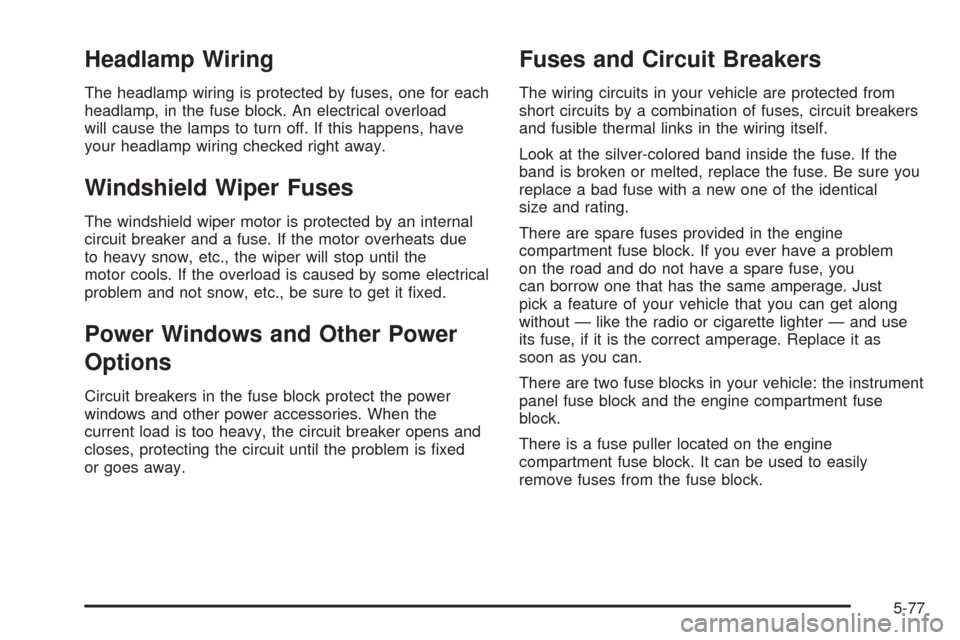
Headlamp Wiring
The headlamp wiring is protected by fuses, one for each
headlamp, in the fuse block. An electrical overload
will cause the lamps to turn off. If this happens, have
your headlamp wiring checked right away.
Windshield Wiper Fuses
The windshield wiper motor is protected by an internal
circuit breaker and a fuse. If the motor overheats due
to heavy snow, etc., the wiper will stop until the
motor cools. If the overload is caused by some electrical
problem and not snow, etc., be sure to get it fixed.
Power Windows and Other Power
Options
Circuit breakers in the fuse block protect the power
windows and other power accessories. When the
current load is too heavy, the circuit breaker opens and
closes, protecting the circuit until the problem is fixed
or goes away.
Fuses and Circuit Breakers
The wiring circuits in your vehicle are protected from
short circuits by a combination of fuses, circuit breakers
and fusible thermal links in the wiring itself.
Look at the silver-colored band inside the fuse. If the
band is broken or melted, replace the fuse. Be sure you
replace a bad fuse with a new one of the identical
size and rating.
There are spare fuses provided in the engine
compartment fuse block. If you ever have a problem
on the road and do not have a spare fuse, you
can borrow one that has the same amperage. Just
pick a feature of your vehicle that you can get along
without — like the radio or cigarette lighter — and use
its fuse, if it is the correct amperage. Replace it as
soon as you can.
There are two fuse blocks in your vehicle: the instrument
panel fuse block and the engine compartment fuse
block.
There is a fuse puller located on the engine
compartment fuse block. It can be used to easily
remove fuses from the fuse block.
5-77
Page 257 of 316
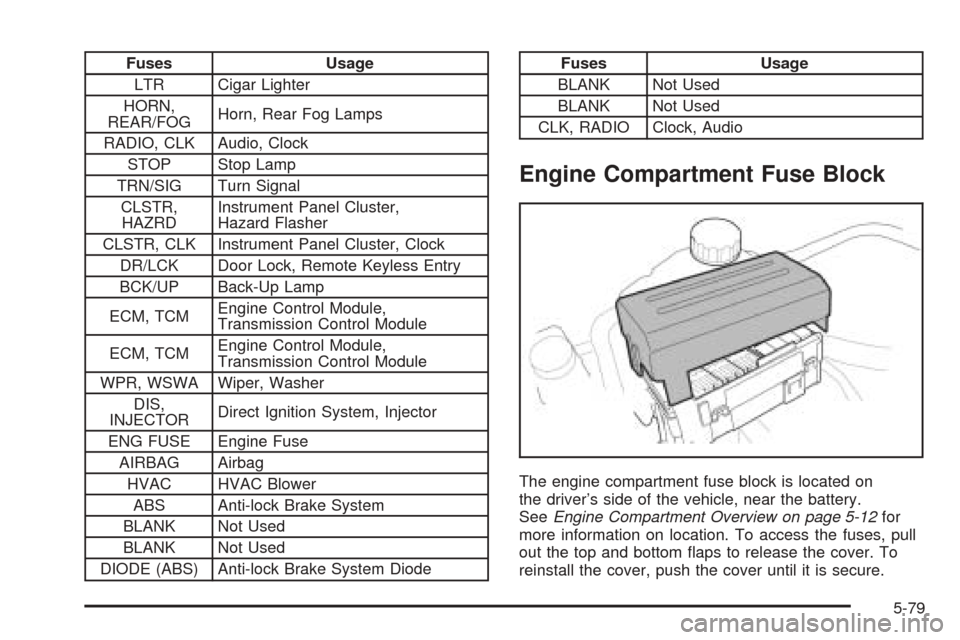
Fuses Usage
LTR Cigar Lighter
HORN,
REAR/FOGHorn, Rear Fog Lamps
RADIO, CLK Audio, Clock
STOP Stop Lamp
TRN/SIG Turn Signal
CLSTR,
HAZRDInstrument Panel Cluster,
Hazard Flasher
CLSTR, CLK Instrument Panel Cluster, Clock
DR/LCK Door Lock, Remote Keyless Entry
BCK/UP Back-Up Lamp
ECM, TCMEngine Control Module,
Transmission Control Module
ECM, TCMEngine Control Module,
Transmission Control Module
WPR, WSWA Wiper, Washer
DIS,
INJECTORDirect Ignition System, Injector
ENG FUSE Engine Fuse
AIRBAG Airbag
HVAC HVAC Blower
ABS Anti-lock Brake System
BLANK Not Used
BLANK Not Used
DIODE (ABS) Anti-lock Brake System DiodeFuses Usage
BLANK Not Used
BLANK Not Used
CLK, RADIO Clock, Audio
Engine Compartment Fuse Block
The engine compartment fuse block is located on
the driver’s side of the vehicle, near the battery.
SeeEngine Compartment Overview on page 5-12for
more information on location. To access the fuses, pull
out the top and bottom flaps to release the cover. To
reinstall the cover, push the cover until it is secure.
5-79