2005 CHEVROLET AVEO parking brake
[x] Cancel search: parking brakePage 214 of 316
Jump Starting
If your battery has run down, you may want to use
another vehicle and some jumper cables to start your
vehicle. Be sure to use the following steps to do it safely.
{CAUTION:
Batteries can hurt you. They can be dangerous
because:
They contain acid that can burn you.
They contain gas that can explode or
ignite.
They contain enough electricity to
burn you.
If you do not follow these steps exactly, some
or all of these things can hurt you.
Notice:Ignoring these steps could result in costly
damage to your vehicle that would not be covered
by your warranty.
Trying to start your vehicle by pushing or pulling it
will not work, and it could damage your vehicle.
1. Check the other vehicle. It must have a 12-volt
battery with a negative ground system.Notice:If the other vehicle’s system is not a 12-volt
system with a negative ground, both vehicles can
be damaged. Only use vehicles with 12-volt systems
with negative grounds to jump start your vehicle.
2. Get the vehicles close enough so the jumper cables
can reach, but be sure the vehicles are not touching
each other. If they are, it could cause a ground
connection you do not want. You would not be able
to start your vehicle, and the bad grounding
could damage the electrical systems.
To avoid the possibility of the vehicles rolling, set
the parking brake firmly on both vehicles involved
in the jump start procedure. Put an automatic
transaxle in PARK (P) or a manual transaxle in
NEUTRAL before setting the parking brake.
Notice:If you leave your radio or other accessories
on during the jump starting procedure, they could
be damaged. The repairs would not be covered
by your warranty. Always turn off your radio and
other accessories when jump starting your vehicle.
3. Turn off the ignition on both vehicles. Unplug
unnecessary accessories plugged into the cigarette
lighter or the accessory power outlet. Turn off
the radio and all lamps that are not needed. This
will avoid sparks and help save both batteries.
And it could save the radio!
5-36
Page 239 of 316
{CAUTION:
Changing a tire can be dangerous. The vehicle
can slip off the jack and roll over or fall on you
or other people. You and they could be badly
injured or even killed. Find a level place to
change your tire. To help prevent the vehicle
from moving:
1. Set the parking brake rmly.
2. Put an automatic transaxle shift lever in
PARK (P), or shift a manual transaxle to
FIRST (1) or REVERSE (R).
3. Turn off the engine and do not restart
while the vehicle is raised.
4. Do not allow passengers to remain in
the vehicle.
To be even more certain the vehicle will not
move, you should put blocks at the front and
rear of the tire farthest away from the one
being changed. That would be the tire on the
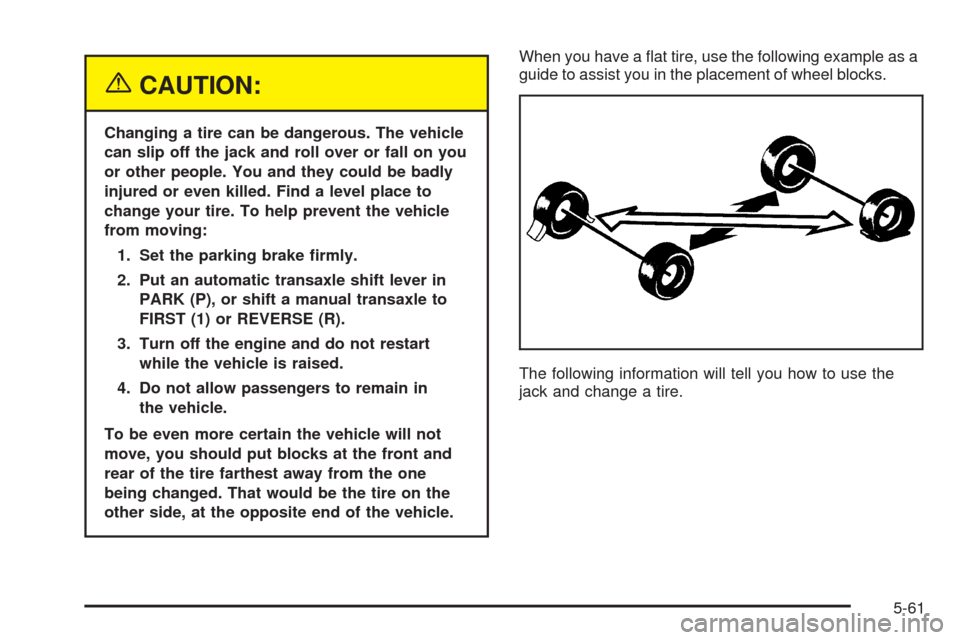
other side, at the opposite end of the vehicle.When you have a flat tire, use the following example as a
guide to assist you in the placement of wheel blocks.
The following information will tell you how to use the
jack and change a tire.
5-61
Page 259 of 316
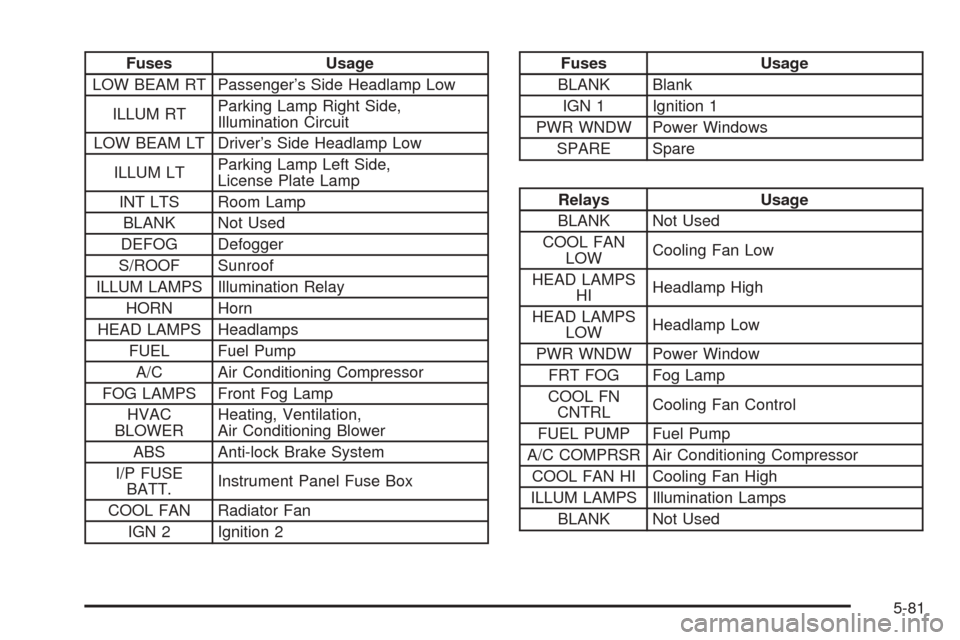
Fuses Usage
LOW BEAM RT Passenger’s Side Headlamp Low
ILLUM RTParking Lamp Right Side,
Illumination Circuit
LOW BEAM LT Driver’s Side Headlamp Low
ILLUM LTParking Lamp Left Side,
License Plate Lamp
INT LTS Room Lamp
BLANK Not Used
DEFOG Defogger
S/ROOF Sunroof
ILLUM LAMPS Illumination Relay
HORN Horn
HEAD LAMPS Headlamps
FUEL Fuel Pump
A/C Air Conditioning Compressor
FOG LAMPS Front Fog Lamp
HVAC
BLOWERHeating, Ventilation,
Air Conditioning Blower
ABS Anti-lock Brake System
I/P FUSE
BATT.Instrument Panel Fuse Box
COOL FAN Radiator Fan
IGN 2 Ignition 2Fuses Usage
BLANK Blank
IGN 1 Ignition 1
PWR WNDW Power Windows
SPARE Spare
Relays Usage
BLANK Not Used
COOL FAN
LOWCooling Fan Low
HEAD LAMPS
HIHeadlamp High
HEAD LAMPS
LOWHeadlamp Low
PWR WNDW Power Window
FRT FOG Fog Lamp
COOL FN
CNTRLCooling Fan Control
FUEL PUMP Fuel Pump
A/C COMPRSR Air Conditioning Compressor
COOL FAN HI Cooling Fan High
ILLUM LAMPS Illumination Lamps
BLANK Not Used
5-81
Page 282 of 316
At Least Once a Year
Key Lock Cylinders Service
Lubricate the key lock cylinders with the lubricant
specified in Part D.
Body Lubrication Service
Lubricate all hood latch assemblies, secondary latch,
pivots, spring anchor, release pawl, hood and body
door hinges, rear compartment and any folding
seat hardware. Part D tells you what to use.
More frequent lubrication may be required when
exposed to a corrosive environment.
Starter Switch Check
{CAUTION:
When you are doing this inspection, the
vehicle could move suddenly. If the vehicle
moves, you or others could be injured.
1. Before you start, be sure you have enough room
around the vehicle.
2. Firmly apply both the parking brake and the regular
brake. SeeParking Brake on page 2-26if necessary.
Do not use the accelerator pedal, and be ready to
turn off the engine immediately if it starts.
3. On automatic transaxle vehicles, try to start the
engine in each gear. The starter should work only in
PARK (P) or NEUTRAL (N). If the starter works in
any other position, your vehicle needs service.
On manual transaxle vehicles, put the shift lever in
NEUTRAL, push the clutch down halfway and try to
start the engine. The starter should work only when
the clutch is pushed down all the way to the floor.
If the starter works when the clutch is not pushed all
the way down, your vehicle needs service.
6-20
Page 283 of 316
Automatic Transaxle Shift Lock Control
System Check
{CAUTION:
When you are doing this inspection, the
vehicle could move suddenly. If the vehicle
moves, you or others could be injured.
1. Before you start, be sure you have enough room
around the vehicle. It should be parked on a level
surface.
2. Firmly apply the parking brake. SeeParking Brake
on page 2-26if necessary.
Be ready to apply the regular brake immediately if
the vehicle begins to move.
3. With the engine off, turn the ignition to ON, but do
not start the engine. Without applying the regular
brake, try to move the shift lever out of PARK (P)
with normal effort. If the shift lever moves out
of PARK (P), your vehicle needs service.
Ignition Transaxle Lock Check
While parked, and with the parking brake set, try to turn
the ignition to LOCK in each shift lever position.
•With an automatic transaxle, the ignition should turn
to LOCK only when the shift lever is in PARK (P).
•With a manual transaxle, the ignition should turn to
LOCK only when you press the key release button.
On all vehicles, the key should come out only in LOCK.
Turn the steering wheel to the left and to the right. It
should only lock when turned to the right.
6-21
Page 284 of 316
Parking Brake and Automatic Transaxle
Park (P) Mechanism Check
{CAUTION:
When you are doing this check, your vehicle
could begin to move. You or others could be
injured and property could be damaged.
Make sure there is room in front of your
vehicle in case it begins to roll. Be ready to
apply the regular brake at once should the
vehicle begin to move.Park on a fairly steep hill, with the vehicle facing
downhill. Keeping your foot on the regular brake,
set the parking brake.
•To check the parking brake’s holding ability: With
the engine running and transaxle in NEUTRAL (N),
slowly remove foot pressure from the regular
brake pedal. Do this until the vehicle is held by the
parking brake only.
•To check the PARK (P) mechanism’s holding ability:
With the engine running, shift to PARK (P). Then
release the parking brake followed by the regular
brake.
Underbody Flushing Service
At least every spring, use plain water to flush any
corrosive materials from the underbody. Take care to
clean thoroughly any areas where mud and other debris
can collect.
6-22
Page 286 of 316
Engine Cooling System Inspection
Inspect the hoses and have them replaced if they
are cracked, swollen or deteriorated. Inspect all pipes,
fittings and clamps; replace as needed. Clean the
outside of the radiator and air conditioning condenser.
To help ensure proper operation, a pressure test of
the cooling system and pressure cap is recommended
at least once a year.
Throttle System Inspection
Inspect the throttle system for interference or binding,
and for damaged or missing parts. Replace parts
as needed. Replace any components that have high
effort or excessive wear. Do not lubricate accelerator
and cruise control cables.
Brake System Inspection
Inspect the complete system. Inspect brake lines and
hoses for proper hook-up, binding, leaks, cracks,
chafing, etc. Inspect disc brake pads for wear and rotors
for surface condition. Also inspect drum brake linings
for wear and cracks. Inspect other brake parts, including
drums, wheel cylinders, calipers, parking brake, etc.
Check parking brake adjustment. You may need to
have your brakes inspected more often if your driving
habits or conditions result in frequent braking.
6-24
Page 306 of 316
B
Battery..........................................................5-35
Before Leaving on a Long Trip.........................4-20
Brake
Anti-Lock Brake System (ABS)........................ 4-6
Emergencies................................................ 4-8
Parking......................................................2-26
System Inspection.......................................6-24
System Warning Light..................................3-22
Brakes..........................................................5-32
Braking........................................................... 4-5
Braking in Emergencies..................................... 4-8
Break-In, New Vehicle.....................................2-17
Bulb Replacement...........................................5-40
Fog Lamps.................................................5-43
Front Turn Signal and Parking Lamps.............5-42
Halogen Bulbs............................................5-40
Headlamp Aiming........................................5-39
Headlamps.................................................5-40
Replacement Bulbs......................................5-46
Sidemarker Lamps.......................................5-44
Taillamps, Turn Signal, Stoplamps and
Back-up Lamps........................................5-45
Turn Signal Lamps......................................5-42
Buying New Tires...........................................5-56
C
California Fuel.................................................. 5-5
Canadian Owners................................................ ii
Capacities and Specifications............................5-82
Carbon Monoxide.............2-9, 2-11, 2-30, 4-23, 4-35
Care of
Safety Belts................................................5-71
Your CD Player...........................................3-45
Your CDs ...................................................3-45
Center Rear Passenger Position, Safety Belts.....1-26
Chains, Tire...................................................5-59
Charging System Light....................................3-27
Check
Engine Light...............................................3-28
Checking Things Under the Hood......................5-10
Chemical Paint Spotting...................................5-75
Child Restraints
Child Restraint Systems...............................1-33
Infants and Young Children...........................1-30
Lower Anchorages and Top Tethers for
Children (LATCH System)..........................1-39
Older Children.............................................1-27
Securing a Child Restraint Designed for the
LATCH System........................................1-41
2