Page 218 of 316
Bulb Replacement
For the proper type of replacement bulbs, see
Replacement Bulbs on page 5-46.
For any bulb changing procedure not listed in this
section, contact your dealer.
Halogen Bulbs
{CAUTION:
Halogen bulbs have pressurized gas inside
and can burst if you drop or scratch the bulb.
You or others could be injured. Be sure to
read and follow the instructions on the bulb
package.
Headlamps
To replace a headlamp bulb, do the following:
1. Open the hood. SeeHood Release on page 5-10
for more information.
2. Remove the five screws from top of the radiator
grille.
3. Remove the radiator grille.
4. Remove the three bolts from the headlamp
assembly.
5. Remove the headlamp assembly.
5-40
Page 219 of 316
6. Disconnect the wiring harness connector from the
rear of the bulb.
7. Remove the headlamp cap.8. Release the spring that retains the bulb by loosing
the screw.
9. Remove the old bulb.
10. Install the new bulb.
11. Install the bulb retaining spring.
12. Reverse Steps 1 through 3 to install the headlamp
assembly.
5-41
Page 220 of 316

Front Turn Signal and Parking
Lamps
To replace a front turn signal or parking lamp bulb,
do the following:
1. Remove the radiator grille and the headlamp
assembly. See Steps 2 through 5 underHeadlamps
on page 5-40for instructions on how to remove
the headlamp assembly.
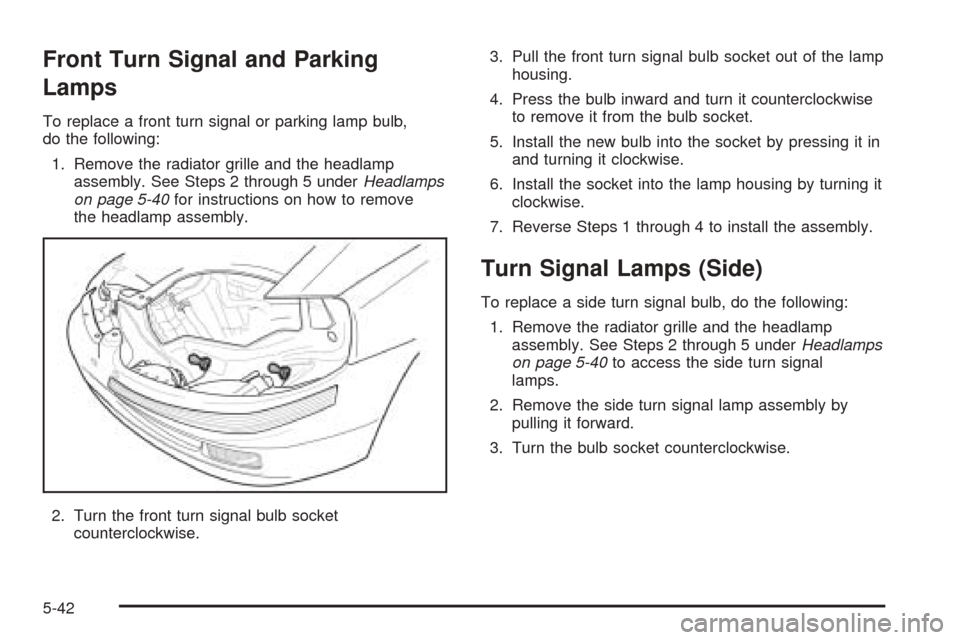
2. Turn the front turn signal bulb socket
counterclockwise.3. Pull the front turn signal bulb socket out of the lamp
housing.
4. Press the bulb inward and turn it counterclockwise
to remove it from the bulb socket.
5. Install the new bulb into the socket by pressing it in
and turning it clockwise.
6. Install the socket into the lamp housing by turning it
clockwise.
7. Reverse Steps 1 through 4 to install the assembly.
Turn Signal Lamps (Side)
To replace a side turn signal bulb, do the following:
1. Remove the radiator grille and the headlamp
assembly. See Steps 2 through 5 underHeadlamps
on page 5-40to access the side turn signal
lamps.
2. Remove the side turn signal lamp assembly by
pulling it forward.
3. Turn the bulb socket counterclockwise.
5-42
Page 222 of 316
Sidemarker Lamps (Front)
To replace a front sidemarker bulb, do the following:
1. Remove the radiator grille and the headlamp
assembly. See Steps 2 through 5 underHood
Release on page 5-10to access the front
sidemarker lamps.
2. Turn the front sidemarker bulb socket
counterclockwise.
3. Pull the front sidemarker bulb socket out of the front
bumper.4. Pull the old bulb straight out from the bulb socket.
5. Install the new bulb by pressing it straight into
the bulb socket.
6. Reverse Steps 1 through 4 to install the bulb socket
and assembly.
Sidemarker Lamps (Rear)
To replace a rear sidemarker bulb, do the following:
1. Reach into the inside of the rear bumper and locate
the rear sidemarker bulb socket.
2. Turn the bulb socket counterclockwise.
3. Pull the bulb socket out of the rear bumper.
5-44
Page 224 of 316
Replacement Bulbs
Exterior Lamp Bulb Number
Back-Up 94535571
Center High-Mounted Stoplamp
(CHMSL)94535587
Headlamps 94535548
Fog 96535557
Front Parking/Turn Signal 94535574
Sidemarker, Front and Rear 94535587
Side Turn Signal 94535587
Stoplamp/Taillamps 94535574
Turn Signal Lamps 94535572
For replacement bulbs not listed here, contact your
dealer.
Windshield Wiper Blade
Replacement
Windshield wiper blades should be inspected for
wear or cracking. See “Wiper Blade Check” under
Part B: Owner Checks and Services on page 6-18
for more information.Replacement blades come in different types and are
removed in different ways.
Here is how to remove the Shepherd’s Hook type:
1. Pull the windshield wiper arm away from the
windshield.
2. Press the retaining clip (A) and pull the wiper blade
off the arm.
3. Install a new blade by reversing Steps 1 and 2.
5-46
Page 237 of 316

{CAUTION:
Using the wrong replacement wheels, wheel
bolts or wheel nuts on your vehicle can be
dangerous. It could affect the braking and
handling of your vehicle, make your tires lose
air and make you lose control. You could have
a collision in which you or others could be
injured. Always use the correct wheel, wheel
bolts and wheel nuts for replacement.
Notice:The wrong wheel can also cause problems
with bearing life, brake cooling, speedometer or
odometer calibration, headlamp aim, bumper height,
vehicle ground clearance and tire or tire chain
clearance to the body and chassis.
SeeChanging a Flat Tire on page 5-60for more
information.
Used Replacement Wheels
{CAUTION:
Putting a used wheel on your vehicle is
dangerous. You can’t know how it’s been
used or how far it’s been driven. It could fail
suddenly and cause a crash. If you have to
replace a wheel, use a new GM original
equipment wheel.
Tire Chains
Notice:Use tire chains only where legal and only
when you must. Use only SAE Class “S” type chains
that are the proper size for your tires. Install them
on the front tires and tighten them as tightly as
possible with the ends securely fastened. Drive
slowly and follow the chain manufacturer’s
instructions. If you can hear the chains contacting
your vehicle, stop and retighten them. If the contact
continues, slow down until it stops. Driving too
fast or spinning the wheels with chains on will
damage your vehicle.
5-59
Page 255 of 316

Headlamp Wiring
The headlamp wiring is protected by fuses, one for each
headlamp, in the fuse block. An electrical overload
will cause the lamps to turn off. If this happens, have
your headlamp wiring checked right away.
Windshield Wiper Fuses
The windshield wiper motor is protected by an internal
circuit breaker and a fuse. If the motor overheats due
to heavy snow, etc., the wiper will stop until the
motor cools. If the overload is caused by some electrical
problem and not snow, etc., be sure to get it fixed.
Power Windows and Other Power
Options
Circuit breakers in the fuse block protect the power
windows and other power accessories. When the
current load is too heavy, the circuit breaker opens and
closes, protecting the circuit until the problem is fixed
or goes away.
Fuses and Circuit Breakers
The wiring circuits in your vehicle are protected from
short circuits by a combination of fuses, circuit breakers
and fusible thermal links in the wiring itself.
Look at the silver-colored band inside the fuse. If the
band is broken or melted, replace the fuse. Be sure you
replace a bad fuse with a new one of the identical
size and rating.
There are spare fuses provided in the engine
compartment fuse block. If you ever have a problem
on the road and do not have a spare fuse, you
can borrow one that has the same amperage. Just
pick a feature of your vehicle that you can get along
without — like the radio or cigarette lighter — and use
its fuse, if it is the correct amperage. Replace it as
soon as you can.
There are two fuse blocks in your vehicle: the instrument
panel fuse block and the engine compartment fuse
block.
There is a fuse puller located on the engine
compartment fuse block. It can be used to easily
remove fuses from the fuse block.
5-77
Page 258 of 316
Fuses Usage
HI BEAM RT Passenger’s Side Headlamp High
DIODE (FOG) Fog Lamp DiodeFuses Usage
HI BEAM LT Driver’s Side Headlamp High
BLANK Not Used
5-80