2005 CHEVROLET AVALANCHE lock
[x] Cancel search: lockPage 322 of 496

Rear Towing (Rear Wheels Off the Ground)
Two-Wheel-Drive Vehicles
Use the following procedure to tow your vehicle from
the rear:
1. Drive the vehicle onto the dolly.
2. Firmly set the parking brake. SeeParking
Brake on page 2-38for more information.
3. Put the transmission in PARK (P).
4. Follow the dolly manufacturer’s instructions to
attach and secure the vehicle being towed to
the dolly and then the loaded dolly to the tow
vehicle.
Make sure the wheels are straight before
proceeding to the next steps.
5. Release the parking brake only after the vehicle
being towed is �rmly attached to the tow vehicle.
6. Turn the ignition off and lock the steering column.
If the tow vehicle will not be started or driven for six
weeks or more, remove the battery cable from
the negative terminal (post) of the battery to prevent
your battery from draining while towing.
Four-Wheel-Drive Vehicles
Use the following procedure to tow your vehicle from
the rear:
1. Drive the vehicle onto the dolly.
2. Put the transmission in PARK (P).
3. Turn the engine off, but leave the ignition on.
4. Firmly set the parking brake.
5. Follow the dolly manufacturer’s instructions to
attach and secure the vehicle being towed to
the dolly and then the loaded dolly to the tow
vehicle.
Make sure the wheels are straight before
proceeding to the next steps.
{CAUTION:
Shifting the transfer case to NEUTRAL can
cause your vehicle to roll even if the
transmission is in PARK (P). You or someone
else could be seriously injured. Be sure to set
the parking brake before placing the transfer
case in NEUTRAL. SeeParking Brake on
page 2-38.
4-62
Page 323 of 496

6. Shift the transfer case to NEUTRAL (N). See
Four-Wheel Drive on page 2-34for the proper
procedure to select the neutral position for your
vehicle.
7. Release the parking brake only after the vehicle
being towed is �rmly attached to the tow vehicle.
8. Turn the ignition off and lock the steering column.
If the tow vehicle will not be started or driven for
six weeks or more, remove the battery cable
from the negative terminal (post) of the battery to
prevent your battery from draining while towing.
Level Control
Self-Adjusting
The self-adjusting rear suspension may come as part of
the premium smooth ride suspension package.
This type of level control will provide a leveled riding
position as well as improved handling under a variety of
passenger and loading conditions. A hydraulic pump
inside each rear shock absorber raises the rear of
the vehicle to the proper height, based on inputs from
the road surface, while the vehicle is being driven.
It take approximately 2 miles (3.2 km) of driving for the
leveling to complete, depending on the road surface
conditions.If the loaded vehicle is not moved for approximately
12 hours, the leveling system may bleed down to a lower
height. This can be especially apparent if a trailer is
left attached to a parked vehicle for long periods of time.
The vehicle must be driven to re-level the vehicle.
If a self-equalizing hitch is being used, the vehicle
should be driven approximately 2 miles (3.2 km) with
the trailer prior to adjusting (leveling) the hitch.
Truck-Camper Loading Information
Your vehicle was neither designed nor intended to carry
a slide-in type camper.
Notice:Adding a slide-in camper or similar
equipment to your vehicle can damage it, and the
repairs would not be covered by your warranty.
Do not install a slide-in camper or similar equipment
on your vehicle.
4-63
Page 336 of 496

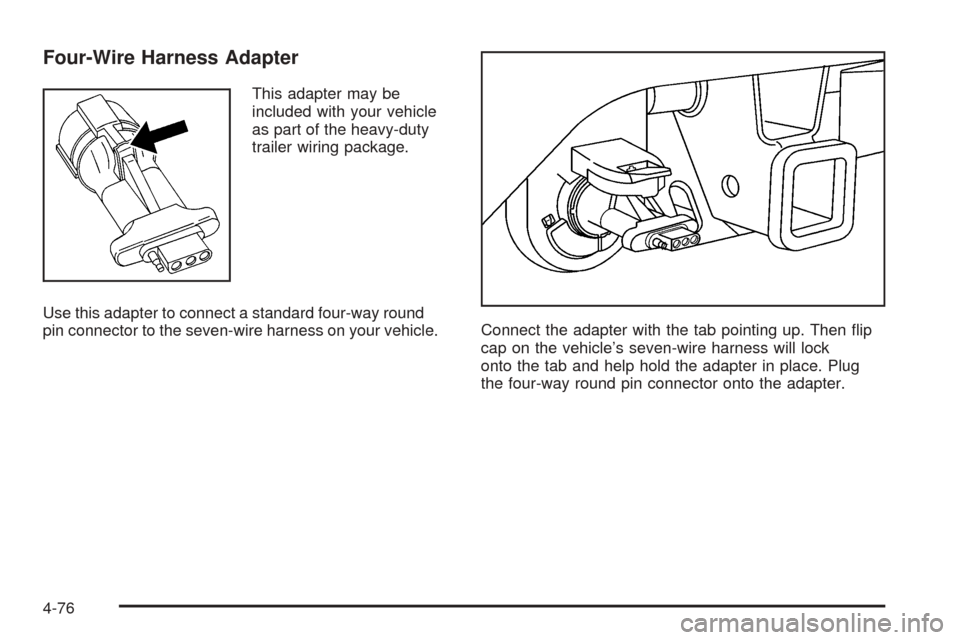
Four-Wire Harness Adapter
This adapter may be
included with your vehicle
as part of the heavy-duty
trailer wiring package.
Use this adapter to connect a standard four-way round
pin connector to the seven-wire harness on your vehicle.Connect the adapter with the tab pointing up. Then �ip
cap on the vehicle’s seven-wire harness will lock
onto the tab and help hold the adapter in place. Plug
the four-way round pin connector onto the adapter.
4-76
Page 340 of 496

Tires..............................................................5-59
Tire Sidewall Labelling...................................5-60
Tire Terminology and De�nitions.....................5-63
In�ation - Tire Pressure.................................5-66
Tire Inspection and Rotation...........................5-67
When It Is Time for New Tires.......................5-69
Buying New Tires.........................................5-69
Uniform Tire Quality Grading..........................5-71
Wheel Alignment and Tire Balance..................5-72
Wheel Replacement......................................5-72
Tire Chains..................................................5-74
If a Tire Goes Flat........................................5-74
Changing a Flat Tire.....................................5-75
Removing the Spare Tire and Tools................5-76
Removing the Flat Tire and Installing the
Spare Tire................................................5-80
Secondary Latch System...............................5-87
Storing a Flat or Spare Tire and Tools............5-91
Spare Tire...................................................5-93
Appearance Care............................................5-94
Cleaning the Inside of Your Vehicle.................5-95
Fabric/Carpet...............................................5-96
Leather.......................................................5-97
Instrument Panel, Vinyl, and Other Plastic
Surfaces..................................................5-97
Care of Safety Belts......................................5-97Weatherstrips...............................................5-98
Washing Your Vehicle...................................5-98
Cleaning Exterior Lamps/Lenses.....................5-98
Finish Care..................................................5-98
Windshield and Wiper Blades.........................5-99
Aluminum or Chrome-Plated Wheels..............5-100
Tires.........................................................5-100
Sheet Metal Damage...................................5-101
Finish Damage...........................................5-101
Underbody Maintenance...............................5-101
Chemical Paint Spotting...............................5-101
Vehicle Care/Appearance Materials................5-102
Vehicle Identi�cation.....................................5-103
Vehicle Identi�cation Number (VIN)................5-103
Service Parts Identi�cation Label...................5-103
Electrical System..........................................5-103
Windshield Wiper Fuses...............................5-104
Power Windows and Other Power Options......5-104
Fuses and Circuit Breakers..........................5-104
Instrument Panel Fuse Block........................5-104
Center Instrument Panel Fuse Block..............5-106
Underhood Fuse Block................................5-107
Capacities and Speci�cations........................5-112
Section 5 Service and Appearance Care
5-2
Page 346 of 496

Filling the Tank
{CAUTION:
Fuel vapor burns violently and a fuel �re can
cause bad injuries. To help avoid injuries to
you and others, read and follow all the
instructions on the pump island. Turn off your
engine when you are refueling. Do not smoke
if you are near fuel or refueling your vehicle.
Keep sparks, �ames, and smoking materials
away from fuel. Do not leave the fuel pump
unattended when refueling your vehicle — this
is against the law in some places. Keep
children away from the fuel pump; never let
children pump fuel.
The tethered fuel cap is located behind a hinged fuel
door on the driver’s side of the vehicle.
To remove the fuel cap, turn it slowly counterclockwise.
It will require more effort to turn the fuel cap on the
last turn as you loosen it.
{CAUTION:
If you spill fuel and then something ignites it,
you could be badly burned. Fuel can spray out
on you if you open the fuel cap too quickly.
This spray can happen if your tank is nearly
full, and is more likely in hot weather. Open
the fuel cap slowly and wait for any hiss noise
to stop. Then unscrew the cap all the way.
Be careful not to spill fuel. Do not top off or over�ll the
tank and wait a few seconds after you have �nished
pumping before removing the nozzle. Clean fuel
from painted surfaces as soon as possible. See
Washing Your Vehicle on page 5-98.
When replacing the fuel cap, turn it clockwise until it
clicks. It will require more effort to turn the fuel cap on
the last turn as you tighten it. Make sure the cap is
fully installed. The diagnostic system can determine if
the fuel cap has been left off or improperly installed.
This would allow fuel to evaporate into the atmosphere.
SeeMalfunction Indicator Lamp on page 3-40.
5-8
Page 351 of 496

A. Engine Air Cleaner/Filter. SeeEngine Air
Cleaner/Filter on page 5-20.
B. Coolant Surge Tank and Pressure Cap. SeeCooling
System on page 5-30andCoolant Surge Tank
Pressure Cap on page 5-28.
C. Air Filter Restriction Indicator (If Equipped). See
Engine Air Cleaner/Filter on page 5-20.
D. Engine Oil Fill Cap. See “When to Add Engine Oil”
underEngine Oil on page 5-15.
E. Engine Oil Dipstick. See “Checking Engine Oil”
underEngine Oil on page 5-15.
F. Automatic Transmission Fluid Dipstick. See
“Checking the Fluid Level” underAutomatic
Transmission Fluid on page 5-22.
G. Engine Cooling Fan. SeeCooling System on
page 5-30.H. Remote Negative (−) Terminal (GND). SeeJump
Starting on page 5-42.
I. Power Steering Fluid Reservoir (Out of View). See
Power Steering Fluid on page 5-36.
J. Remote Positive (+) Terminal. SeeJump Starting on
page 5-42.
K. Brake Fluid Reservoir. See “Brake Fluid” under
Brakes on page 5-38.
L. Underhood Fuse Block. SeeUnderhood Fuse Block
on page 5-107.
M. Battery. SeeBattery on page 5-41.
N. Windshield Washer Fluid Reservoir. See “Adding
Washer Fluid” underWindshield Washer Fluid
on page 5-36.
5-13
Page 353 of 496

A. Engine Air Cleaner/Filter. SeeEngine Air
Cleaner/Filter on page 5-20.
B. Coolant Surge Tank and Pressure Cap. SeeCooling
System on page 5-30andCoolant Surge Tank
Pressure Cap on page 5-28.
C. Air Filter Restriction Indicator (If Equipped). See
Engine Air Cleaner/Filter on page 5-20.
D. Engine Oil Dipstick. See “Checking Engine Oil”
underEngine Oil on page 5-15.
E. Automatic Transmission Fluid Dipstick. See
“Checking the Fluid Level” underAutomatic
Transmission Fluid on page 5-22.
F. Engine Oil Fill Cap. See “When to Add Engine Oil”
underEngine Oil on page 5-15.
G. Engine Cooling Fan. SeeCooling System on
page 5-30.
H. Remote Negative (−) Terminal (GND). SeeJump
Starting on page 5-42.
I. Remote Positive (+) Terminal. SeeJump Starting on
page 5-42.
J. Power Steering Fluid Reservoir. SeePower Steering
Fluid on page 5-36.
K. Brake Fluid Reservoir. See “Brake Fluid” under
Brakes on page 5-38.
L. Underhood Fuse Block. SeeUnderhood Fuse Block
on page 5-107.M. Battery. SeeBattery on page 5-41.
N. Windshield Washer Fluid Reservoir. See “Adding
Washer Fluid” underWindshield Washer Fluid
on page 5-36.
Engine Oil
If the CHECK OIL LEVEL message appears on the
instrument cluster, it means you need to check
your engine oil level right away.
For more information, see CHECK OIL LEVEL under
DIC Warnings and Messages on page 3-49.
You should check your engine oil level regularly; this is
an added reminder.
Checking Engine Oil
It is a good idea to check your engine oil every time you
get fuel. In order to get an accurate reading, the oil
must be warm and the vehicle must be on level ground.
The engine oil dipstick handle is a yellow loop. See
Engine Compartment Overview on page 5-12for
the location of the engine oil dipstick.
1. Turn off the engine and give the oil several minutes
to drain back into the oil pan. If you do not do this,
the oil dipstick might not show the actual level.
5-15
Page 357 of 496

How to Reset the Engine Oil Life
System
The Engine Oil Life System calculates when to change
your engine oil and �lter based on vehicle use.
Anytime your oil is changed, reset the system so it can
calculate when the next oil change is required. If a
situation occurs where you change your oil prior to a
CHANGE ENGINE OIL message being turned on, reset
the system.
To reset the CHANGE ENGINE OIL message, see
“Engine Oil Life System” underDIC Operation and
Displays on page 3-46for vehicles equipped with the
DIC, or do the following:
1. Turn the ignition key to RUN with the engine off.
2. Fully press and release the accelerator pedal slowly
three times within �ve seconds.
If the OIL LIFE RESET message �ashes for
10 seconds, the system is resetting.
3. Turn the key to LOCK.
If the CHANGE ENGINE OIL message comes back on
when you start your vehicle, the engine oil life system
has not reset. Repeat the procedure. If it still does
not reset, see your dealer for service.
What to Do with Used Oil
Used engine oil contains certain elements that may be
unhealthy for your skin and could even cause cancer.
Do not let used oil stay on your skin for very long. Clean
your skin and nails with soap and water, or a good
hand cleaner. Wash or properly dispose of clothing or
rags containing used engine oil. See the manufacturer’s
warnings about the use and disposal of oil products.
Used oil can be a threat to the environment. If you
change your own oil, be sure to drain all the oil from the
�lter before disposal. Never dispose of oil by putting it in
the trash, pouring it on the ground, into sewers, or into
streams or bodies of water. Instead, recycle it by taking it
to a place that collects used oil. If you have a problem
properly disposing of your used oil, ask your dealer, a
service station or a local recycling center for help.
5-19