2005 CHEVROLET ASTRO CARGO VAN wheel
[x] Cancel search: wheelPage 198 of 370
Towing
Towing Your Vehicle
Consult your dealer or a professional towing service if
you need to have your disabled vehicle towed. See
Roadside Assistance Program on page 7-5.
If you want to tow your vehicle behind another vehicle
for recreational purposes (such as behind a motorhome),
see “Recreational Vehicle Towing” following.
Recreational Vehicle Towing
Recreational vehicle towing means towing your vehicle
behind another vehicle — such as behind a motorhome.
The two most common types of recreational vehicle
towing are known as “dinghy towing” (towing your vehicle
with all four wheels on the ground) and “dolly towing”
(towing your vehicle with two wheels on the ground and
two wheels up on a device known as a “dolly”).
Notice:Towing an all-wheel-drive vehicle with all
four wheels on the ground, or even with only two of
its wheels on the ground, will damage drivetrain
components. Do not tow an all-wheel-drive vehicle if
any of its wheels will be on the ground.Your vehicle was not designed to be towed with any of
its wheels on the ground. If your vehicle must be
towed, it should be placed on a platform trailer.
Towing a Trailer
{CAUTION:
If you do not use the correct equipment and
drive properly, you can lose control when you
pull a trailer. For example, if the trailer is too
heavy, the brakes may not work well — or even
at all. You and your passengers could be
seriously injured. Pull a trailer only if you have
followed all the steps in this section. Ask your
dealer for advice and information about towing
a trailer with your vehicle.
Notice:Pulling a trailer improperly can damage
your vehicle and result in costly repairs that would
not be covered by your warranty. Always follow
the instructions in this section and check with your
dealer for more information about towing a trailer
with your vehicle.
4-34
Page 201 of 370
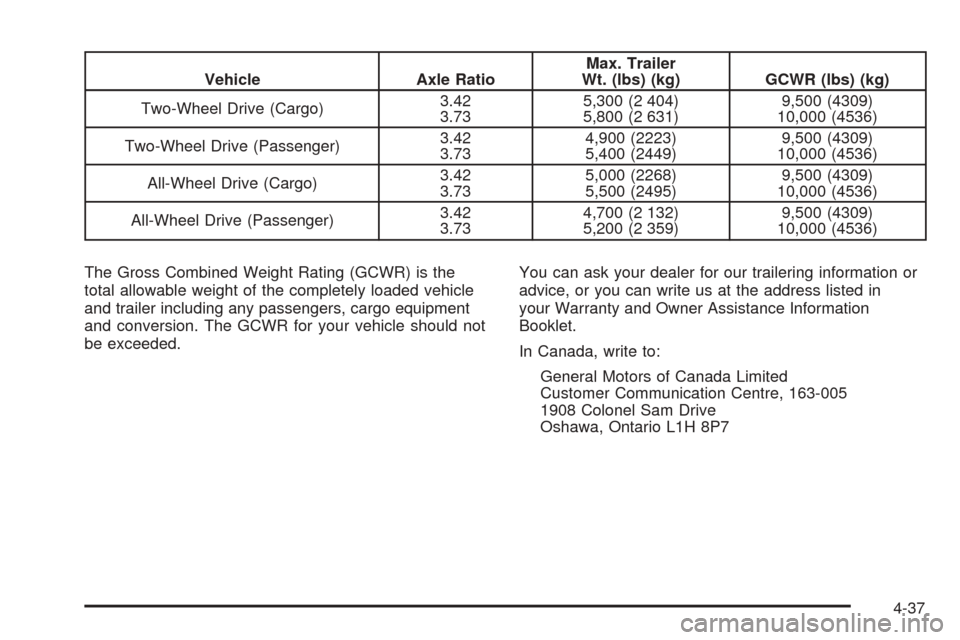
Vehicle Axle RatioMax. Trailer
Wt. (lbs) (kg) GCWR (lbs) (kg)
Two-Wheel Drive (Cargo)3.42
3.735,300 (2 404)
5,800 (2 631)9,500 (4309)
10,000 (4536)
Two-Wheel Drive (Passenger)3.42
3.734,900 (2223)
5,400 (2449)9,500 (4309)
10,000 (4536)
All-Wheel Drive (Cargo)3.42
3.735,000 (2268)
5,500 (2495)9,500 (4309)
10,000 (4536)
All-Wheel Drive (Passenger)3.42
3.734,700 (2 132)
5,200 (2 359)9,500 (4309)
10,000 (4536)
The Gross Combined Weight Rating (GCWR) is the
total allowable weight of the completely loaded vehicle
and trailer including any passengers, cargo equipment
and conversion. The GCWR for your vehicle should not
be exceeded.You can ask your dealer for our trailering information or
advice, or you can write us at the address listed in
your Warranty and Owner Assistance Information
Booklet.
In Canada, write to:
General Motors of Canada Limited
Customer Communication Centre, 163-005
1908 Colonel Sam Drive
Oshawa, Ontario L1H 8P7
4-37
Page 206 of 370
Passing
You’ll need more passing distance up ahead when
you’re towing a trailer. And, because you’re a good deal
longer, you’ll need to go much farther beyond the
passed vehicle before you can return to your lane.
Backing Up
Hold the bottom of the steering wheel with one hand.
Then, to move the trailer to the left, just move that hand
to the left. To move the trailer to the right, move your
hand to the right. Always back up slowly and, if possible,
have someone guide you.
Making Turns
Notice:Making very sharp turns while trailering
could cause the trailer to come in contact with the
vehicle. Your vehicle could be damaged. Avoid
making very sharp turns while trailering.
When you’re turning with a trailer, make wider turns
than normal. Do this so your trailer won’t strike
soft shoulders, curbs, road signs, trees or other objects.
Avoid jerky or sudden maneuvers. Signal well in
advance.
Turn Signals When Towing a Trailer
When you tow a trailer, your vehicle has to have extra
wiring (included in the optional trailering package).
The arrows on your instrument panel will ash whenever
you signal a turn or lane change. Properly hooked up,
the trailer lamps will also ash, telling other drivers
you’re about to turn, change lanes or stop.
When towing a trailer, the arrows on your instrument
panel will ash for turns even if the bulbs on the trailer
are burned out. Thus, you may think drivers behind
you are seeing your signal when they are not. It’s
important to check occasionally to be sure the trailer
bulbs are still working.
Driving On Grades
Reduce speed and shift to a lower gearbeforeyou start
down a long or steep downgrade. If you don’t shift
down, you might have to use your brakes so much that
they would get hot and no longer work well.
You can tow in DRIVE (D). You may want to shift the
transmission to THIRD (3) or, if necessary, a lower gear
selection if the transmission shifts too often (e.g.,
under heavy loads and/or hilly conditions).
4-42
Page 207 of 370
When towing at high altitude on steep uphill grades,
consider the following: Engine coolant will boil at a lower
temperature than at normal altitudes. If you turn your
engine off immediately after towing at high altitude
on steep uphill grades, your vehicle may show signs
similar to engine overheating. To avoid this, let the
engine run while parked (preferably on level ground)
with the transmission in PARK (P) for a few minutes
before turning the engine off. If you do get the overheat
warning, seeEngine Overheating on page 5-28.
Parking on Hills
{CAUTION:
You really should not park your vehicle, with a
trailer attached, on a hill. If something goes
wrong, your rig could start to move. People
can be injured, and both your vehicle and the
trailer can be damaged.
But if you ever have to park your rig on a hill, here’s
how to do it:
1. Apply your regular brakes, but don’t shift into
PARK (P) yet.2. Have someone place chocks under the trailer
wheels.
3. When the wheel chocks are in place, release the
regular brakes until the chocks absorb the load.
4. Reapply the regular brakes. Then apply your
parking brake, and shift to PARK (P).
5. Release the regular brakes.
When You Are Ready to Leave After
Parking on a Hill
1. Apply your regular brakes and hold the pedal down
while you:
start your engine,
shift into a gear, and
release the parking brake.
2. Let up on the brake pedal.
3. Drive slowly until the trailer is clear of the chocks.
4. Stop and have someone pick up and store the
chocks.
4-43
Page 208 of 370
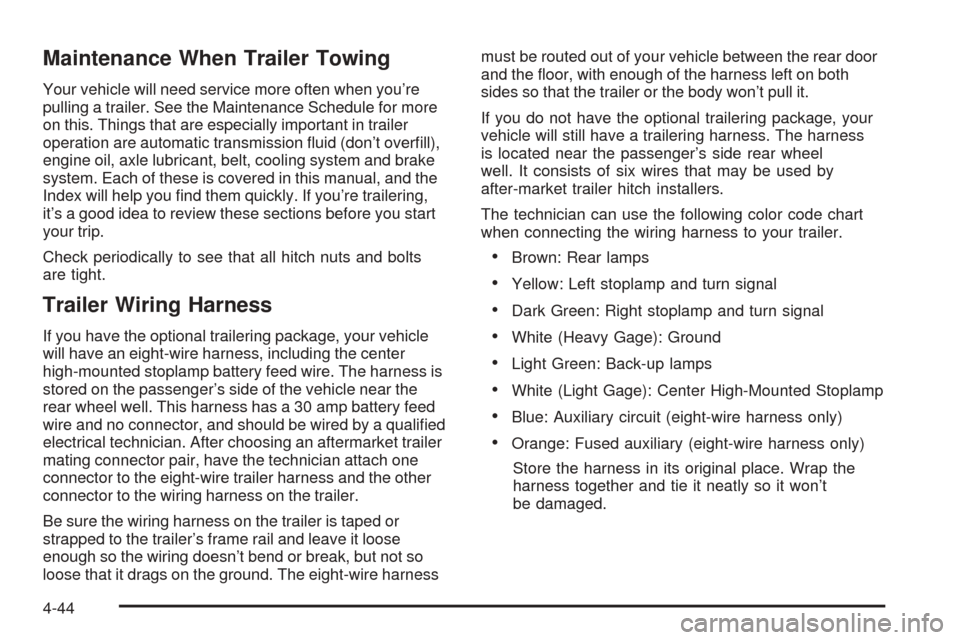
Maintenance When Trailer Towing
Your vehicle will need service more often when you’re
pulling a trailer. See the Maintenance Schedule for more
on this. Things that are especially important in trailer
operation are automatic transmission uid (don’t overll),
engine oil, axle lubricant, belt, cooling system and brake
system. Each of these is covered in this manual, and the
Index will help you nd them quickly. If you’re trailering,
it’s a good idea to review these sections before you start
your trip.
Check periodically to see that all hitch nuts and bolts
are tight.
Trailer Wiring Harness
If you have the optional trailering package, your vehicle
will have an eight-wire harness, including the center
high-mounted stoplamp battery feed wire. The harness is
stored on the passenger’s side of the vehicle near the
rear wheel well. This harness has a 30 amp battery feed
wire and no connector, and should be wired by a qualied
electrical technician. After choosing an aftermarket trailer
mating connector pair, have the technician attach one
connector to the eight-wire trailer harness and the other
connector to the wiring harness on the trailer.
Be sure the wiring harness on the trailer is taped or
strapped to the trailer’s frame rail and leave it loose
enough so the wiring doesn’t bend or break, but not so
loose that it drags on the ground. The eight-wire harnessmust be routed out of your vehicle between the rear door
and the oor, with enough of the harness left on both
sides so that the trailer or the body won’t pull it.
If you do not have the optional trailering package, your
vehicle will still have a trailering harness. The harness
is located near the passenger’s side rear wheel
well. It consists of six wires that may be used by
after-market trailer hitch installers.
The technician can use the following color code chart
when connecting the wiring harness to your trailer.
Brown: Rear lamps
Yellow: Left stoplamp and turn signal
Dark Green: Right stoplamp and turn signal
White (Heavy Gage): Ground
Light Green: Back-up lamps
White (Light Gage): Center High-Mounted Stoplamp
Blue: Auxiliary circuit (eight-wire harness only)
Orange: Fused auxiliary (eight-wire harness only)
Store the harness in its original place. Wrap the
harness together and tie it neatly so it won’t
be damaged.
4-44
Page 209 of 370
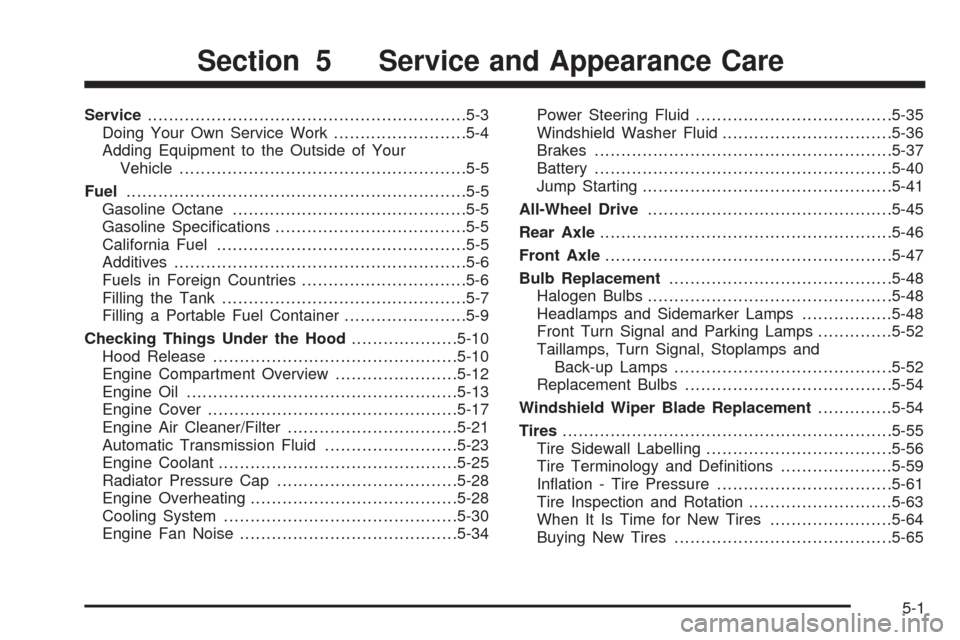
Service............................................................5-3
Doing Your Own Service Work.........................5-4
Adding Equipment to the Outside of Your
Vehicle......................................................5-5
Fuel................................................................5-5
Gasoline Octane............................................5-5
Gasoline Specications....................................5-5
California Fuel...............................................5-5
Additives.......................................................5-6
Fuels in Foreign Countries...............................5-6
Filling the Tank..............................................5-7
Filling a Portable Fuel Container.......................5-9
Checking Things Under the Hood....................5-10
Hood Release..............................................5-10
Engine Compartment Overview.......................5-12
Engine Oil...................................................5-13
Engine Cover...............................................5-17
Engine Air Cleaner/Filter................................5-21
Automatic Transmission Fluid.........................5-23
Engine Coolant.............................................5-25
Radiator Pressure Cap..................................5-28
Engine Overheating.......................................5-28
Cooling System............................................5-30
Engine Fan Noise.........................................5-34Power Steering Fluid.....................................5-35
Windshield Washer Fluid................................5-36
Brakes........................................................5-37
Battery........................................................5-40
Jump Starting...............................................5-41
All-Wheel Drive..............................................5-45
Rear Axle.......................................................5-46
Front Axle......................................................5-47
Bulb Replacement..........................................5-48
Halogen Bulbs..............................................5-48
Headlamps and Sidemarker Lamps.................5-48
Front Turn Signal and Parking Lamps..............5-52
Taillamps, Turn Signal, Stoplamps and
Back-up Lamps.........................................5-52
Replacement Bulbs.......................................5-54
Windshield Wiper Blade Replacement..............5-54
Tires..............................................................5-55
Tire Sidewall Labelling...................................5-56
Tire Terminology and Denitions.....................5-59
Ination - Tire Pressure.................................5-61
Tire Inspection and Rotation...........................5-63
When It Is Time for New Tires.......................5-64
Buying New Tires.........................................5-65
Section 5 Service and Appearance Care
5-1
Page 210 of 370
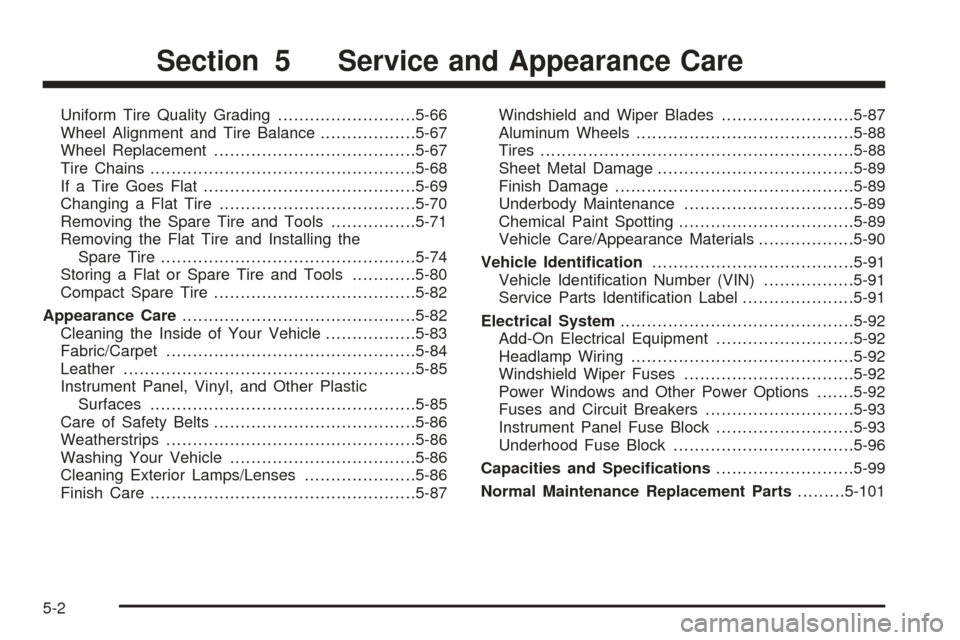
Uniform Tire Quality Grading..........................5-66
Wheel Alignment and Tire Balance..................5-67
Wheel Replacement......................................5-67
Tire Chains..................................................5-68
If a Tire Goes Flat........................................5-69
Changing a Flat Tire.....................................5-70
Removing the Spare Tire and Tools................5-71
Removing the Flat Tire and Installing the
Spare Tire................................................5-74
Storing a Flat or Spare Tire and Tools............5-80
Compact Spare Tire......................................5-82
Appearance Care............................................5-82
Cleaning the Inside of Your Vehicle.................5-83
Fabric/Carpet...............................................5-84
Leather.......................................................5-85
Instrument Panel, Vinyl, and Other Plastic
Surfaces..................................................5-85
Care of Safety Belts......................................5-86
Weatherstrips...............................................5-86
Washing Your Vehicle...................................5-86
Cleaning Exterior Lamps/Lenses.....................5-86
Finish Care..................................................5-87Windshield and Wiper Blades.........................5-87
Aluminum Wheels.........................................5-88
Tires...........................................................5-88
Sheet Metal Damage.....................................5-89
Finish Damage.............................................5-89
Underbody Maintenance................................5-89
Chemical Paint Spotting.................................5-89
Vehicle Care/Appearance Materials..................5-90
Vehicle Identication......................................5-91
Vehicle Identication Number (VIN).................5-91
Service Parts Identication Label.....................5-91
Electrical System............................................5-92
Add-On Electrical Equipment..........................5-92
Headlamp Wiring..........................................5-92
Windshield Wiper Fuses................................5-92
Power Windows and Other Power Options.......5-92
Fuses and Circuit Breakers............................5-93
Instrument Panel Fuse Block..........................5-93
Underhood Fuse Block..................................5-96
Capacities and Specications..........................5-99
Normal Maintenance Replacement Parts.........5-101
Section 5 Service and Appearance Care
5-2
Page 247 of 370
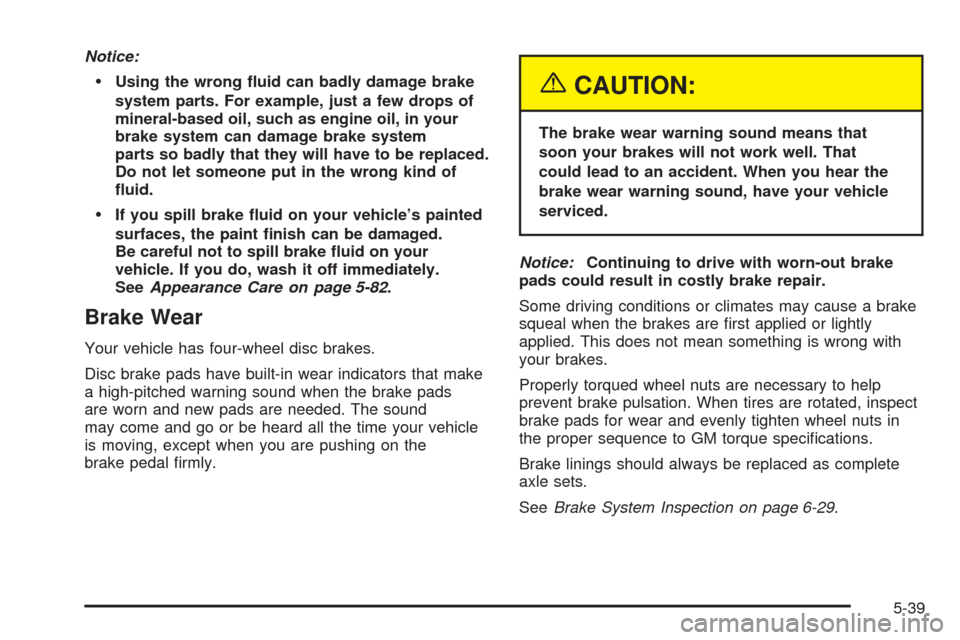
Notice:
Using the wrong uid can badly damage brake
system parts. For example, just a few drops of
mineral-based oil, such as engine oil, in your
brake system can damage brake system
parts so badly that they will have to be replaced.
Do not let someone put in the wrong kind of
uid.
If you spill brake uid on your vehicle’s painted
surfaces, the paint nish can be damaged.
Be careful not to spill brake uid on your
vehicle. If you do, wash it off immediately.
SeeAppearance Care on page 5-82.
Brake Wear
Your vehicle has four-wheel disc brakes.
Disc brake pads have built-in wear indicators that make
a high-pitched warning sound when the brake pads
are worn and new pads are needed. The sound
may come and go or be heard all the time your vehicle
is moving, except when you are pushing on the
brake pedal rmly.
{CAUTION:
The brake wear warning sound means that
soon your brakes will not work well. That
could lead to an accident. When you hear the
brake wear warning sound, have your vehicle
serviced.
Notice:Continuing to drive with worn-out brake
pads could result in costly brake repair.
Some driving conditions or climates may cause a brake
squeal when the brakes are rst applied or lightly
applied. This does not mean something is wrong with
your brakes.
Properly torqued wheel nuts are necessary to help
prevent brake pulsation. When tires are rotated, inspect
brake pads for wear and evenly tighten wheel nuts in
the proper sequence to GM torque specications.
Brake linings should always be replaced as complete
axle sets.
SeeBrake System Inspection on page 6-29.
5-39