2005 BUICK PARK AVENUE reset
[x] Cancel search: resetPage 171 of 388

The radio will only scan preset stations with a strong
signal that are in the selected band.
AUTO SET (Automatic Set):Press this button, after
selecting AM or FM, to seek and set the 12 strongest FM
or the 6 strongest AM stations on the preset
pushbuttons. AUTO SET will appear on the display and
will �ash while seeking until all stations are stored.
To return to the stations that were manually set, press
AUTO SET again.
Setting Preset Stations
Up to 18 stations (six FM1, six FM2, and six AM) can be
programmed on the six numbered pushbuttons, by
performing the following steps:
1. Turn the radio on.
2. Press AM-FM to select FM1, FM2, or AM.
3. Tune in the desired station.
4. Press TONE to select the equalization.
5. Press and hold one of the six numbered
pushbuttons. The sound will mute. When the sound
returns, release the pushbutton. Whenever that
numbered pushbutton is pressed, the station that
was set will return and the equalization that
was selected will be stored for that pushbutton.
6. Repeat the steps for each pushbutton.
Setting the Tone (Bass/Treble)
BASS:Press this knob lightly so it extends. Turn the
knob to increase or to decrease the bass.
TREB (Treble):Press this knob lightly so it extends.
Turn the knob to increase or to decrease the treble. If a
station is weak or noisy, decrease the treble.
Return these knobs to their stored positions when you
are not using them.
TONE:Press this button to select customized
equalization settings designed for country/western,
jazz, talk, pop, and classical.
To return the bass and treble to the manual mode,
press TONE until MANUAL appears on the display or
press and release the BASS or TREB knob and
turn it until the display goes blank. See “Setting
Preset Stations” listed previously to program the auto
tone feature.
3-57
Page 174 of 388

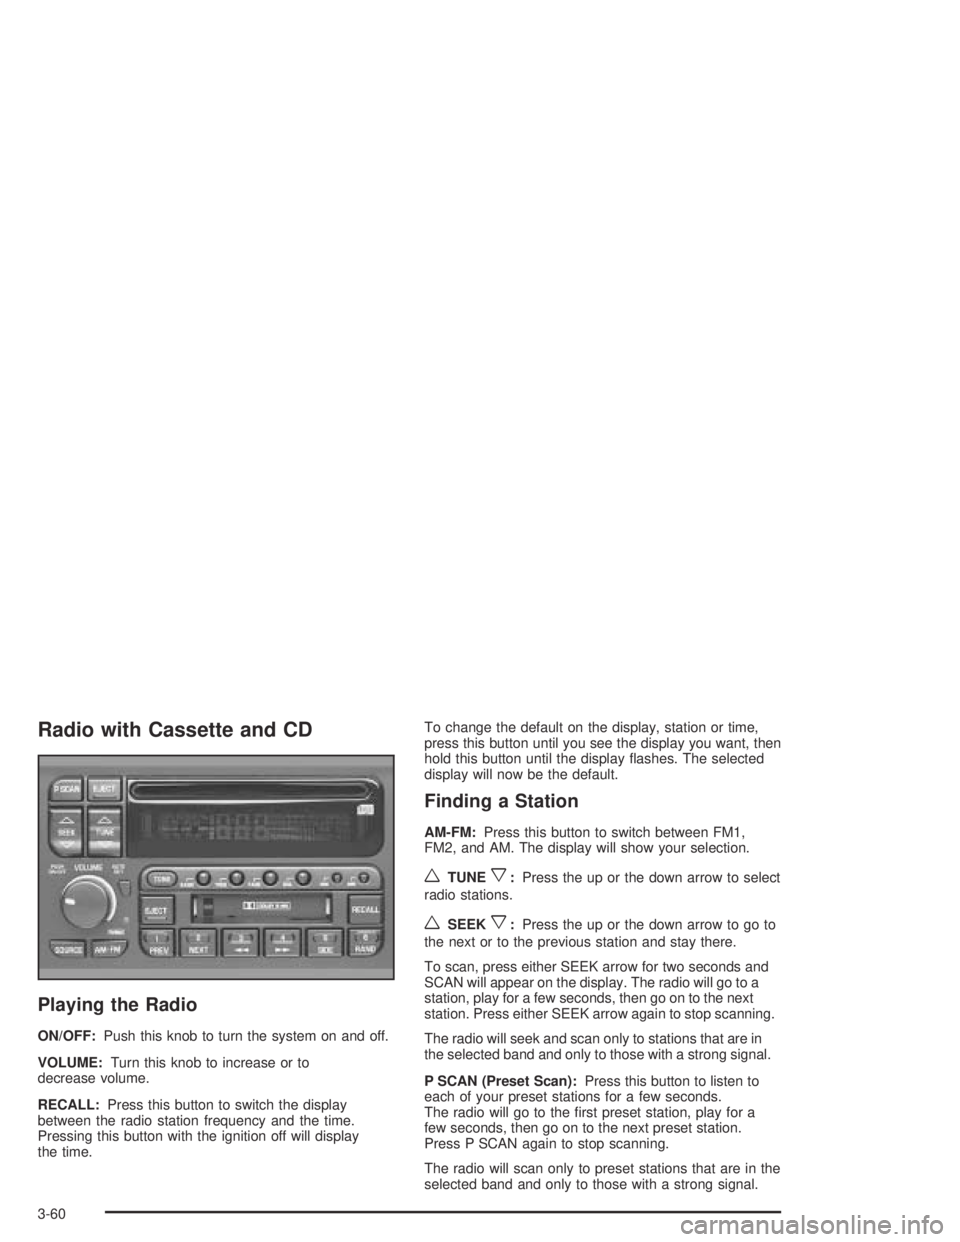
Radio with Cassette and CD
Playing the Radio
ON/OFF:Push this knob to turn the system on and off.
VOLUME:Turn this knob to increase or to
decrease volume.
RECALL:Press this button to switch the display
between the radio station frequency and the time.
Pressing this button with the ignition off will display
the time.To change the default on the display, station or time,
press this button until you see the display you want, then
hold this button until the display �ashes. The selected
display will now be the default.
Finding a Station
AM-FM:Press this button to switch between FM1,
FM2, and AM. The display will show your selection.
wTUNEx:Press the up or the down arrow to select
radio stations.
wSEEKx:Press the up or the down arrow to go to
the next or to the previous station and stay there.
To scan, press either SEEK arrow for two seconds and
SCAN will appear on the display. The radio will go to a
station, play for a few seconds, then go on to the next
station. Press either SEEK arrow again to stop scanning.
The radio will seek and scan only to stations that are in
the selected band and only to those with a strong signal.
P SCAN (Preset Scan):Press this button to listen to
each of your preset stations for a few seconds.
The radio will go to the �rst preset station, play for a
few seconds, then go on to the next preset station.
Press P SCAN again to stop scanning.
The radio will scan only to preset stations that are in the
selected band and only to those with a strong signal.
3-60
Page 175 of 388

AUTO SET (Automatic Set):Press this button, after
selecting AM or FM, to seek and set the 12 strongest
FM or the 6 strongest AM stations on your preset
pushbuttons. AUTO SET will appear on the display and
�ash while seeking until this function is complete. To
return to the stations you manually set, press AUTO
SET again.
Setting Preset Stations
The six numbered pushbuttons let you return to
your favorite stations. You can set up to 18 stations
(six FM1, six FM2, and six AM) by performing the
following steps:
1. Turn the radio on.
2. Press AM-FM to select FM1, FM2, or AM.
3. Tune in the desired station.
4. Press TONE to select the equalization.
5. Press and hold one of the six numbered
pushbuttons. The sound will mute. When the sound
returns, release the pushbutton. Whenever you
press that numbered pushbutton, the station you set
will return and the equalization you selected will
be automatically stored for that pushbutton.
6. Repeat the steps for each pushbutton.
Setting the Tone (Bass/Treble)
BASS:Press this knob lightly so it extends. Turn the
knob to increase or to decrease bass.
TREB (Treble):Press this knob lightly so it extends.
Turn the knob to increase or to decrease treble. If
a station is weak or noisy, you may want to decrease
the treble.
Return these knobs to their stored positions when you
are not using them.
TONE:Press this button to select customized
equalization settings designed for country/western, jazz,
talk, pop, and classical.
To return the bass and treble to the manual mode,
press TONE until MANUAL appears on the display or
press and release the BASS or TREB knob and
turn it until the display goes blank. See “Setting
Preset Stations” listed previously to program the auto
tone feature.
3-61
Page 183 of 388

If the error occurred while trying to play a CD in the
CD player or changer, it could be for one of the
following reasons:
It is very hot. When the temperature returns to
normal, the CD should play.
You are driving on a very rough road. When the
road becomes smoother, the CD should play.
The CD is dirty, scratched, wet, or upside down.
The air is very humid. If so, wait about an hour and
try again.
There may have been a problem while burning
the CD.
The label may be caught in the CD player.
If any error occurs repeatedly or if an error cannot be
corrected, contact your dealer.
If the radio displays an error message other than the
error codes listed previously, write it down and provide it
to your dealer when reporting the problem.
Personal Choice Radio Controls
If your vehicle has this feature it will enable two drivers
to store and recall personal settings for radio presets,
last tuned station, volume, tone, and audio source
(radio, cassette, or CD).
The memory buttons, 1 and 2, are located on the
driver’s door panel and correspond to the numbers,
1 and 2, found on the back of each remote keyless entry
transmitter.
To recall audio sources, press the unlock button on the
remote keyless entry transmitter and turn the ignition
on. The radio settings will adjust to where they were last
set by the identi�ed driver, 1 or 2.
To program this feature, do the following:
1. Set all radio preferences. For more information see
“Setting Preset Stations” and “Setting the Tone”
listed for the radio.
2. Locate the memory buttons on the driver’s
door panel.
3. Press one of the memory buttons, 1 or 2, until you
hear two beeps. The beeps con�rm that the
selection has been saved and can now be recalled.
Follow these steps each time you want to change the
stored settings.
3-69
Page 186 of 388

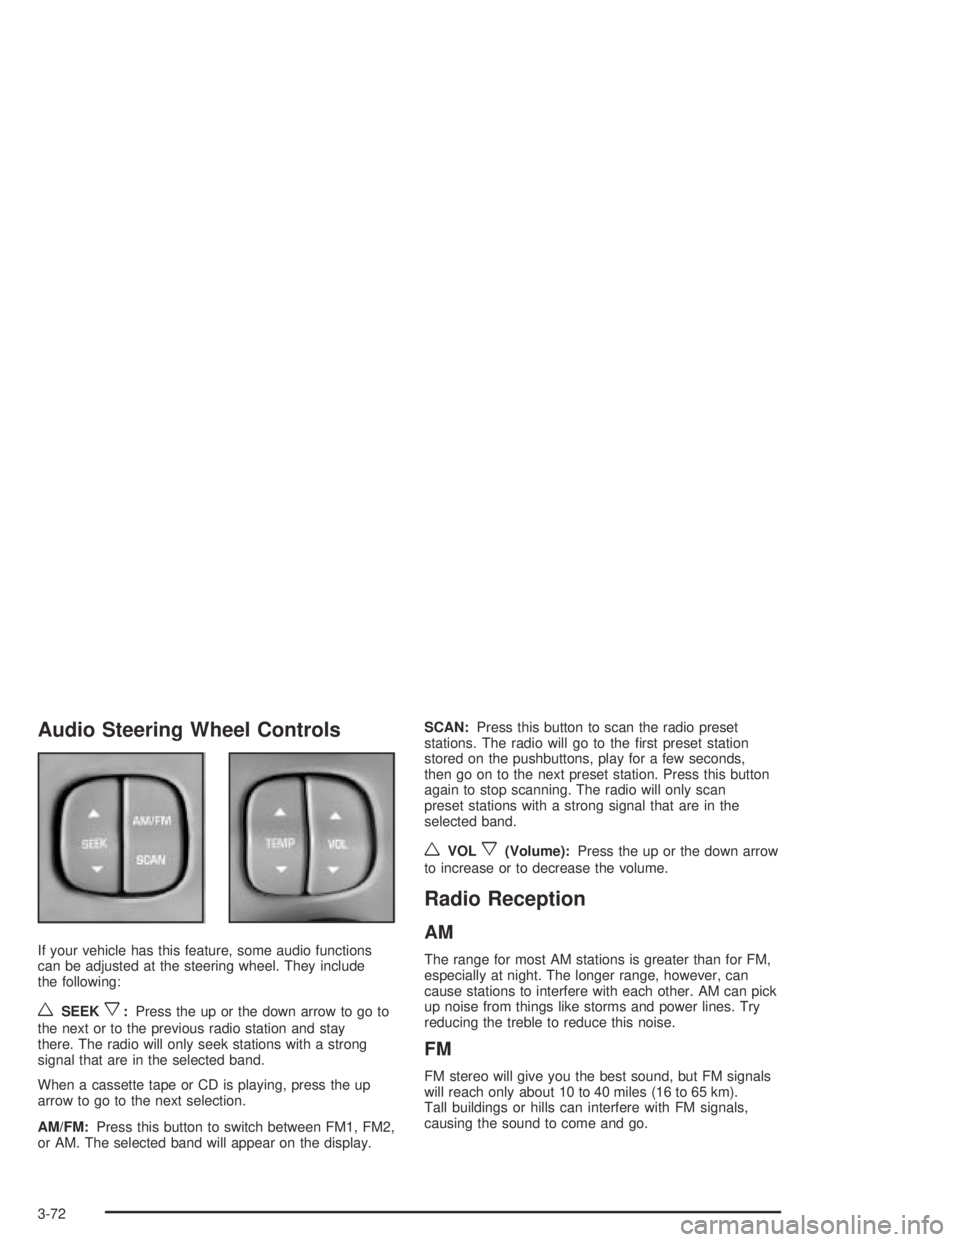
Audio Steering Wheel Controls
If your vehicle has this feature, some audio functions
can be adjusted at the steering wheel. They include
the following:
wSEEKx:Press the up or the down arrow to go to
the next or to the previous radio station and stay
there. The radio will only seek stations with a strong
signal that are in the selected band.
When a cassette tape or CD is playing, press the up
arrow to go to the next selection.
AM/FM:Press this button to switch between FM1, FM2,
or AM. The selected band will appear on the display.SCAN:Press this button to scan the radio preset
stations. The radio will go to the �rst preset station
stored on the pushbuttons, play for a few seconds,
then go on to the next preset station. Press this button
again to stop scanning. The radio will only scan
preset stations with a strong signal that are in the
selected band.
wVOLx(Volume):Press the up or the down arrow
to increase or to decrease the volume.
Radio Reception
AM
The range for most AM stations is greater than for FM,
especially at night. The longer range, however, can
cause stations to interfere with each other. AM can pick
up noise from things like storms and power lines. Try
reducing the treble to reduce this noise.
FM
FM stereo will give you the best sound, but FM signals
will reach only about 10 to 40 miles (16 to 65 km).
Tall buildings or hills can interfere with FM signals,
causing the sound to come and go.
3-72
Page 187 of 388

Care of Your Cassette Tape Player
A tape player that is not cleaned regularly can cause
reduced sound quality, ruined cassettes, or a damaged
mechanism. Cassette tapes should be stored in their
cases away from contaminants, direct sunlight, and
extreme heat. If they are not, they may not operate
properly or may cause failure of the tape player.
The tape player should be cleaned regularly after every
50 hours of use. The radio may display CLN to
indicate that the tape player has been used for 50 hours
without resetting the tape clean timer. If CLN appears
on the display, the cassette tape player needs to
be cleaned. It will still play tapes, but it should be
cleaned as soon as possible to prevent damage to the
tapes and player. If there is a reduction in sound
quality, try a known good cassette to see if the tape or
the tape player is at fault. If this other cassette has
no improvement in sound quality, clean the tape player.
For best results, use a scrubbing action, non-abrasive
cleaning cassette with pads which scrub the tape
head as the hubs of the cleaner cassette turn. The
recommended cleaning cassette is available through
your dealer.The cut tape detection feature of the cassette
tape player may identify the cleaning cassette as a
damaged tape, in error. If the cleaning cassette ejects,
insert the cassette at least three times to ensure
thorough cleaning.
A non-scrubbing action, wet-type cleaner which uses a
cassette with a fabric belt to clean the tape head
can be used. This type of cleaning cassette will not
eject on its own. A non-scrubbing action cleaner may not
clean as thoroughly as the scrubbing type cleaner.
The use of a non-scrubbing action, dry-type cleaning
cassette is not recommended.
After the player is cleaned, press and hold the EJECT
button for �ve seconds to reset the CLN indicator.
The radio will display --- to show the indicator was reset.
Cassettes are subject to wear and the sound
quality may degrade over time. Always make sure the
cassette tape is in good condition before the tape player
is serviced.
3-73
Page 249 of 388

Engine Oil Life System
When to Change Engine Oil (Vehicles
With the GM Oil Life System)
If so equipped, your vehicle has a computer system that
lets you know when to change the engine oil and
�lter. This is based on engine revolutions and engine
temperature, and not on mileage. Based on driving
conditions, the mileage at which an oil change will be
indicated can vary considerably. For the oil life system to
work properly, you must reset the system every time
the oil is changed.
When the system has calculated that oil life has been
diminished, it will indicate that an oil change is
necessary. A CHANGE ENGINE OIL SOON message
will come on. Change your oil as soon as possible within
the next two times you stop for fuel. It is possible that,
if you are driving under the best conditions, the oil
life system may not indicate that an oil change is
necessary for over a year. However, your engine oil and
�lter must be changed at least once a year and at
this time the system must be reset. Your dealer has
GM-trained service people who will perform this
work using genuine GM parts and reset the system. It is
also important to check your oil regularly and keep it
at the proper level.If the system is ever reset accidentally, you must
change your oil at 3,000 miles (5 000 km) since your
last oil change. Remember to reset the oil life system
whenever the oil is changed.How to Reset the Oil Life System
The GM Oil Life System calculates when to change
your engine oil and �lter based on vehicle use. Anytime
your oil is changed, reset the system so it can
calculate when the next oil change is required. If a
situation occurs where you change your oil prior to a
CHANGE ENGINE OIL SOON message being
turned on, reset the system.
Always reset the engine oil life to 100% after every oil
change. It will not reset itself. To reset the Oil Life
System, do the following:
1. Display OIL LIFE INDEX on the DIC.
2. Press and hold the DIC RESET button for
more than �ve seconds. The oil life will change
to 100%.
3. Turn the key to OFF.
If the CHANGE ENGINE OIL SOON message comes
back on when you start your vehicle, the engine oil
life system has not reset. Repeat the procedure.
5-17
Page 298 of 388

The check tire pressure system detects differences in
tire rotation speeds that are caused by changes in
tire pressure. The system can alert you about a
low tire — but it does not replace normal tire
maintenance. SeeTires on page 5-58.
When the TIRE PRESSURE LOW message appears on
the Driver Information Center, you should stop as
soon as you can and check all your tires for damage. If
a tire is �at, seeIf a Tire Goes Flat on page 5-73.
Also check the tire pressure in all four tires as soon as
you can. SeeIn�ation - Tire Pressure on page 5-64.
Any time you adjust a tire’s pressure or have one
or more tires repaired or replaced, you will need to reset
(calibrate) the check tire pressure system. You will
also need to reset the system whenever you rotate the
tires, buy new tires and install or remove the compact
spare tire.
Do not reset the check tire pressure system without �rst
correcting the cause of the problem and checking
and adjusting the pressure in all four tires. If you reset
the system when the tire pressures are incorrect,
the check tire pressure system will not work properly
and may not alert you when a tire is low or high.To reset (calibrate) the system:
1. Turn the ignition switch to RUN.
2. Press the GAGE INFO button on the DIC until TIRE
PRESSURE appears on the display.
3. Press and hold the DIC RESET button for about
�ve seconds. After �ve seconds, the display will
show TIRE PRESSURE RESET. If TIRE
PRESSURE RESET does not appear on the
display after about �ve seconds, see your dealer for
service. After you release the DIC RESET button,
TIRE PRESSURE NORMAL will appear on
the display.
The system completes the calibration process during
driving. Calibration time can take 45 to 90 minutes,
depending on your driving habits. After the system
has been calibrated, the system will alert the driver
that a tire is low, up to a maximum speed of
65 mph (105 km/h).
5-66