2005 BUICK LACROSSE radio
[x] Cancel search: radioPage 232 of 410
Audio Steering Wheel Controls
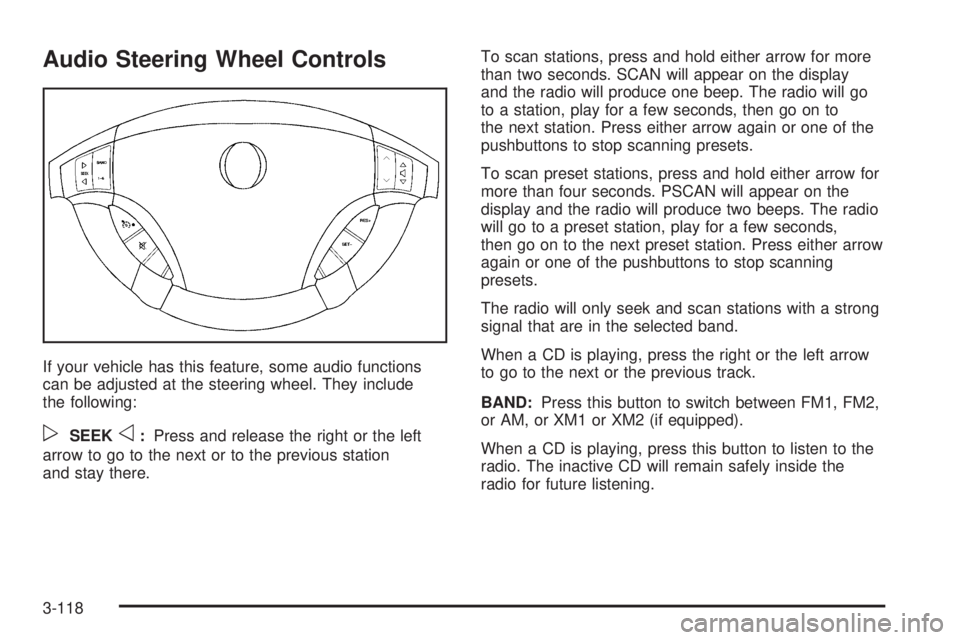
If your vehicle has this feature, some audio functions
can be adjusted at the steering wheel. They include
the following:
pSEEKo:Press and release the right or the left
arrow to go to the next or to the previous station
and stay there.To scan stations, press and hold either arrow for more
than two seconds. SCAN will appear on the display
and the radio will produce one beep. The radio will go
to a station, play for a few seconds, then go on to
the next station. Press either arrow again or one of the
pushbuttons to stop scanning presets.
To scan preset stations, press and hold either arrow for
more than four seconds. PSCAN will appear on the
display and the radio will produce two beeps. The radio
will go to a preset station, play for a few seconds,
then go on to the next preset station. Press either arrow
again or one of the pushbuttons to stop scanning
presets.
The radio will only seek and scan stations with a strong
signal that are in the selected band.
When a CD is playing, press the right or the left arrow
to go to the next or the previous track.
BAND:Press this button to switch between FM1, FM2,
or AM, or XM1 or XM2 (if equipped).
When a CD is playing, press this button to listen to the
radio. The inactive CD will remain safely inside the
radio for future listening.
3-118
Page 233 of 410
1 – 6 (Preset Stations):Press this button to go to the
next station that is programmed on the radio preset
pushbuttons.
>(OnStar/Mute):Press and release this button to
silence the audio system. Press it again, or any
other radio button, to turn on the sound.
If your vehicle has OnStar
®, press and hold this button
for two seconds to interact with the OnStar®system.
See the OnStar®manual provided with your vehicle for
more information.
wxx(Volume):Press the up or the down arrow to
increase or to decrease the volume.
Radio Reception
AM
The range for most AM stations is greater than for FM,
especially at night. The longer range, however, can
cause stations to interfere with each other. AM can pick
up noise from things like storms and power lines. Try
reducing the treble to reduce this noise.
FM
FM stereo will give you the best sound, but FM signals
will reach only about 10 to 40 miles (16 to 65 km).
Tall buildings or hills can interfere with FM signals,
causing the sound to come and go.
Care of Your CDs
Handle CDs carefully. Store them in their original cases
or other protective cases and away from direct
sunlight and dust. If the surface of a CD is soiled,
dampen a clean, soft cloth in a mild, neutral detergent
solution and clean it, wiping from the center to the edge.
Be sure never to touch the side without writing when
handling CDs. Pick up CDs by grasping the outer edges
or the edge of the hole and the outer edge.
Care of Your CD Player
The use of CD lens cleaners for CD players is not
advised, due to the risk of contaminating the lens of the
CD optics with lubricants internal to the CD mechanism.
3-119
Page 234 of 410
Backglass Antenna
The AM-FM antenna is integrated with the rear window
defogger, located in the rear window. Be sure that the
inside surface of the rear window is not scratched and
that the lines on the glass are not damaged. If the inside
surface is damaged, it could interfere with radio
reception. Also, for proper radio reception, the antenna
connector at the top-center of the rear window needs to
be properly attached to the post on the glass.
Notice:Using a razor blade or sharp object to clear
the inside rear window may damage the rear window
antenna and/or the rear window defogger. Repairs
would not be covered by your warranty. Do not clear
the inside rear window with sharp objects.
Notice:Do not apply aftermarket glass tinting with
metallic �lm. The metallic �lm in some tinting
materials will interfere with or distort the incoming
radio reception. Any damage caused to your
backglass antenna due to metallic tinting materials
will not be covered by your warranty.
Because this antenna is built into your rear window,
there is a reduced risk of damage caused by car washes
and vandals.If you choose to add a cellular telephone to your
vehicle, and the antenna needs to be attached to the
glass, be sure that you do not damage the grid lines for
the AM-FM antenna. There is enough space between
the lines to attach a cellular telephone antenna
without interfering with radio reception.
Do not apply aftermarket glass tinting to the back glass.
The metallic �lm in some tinting materials will interfere
with or distort the incoming radio reception. Care
must be taken when cleaning the rear window because
it breaks in the resistive material heating element
and will adversely affect radio and defogger
performance. See your dealer for details.
Chime Level Adjustment
The radio is the vehicle’s chime producer. To change
the volume level, press and hold pushbutton 6 with
the ignition on and the radio power off. The chime
volume level will change from the normal level to loud,
and LOUD will appear on the radio display. To
change back to the default or normal setting, press and
hold pushbutton 6 again. The chime level will change
from the loud level to normal, and NORMAL will appear
on the radio display. Removing the radio and not
replacing it with a factory radio or chime will disable
vehicle chimes.
3-120
Page 243 of 410
You may feel or hear the system working, but this is
normal.
If the vehicle is in cruise control when the TCS begins
to limit wheel spin, the cruise control will automatically
disengage. When road conditions allow safe use of
the cruise control, it can be used again. SeeCruise
Control on page 3-10.
The TCS operates in all transaxle shift lever positions.
But the system can upshift the transaxle only as high as
the shift lever position that was chosen, so use the
lower gears only when necessary. SeeAutomatic
Transaxle Operation on page 2-24.
To limit wheel spin, especially in slippery road
conditions, you should always leave the TCS on. But
you can turn the system off if you ever need to. The TCS
should be turned off if the vehicle ever gets stuck in
sand, mud or snow and rocking the vehicle is required.
SeeRocking Your Vehicle to Get It Out on page 4-28
andIf Your Vehicle is Stuck in Sand, Mud, Ice or Snow
on page 4-28.
To turn the TCS on or off, press the TCS button located
directly behind the gear shift lever. If your vehicle has
a DIC, the TCS button is located above the radio.
When the TCS is turned off, the TCS warning light will
come on. It will disappear when the TCS is turned
back on. If the TCS is limiting wheel spin when the TCS
button is pressed, the TCS warning light will come on
and the TCS will turn off right away.StabiliTrak®System
Your vehicle may be equipped with a vehicle stability
enhancement system called StabiliTrak®.Itisan
advanced computer controlled system that assists you
with directional control of the vehicle in difficult
driving conditions.
StabiliTrak
®activates when the computer senses a
discrepancy between your intended path and the
direction the vehicle is actually traveling. StabiliTrak
®
selectively applies braking pressure at any one of
the vehicle’s brakes to help steer the vehicle in the
direction which you are steering.
When the system activates, a STABILITY CONTROL
ACTIVE message will be displayed on the Driver
Information Center (DIC). SeeDIC Warnings and
Messages on page 3-53. You may also hear a noise or
feel vibration in the brake pedal. This is normal. Continue
to steer the vehicle in the direction you want it to go.
If there is a problem detected with StabiliTrak
®,a
SERVICE STABILITY SYSTEM message will be
displayed on the Driver Information Center (DIC). See
DIC Warnings and Messages on page 3-53. When
this message is displayed, the system is not operational.
Driving should be adjusted accordingly.
If your vehicle is in cruise control when the StabiliTrak
®
activates, the cruise control will automatically
disengage. When road conditions allow you to safely
use it again, you may reengage the cruise control. See
Cruise Control on page 3-10for more information.
4-9
Page 315 of 410
Jump Starting
If your battery has run down, you may want to use
another vehicle and some jumper cables to start your
vehicle. Be sure to use the following steps to do it safely.
{CAUTION:
Batteries can hurt you. They can be dangerous
because:
They contain acid that can burn you.
They contain gas that can explode
or ignite.
They contain enough electricity to
burn you.
If you do not follow these steps exactly, some
or all of these things can hurt you.
Notice:Ignoring these steps could result in costly
damage to your vehicle that would not be covered
by your warranty.
Trying to start your vehicle by pushing or pulling it
will not work, and it could damage your vehicle.
1. Check the other vehicle. It must have a 12-volt
battery with a negative ground system.Notice:If the other vehicles system is not a 12-volt
system with a negative ground, both vehicles can
be damaged. Only use vehicles with 12-volt systems
with negative grounds to jump start your vehicle.
2. Get the vehicles close enough so the jumper cables
can reach, but be sure the vehicles are not touching
each other. If they are, it could cause a ground
connection you do not want. You would not be able
to start your vehicle, and the bad grounding
could damage the electrical systems.
To avoid the possibility of the vehicles rolling, set
the parking brake �rmly on both vehicles involved in
the jump start procedure. Put an automatic
transmission in PARK (P) or a manual transmission
in NEUTRAL (N) before setting the parking brake.
Notice:If you leave your radio or other accessories
on during the jump starting procedure, they could
be damaged. The repairs would not be covered
by your warranty. Always turn off your radio and
other accessories when jump starting your vehicle.
3. Turn off the ignition on both vehicles. Unplug
unnecessary accessories plugged into the cigarette
lighter or the accessory power outlets. Turn off
the radio and all lamps that are not needed. This
will avoid sparks and help save both batteries. And
it could save your radio!
5-39
Page 365 of 410

Fuses Usage
DR/LCK
TRUNKDoor Locks, Trunk
RFA/MOD Remote Keyless Entry
PRK/SWTCH Ignition Key Lock
CLSTR Cluster
STR/WHL/
ILLUMSteering Wheel Controls Illumination
Fuses Usage
ONSTAR/ALDL OnStar®, Data Link
INT/ILLUM Interior Lamps
PWR/SEAT Power Seat
S/ROOF Sunroof
CNSTR Canister Vent
HVAC Climate Control System
HAZRD Turn Signal, Hazard
PRK/LAMP Park Lamps
CHMSL/BKUPCenter-High-Mounted
Stoplamp/Back-up Lamps
PWR/MIR Power Mirrors
CRUISE Cruise Control
RDO/AMP Radio, Ampli�er
HTD/SEAT Heated Seats
HTD/MIR Heated Mirrors
PWR/WNDW Power Window
Relays Usage
RAP Retained Accessory Power
PRK/LAMP Park Lamp Relay
R/DEFOG Rear Defogger Relay
5-89
Page 398 of 410

Audio System(s) (cont.)
Radio with CD............................3-79, 3-84, 3-92
Radio with Six-Disc CD..............................3-105
Setting the Time..........................................3-79
Theft-Deterrent Feature...............................3-117
Understanding Radio Reception...................3-119
Automatic Transaxle
Operation...................................................2-24
Automatic Transmission
Fluid..........................................................5-21
B
Backglass Antenna........................................3-120
Battery..........................................................5-38
Exterior Lighting Battery Saver......................3-15
Run-Down Protection...................................3-18
Before Leaving on a Long Trip.........................4-21
Brake
Anti-Lock Brake System (ABS)........................ 4-6
Emergencies................................................ 4-8
Parking......................................................2-27
System Warning Light..................................3-36
Brakes..........................................................5-35
Braking........................................................... 4-5
Braking in Emergencies..................................... 4-8
Break-In, New Vehicle.....................................2-21Bulb Replacement...........................................5-45
Fog Lamps.................................................5-48
Front Turn Signal and Parking Lamps.............5-47
Halogen Bulbs............................................5-45
Headlamp Aiming........................................5-43
Replacement Bulbs......................................5-50
Taillamps, Turn Signal, Sidemarker,
Stoplamps, and Back-Up Lamps.................5-48
Buying New Tires...........................................5-62
C
California Fuel.................................................. 5-6
Canadian Owners................................................ ii
Capacities and Speci�cations............................5-92
Carbon Monoxide...................2-13, 2-30, 4-24, 4-35
Care of
Safety Belts................................................5-81
Your CD Player.........................................3-119
Your CDs .................................................3-119
Center Console Storage Area...........................2-41
Center Front Passenger Position, Safety Belts....1-24
Center Seat..................................................... 1-7
Chains, Tire...................................................5-66
Charging System Light....................................3-35
2
Page 406 of 410

Power (cont.)
Lumbar Controls........................................... 1-4
Reduced Engine Light..................................3-44
Retained Accessory (RAP)............................2-22
Six-Way Seats.............................................. 1-4
Steering Fluid.............................................5-33
Windows....................................................2-16
Pretensioners, Safety Belt................................1-30
Programming the HomeLink
®Transmitter...........2-36
Q
Questions and Answers About Safety Belts.........1-14
R
Radiator Pressure Cap....................................5-24
Radios..........................................................3-79
Care of Your CD Player..............................3-119
Care of Your CDs......................................3-119
Radio with CD............................3-79, 3-84, 3-92
Radio with Six-Disc CD..............................3-105
Setting the Time..........................................3-79
Theft-Deterrent..........................................3-117
Understanding Reception............................3-119
Rear Assist Handle Reading Lamps...................3-18
Rear Safety Belt Comfort Guides......................1-27
Rear Seat Passengers, Safety Belts..................1-25Rearview Mirror, Automatic Dimming..................2-32
Rearview Mirror, Automatic Dimming
with OnStar
®..............................................2-33
Rearview Mirror with OnStar®...........................2-32
Rearview Mirrors.............................................2-32
Reclining Seatbacks.......................................... 1-5
Recommended Fluids and Lubricants.................6-12
Recreational Vehicle Towing.............................4-34
Reduced Engine Power Light............................3-44
Remote Keyless Entry System............................ 2-3
Remote Keyless Entry System, Operation............ 2-4
Removing the Flat Tire and Installing the
Spare Tire..................................................5-71
Removing the Spare Tire and Tools...................5-69
Replacement Bulbs.........................................5-50
Reporting Safety Defects
Canadian Government..................................7-11
General Motors...........................................7-11
United States Government............................7-10
Restraint System Check
Checking the Restraint Systems....................1-65
Replacing Restraint System Parts
After a Crash..........................................1-65
Retained Accessory Power (RAP)......................2-22
Right Front Passenger Position, Safety Belts......1-23
Roadside
Assistance Program....................................... 7-6
Rocking Your Vehicle to Get it Out....................4-28
Running the Engine While Parked.....................2-31
10