Page 273 of 410
Before starting, check all trailer hitch parts and
attachments, safety chains, electrical connector, lamps,
tires, and mirror adjustment. If the trailer has electric
brakes, start the vehicle and trailer moving and
then apply the trailer brake controller by hand to be sure
the brakes are working. This lets you check the
electrical connection at the same time.
During your trip, check occasionally to be sure that the
load is secure, and that the lamps and any trailer
brakes are still working.
Following Distance
Stay at least twice as far behind the vehicle ahead as
when driving the vehicle without a trailer. This can
help avoid situations that require heavy braking
and sudden turns.
Passing
More passing distance is needed up ahead when
towing a trailer. And, because the vehicle is a good deal
longer with the trailer, you will need to go much farther
beyond the vehicle you have passed before you
can return to the proper lane.
Backing Up
Hold the bottom of the steering wheel with one hand.
Then, to move the trailer to the left, move that hand
to the left. To move the trailer to the right, move your
hand to the right. Always back up slowly and, if possible,
have someone guide you.
Making Turns
Notice:Making very sharp turns while trailering
could cause the trailer to come in contact with the
vehicle. Your vehicle could be damaged. Avoid
making very sharp turns while trailering.
When turning with a trailer, make wider turns than
normal. Do this so the trailer will not strike soft shoulders,
curbs, road signs, trees, or other objects. Avoid jerky or
sudden maneuvers. Signal well in advance.
Turn Signals When Towing a Trailer
When towing a trailer, the vehicle may need a different
turn signal �asher and/or extra wiring. Check with your
dealer. The arrows on the instrument panel will �ash
whenever signaling a turn or lane change. Properly
hooked up, the trailer lamps will also �ash, telling other
drivers you are about to turn, change lanes or stop.
When towing a trailer, the arrows on the instrument
panel will �ash for turns even if the bulbs on the trailer
are burned out. You may think drivers behind you
are seeing your signal when they are not. It is important
to check occasionally to be sure the trailer bulbs are
still working.
4-39
Page 287 of 410
Hood Release
To open the hood, do the following:
1. Pull the interior hood
release handle with
this symbol on it. It is
located to the left
of the steering
column below the
instrument panel.
2. Push the secondary hood release lever, located
under the center of the hood above the grille, up
and to the right to disengage it.
3. Lift the hood.
Before closing the hood, make sure all the �ller caps
are properly secured. Pull the hood down and close
it �rmly.
5-11
Page 323 of 410
6. Pull back on the front fascia and then pull the
headlamp assembly out from the vehicle. Moving
the headlamp up and down slightly may help with
its removal.
You may have someone assist you with this step.
7. Remove the access cover from behind the bulb
being replaced.
8. Turn the bulb socket one-quarter of a turn to
remove it from the headlamp assembly.
9. Holding the base of the socket, pull the old bulb
from the socket.
10. Replace with a new bulb.
11. Reverse all the steps to reassemble the headlamp
assembly.
When replacing the plastic retaining clip, push down
on it while pushing rearward on the headlamp,
making sure the headlamp assembly is secure.
High-Beam Headlamp Bulbs
To replace the high-beam headlamp bulb, do the
following:
1. Open the hood. SeeHood Release on page 5-11
for more information.
2. Locate the high-beam headlamp bulb socket.3. Remove the access cover from behind the bulb
being replaced.
4. Turn the bulb socket counterclockwise and pull it
from the headlamp assembly.
5. Holding the base of the socket, pull the old bulb
from the socket.
6. Replace with a new bulb.
7. Reverse Steps 2 through 4 to reinstall.
Front Turn Signal and
Parking Lamps
To replace a front turn signal/parking lamp bulb in the
front fascia, do the following:
1. Locate the front turn signal/parking bulb socket by
reaching behind the front bumper.
2. Turn the bulb socket counterclockwise and pull it
out of the assembly.
3. Holding the base of the socket, pull the old bulb
from the socket.
4. Push the new bulb into the socket.
5. Reverse Steps 1 through 3 to reinstall.
5-47
Page 327 of 410
Windshield Wiper Blade
Replacement
Windshield wiper blades should be inspected for wear
or cracking each time maintenance is performed.
SeeScheduled Maintenance on page 6-4.
1. Lift the wiper arm and turn the blade until is facing
away from the windshield.
2. Push the release lever under the windshield
wiper arm, and slide the wiper assembly off of the
wiper arm.
3. Slide the new wiper blade securely on the
wiper arm until you hear the release clip click into
place.
For wiper blade type and length, seeNormal
Maintenance Replacement Parts on page 6-13.
5-51
Page 342 of 410
Used Replacement Wheels
{CAUTION:
Putting a used wheel on your vehicle is
dangerous. You can’t know how it’s been used
or how far it’s been driven. It could fail suddenly
and cause a crash. If you have to replace a
wheel, use a new GM original equipment wheel.
Tire Chains
{CAUTION:
If your vehicle has P225/55R17 size tires, do not
use tire chains, there is not enough clearance.
Tire chains used on a vehicle without the proper
amount of clearance can cause damage to the
brakes, suspension or other vehicle parts. The
area damaged by the tire chains could cause
you to lose control of your vehicle and you or
others may be injured in a crash.
CAUTION: (Continued)
CAUTION: (Continued)
Use another type of traction device only if its
manufacturer recommends it for use on your
vehicle and tire size combination and road
conditions. Follow that manufacturer’s
instructions. To help avoid damage to your
vehicle, drive slowly, readjust or remove the
device if it is contacting your vehicle, and do
not spin your wheels.
If you do �nd traction devices that will �t,
install them on the front tires.
Notice:If your vehicle has a tire size other than
P225/55R17 size tires, use tire chains only where
legal and only when you must. Use only SAE Class
“S” type chains that are the proper size for your
tires. Install them on the front tires and tighten them
as tightly as possible with the ends securely
fastened. Drive slowly and follow the chain
manufacturer’s instructions. If you can hear the
chains contacting your vehicle, stop and retighten
them. If the contact continues, slow down until
it stops. Driving too fast or spinning the wheels with
chains on will damage your vehicle.
5-66
Page 347 of 410
Removing the Flat Tire and
Installing the Spare Tire
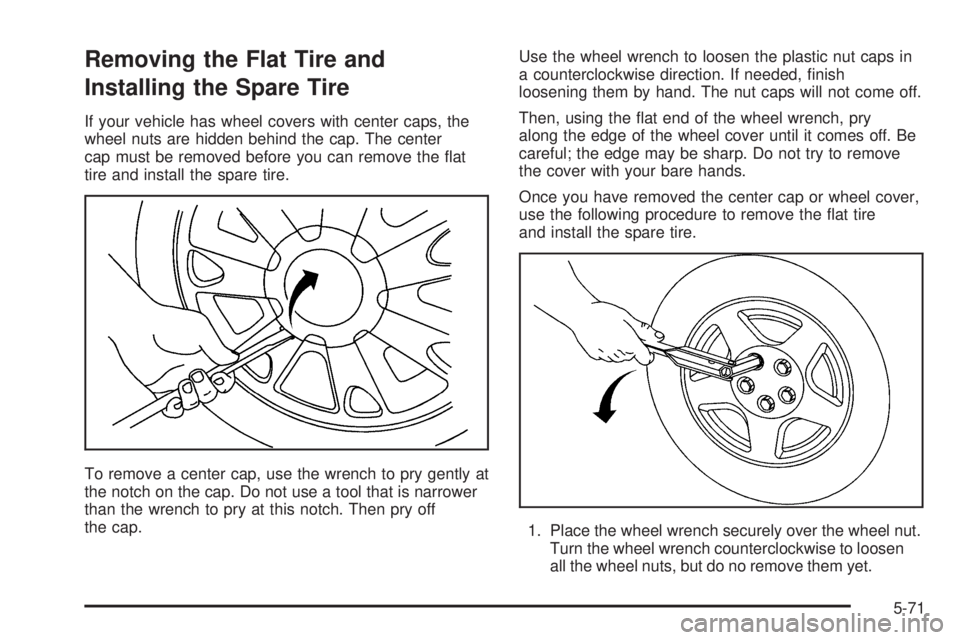
If your vehicle has wheel covers with center caps, the
wheel nuts are hidden behind the cap. The center
cap must be removed before you can remove the �at
tire and install the spare tire.
To remove a center cap, use the wrench to pry gently at
the notch on the cap. Do not use a tool that is narrower
than the wrench to pry at this notch. Then pry off
the cap.Use the wheel wrench to loosen the plastic nut caps in
a counterclockwise direction. If needed, �nish
loosening them by hand. The nut caps will not come off.
Then, using the �at end of the wheel wrench, pry
along the edge of the wheel cover until it comes off. Be
careful; the edge may be sharp. Do not try to remove
the cover with your bare hands.
Once you have removed the center cap or wheel cover,
use the following procedure to remove the �at tire
and install the spare tire.
1. Place the wheel wrench securely over the wheel nut.
Turn the wheel wrench counterclockwise to loosen
all the wheel nuts, but do no remove them yet.
5-71
Page 352 of 410

Storing a Flat or Spare Tire
and Tools
{CAUTION:
Storing a jack, a tire, or other equipment in the
passenger compartment of the vehicle could
cause injury. In a sudden stop or collision,
loose equipment could strike someone. Store
all these in the proper place.
After the compact spare tire has been installed on the
vehicle, store the �at tire in the trunk. Use the following
procedure to secure the �at tire in the trunk.When storing a full-size tire, use the extension with the
protector, located in the foam holder, to help avoid
wheel surface damage. To store a full-size tire, place
the tire valve stem facing down, and then remove
the protector and attach the retainer securely. Store the
cover as far forward as possible.
When storing a compact spare tire in the trunk, put the
protector back in the foam holder.
The compact spare is for temporary use only. Replace
the compact spare tire with a full-size tire as soon
as you can. SeeCompact Spare Tire on page 5-77. See
the storage instructions label to return the compact
spare to the trunk properly.
5-76
Page 377 of 410
Engine Coolant Level Check
Check the engine coolant level and add
DEX-COOL®coolant mixture if necessary. SeeEngine
Coolant on page 5-21for further details.
Windshield Washer Fluid Level Check
Check the windshield washer �uid level in the windshield
washer tank and add the proper �uid if necessary.
At Least Once a Month
Tire In�ation Check
Visually inspect your vehicle’s tires and make sure they
are in�ated to the correct pressures. Do not forget to
check the spare tire. SeeTires on page 5-52for further
details. Check to make sure the spare tire is stored
securely. SeeChanging a Flat Tire on page 5-68.
Tire Wear Inspection
Tire rotation may be required for high mileage highway
drivers prior to the Engine Oil Life System service
noti�cation. Check the tires for wear and, if necessary,
rotate the tires. SeeTire Inspection and Rotation on
page 5-60.
At Least Once a Year
Starter Switch Check
{CAUTION:
When you are doing this inspection, the
vehicle could move suddenly. If the vehicle
moves, you or others could be injured.
1. Before you start, be sure you have enough room
around the vehicle.
2. Firmly apply both the parking brake and the regular
brake. SeeParking Brake on page 2-27if
necessary.
Do not use the accelerator pedal, and be ready to
turn off the engine immediately if it starts.
3. Try to start the engine in each gear. The starter
should work only in PARK (P) or NEUTRAL (N).
If the starter works in any other position, contact
your GM Goodwrench
®dealer for service.
6-9