2005 BUICK LACROSSE door lock
[x] Cancel search: door lockPage 324 of 410

Fog Lamps
Your vehicle may have fog lamps. To replace a fog
lamp bulb, do the following:
1. Locate the access door in the splash shield. It is
located behind the front fascia. To do this, reach
up under and behind the front fascia.
2. Open the access door.
3. Locate the fog lamp bulb socket.
4. Turn the bulb socket counterclockwise one-quarter
of a turn while pressing the socket in �rmly.
5. Pull the socket rearward until the bulb socket clears
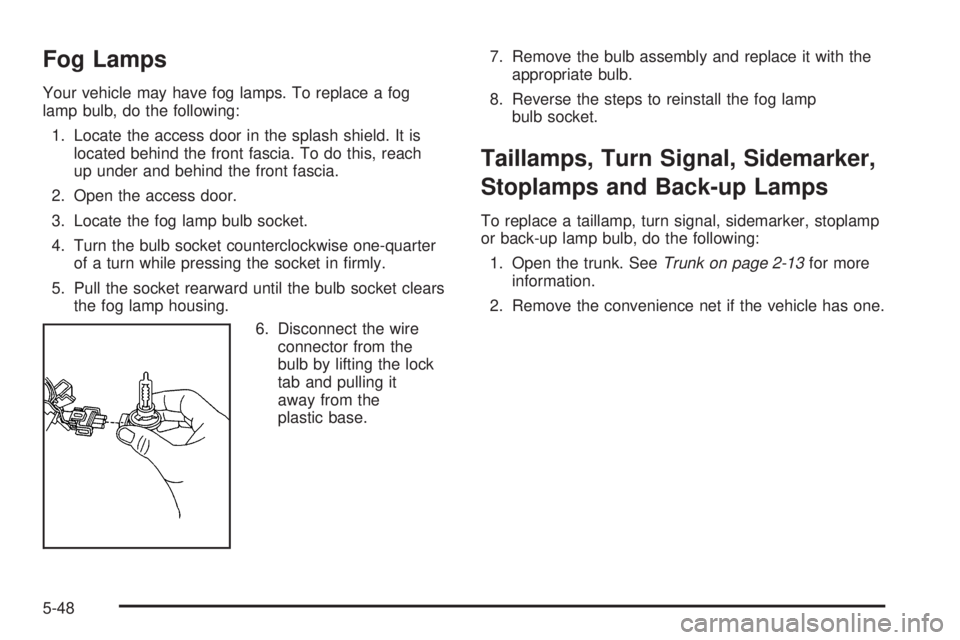
the fog lamp housing.
6. Disconnect the wire
connector from the
bulb by lifting the lock
tab and pulling it
away from the
plastic base.7. Remove the bulb assembly and replace it with the
appropriate bulb.
8. Reverse the steps to reinstall the fog lamp
bulb socket.
Taillamps, Turn Signal, Sidemarker,
Stoplamps and Back-up Lamps
To replace a taillamp, turn signal, sidemarker, stoplamp
or back-up lamp bulb, do the following:
1. Open the trunk. SeeTrunk on page 2-13for more
information.
2. Remove the convenience net if the vehicle has one.
5-48
Page 365 of 410

Fuses Usage
DR/LCK
TRUNKDoor Locks, Trunk
RFA/MOD Remote Keyless Entry
PRK/SWTCH Ignition Key Lock
CLSTR Cluster
STR/WHL/
ILLUMSteering Wheel Controls Illumination
Fuses Usage
ONSTAR/ALDL OnStar®, Data Link
INT/ILLUM Interior Lamps
PWR/SEAT Power Seat
S/ROOF Sunroof
CNSTR Canister Vent
HVAC Climate Control System
HAZRD Turn Signal, Hazard
PRK/LAMP Park Lamps
CHMSL/BKUPCenter-High-Mounted
Stoplamp/Back-up Lamps
PWR/MIR Power Mirrors
CRUISE Cruise Control
RDO/AMP Radio, Ampli�er
HTD/SEAT Heated Seats
HTD/MIR Heated Mirrors
PWR/WNDW Power Window
Relays Usage
RAP Retained Accessory Power
PRK/LAMP Park Lamp Relay
R/DEFOG Rear Defogger Relay
5-89
Page 375 of 410

Maintenance Footnotes
†The U.S. Environmental Protection Agency or the
California Air Resources Board has determined that the
failure to perform this maintenance item will not nullify
the emission warranty or limit recall liability prior to
the completion of the vehicle’s useful life. We, however,
urge that all recommended maintenance services be
performed at the indicated intervals and the
maintenance be recorded.
(a)Visually inspect brake lines and hoses for proper
hook-up, binding, leaks, cracks, cha�ng, etc. Inspect
disc brake pads for wear and rotors for surface
condition. Inspect other brake parts, including calipers,
parking brake, etc.
(b)Visually inspect front and rear suspension and
steering system for damaged, loose or missing parts or
signs of wear. Inspect power steering lines and
hoses for proper hook-up, binding, leaks, cracks,
cha�ng, etc.
(c)Visually inspect hoses and have them replaced if
they are cracked, swollen or deteriorated. Inspect
all pipes, �ttings and clamps; replace with genuine
GM parts as needed. To help ensure proper operation,
a pressure test of the cooling system and pressure
cap and cleaning the outside of the radiator and
air conditioning condenser is recommended at least
once a year.(d)Visually inspect wiper blades for wear or cracking.
Replace blade inserts that appear worn or damaged
or that streak or miss areas of the windshield.
(e)Make sure the safety belt reminder light and all your
belts, buckles, latch plates, retractors and anchorages
are working properly. Look for any other loose or
damaged safety belt system parts. If you see anything
that might keep a safety belt system from doing its
job, have it repaired. Have any torn or frayed safety belts
replaced. Also look for any opened or broken airbag
coverings, and have them repaired or replaced.
(The airbag system does not need regular maintenance.)
(f)Lubricate all key lock cylinders. Lubricate all hinges
and latches, including those for the body doors,
hood, secondary latch, pivots, spring anchor, release
pawl, rear compartment, glove box door and console
door. More frequent lubrication may be required
when exposed to a corrosive environment. Applying
silicone grease on weatherstrips with a clean cloth will
make them last longer, seal better and not stick or
squeak.
(g)If you drive regularly under dusty conditions, the
�lter may require replacement more often.
6-7
Page 380 of 410

Recommended Fluids and
Lubricants
Fluids and lubricants identi�ed below by name,
part number or speci�cation may be obtained from
your dealer.
Usage Fluid/Lubricant
Engine OilEngine oil which meets GM
Standard GM6094M and displays
the American Petroleum Institute
Certi�ed for Gasoline Engines
starburst symbol. GM
Goodwrench
®oil meets all the
requirements for your vehicle. To
determine the proper viscosity for
your vehicle’s engine, seeEngine
Oil on page 5-15.
Engine Coolant50/50 mixture of clean, drinkable
water and use only DEX-COOL
®
Coolant. SeeEngine Coolant on
page 5-21.
Hydraulic Brake
SystemDelco Supreme 11 Brake Fluid or
equivalent DOT-3 brake �uid.
Windshield
Washer SolventGM Optikleen
®Washer Solvent.
Usage Fluid/Lubricant
Power Steering
SystemGM Power Steering Fluid
(GM Part No. U.S. 89021184, in
Canada 89021186).
Automatic
TransaxleDEXRON
®-III Automatic
Transmission Fluid. Look for
“Approved for the H-Speci�cation”
on the label.
Key Lock
CylindersMulti-Purpose Lubricant, Superlube
(GM Part No. U.S. 12346241, in
Canada 10953474).
Hood Latch
Assembly,
Secondary
Latch, Pivots,
Spring Anchor
and Release
PawlLubriplate Lubricant Aerosol
(GM Part No. U.S. 12346293, in
Canada 992723) or lubricant
meeting requirements of NLGI #2,
Category LB or GC-LB.
Hood and Door
HingesMulti-Purpose Lubricant, Superlube
(GM Part No. U.S. 12346241, in
Canada 109435474).
Weatherstrip
ConditioningDielectric Silicone Grease
(GM Part No. U.S. 12345579, in
Canada 992887).
6-12
Page 400 of 410

Cruise Control Lever.......................................3-10
Cruise Control Light........................................3-43
Cupholder(s)..................................................2-40
Customer Assistance Information
Courtesy Transportation.................................. 7-7
Customer Assistance for Text
Telephone (TTY) Users............................... 7-4
Customer Assistance Offices........................... 7-4
Customer Satisfaction Procedure..................... 7-2
GM Mobility Reimbursement Program............... 7-5
Reporting Safety Defects to General Motors....7-11
Reporting Safety Defects to the Canadian
Government............................................7-11
Reporting Safety Defects to the United States
Government............................................7-10
Roadside Assistance Program......................... 7-6
Service Publications Ordering Information........7-11
D
Daytime Running Lamps/Automatic
Headlamp System.......................................3-14
Defensive Driving............................................. 4-2
Delayed Entry Lighting.....................................3-17
Delayed Exit Lighting.......................................3-17
Delayed Locking.............................................2-11
Doing Your Own Service Work........................... 5-4
Door
Ajar Light...................................................3-45Door (cont.)
Delayed Locking..........................................2-11
Locks........................................................2-10
Power Door Locks.......................................2-11
Driver
Position, Safety Belt.....................................1-15
Driver Information Center (DIC).........................3-47
DIC Operation and Displays..........................3-47
DIC Vehicle Personalization..........................3-71
DIC Warnings and Messages........................3-53
Driving
At Night.....................................................4-15
City...........................................................4-19
Defensive..................................................... 4-2
Drunken....................................................... 4-2
Freeway.....................................................4-20
Hill and Mountain Roads..............................4-22
In Rain and on Wet Roads...........................4-16
Rocking Your Vehicle to Get it Out.................4-28
Winter........................................................4-24
Dual Automatic Climate Control System.............3-24
E
Electrical System
Add-On Equipment......................................5-87
Fuses and Circuit Breakers...........................5-88
Headlamp Wiring.........................................5-87
Instrument Panel Fuse Block.........................5-88
4
Page 402 of 410

Fuses
Fuses and Circuit Breakers...........................5-88
Instrument Panel Fuse Block.........................5-88
Underhood Fuse Block.................................5-90
Windshield Wiper.........................................5-87
G
Gage
Engine Coolant Temperature.........................3-38
Fuel..........................................................3-46
Speedometer..............................................3-32
Tachometer.................................................3-32
Garage Door Opener.......................................2-36
Gasoline
Octane........................................................ 5-5
Speci�cations............................................... 5-6
Glove Box.....................................................2-40
GM Mobility Reimbursement Program.................. 7-5
H
Hazard Warning Flashers................................... 3-6
Head Restraints............................................... 1-7
Headlamp
Aiming.......................................................5-43Headlamp Wiring............................................5-87
Headlamps
Bulb Replacement.......................................5-45
Daytime Running Lamps/Automatic
Headlamp System....................................3-14
Flash-to-Pass............................................... 3-8
Front Turn Signal and Parking Lamps.............5-47
Halogen Bulbs............................................5-45
Headlamps and Sidemarker Lamps................5-46
High/Low Beam Changer................................ 3-8
Suggested Light..........................................3-44
Headlamps and Sidemarker Lamps...................5-46
Heated Seats................................................... 1-5
Heater...........................................................3-21
Heater...........................................................3-24
Highbeam On Light.........................................3-44
Highway Hypnosis...........................................4-21
Hill and Mountain Roads..................................4-22
HomeLink
®Transmitter....................................2-36
HomeLink®Transmitter, Programming................2-36
Hood
Checking Things Under................................5-10
Release.....................................................5-11
Horn............................................................... 3-6
How to Use This Manual...................................... ii
How to Wear Safety Belts Properly...................1-15
6
Page 403 of 410

I
Ignition Positions.............................................2-21
Infants and Young Children, Restraints...............1-33
In�ation -- Tire Pressure..................................5-58
Instrument Panel
Brightness..................................................3-16
Cluster.......................................................3-31
Overview..................................................... 3-4
Interior Lamps................................................3-16
J
Jump Starting.................................................5-39
K
Keyless Entry System....................................... 2-3
Keys............................................................... 2-2
L
Labelling, Tire Sidewall....................................5-53
Lamps
Battery Run-Down Protection.........................3-18
Courtesy....................................................3-16
Exterior......................................................3-13Lamps (cont.)
Exterior Lighting Battery Saver......................3-15
Fog ...................................................3-15, 5-48
Interior.......................................................3-16
Overhead Console Reading..........................3-18
Rear Assist Handle Reading..........................3-18
LATCH System
Child Restraints...........................................1-43
Securing a Child Restraint Designed for the
LATCH System........................................1-45
Light
Airbag Readiness........................................3-33
Anti-Lock Brake System Warning...................3-37
Brake System Warning.................................3-36
Change Engine Oil......................................3-43
Charging System.........................................3-35
Check Gas Cap..........................................3-46
Cruise Control.............................................3-43
Door Ajar...................................................3-45
Engine Coolant Temperature Warning.............3-38
Headlamps Suggested.................................3-44
Highbeam On.............................................3-44
Low Coolant Warning...................................3-39
Low Fuel Warning.......................................3-46
Low Washer Fluid Warning...........................3-45
Malfunction Indicator....................................3-39
Oil Pressure...............................................3-42
Passenger Airbag Status Indicator..................3-34
7
Page 404 of 410

Light (cont.)
Reduced Engine Power................................3-44
Safety Belt Reminder...................................3-32
Security.....................................................3-43
Service Vehicle Soon...................................3-45
TCS Warning Light......................................3-37
Traction Control System (TCS) Warning..........3-37
Trunk Ajar..................................................3-45
Lighting
Delayed Entry.............................................3-17
Delayed Exit...............................................3-17
Entry.........................................................3-16
Perimeter...................................................3-18
Theater Dimming.........................................3-17
Loading Your Vehicle.......................................4-29
Lockout Protection..........................................2-12
Locks
Delayed Locking..........................................2-11
Door..........................................................2-10
Lockout Protection.......................................2-12
Power Door................................................2-11
Loss of Control...............................................4-13
Low Coolant Warning Light..............................3-39
Low Fuel Warning Light...................................3-46
Low Washer Fluid Warning Light.......................3-45
Lumbar
Power Controls............................................. 1-4M
Maintenance Schedule
Additional Required Services........................... 6-6
At Each Fuel Fill........................................... 6-8
At Least Once a Month.................................. 6-9
At Least Once a Year.................................... 6-9
Introduction.................................................. 6-2
Maintenance Footnotes.................................. 6-7
Maintenance Record....................................6-14
Maintenance Requirements............................. 6-2
Normal Maintenance Replacement Parts.........6-13
Owner Checks and Services........................... 6-8
Recommended Fluids and Lubricants.............6-12
Scheduled Maintenance................................. 6-4
Using.......................................................... 6-3
Your Vehicle and the Environment................... 6-2
Malfunction Indicator Light................................3-39
Manual Seats................................................... 1-3
Message
DIC Warnings and Messages........................3-53
Mirrors
Automatic Dimming Rearview........................2-32
Automatic Dimming Rearview with OnStar
®.....2-33
Manual Rearview Mirror................................2-32
Manual Rearview Mirror with OnStar
®.............2-32
Outside Convex Mirror.................................2-34
8