2005 BUICK LACROSSE window
[x] Cancel search: windowPage 142 of 410

Rear Window Defogger
The rear window defogger uses a warming grid to
remove fog or frost from the rear window. The rear
window defogger will only work when the engine
is running.
=(Rear Window Defogger):Press this button to
turn the rear window defogger on and off. Be sure
to clear as much snow from the rear window as possible.
The rear window defogger will turn off approximately
20 minutes after the button is pressed. If turned on
again, the defogger will only run for approximately
20 minutes before turning off. The defogger can also be
turned off by pressing the button again or by turning
off the engine.
Do not drive the vehicle until all the windows are clear.
Notice:Using a razor blade or sharp object to
clear the inside rear window may damage the rear
window defogger. Repairs would not be covered
by your warranty. Do not clear the inside of the rear
window with sharp objects.
Outlet Adjustment
Use the thumbwheels located between the center
outlets to open and close the outlets. Move the lever in
the center of each air outlet to adjust the direction of
the air�ow.
Operation Tips
Clear away any ice, snow or leaves from the air
inlets at the base of the windshield that may
block the �ow of air into the vehicle.
Use of non-GM approved hood de�ectors may
adversely affect the performance of the system.
Keep the path under the front seats clear of
objects to help circulate the air inside of the
vehicle more effectively.
If the vehicle has a passenger compartment air �lter
and the air�ow seems low when the fan is at the
highest setting it may need to be replaced. For more
information, seePassenger Compartment Air
Filter on page 3-28.
Passenger Compartment Air Filter
The passenger compartment air �lter is located in
the engine compartment below the air inlet grille, near
the passenger’s side windshield wiper arm. See
Engine Compartment Overview on page 5-12.
The �lter traps most of the pollen from the air entering
the air conditioning module. Like the engine’s air cleaner
�lter, it may need to be changed periodically. For
information on how often to change the passenger
compartment air �lter, seeScheduled Maintenance on
page 6-4.
3-28
Page 234 of 410
Backglass Antenna
The AM-FM antenna is integrated with the rear window
defogger, located in the rear window. Be sure that the
inside surface of the rear window is not scratched and
that the lines on the glass are not damaged. If the inside
surface is damaged, it could interfere with radio
reception. Also, for proper radio reception, the antenna
connector at the top-center of the rear window needs to
be properly attached to the post on the glass.
Notice:Using a razor blade or sharp object to clear
the inside rear window may damage the rear window
antenna and/or the rear window defogger. Repairs
would not be covered by your warranty. Do not clear
the inside rear window with sharp objects.
Notice:Do not apply aftermarket glass tinting with
metallic �lm. The metallic �lm in some tinting
materials will interfere with or distort the incoming
radio reception. Any damage caused to your
backglass antenna due to metallic tinting materials
will not be covered by your warranty.
Because this antenna is built into your rear window,
there is a reduced risk of damage caused by car washes
and vandals.If you choose to add a cellular telephone to your
vehicle, and the antenna needs to be attached to the
glass, be sure that you do not damage the grid lines for
the AM-FM antenna. There is enough space between
the lines to attach a cellular telephone antenna
without interfering with radio reception.
Do not apply aftermarket glass tinting to the back glass.
The metallic �lm in some tinting materials will interfere
with or distort the incoming radio reception. Care
must be taken when cleaning the rear window because
it breaks in the resistive material heating element
and will adversely affect radio and defogger
performance. See your dealer for details.
Chime Level Adjustment
The radio is the vehicle’s chime producer. To change
the volume level, press and hold pushbutton 6 with
the ignition on and the radio power off. The chime
volume level will change from the normal level to loud,
and LOUD will appear on the radio display. To
change back to the default or normal setting, press and
hold pushbutton 6 again. The chime level will change
from the loud level to normal, and NORMAL will appear
on the radio display. Removing the radio and not
replacing it with a factory radio or chime will disable
vehicle chimes.
3-120
Page 255 of 410
Before Leaving on a Long Trip
Make sure you are ready. Try to be well rested. If you
must start when you are not fresh — such as after
a day’s work — do not plan to make too many miles that
�rst part of the journey. Wear comfortable clothing
and shoes you can easily drive in.
Is your vehicle ready for a long trip? If you keep it
serviced and maintained, it is ready to go. If it needs
service, have it done before starting out. Of course, you
will �nd experienced and able service experts in GM
dealerships all across North America. They will be ready
and willing to help if you need it.
Here are some things you can check before a trip:
Windshield Washer Fluid:Is the reservoir full? Are
all windows clean inside and outside?
Wiper Blades:Are they in good shape?
Fuel, Engine Oil, Other Fluids:Have you checked
all levels?
Lamps:Are they all working? Are the lenses clean?
Tires:They are vitally important to a safe,
trouble-free trip. Is the tread good enough for
long-distance driving? Are the tires all in�ated to the
recommended pressure?
Weather Forecasts:What is the weather outlook
along your route? Should you delay your trip a
short time to avoid a major storm system?
Maps:Do you have up-to-date maps?
Highway Hypnosis
Is there actually such a condition as highway hypnosis?
Or is it just plain falling asleep at the wheel? Call it
highway hypnosis, lack of awareness, or whatever.
There is something about an easy stretch of road with
the same scenery, along with the hum of the tires on the
road, the drone of the engine, and the rush of the
wind against the vehicle that can make you sleepy. Do
not let it happen to you! If it does, your vehicle can
leave the road in less than a second, and you could
crash and be injured.
What can you do about highway hypnosis? First, be
aware that it can happen.
Then here are some tips:
Make sure your vehicle is well ventilated, with a
comfortably cool interior.
Keep your eyes moving. Scan the road ahead and
to the sides. Check your rearview mirrors and your
instruments frequently.
If you get sleepy, pull off the road into a rest,
service, or parking area and take a nap, get some
exercise, or both. For safety, treat drowsiness
on the highway as an emergency.
4-21
Page 261 of 410
{CAUTION:
Snow can trap exhaust gases under your
vehicle. This can cause deadly CO (carbon
monoxide) gas to get inside. CO could
overcome you and kill you. You cannot see it
or smell it, so you might not know it is in your
vehicle. Clear away snow from around the
base of your vehicle, especially any that is
blocking your exhaust pipe. And check around
again from time to time to be sure snow does
not collect there.
Open a window just a little on the side of the
vehicle that is away from the wind. This will
help keep CO out.Run your engine only as long as you must. This saves
fuel. When you run the engine, make it go a little
faster than just idle. That is, push the accelerator
slightly. This uses less fuel for the heat that you get and
it keeps the battery charged. You will need a
well-charged battery to restart the vehicle, and possibly
for signaling later on with your headlamps. Let the
heater run for a while.
Then, shut the engine off and close the window almost
all the way to preserve the heat. Start the engine
again and repeat this only when you feel really
uncomfortable from the cold. But do it as little as
possible. Preserve the fuel as long as you can. To help
keep warm, you can get out of the vehicle and do
some fairly vigorous exercises every half hour or so until
help comes.
4-27
Page 278 of 410

Tire Chains..................................................5-66
If a Tire Goes Flat........................................5-67
Changing a Flat Tire.....................................5-68
Removing the Spare Tire and Tools................5-69
Removing the Flat Tire and Installing the
Spare Tire................................................5-71
Storing a Flat or Spare Tire and Tools............5-76
Compact Spare Tire......................................5-77
Appearance Care............................................5-78
Fabric/Carpet...............................................5-78
Vinyl...........................................................5-80
Leather.......................................................5-80
Instrument Panel..........................................5-80
Interior Plastic Components............................5-80
Glass Surfaces.............................................5-80
Care of Safety Belts......................................5-81
Weatherstrips...............................................5-81
Washing Your Vehicle...................................5-81
Cleaning Exterior Lamps/Lenses.....................5-81
Finish Care..................................................5-82Windshield and Wiper Blades.........................5-82
Aluminum or Chrome-Plated Wheels................5-83
Tires...........................................................5-83
Sheet Metal Damage.....................................5-84
Finish Damage.............................................5-84
Underbody Maintenance................................5-84
Chemical Paint Spotting.................................5-84
Vehicle Care/Appearance Materials..................5-85
Vehicle Identi�cation......................................5-86
Vehicle Identi�cation Number (VIN).................5-86
Service Parts Identi�cation Label.....................5-86
Electrical System............................................5-87
Add-On Electrical Equipment..........................5-87
Headlamp Wiring..........................................5-87
Windshield Wiper Fuses................................5-87
Power Windows and Other Power Options.......5-88
Fuses and Circuit Breakers............................5-88
Instrument Panel Fuse Block..........................5-88
Underhood Fuse Block..................................5-90
Capacities and Speci�cations..........................5-92
Section 5 Service and Appearance Care
5-2
Page 301 of 410
Notice:If your engine catches �re because you
keep driving with no coolant, your vehicle can
be badly damaged. The costly repairs would not be
covered by your warranty. SeeOverheated Engine
Protection Operating Mode on page 5-26for
information on driving to a safe place in an
emergency.
If No Steam Is Coming From
Your Engine
If you get an engine overheat warning, but see or hear
no steam, the problem may not be too serious.
Sometimes the engine can get a little too hot when you:
Climb a long hill on a hot day.
Stop after high-speed driving.
Idle for long periods in traffic.
Tow a trailer.If you get the overheat warning with no sign of steam,
try this for a minute or so:
1. In heavy traffic, let the engine idle in NEUTRAL (N)
while stopped. If it is safe to do so, pull off the road,
shift to PARK (P) or NEUTRAL (N) and let the
engine idle.
2. Set the climate controls to the highest heat setting
and fan speed and open the windows as necessary.
If you no longer have the overheat warning, you
can drive. Just to be safe, drive slower for about
10 minutes. If the warning does not come back on, you
can drive normally.
If the warning continues and you have not stopped, pull
over, stop, and park your vehicle right away.
If there is still no sign of steam, you can idle the engine
for three minutes while you are parked. If you still
have the warning,turn off the engine and get everyone
out of the vehicleuntil it cools down. Also, see
“Overheated Engine Protection Operating Mode” later in
this section.
You may decide not to lift the hood but to get service
help right away.
5-25
Page 331 of 410
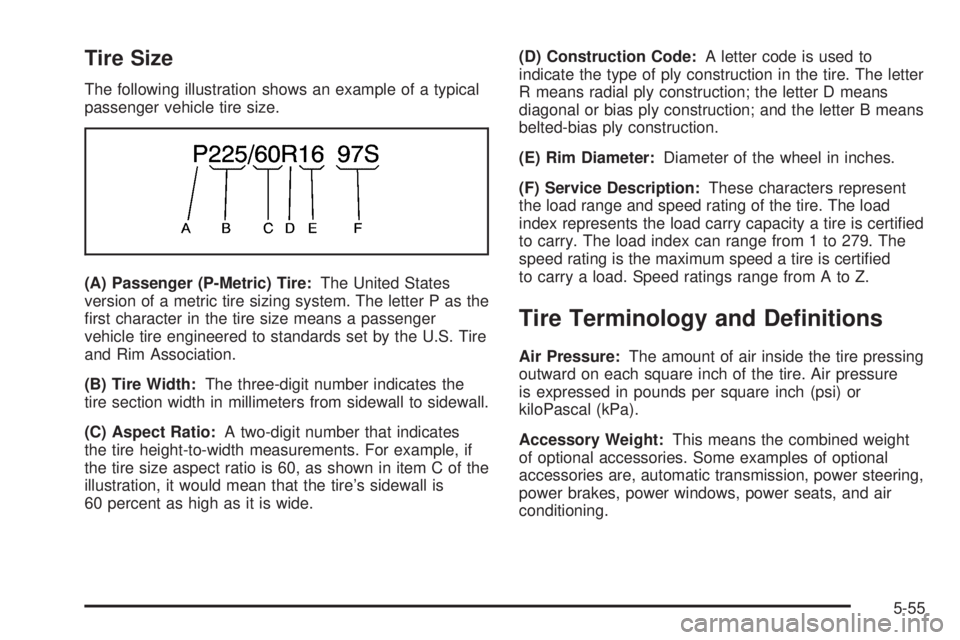
Tire Size
The following illustration shows an example of a typical
passenger vehicle tire size.
(A) Passenger (P-Metric) Tire:The United States
version of a metric tire sizing system. The letter P as the
�rst character in the tire size means a passenger
vehicle tire engineered to standards set by the U.S. Tire
and Rim Association.
(B) Tire Width:The three-digit number indicates the
tire section width in millimeters from sidewall to sidewall.
(C) Aspect Ratio:A two-digit number that indicates
the tire height-to-width measurements. For example, if
the tire size aspect ratio is 60, as shown in item C of the
illustration, it would mean that the tire’s sidewall is
60 percent as high as it is wide.(D) Construction Code:A letter code is used to
indicate the type of ply construction in the tire. The letter
R means radial ply construction; the letter D means
diagonal or bias ply construction; and the letter B means
belted-bias ply construction.
(E) Rim Diameter:Diameter of the wheel in inches.
(F) Service Description:These characters represent
the load range and speed rating of the tire. The load
index represents the load carry capacity a tire is certi�ed
to carry. The load index can range from 1 to 279. The
speed rating is the maximum speed a tire is certi�ed
to carry a load. Speed ratings range from A to Z.
Tire Terminology and De�nitions
Air Pressure:The amount of air inside the tire pressing
outward on each square inch of the tire. Air pressure
is expressed in pounds per square inch (psi) or
kiloPascal (kPa).
Accessory Weight:This means the combined weight
of optional accessories. Some examples of optional
accessories are, automatic transmission, power steering,
power brakes, power windows, power seats, and air
conditioning.
5-55
Page 354 of 410
Appearance Care
Cleaning products can be hazardous. Some are toxic.
Other cleaning products can burst into �ames if a match
is struck near them or if they get on a hot part of the
vehicle. Some are dangerous if their fumes are inhaled
in an enclosed space. When anything from a container
is used to clean the vehicle, be sure to follow the
manufacturer’s warnings and instructions. Always open
the doors or windows of the vehicle when cleaning
the inside.
Never use these to clean the vehicle:
Gasoline
Benzene
Naphtha
Carbon Tetrachloride
Acetone
Paint Thinner
Turpentine
Lacquer Thinner
Nail Polish Remover
They can all be hazardous — some more than
others — and they can all damage the vehicle, too.Do not use any of these products unless this manual
says you can. In many uses, these will damage
the vehicle:
Alcohol
Laundry Soap
Bleach
Reducing Agents
Fabric/Carpet
Use a vacuum cleaner often to get rid of dust and loose
dirt. Wipe vinyl, leather, plastic, and painted surfaces
with a clean, damp cloth.
GM-approved cleaning products can be obtained from
your dealer.
Here are some cleaning tips:
Always read the instructions on the cleaner label.
Clean up stains as soon as you can before they set.
Carefully scrape off any excess stain.
Use a clean cloth or sponge, and change to a clean
area often. A soft brush may be used if stains are
stubborn.
To avoid forming a ring on the fabric after spot
cleaning, clean the entire area immediately or it
will set.
5-78