2005 BUICK LACROSSE change time
[x] Cancel search: change timePage 158 of 410
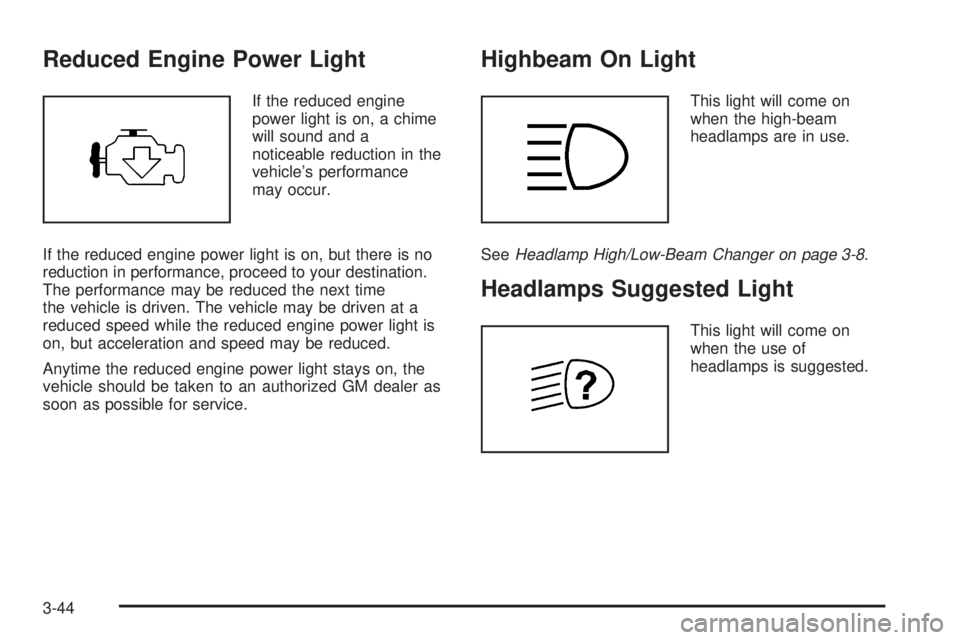
Reduced Engine Power Light
If the reduced engine
power light is on, a chime
will sound and a
noticeable reduction in the
vehicle’s performance
may occur.
If the reduced engine power light is on, but there is no
reduction in performance, proceed to your destination.
The performance may be reduced the next time
the vehicle is driven. The vehicle may be driven at a
reduced speed while the reduced engine power light is
on, but acceleration and speed may be reduced.
Anytime the reduced engine power light stays on, the
vehicle should be taken to an authorized GM dealer as
soon as possible for service.
Highbeam On Light
This light will come on
when the high-beam
headlamps are in use.
SeeHeadlamp High/Low-Beam Changer on page 3-8.
Headlamps Suggested Light
This light will come on
when the use of
headlamps is suggested.
3-44
Page 164 of 410
Fuel Menu Items (Uplevel Only)
.
(Fuel):Press this button to scroll through the
following menu items:
Fuel Range
Press the fuel button until FUEL RANGE displays.
This mode shows the approximate number of
remaining miles or kilometers the vehicle can be
driven without refueling.
Fuel range is based on several factors, including
distance travelled, fuel used, fuel capacity, etc. This
estimate will change if driving conditions change.
For example, if driving in traffic and making frequent
stops, this mode may read one number, but if the vehicle
is driven on a freeway, the number may change even
though the same amount of fuel is in the fuel tank. This
is because different driving conditions produce
different fuel economies. Generally, freeway driving
produces better fuel economy than city driving.
Fuel range cannot be reset.
If your vehicle is low on fuel, FUEL RANGE LOW will
display followed by the LOW FUEL message. See “LOW
FUEL” underDIC Warnings and Messages on
page 3-53for more information.
Average Fuel Economy
Press the fuel button until AVG ECONOMY displays.
This mode shows the approximate average miles per
gallon (mpg) or liters per 100 kilometers (L/100 km). This
number is calculated based on the number of mpg
(L/100 km) recorded since the last time this menu item
was reset. To reset AVG ECONOMY, press and hold the
set/reset button. The display will return to zero.
Instantaneous Fuel Economy
Press the fuel button until INST ECONOMY displays.
This mode shows the current fuel economy at a
particular moment and will change frequently as driving
conditions change. This mode shows the instantaneous
fuel economy in miles per gallon (mpg) or liters per
100 kilometers (L/100 km). Unlike average fuel
economy, this screen cannot be reset.
Gages Menu Items (Uplevel Only)
2
(Gages):Press this button to scroll through the
following menu items:
Battery
Press the gages button until BATTERY displays. This
mode shows the current battery voltage.
3-50
Page 165 of 410

If there is a problem with the battery charging system, a
DIC message will display. SeeDIC Warnings and
Messages on page 3-53for more information.
Your vehicle’s charging system regulates voltage based
on the state of the battery. The battery voltage may
�uctuate when viewing this information on the DIC. This
is normal.
Oil Life
Press the gages button until OIL LIFE displays. This
mode shows an estimate of the oil’s remaining useful
life. If you see OIL LIFE 99% on the display, that means
99% of the current oil life remains. The engine oil life
system will alert you to change your oil on a schedule
consistent with your driving conditions.
When the remaining oil life is low, the CHANGE OIL
SOON message will appear on the display. You should
change your oil as soon as possible. SeeEngine Oil
on page 5-15. In addition to the engine oil life system
monitoring the oil life, additional maintenance is
recommended in the Maintenance Schedule in this
manual. SeeScheduled Maintenance on page 6-4for
more information.
Remember, you must reset the OIL LIFE yourself after
each oil change. It will not reset itself. Also, be
careful not to reset the OIL LIFE accidentally at any
time other than when the oil has just been changed. It
cannot be reset accurately until the next oil change.To reset the engine oil life system, press and hold the
set/reset button while OIL LIFE is displayed. The display
will show 100% when the system is reset. SeeEngine
Oil Life System on page 5-18for more information.
Option Menu Items (Uplevel Only)
4
(Option):Press this button to scroll through the
following menu items:
Units
Press the option button until UNITS displays. This mode
allows you to select between English or Metric units
of measurement. Once in this mode, press the set/reset
button to select between ENGLISH or METRIC units.
Language
Press the option button until the language screen
displays. This mode allows you to select the language
in which the DIC messages will appear. Once in
this mode, press the set/reset button to select among
the following choices:
English
Francais (French)
Espanol (Spanish)
3-51
Page 183 of 410

STABILITY CONTROL ACTIVE
If your vehicle has StabiliTrak®, this message will
display when StabiliTrak®is actively assisting you with
directional control of the vehicle. Slippery road
conditions may exist when this message is displayed,
so adjust your driving accordingly. SeeStabiliTrak
®
System on page 4-9.
This message will display only while the ignition is in
RUN. This message stays on until road conditions
change and StabiliTrak
®is not active.
This message cannot be acknowledged and cleared
from the screen.
STABILITY CONTROL OFF
If your vehicle has StabiliTrak®, this message will
display any time the system turns off. When this
message has been displayed, StabiliTrak
®is no longer
available to assist you with directional control of the
vehicle. Adjust your driving accordingly. SeeStabiliTrak
®
System on page 4-9.
This message will display only while the ignition is
in RUN.
Any of the following conditions may cause the
StabiliTrak
®system to turn off:
The battery is low.
There is a StabiliTrak®system failure. See your
GM dealer for service.
STARTING DISABLED
This message will display if the starting of the engine is
disabled due to the electronic throttle control system
or vehicle theft-deterrent system. Have your vehicle
serviced by your GM dealer immediately.
This message will only appear while the ignition
is in RUN, and will not disappear until the problem
is resolved.
This message cannot be acknowledged.
TRACTION CONTROL ACTIVE
If your vehicle has the traction control system, this
message will display when the system is on. Slippery
road conditions may exist if this message is displayed,
so adjust your driving accordingly. SeeTraction
Control System (TCS) on page 4-8for more information.
This message only displays while the ignition is in
RUN and will not disappear until driving conditions
change and the traction control is no longer active.
This message cannot be acknowledged or cleared from
the screen.
3-69
Page 186 of 410
3. Press the set/reset button to begin.
4. The DIC will then display an instruction screen.
Press the option button to display the features
that are available to program.
Press the set/reset button to change the setting of
each feature.
Customization Menu Items
The following are customization features that allow you
to program settings to the vehicle:
FACTORY DEFAULTS
This feature allows you to set all of the customization
and personalization features back to their factory
default settings.
Press the option button until FACTORY DEFAULTS
appears on the DIC display. Press the set/reset button
to scroll through the following choices:
NO (default):The customization and personalization
features will not be set to their factory default settings.
YES:The customization and personalization features
will be set to their factory default settings.
Select one of the available choices and press the option
button while it is displayed on the DIC to select it and
move on to the next feature.
ALL KEYS WILL BE RESET
This screen will only display if YES was selected on the
FACTORY DEFAULTS screen.
Press the set/reset button to scroll through the
following choices:
CANCEL (default):The features will not be set to their
factory default settings and the DIC will return to the
PERSONAL PROGRAM menu.
OK:The features will be set to their factory default
settings, the DIC will exit the personal program menu,
and PERSONAL OPTIONS SAVED will display.
EXT LIGHT DELAY
This feature allows you to set the amount of time the
exterior lamps remain on after the key is removed from
the ignition or the vehicle is unlocked using the
remote keyless entry transmitter.
Press the option button until EXT LIGHT DELAY
appears on the DIC display. Press the set/reset button
to scroll through the following choices:
OFF:The exterior lamps will not turn on.
15 seconds:The exterior lamps will stay on for
15 seconds.
30 seconds (default):The exterior lamps will stay on
for 30 seconds.
3-72
Page 190 of 410
REPLACE KEY
This screen displays only if YES was selected for the
PERSONALIZE KEY feature, keys 1 and 2 have already
been personalized, and the current key being used is
not key 1 or 2. This feature allows you to program a key
to be recognized as key 1 or 2 in the event that the
previously programmed key needs to be replaced.
1:The key will be programmed to be recognized
as key 1.
2:The key will be programmed to be recognized
as key 2.
CANCEL (default):The key will not be programmed.
RADIO STATIONS PERSONALIZED
This screen displays only if YES was selected for the
PERSONALIZE KEY feature. This feature allows you to
set the radio station presets to be recognized for the
key, 1 or 2, that is being used. You may notice a change
to the radio after this message displays. Once this
message displays, set the radio station presets. If the
presets are not set at this time, the presets will not
be recognized for key 1 or 2, however, the vehicle radio
station presets will be maintained.
AUTO DOOR LOCK
This feature allows automatic door locking to be turned
OFF or ON.
Press the option button until AUTO DOOR LOCK
appears on the DIC display. Press the set/reset button
to scroll through the following choices:
OFF:All automatic door locking is disabled. The doors
will always need to be locked manually before driving,
to increase occupant safety.
ON (default):The vehicle’s doors automatically lock
when the doors are closed and the vehicle is shifted into
DRIVE (D).
Select one of the available choices and press the option
button while it is displayed on the DIC to select it and
move on to the next feature.
3-76
Page 194 of 410
DISP (Display):Press this button to switch the display
between the radio station frequency, band, and time
of day. When the ignition is turned off, press this knob to
display the time.
To change the default on the display, press the DISP
button until you see the display you want, then hold
this button for two seconds. The radio will produce
one beep and the selected display will now be
the default.
Finding a Station
BAND:Press this button to switch between FM1, FM2,
and AM. The display will show the selection.
e(Tune):Turn this knob to select radio stations.
oSEEKp:Press and release the right or the left
arrow to go to the next or to the previous station
and stay there.
To scan stations, press and hold either arrow for more
than two seconds. SCN will appear on the display
and the radio will produce one beep. The radio will go
to a station, play for a few seconds, then go on to
the next station. Press either arrow again or one of the
pushbuttons to stop scanning presets.To scan preset stations, press and hold either arrow for
more than four seconds. PSC will appear on the
display and the radio will produce two beeps. The radio
will go to a preset station, play for a few seconds,
then go on to the next preset station. Press either
arrow again or one of the pushbuttons to stop
scanning presets.
The radio will only seek and scan stations with a strong
signal that are in the selected band.
Setting Preset Stations
Up to 18 stations (six FM1, six FM2, and six AM), can
be programmed on the six numbered pushbuttons,
by performing the following steps:
1. Turn the radio on.
2. Press BAND to select FM1, FM2, or AM.
3. Tune in the desired station.
4. Press and hold one of the six numbered
pushbuttons until you hear a beep. Whenever that
numbered pushbutton is pressed, the station
that was set will return.
5. Repeat the steps for each pushbutton.
3-80
Page 197 of 410
DISP (Display):Press this button to see how long the
current track has been playing. The elapsed time of
the track will appear on the display. To change
the default on the display, track, elapsed time, or time of
day, press this button until you see the display you
want, then hold the button for two seconds. The radio
will produce one beep and the selected display will now
be the default.
BAND:Press this button to listen to the radio when a
CD is playing. The inactive CD will remain safely
inside the radio for future listening.
CD:Press this button to play a CD when listening to
the radio. The CD symbol will appear on the display
when a CD is loaded.
Z(Eject):Press this button to eject a CD. Eject may
be activated with either the ignition or radio off. CDs
may be loaded with the ignition and radio off if this
button is pressed �rst.
CD Messages
CHECK CD:If this message appears on the display
and/or the CD comes out, it could be for one of the
following reasons:
It is very hot. When the temperature returns to
normal, the CD should play.
You are driving on a very rough road. When the
road becomes smoother, the CD should play.
The CD is dirty, scratched, wet, or upside down.
The air is very humid. If so, wait about an hour and
try again.
There may have been a problem while burning
the CD.
The label may be caught in the CD player.
If the CD is not playing correctly, for any other reason,
try a known good CD.
If any error occurs repeatedly or if an error cannot be
corrected, contact your GM dealer. If the radio displays
an error message, write it down and provide it to
your GM dealer when reporting the problem.
3-83